DIY Easy First Needle Felting Project

Are you curious how a woolly picture can be applied to a fabric? Welcome to Needle Felting. This tutorial is a simple first Needle Felting project. It all came about from up-cycling some felted wool sweaters into mittens. It is almost as easy as a colouring book…
What is Needle Felting?
I understand that not everyone thinks they can create art. Well, I am here to offer some encouragement and hopefully change that. Knitting and crocheting takes quite a bit of time & pattern reading, I agree. This felting method however uses fibres to make images on fabric quite quickly. To put it simply; poking wool of various colours pushes them into the fabric and anchors it there. This is called Needle-Felting. It is not a method of stitching, the fibres ‘entangle’ (felt) and stay in place since the tiny tiny scales of the wool fibre strands become locked together. There are many forms of felting, 2D needle felting, 3D needle felting, nuno felting, wet felting and even accidental felting when that wool sweater went into the washing machine…

What tools do you need to Needle Felt?
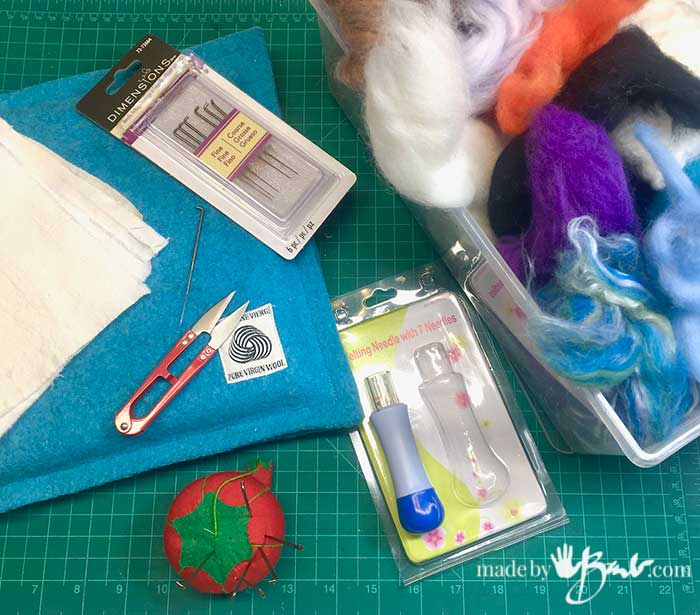
The great thing about needle-felting is that it does not need many tools. The basic tool is the barbed felting needle. The very tiny barbs catch the fibres and push them into the backing fabric (or felted sweater as in my case). These long thin needles come in a variety of styles and sizes. When you are beginner to needle felting the slight difference may not be quite noticeable quite yet. Some needle sets come in a variety of coarse and fine, also spiral and star shaped. As with learning any new art form you do not want to put too much pressure on yourself; it should be enjoyable.
Needles come in a variety of gauges; 32-42, the larger the number – the thinner the shaft. The coarse needles catch more fibres in their barbs on the shaft of the needle so they pull more strands into the base fabric. They will however leave larger holes. The fine needles will leave smaller holes and are great for tinier details. The spiral needles push and twist the fibres during the poking to create a very tight felting. The shaft may also be in different shapes, triangle (barbs on 3 sides of shaft) and star shape has 4 sides.
If you are only wanting to buy one size, choosing a medium 38 gauge would work for fine and coarse wool as a beginner needle. Often there needle felting kits that come with many needles and also a holder that can hold one or a combination of a few for faster poking.
These needles are the same ones used for 3 dimensional needle felting. The same principle is used but the piece is built like sculpture adding wool to create a full 3D object (animals, characters, plants, all kinds of things)

What Fibres Can be Felted?
Most commonly wool roving is available in a full palette of colours for needle felting and other fibre arts. It can come in a fine Merino wool or some coarser micron. The sheep’s wool is often measured in microns where 19 microns is a soft fine wool. Thicker micron over 20 would be used to make the structure for 3D needle felted forms. Other animal fibres like alpaca, cashmere, mohair, yak, and even other animals like dog or cat can also felt. Even human hair can be forced to felt when you think of dreadlocks.
Needle felting with protein fibres (animal) is a dry felting method but wet felting also works to tangle the fibres together. To further explore the felting process I also wet felted the ‘Roller skate’ felting. (see the video)

When I was designing the hats I used accidentally felted sweaters. I had many scraps that just wanted to become something; mittens. I’ve been loving the new mitten pattern too! These simple leaves came together in mere minutes without much planning… just adding as I saw fit.

The Felting Pad:
The felted wool fabric needs to be on some sort of pad or felting mat. That allows the felting needle to plunge deep enough and also protect your surface (or lap). I made a felting pad with a few layers of an old wool blanket inside a case like a pillow. You can also use a piece of foam pad.

For this blue pair the backing is a fine merino wool from a sweater that ended up in the wash. It became so dense that the individual threads of yarn all became one felted fabric but still feels soft.
The roller-girl mittens were made for that special person who keeps this website ‘alive’. Believe me, so much goes on behind what you see on the page…

DIY Easy First Needle Felting Project
Equipment
- Needle Felting Needles
- Felting Pad - Foam or Thick wool felt
- Scissors or snipper
- Optional Multi-needle Tool
- Chalk or Transfer media
Ingredients
- Wool Roving colours according to your chosen design
- Felted Sweater or Blanket densely felted
- Additional fabrics/leather to finish mittens
- Pattern for Mittens
Instructions
- Get the base fabric ready. Cut the basic piece of felt or felted fabric. Allow extra to decide exact placement later.Felted Sweater or Blanket
- Choose an design that is simple. Solid areas of colour are best for a beginner needle-felter.
- Depending on background colour, sketch basic shape with chalk or pencil. (If transferring image is difficult temporary tacking can be used to plan image)
- Place base piece of fabric on the felting pad (thick layers of wool blanket or a piece of foam) so that working surface is protected.
- Pull small pieces of roving from skein and place over areas of design. Using the barbed felting needles poke through the fibres to force them into the background fabric. Repeatedly poke through and the roving will become a flat area of colour. Manipulate and add more; this will build the image.
- Continue adding where needed. Colours can also be added on top of other colours. Using a pet brush, colours an also be mixed by brushing together. Twist thin strands to make lines.
- Once you are satisfied with the image you can use the multi-needle tool go over the design to make sure it is well anchored into the fibre of the base fabric. You can also use the single needle to secure any areas that look loose. The fibres should look quite densely flattened on the surface.
- Use a steam iron press firmly to add extra assurance of embedding into the base. (It is optional to also wet-felt this, see details in this post)

Step by Step Needle Felting:
Transferring the image to the fabric with a piece of chalk or pencil depending the background colour.

Pull a bit of roving from the large skeins. Twist or create a shape that follows the area where it will be applied. Start poking through the fabric with the felting needle. Move the roving to where it is needed, much like painting but with a dry wool ‘paint’. Be careful of your fingers!

Continue poking and moving the wool to areas to fill the shape. You can ‘tack’ with a few pokes and then once you are happy add more pokes to make permanent. If it is just tacked you can pull it out if you are not happy.

Manipulate the wool, stretch, or make little balls of it depending where you want to place it. Tip: it usually becomes smaller as it gets pushed into the fabric but more can always be added on top.

The needle point can help guide some of the stray fibres toward the shape. Keep the needle as vertical as possible, it is quite fragile.

Before you know it, you will become more confident. The ‘lines’ are made with thin sections of roving twisted and poked in meticulously. I enjoy this method of ‘painting’ since it is easy to stop and start. There are no wet paints to deal with.

Needle felting can also have more layers added on top for the details. Once you get the process of attaching the wool – the skies the limit for designs! Use your favourite icons or images, flat shapes of colour or more gradated ones.
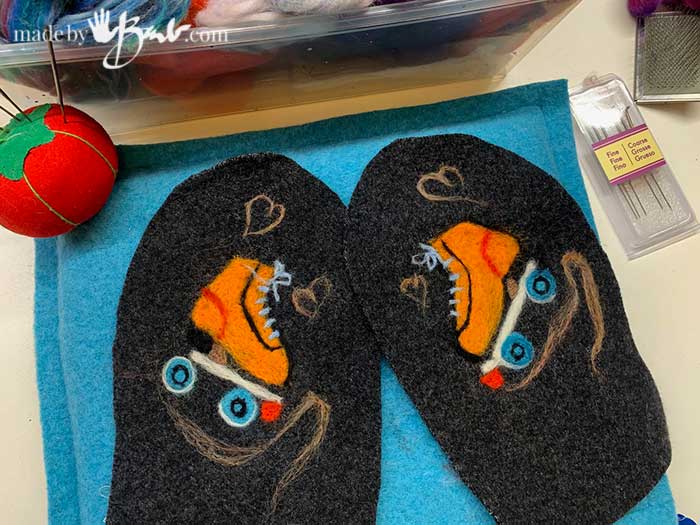
I added more felting by using the 7 needle tool when I was happy with the design. Fasten the fibres more by using the tool repeatedly.

Optional Wet Felting:
The wool fibres look very well attached. I wanted to see if the method of wet felting would make any difference to the final piece. The fabric was already felted as it had been through the washing machine. It would not shrink much more if at all.
Soak the pieces with hot water that has some olive soap in it. This will allow slip between all the fibres. Agitation using a bumpy tool and the bubble wrap roll-up creates more connection of the scales on the wool. Roll the bundle back & forth for a few minutes (or longer as you wish). Wash afterward and transfer from hot water to cold water; shocking also makes the fibres attach. The fun part is forcefully throwing it into the sink, over and over. Bam, and the fibres attach more.
Sew and finish the Mittens:
I sewed the mittens after drying and ironing. The extra step was really not that vital however it may give an extra level of longevity. It’s a personal choice. The mittens turned out lovely and if you look really closely you may see the fibres have a bit more curl. That is from the additional wet felting process.

What have you needle felted? I’d love to hear your thoughts! I hope I’ve given you some inspiration to learn the basics of needle felting.
I needle felted random colored dots on a brown wool scarf full of moth holes. I love the fun, playful look.
Perfect! Stencils can be used to help keep a shape but I like adding as I go along, somewhat like painting.
I needle felted some purses I had made from wool sweaters and made a sheep that I recently gave away. It turned out very cute. I have a whole bunch more wool fibers to use on something.
There are so many possibilities! I am amazed at how little amount of fibres needed for this type of felting. Even twisted yarn can be brushed out to make it into a usable fibre again. Being creative can really not cost anything… Stay tuned, nuno felting and 3D are on my radar