Simple Faux Stone Engraving
I just love stone! And the artist in me is always seeing ‘new canvasses’ to paint on! During some recent gardening I was looking at a pile of flagstone… What to do?! This Simple Faux Stone Engraving technique combines a bit of imagination (technology) and paint to imitate stone chiseling. It looks amazingly real but is very easy to do. Step by step instructions with pictures:

Step 1:
Find yourself a stone of shape and size you like. The flatter smooth stones are better, but it’s not that crucial. Use some digital software to pick a font and size. Even Microsoft Word can work as long as you enlarge enough. Do try to keep it simple and traditional, but that’s just the typographer in me talking. Most home printers handle a letter size paper, but if you need larger you can print in pieces and tape them together. If you measure first it’s easier to plan. Size and place as you like, and tape into place with masking tape.

Step 2:
You will now need to TRANSFER the image to the surface. I have much experience of this from my illustration world. You can use a sheet of old-fashioned carbon paper, or sewing transfer paper, or a sheet of paper that you rubbed with pencil. Place that sheet under your printed letters and easily trace the outlines with a pen to force the drawing onto the stone. I use a ballpoint pen.
Have a peek to see if it is coming through, since it is taped down you can continue until you have all the outlines. I used the red fabric transfer paper so I could see the lines well.

Step 3:
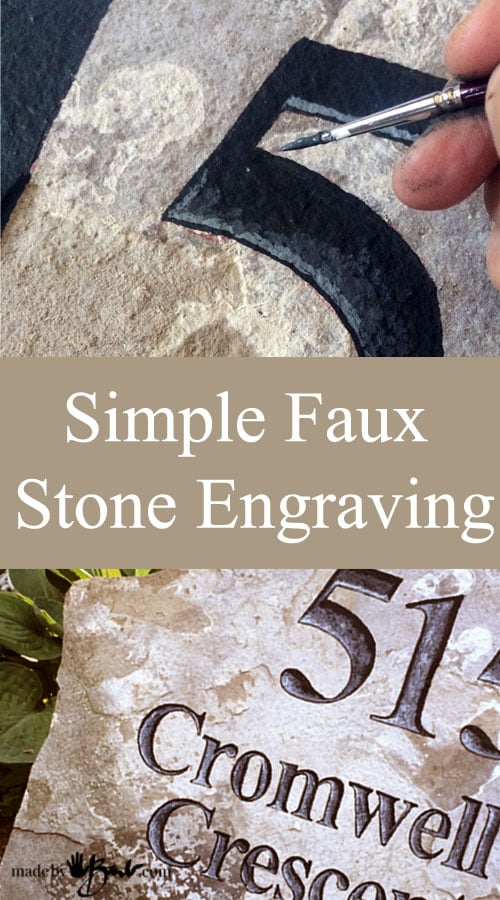
Time to paint! I used some basic black acrylic paint. I had marvelled how some rocks my kids painted eons ago held the paint, so I knew it has staying power. There is also great outdoor paint like this. It doesn’t take that much artistic skill to fill in all the shapes with a fine brush. It is forgiving since it is stone.

Step 4:
Now you become an artist! To make it look engraved you will need to add the ‘faux’ shadows and highlights. Imagine light hitting the indented letters from the top. The upper part of all the letter forms needs a bit of a lighter gray to show light. It is very systematic.

Step 5:
You can now add the midtone gray to the middle so that it looks as if there is a shadow under the top of each part of the letter. Simple isn’t it? Stand back and you will be amazed. If preferred you could just leave it solid black as well.

Since the stone is rough, the paint sticks and stays well, but you could add a layer of clear acrylic to protect even more. Maybe you want to add a logo etc, just apply the same principle.

Step 6:
Smile and pat yourself on the back after you placed it in the garden. Perhaps add a light and have a great house number! Awesome! Let me know how your’s turned out.
Is the stone you used flat? How did you get it to stay up straight?
It was a quite flat stone. I used a few other rocks behind it to have it slightly lean on. I like to be able to adjust or move as I change my mind often… You could also have a bit extra set into the ground.
Very effective. I’m thinking of doing this on a flat PVC board to use as a sign. Any additional suggestions?
The drawing/painting method would still be the same but the issue is getting good adhesion to the PVC. I remember painting polystyrene for architectural models in my days teaching at the college. We would make the acrylic adhere by sanding first. But the models would get no handing or exposure to elements. I would still suggest some sanding and then a good primer before painting with the acrylic. I know there are now spray paints made for plastic but check if it could be painted over. Will it get exposure to elements? I’m in canada so I get a lot of temperature variations. ‘Hope that helps!
You used a flat paint. What do you think about using semi-gloss?
It may be fine, as it might lose the sheen somewhat anyways. It may seem a bit richer in colour as well. Go for it!
Genius Idea! It’s so realistic.
Thank you for sharing!
Enjoy! Lots of opportunities!
This tutorial is so helpful- it was exactly what I was looking for,
I loved the way you showed how to make it faux engraved. The finished product (your address on stone) is so beautiful!
Thank you so much,
Grace
Thank you 😉 (I made the change you requested) ‘Glad you enjoyed the tutorial!
This is terrific. Any suggestion for what colours to use for the letters if the background is a grey stone?
Maybe you want to use a lighter (close to white) and a darker tone. Test visibility by testing on the back of stone. Good luck!
This is absolutely stunning.
My parents have a large (fake) stone with the family name engraved (stamped) on it, which sits in a flower bed in front of their home. It was not cheap and it looks nowhere near as realistic and spectacular as what you created! My wheels are turning…you’ve definitely inspired me.
That’s awesome! Once you understand the way the shadows look it is endless possibilities! Enjoy!