Simple Donut Queen Applique

This post is really about the circle of life. And yes, it may also involve donuts! Trust me, there is rationale in most of my decisions, but everyone deserves some sweetness now and then. Let me share the story and the Simple Donut Queen Applique

Ideas seem to just pop into my head, but to make them viable I need to usually draw something up.
The Story:
A very special person comes over for dinner each week, incidentally who is in love with donuts; so I am assured there will always be a dessert with colourful sprinkles on top. Not to mention that she will also deal with any digital issues I have with this blog. It’s quite a good balanced relationship. It started many many years ago and it has seemed to come completely full circle… kind of like a donut.
When she was very tiny she was practically attached to my hip, propped on my lap even at the sewing machine. I’m sure she was watching all the things I was doing. Eventually I’d be teaching her Adobe software to make her Science fair projects award winning. Yes, as you guessed she was/is my baby girl. Creativity is in my families DNA, especially the women. My mother was the same, gifting me my own sparkling new sewing machine at 12 years old and coaching me throughout my years of self-sewing my wardrobe.
Nowadays it’s a bit tougher to convince the younger crowd to sew but any creative endeavour is worth it. My mother encouraged me to follow my dream of being an artist and I did the same for my baby even though her direction was slightly different. Keeping her going though multiple degrees summa cum laude until landing a great job.
This blog lets me do what I love but is also quite exhausting at times since I do it all myself. She gives me the encouragement to keep going just as I had when she was floundering through post secondary. So you see; what goes round comes round…
This donut is dedicated to her and her birthday gift!

The Pattern:
This design needs only 4 colours of fabric (cotton or poly-cotton) and a garment to apply to. You will also need some heat and bond iron on adhesive to easily attach it to the fabric as well as some carbon paper or dressmakers tracing sheets. I’ve got the pattern ready for you to download here:
Making Shapes:
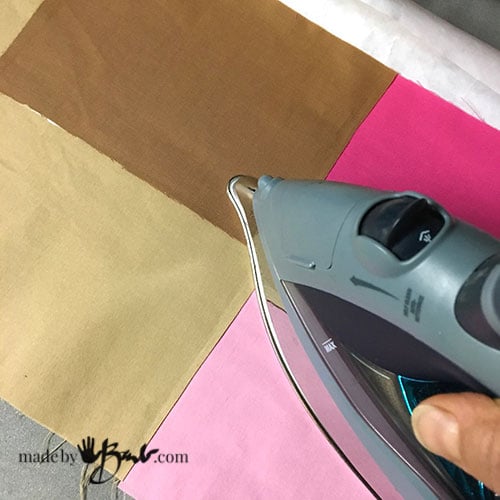
To ready the fabric iron the ‘heat’n bond’ to the back of the fabric pieces (rough cut to size of donut). Pay close attention to where the melting side is and be sure the fabric covers the entire bonding so that it does not melt onto the iron.

Transferring the Shapes:
This is the same principle used in much art work to transfer the image to the required media. Note the legend of the colours but feel free to adjust as desired.

Place a sheet of carbon paper or tracing sheet under the pattern and without moving it trace the outside of the edges of each colour area. Include the ‘thickness’ of the edges as that will be the satin stitching.
To simplify you may make the smaller shapes sit on top of a full large shape, as with the light pink icing on the dark pink.

Once they are traced find the baking sheet and peel away. It has now become nifty iron on fabric.

You may cut out the shapes now. Due to the Heat’n Bond they will not fray.

If your garment is transparent you will be able to see the pattern through it to place all the parts. Make sure that ‘butt’ edges do overlap to catch the stitching.

The shapes are all layered and assembled.

Iron on the layers with a hot iron. These were light weight cotton and adhered nicely.

The Fun Part:
Before you start sewing make sure your tension and stitches are good by making a test on scrap fabric. I prefer to have the tension of the bottom thread a slight bit tighter to pull thread down and create nice satin stitches. And being somewhat lazy I used the same bobbin thread on all and changed only the top thread colour.
Adjust the width of thread to a bit over ‘2’ and test for the length so that it is a nice solid stitch. (there is usually a section near the ‘0’) Slowly sew and follow around the shapes with thread colours as you like. Work slowly around corners by pivoting when needed. It does allow some imperfection since it IS a donut!

Even more fun:
The best part is supposedly the sprinkles so to make it even easier beads seemed like the best choice, just use a very strong thread. ‘So excited for the birthday party!

As you know sometimes things happen… For some reason (possibly that I had some eco printing going) there was a small dot stain that just appeared out of nowhere. Sooooo, I had to camouflage it with a heart of beads. Typical….

Happy Birthday to my ‘baby’ girl; such an accomplished woman who makes me proud each day and gives me the encouragement I need weekly. Together we will DO this and help many become more creative. Join me in sending her Birthday wishes!

I think that is the most adorable thing I’ve ever read! Happy birthday to Barb’s baby girl and blessings to all daughters everywhere.
Awe thanks! She absolutely loved it! Next it will be on a jean jacket!