Blanket to Hooded Vest Up-Cycle
Who doesn’t like a sewing project that is a bit of a ‘cheat’?! Let me share this pattern that is super simplified to make this Blanket to Hooded Vest Up-cycle. If you want to go one step further; I also have a Vintage Quilt Jacket post.
These vests (or jacket if you add sleeves) come together quickly since there are less pattern pieces and the finished edges come from the original blanket
How to make the pattern:
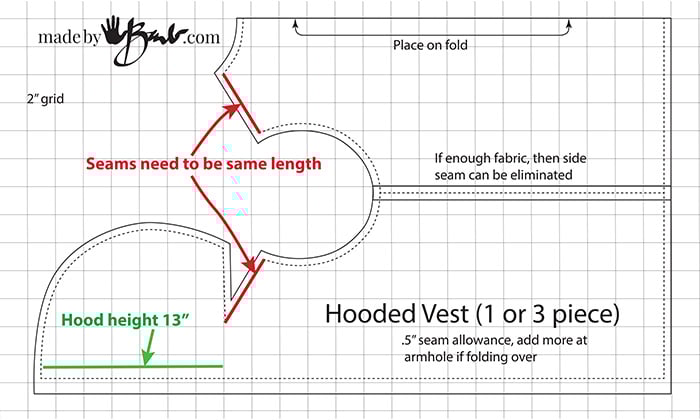
Before you think this is complicated, please wait a second… This pattern is based on your garment that you know fits you. Most t-shirts or blouses have an arm hole and shoulder seam. Lay it flat and trace it roughly. After tracing I then clean up lines and add seam allowances. The usual front piece continues on to be the hood so there is no usual front neck seam. I was amazed that this design could be so simple to make!
There are a few things to take note of. The ‘V’ on the front piece is one part shoulder seam and one part back neck seam. The image above is my XL size draft from a vest that I have. (squares are 2″)
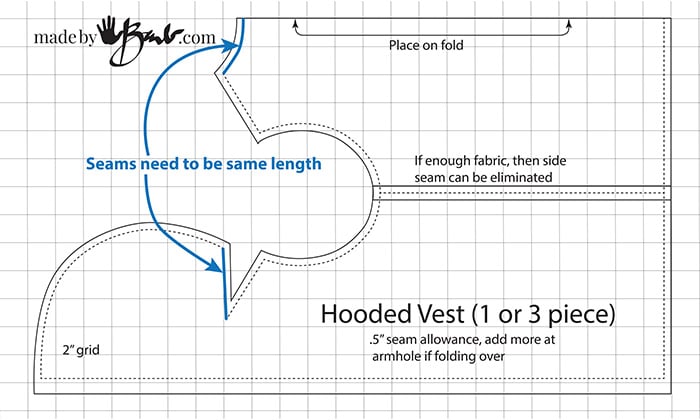
Make sure that the blue lines are about the same length, taking note of the back piece placed on a fold. If you have a large enough blanket the front pieces can be cut in one with the back pieces to be one continuous piece (no side seams). See the tapestry jacket image below ⬇️
This tutorial is a simple sewing project, to make your own free pattern; no collar or waist to worry about.
Choose your Blanket:
Not all blankets will be large enough to have the width across for a full wrap. I cut the back piece from the other end and attached it at the side seams. I try to keep the fringes at the bottom which worked beautifully with this blanket.
Step #1:
The ‘V’ on the front will be sewn in 2 parts and clipped into the ‘V’ so to not stretch & fray so stay stitching is recommended (straight stitch at seam line, 1/2″ seam allowance)
Step #2:
With right sides together sew the front shoulder seam to the back shoulder seam, to the point of the ‘V’.
Step #3:
Clip carefully into the points of the ‘V’ and sew the back neck seam between points.
The clipping allows the 2 seams to be sewn (each to the inside point of the ‘V’.
Finish the edges with surging or a zigzag stitch and press. You have now made the shoulder seams and the neck. The front is an ‘all-in-one’ with the hood so collar to attach.
Step #4:
When it comes to the arm hole some fleece blankets will not fray so folding over the edge would be enough to finish it. Some fabrics will need a binding to keep the edge neat. I have used a 1″ flat bias band to finish the arm hole edge. (you can cut your own bias band ) Sew the bias band at the seam line (before or after you sew the side seams, if side seams needed). I sewed the side seam first.
Fold over the bias and top stitch the folded edge neatly (from the inside)
The ends can be turned under and the curve can be pressed nicely flat.
Step #6:
Since there was extra fabric that had fringe on it the pockets used the fringes at the top. The front edges and bottom were all originally finished from the blanket; so much less work, no hems!
I also just left a slit open up the side since this blanket was not wide enough for the elimination of side seams. The edges were finished and folded over under the seam.
This blanket has light & lovely draping, perfect for this up-cycle. As for closures; I did not add any buttons at this point since I’ll wear it open. Make the vests as long or short as you like or how much blanket you have.
As for sizing, it depends on how loose or tight you’d like your hoodie. Do you like to wrap it around you, the hood sits nicely on the back and no seams at front neck to worry about.
Look at my sweet model who is smaller than me, and as a matter of fact the Hooded vest is still cute on her.
Another Version; A Tapestry Blanket:
I was quite happy to find a Thomas Kincaid tapestry blanket and it was large enough to omit the side seam for one piece (front and back) on the fold – bonus!
To fashion some pockets I used the extra fabric with fringe.
I finished the armholes with the bias band so this vest hoodie was finished quite quickly.
What do you think? Would you wear something like this?
This is cozy and colourful however imagine if there was also enough fabric to make sleeves.
If you want some closures you could consider some toggle buttons or even a Kilt safety pin (like the stick pins we used to use)
OK, ok, one more:
Someone accidentally washed/dried a lambswool blanket and it felted! What an opportunity to fashion a vest from it.
Felted lambswool is so soft, also doesn’t fray and therefore the seams can be quite narrow.
This blanket was narrower than I needed so I added an extra side seam and was able to have fringe on the back as well.
In this instance the armholes could finished with just a fold over and top stitch.
I attached the extra fringe around hood and front to try not to have anything go to waste.
Who loves button holes?! Well, some easy loops makes for a simpler button hole. Do you like my ‘dummy’ model? She’s my custom Dress form, and you can also make one just like you…
Won’t you keep an eye out for throws; to make a blanket to hooded vest up-cycle
Thanks for looking and I hope I’ve inspired you! Oh, and how wonderful would these be for Christmas gifts?!
Hey Barb! This is great. I’m trying to make a sherpa lined blanket into a father Christmas type long vest. I don’t want the hood, just a collar. Do you think I could do the same basic idea but not make it a hood? Any idea of the shape I’d need to cut for a 3-4 inch collar?
Collars are usually a slightly curved piece. The inside curve measurement would be close to the measurement of the neck opening. Have a look at a shirt collar to see. I hope that helps!
Wauw this is just such a nice idea! But instead of making a waistcoat, would it be possible to make a blanket jacket with sleeves with this model?
Sure! The only issue may be that the blanket does not have enough fabric for some sleeves. Sleeves can be tapered or straight, and if there is some original edging, even better! Go for it!
You are truly an artist and a kindred spirit. I admire your creativity and definitely like the idea of upscaling and recycling. Thank you for sharing your creative genius.
Thanks, I think that was a learned from my mom who lived through war times. We absorb without even knowing… Happy making!
I really love those . Hope I can get around to making these thanks for pattern. Pat
Enjoy! There’s a lot of blankets that show up at thrift stores at this time of year! Be creative!
What a fabulous idea, Barb! I’m so glad I ran across your blog. Beautiful work. Thanks for the inspiration and terrific instructions.
Thanks! and thanks for finding me! Look around, enjoy!
Outstanding, I love the simplicity of this!
Thanks! I often see blankets and need to resist buying them all! Good luck!