Paint Everything White (quickly)
It’s natural to want to make changes in your living space. We’d all like to just buy new since we tire of what we have and think something new will give us a new spark! Yes, I agree, but I believe if you repurpose then you will be happier on even more levels. It will be ‘new’ to you and you can feel good about diminishing waste! The answer: just paint everything WHITE!

Why white is a great colour:
My resolution has been to finally get some of my collection of things that are just waiting to get out of the ‘dungeon’ of the basement and get a new life in the spotlight.
There was a time when ‘black’ was the colour to paint everything. (Or if you are old enough; hunter green, but I don’t want to go there…) Now, I just love love love the serenity of WHITE. Since my days are full of colour and busy design I love the relaxing nature of white, like wearing a white blouse or t-shirt.
You will remember my ‘Mid-Century Living Room’ with the white chairs, it is still so tranquil and ‘sunny’!

This tutorial is a whopper, as I have painted so many things white and hope to provide my tricks and tips. I don’t believe there is one answer for all problems… please follow along
The Paint:
I use acrylic or latex paint. To decide which paint depends on the object and how much there is to paint. It is also sometimes about what I have on hand.

For small objects like furniture and frames I love Acrylic Enamel (gloss is great for some sheen) or other indoor/outdoor acrylic enamel. The outdoor quality means it has even more staying power against the elements. Over the decades I have painted a lot of things and have never really had a huge fail from the brand of paint. Usually the problem is not the paint but the preparation for painting that matters.

If I have painted an ENTIRE house of doors and trim (crazy I know, but I’ve done that 2x already) In that case I use a primer first since it is more economical. (However, I have been known to just use latex paint if that is what I have.) My purpose is to get as much opaque and durable coverage to hide the original colour as I can. The final coat can provide the sheen of choice.
The Secret Additive:
I don’t want to spend my ‘entire life’ painting coat after coat to achieve an opaque white so I use an additive to give more coverage and hardness; Calcium Carbonate! I just love adding this into the paint. This substance is found in rocks, shellfish, limestone and even pearls. Those are quite hard, so I think it will add a strength to the paint as well. Yes, it is now what many call a ‘chalk paint’ but I am using it in a different way.
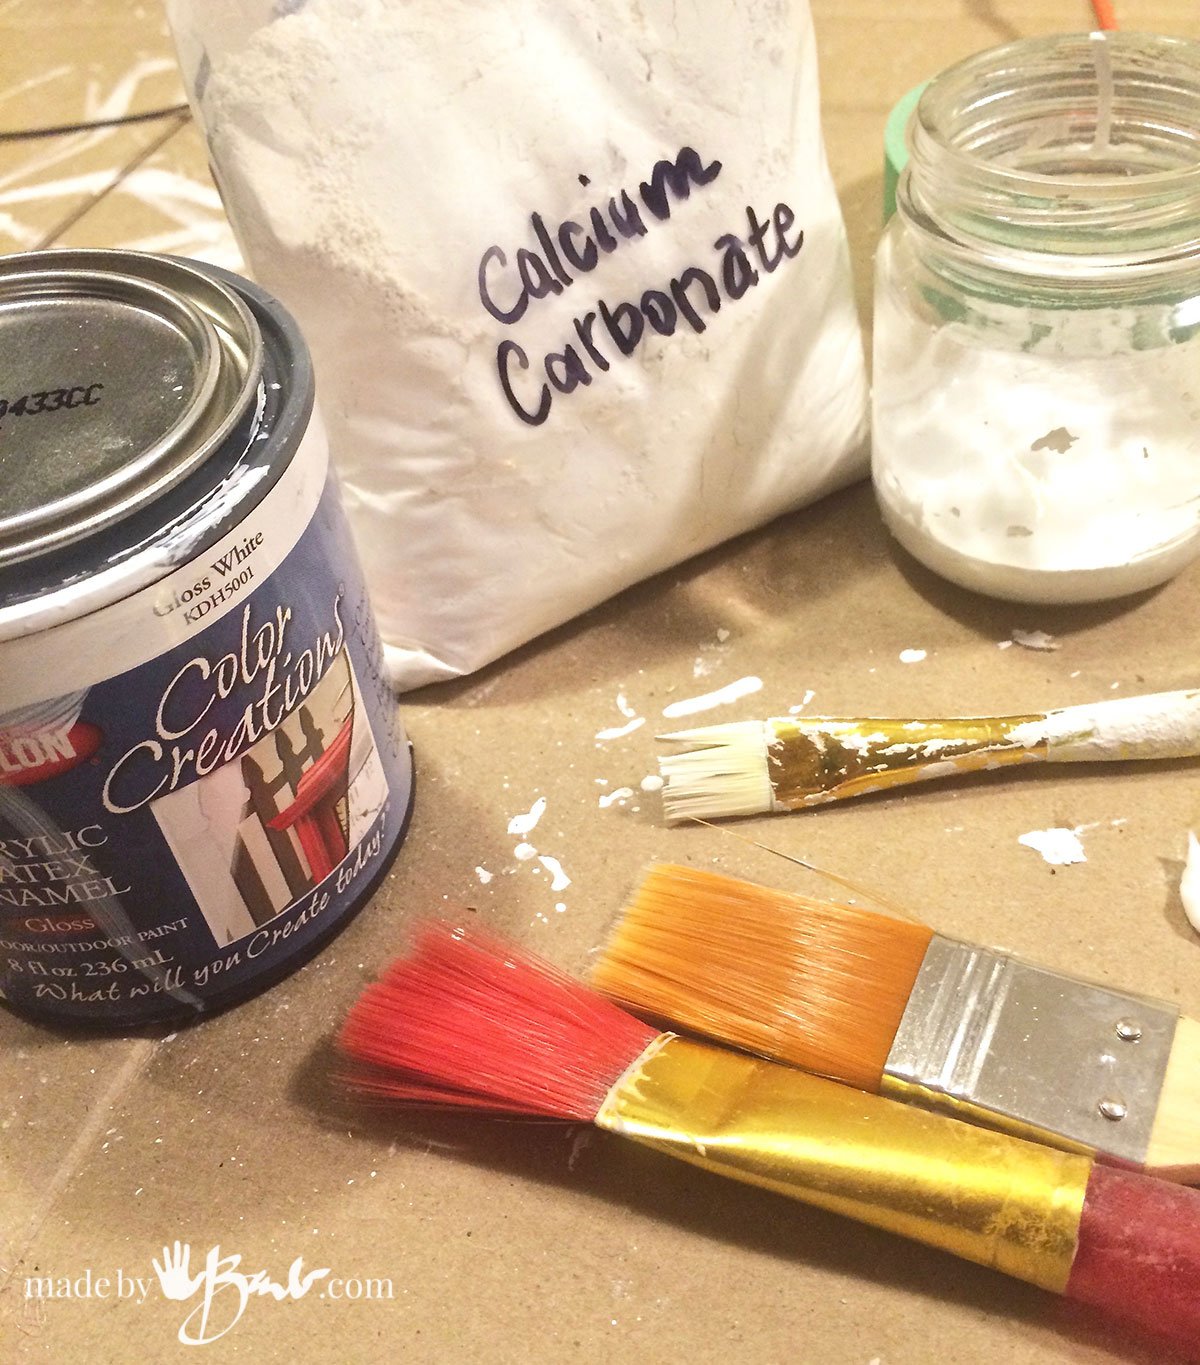
To source Calcium Carbonate you can find it at the drug store as a supplement but I prefer buying it at the wine-making supply stores as it is in powder form and I can order as much as I like. Calcium carbonate is used in the de-acidification of wine. You can also find it at the pigment/paint supply stores, however there usually is a wine-making place in each city.
The recipes range from a tablespoon to a cup to more; depending on your preference. The more calcium carbonate you add the more it will be flat matt when dry. You can alsways add another layer of an acrylic or finish with a sheen.
The Brushes:

My preferred choice of brushes may not be what professionals use. Perhaps it’s the artist in me that prefers more control of the paint. I do really like the flat brushes that are not that thick. I find that those brushes tend not to become huge mops full of ‘globby’ paint, and then there’s less drips. They also can give a nice thin clean edge line. They are usually quite inexpensive and available at craft/hobby/art supply stores.
The Procedure:
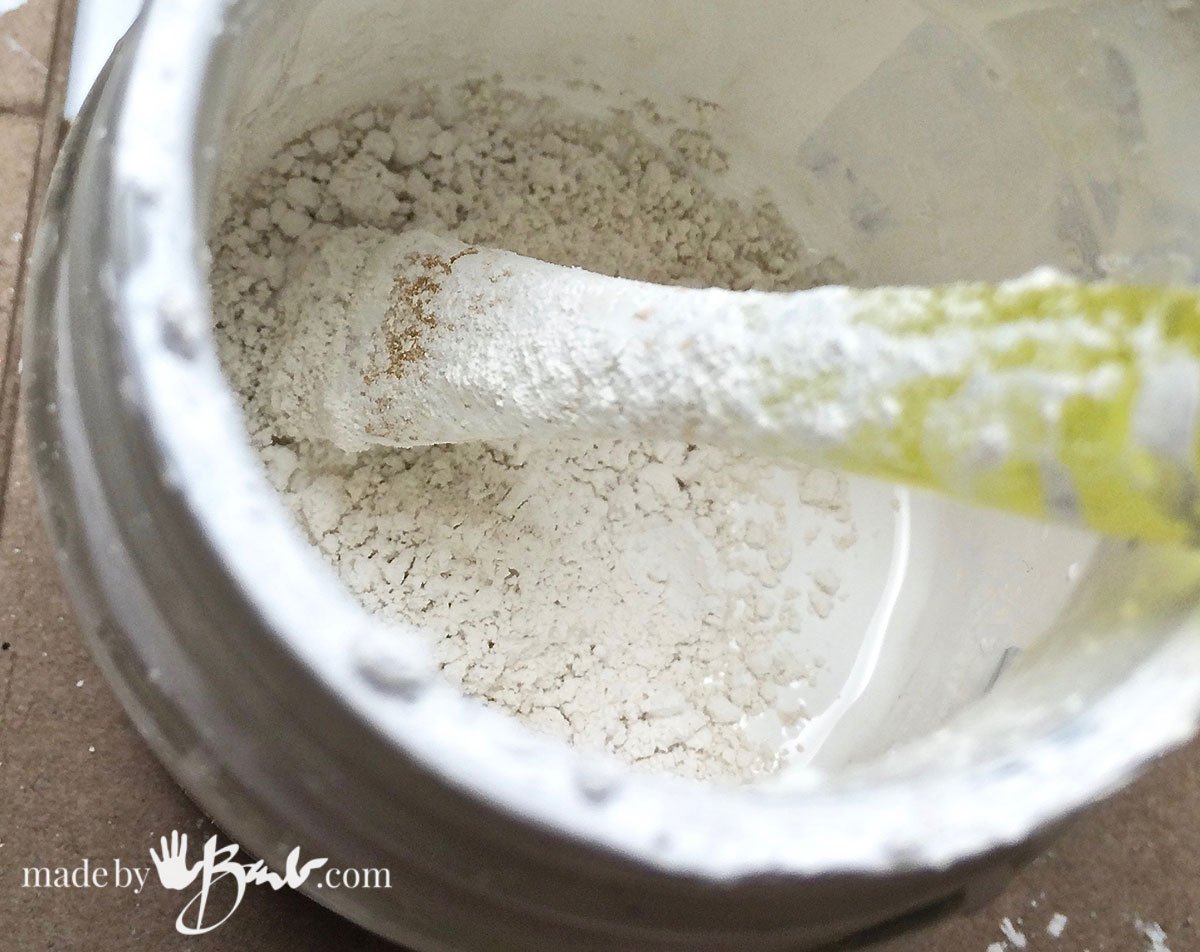
Depending on the object, opacity and finish you would like, mix the calcium carbonate into your choice of paint. If the paint is already very thick wetting the calcium carbonate with some water will allow better incorporation.
And yes, there are many whites out there, another decision that has to be made. (Benjamin Moore; Simply White is nice) Pure white can seem somewhat ‘cold’. I don’t use an exact proportion or recipe as the consistency of paints varies. When I want a ‘fast’ coverage I use as much as 1 part calcium carbonate to 2 parts paint. The hardest part is getting it mixed in without any lumps. I use a brush to mix as it acts somewhat like a whisk. If you have a large amount you could use a paint mixer. It will be quite thick as I usually don’t water it down. Water equals thinning which means less coverage which means more coats… If needed I will add water if it will not spread with a brush.

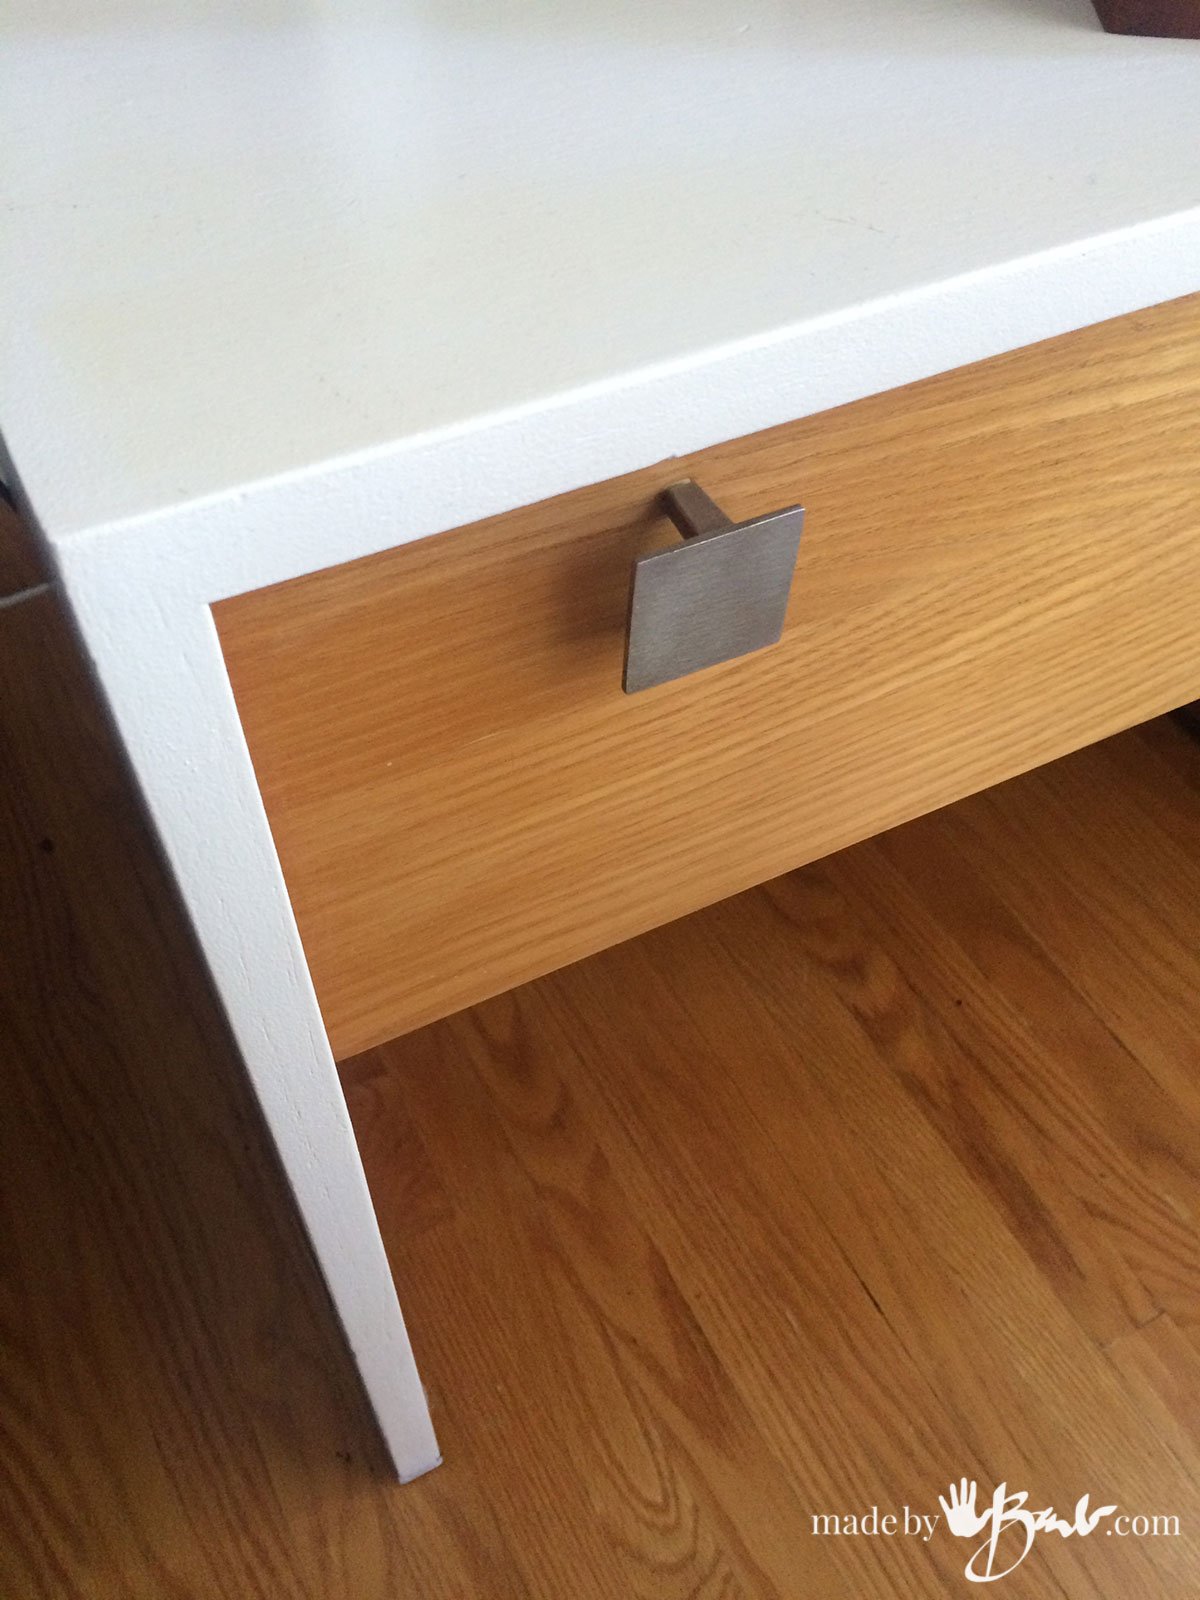
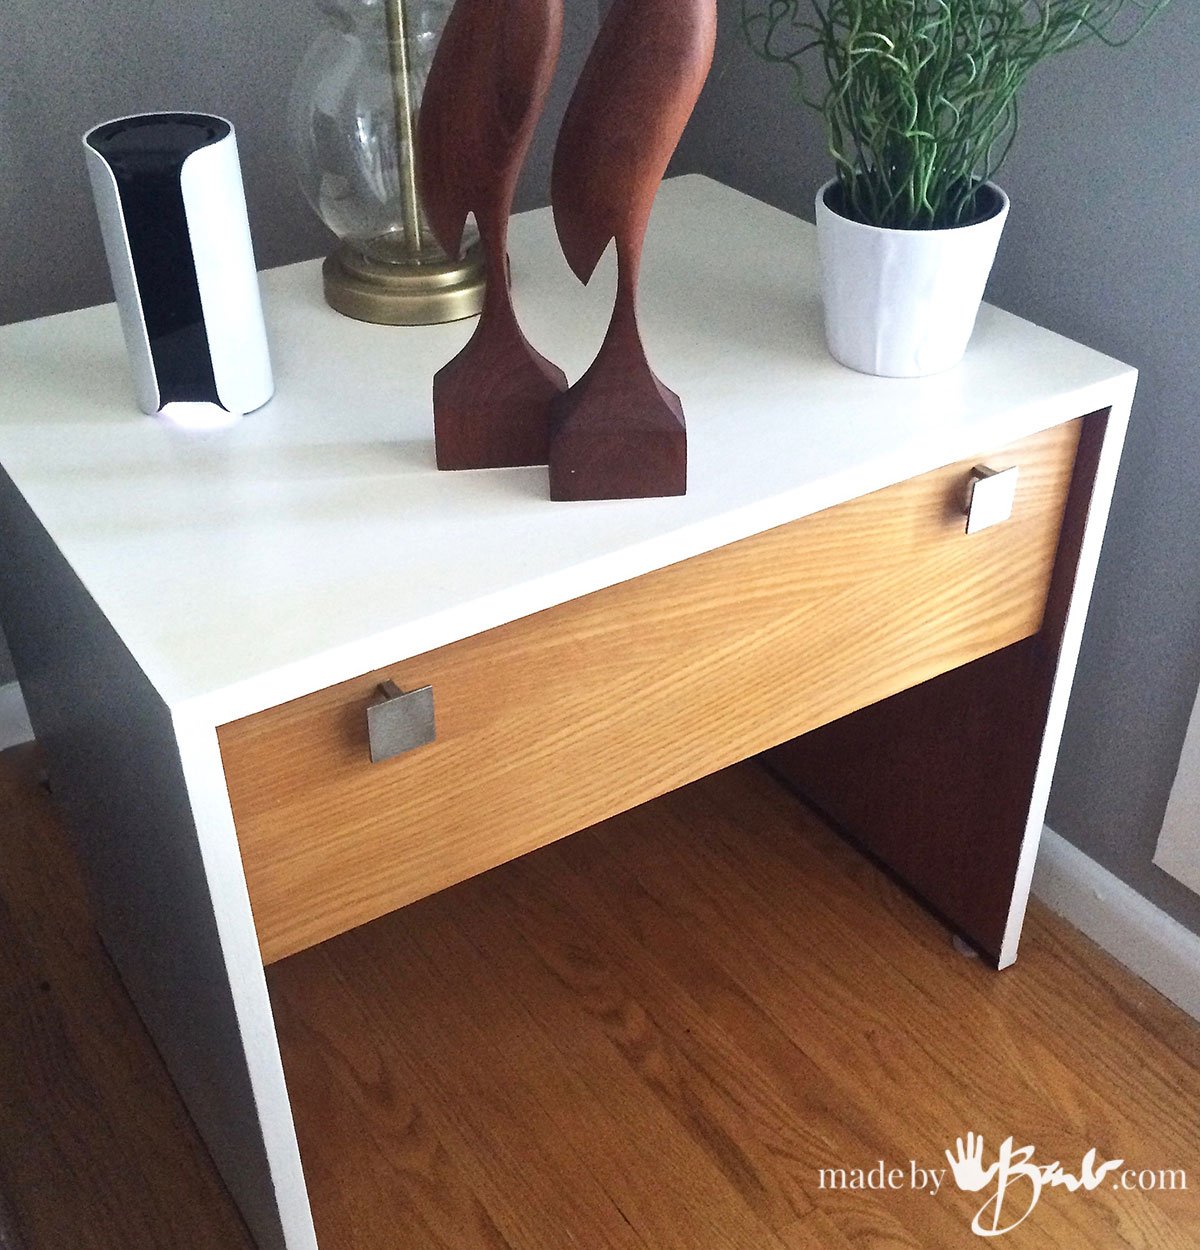
Paint everything White:
This ‘ancient’ chair was not glossy so it did not need any surface prep other than some cleaning. See how quickly the opaque white covers! Cheap thin paints don’t cover quite as well. The finer brushes also help keep the paint strokes from filling the details and carving. The creaminess that the paint has is lovely.

The chalk additive seems to also make the paint go a long way with good coverage. This only used about 3/4 cup of paint.

Since the acrylic enamel was a gloss the finish this finish was not completely flat. I don’t like the shabby-chic/flat look but wanted a bit of sheen so I gave it a quick thin top coat of just the gloss paint. This will also give it a bit of a more ‘washable’ skin against elements. Semi-gloss or eggshell finishes will also enhance the details more than flat.
I can always tell a lot from cleanup time. I can see how well it sticks when it’s super hard to get off my hands and the brush.

Well doesn’t that look so much more modern and fresh?! This chair became a statement piece with shibori dyed fabric upholstery. Good design always has some sort of ‘tension’ or contrast to add interest instead of all matching.
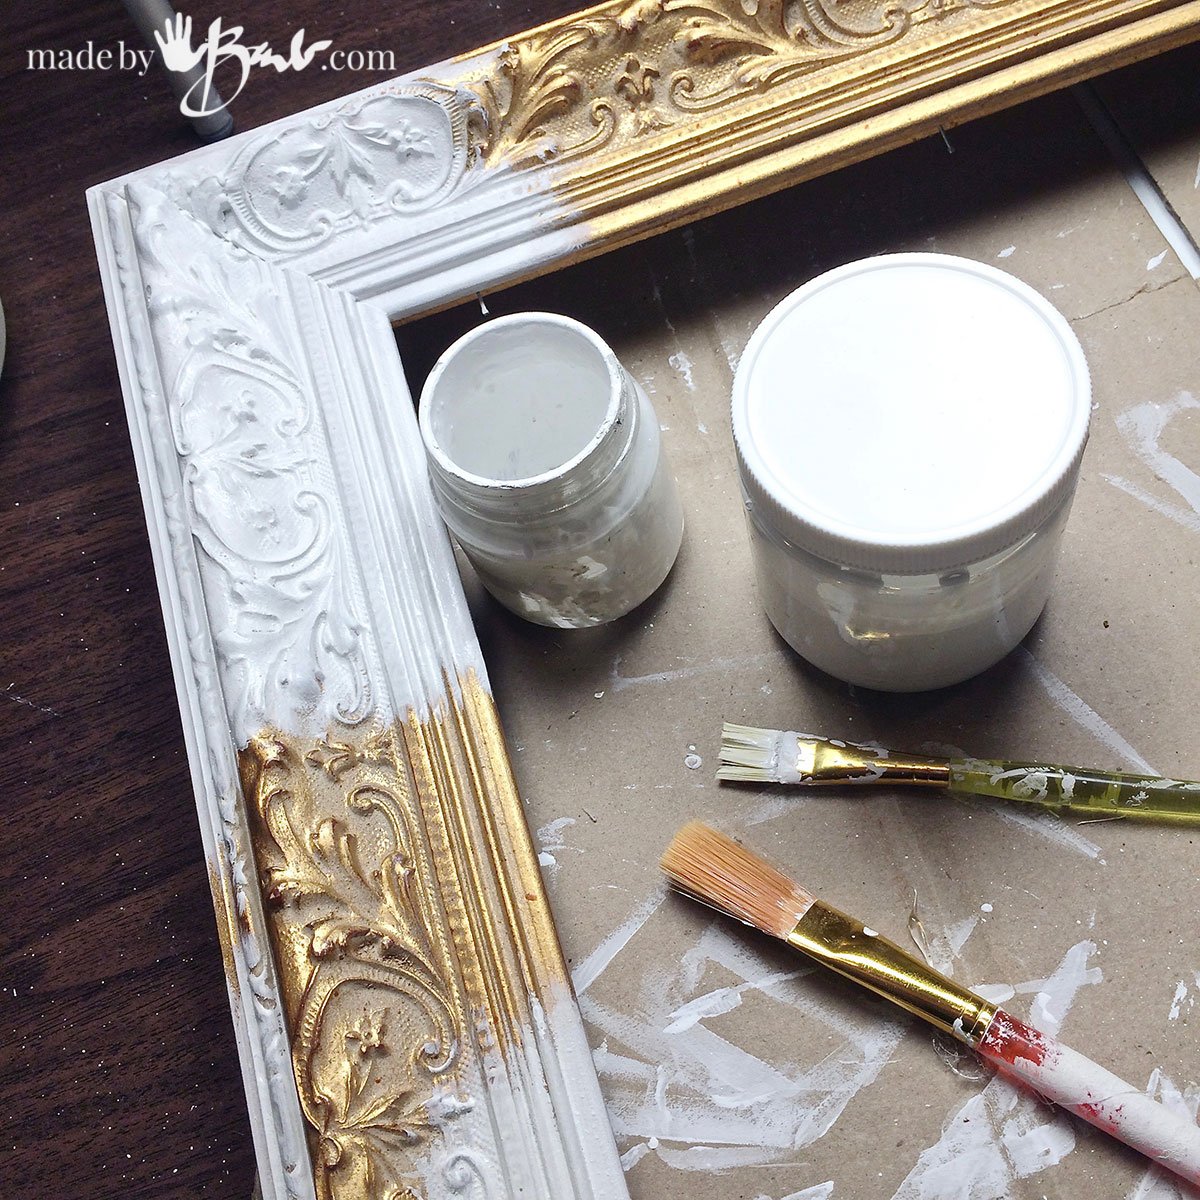
Modernize all those ornate frames with a fresh coat of paint. Warm whites are available by all the brands (Behr, Sherwin Williams, Benjamin Moore, Beautitone etc)

One, maybe 2 coats are sufficient coverage here. A gallon of paint can go a long way…

Details like these need the use of smaller brushes for details and imperfections.. A one-coat gloss top coat finish will make it look like new.

Surface Preparation needed:
When taking on larger scale furniture you may want to prep the surface more. If the piece has a glossy finish you should give it a scuff sanding (fine grit followed by good cleaning). I hate dust so I like to use Liquid Sandpaper as well! Calcium carbonate is mixed into the primer and a sponge roller is used. It may need to be thinned slightly with water to work with the roller. The roller leaves less grooves in the paint than a brush.
To keep the roller for the next coat wrap it in a wet rag & pop it into a plastic bag.

These up-cycled pieces got a completely new life. It is better if they are a good quality of wood if you are going to invest the time to paint them.
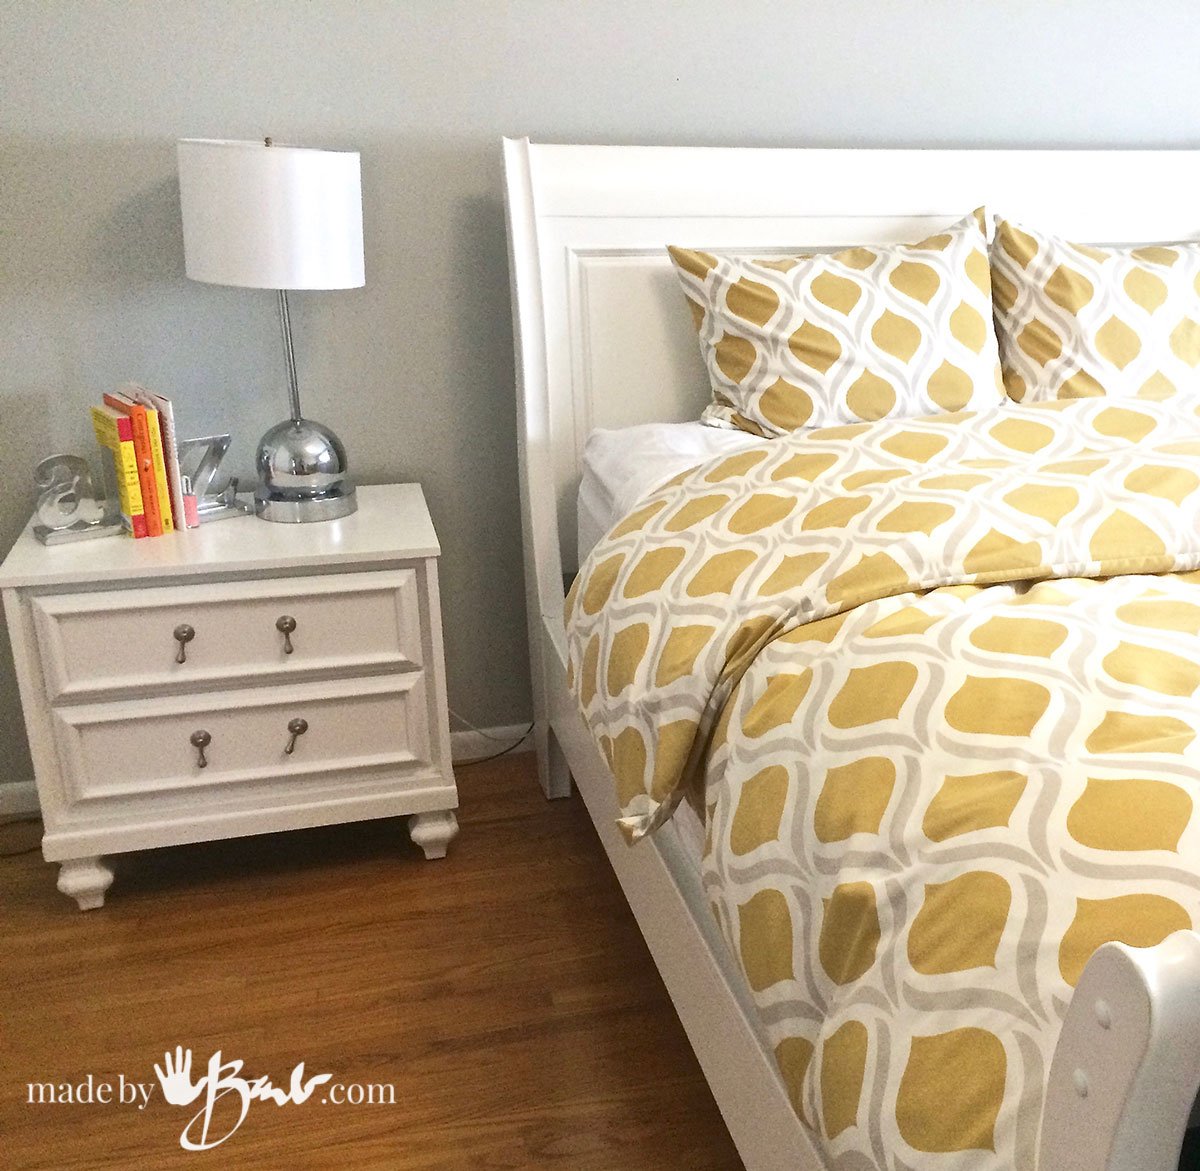
It came together quite nicely for such minimal cost; mostly time. (UPDATE; these have lasted superbly for quite a few years now, no chips or finish issues)

Adding an extra layer of Assurance:
When I paint tables or dressers I know the surface will get a lot of wear. For this reason I like to give the top surfaces an additional coat of a hard clear finish. I have the Nano Defence Floor Finish on hand but I also love the other Rustoleum Diamond Wood Finish. Both provide a VERY hard clear finish (I love satin) to protect against spills etc. They are quite thin but very strong. These pieces of furniture have held up amazingly well.

You will remember these awesome tables in the living room
I smile every time I look at them & knowing they cost only $6 each. There’s no MDf in the making of these either.
Sometimes simple design is best and will last through the years. I bet these are already a few decades old.

Trim and Doors:
Oh, now for the ‘other’ painting… Arghhh! Yes, an entire house needed to be updated with white trim. Most will just rip it out and replace. Yes, it’s much faster, but it just seems wrong and wasteful. The original is a nice hard REAL wood, not sawdust MDF. Soooo, here goes…
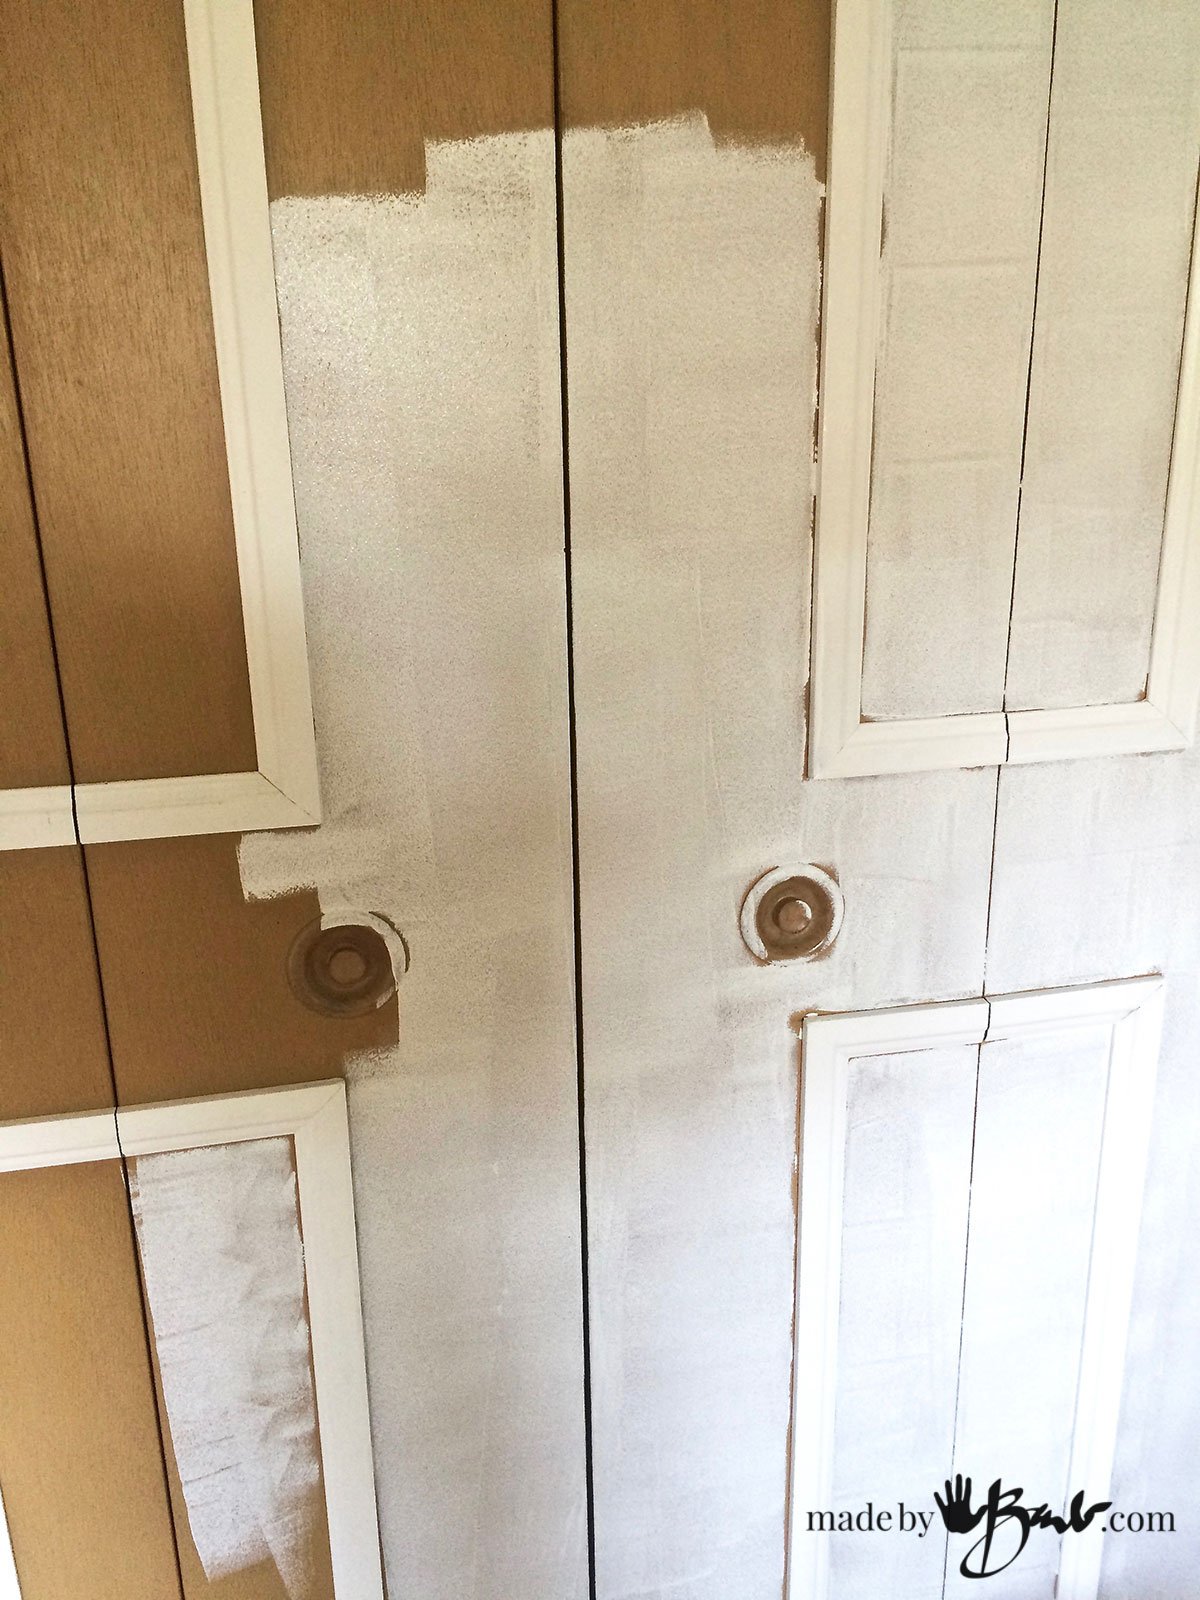
Oh, yes, updating the doors as well… Add some trim and paint paint paint… The major expense for this type of project is TIME. The trim is quite cheap and easy to install with a bit of ‘No more nails’.
I used a sponge roller for the flat sections and then a brush for details. Think of it like therapy. ‘What doesn’t kill you makes you stronger.’ Fresh white ceilings and trim colors are timeless.

Ah, accomplishment! (Don’t mind the masking tape on the floor.) I’m happy with the outcome and so is the house.

I found this great steamer trunk in the basement ‘dungeon’ as well…

It will join the shibori chair in the new guest room that has quite the blue and white theme.
So, there you go. You can paint ‘everything’ white and make it look like you have a new place. Trust me, it’s easier than breaking your back and hauling it into the car and driving it to the donation place (where incidentally there are piles of cast-offs right now)
Thanks for sharing such invaluable tips for painting white.
You are welcome! It has held up well and is well!
I prefer flotrol as a paint additive. It’s great on furniture as I’ve painted a lot. It’s meant for paint. I get it at Home Depot. I love it.
Thanks! It has been on my radar, I’ll give it a try! The painting has lasted amazingly for many years!