DIY Button-Tufted Storage Ottoman

Oh yes, we all have too much stuff nowadays, so furniture that functions for multiple purposes is awesome. I love my ottoman/coffee table that has storage to hide all that paraphernalia that collects in family rooms. I designed it to be an easy build without the use of ‘big-heavy-duty-guy tools’. Button tufting is not as difficult as you may think and gives this such a professional look. I lovingly dedicate this post to my ‘superwoman’ mother who was a homemaker like no other; ‘was already making storage ottomans 40 years ago, and even wired up our rec-room! Come on, you can do it…

It is based on a simple box design with a piano hinge to attach the ‘lid’. Since my sofa is leather (9 years old and going strong) and I didn’t want to futz with leather hides; I opted for a nice subtle fleece-backed vinyl. There are some amazing products now that are hard to distinguish from leather!

The Plan:
The main box is 24″ x 48″ and 3.5″ deep (standard 1″ x 4″ board lumber). Most lumber yards will do a few simple cuts for you for free, yippee! The lid is 24″ x 48″ – 3/4″ plywood. (standard lumberyard size)

I used 1/4″ MDF/masonite board for the bottom. Box ends are butt joined, screwed and glued; nothing fancy since it will be covered. The blocks in the corners were built up to give the attachment of the legs (from bottom) something to screw into. This box is not meant to be strong enough to stand in, it is an ottoman…

The legs are pre-made from an upholstery supply store or here. There are so many styles available to accent any decor. To make the proper height (18″) I added some extra blocks and trim. Stain and varnish the legs to your desired colour.

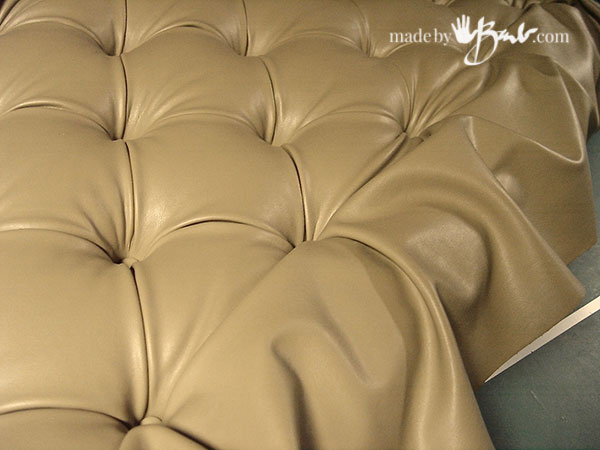
The plywood lid should have less sharp corners (to prevent poking through fabric) and sand edges. Draw a grid of 4″ squares for the placement of the 28 buttons. (see drawing above, note red grid)

Note: NOT each intersection will be a button (see drawing above), mark where the buttons will be. Drill with a 1/4″ drill.

I used a 5″ medium density foam (24″x x48″) and marked the same grid with a marker.

The key to button tufting is cutting holes into the deep foam to allow the button to be pulled deep. For ease I used an xacto knife.

cut some slots diagonally between the button ‘holes’ to further help the fabric find a way to crease.

It isn’t a perfect hole but will work just fine.

To soften the ends and corners add a layer of batting (1/2″ or so) that is stapled over the foam. Most upholstery has some batting to cover.

Add the Fabric:
I got a bit overexcited and missed photographing the grid on the back of the fabric/vinyl. Since the fabric needs extra width and length to be able to be pulled deep into the ‘holes’ ; the fabric grid is LARGER than the one on the foam. (It may depend on your fabric’s amount of stretch) The grid on the foam is a 4″ grid, but the grid on the fabric one is a 5″ grid. (similar to red grid above but larger for fabric) Use a marker or chalk to mark the button placements. Leave enough fabric to wrap around the foam (I left the full 54″ fabric width)
RULE: CAN ALWAYS CUT OFF, BUT CAN NOT ADD!
Make 28 self covering buttons using the same fabric. (follow directions on the package)
String a button on a loop of REALLY strong thread/string. Use a large needle or bend a piece of wire in half to be able to thread it down through the fabric hole, through the batting/foam, through the plywood hole and pull tight (harder pull = deeper tufting) I stapled the string multiple times to anchor (or tie around a button or nail)
Work from one end to the other. That was the tedious part. This method can work for other things like headboards as well.

Ease the fabric into ‘nice’ creases. Don’t mind my crazy fingers… Once all buttons have been attached, work around the outside adding some creases to adjust the excess fabric onto the back. Staple the fabric to the underside of the lid.

Bottom Box:
Wrap the bottom box section in batting and staple. The legs are not in position here, but note the added thickness blocks for the height I wanted.

Staple around the corners.

Measure around the outside of the ‘box’ and seam the corners. Cover the batting with the fabric and staple on bottom and top edge. Drill holes for legs or screw legs into corners. The extra wood inside helps provide stability

Note the gentle creases at the sides to allow for the excess fabric.

Note: the tucking of the fabric at the corners.

To make the inside look finished I used some suede-like fabric to line the box and under lid. Lay it out and bring up the sides, fold under and staple as neatly as possible around the top edge. Add the lining under the lid as well to cover the strings and make it look neat. Finish bottom of box as well and screw legs into the corners. A long piano hinge is used to attach the lid to the top edge of the box. You may choose to find some hardware to hold up the lid (but it is fairly heavy and it didn’t really work for me)

It isn’t very deep but will amply store all the converters and magazines that collect.

I am so happy with it and it has lasted very well! (9 years already) Give it a try.
The vinyl looks so soft and cushy and the material you chose goes really nicely with the sofa. Love secret storage spaces!
Maybe someday I’ll attempt a headboard.
Thanks Brenda! Oh, yes a headboard would be luxurious! I’d love to see it!
Great description of how to do tufting! I have always been so scared to try it because it seemed so difficult but you gave me the courage! I’m going to try it:)
Looks beautiful!
Whenever I am not sure I make a small test piece. Then I see how the material behaves etc. When there is a will there is a way!
Well, i am definitely going to try this. I wanted a rectangular shape and I like the idea of a box under it.
I have lost track of how many years ago (15? or maore?) I made this but it is still going strong! One of the best things I ever made!