
DIY Concrete Smiling Stones


No, I have definitely not ‘lost my marbles’! This craziness sparked from some recent funny things in my life. And nope, I still have my teeth! But a rainy family weekend away meant playing some games. ‘Speak-Out‘ is so hilariously side-splitting funny; I have not laughed that hard in ages!
I’m not sure how, but that crazy artist brain of mine somehow came up with this DIY Concrete Smiling Stone adaptation when I remembered a mold I had kicking around…
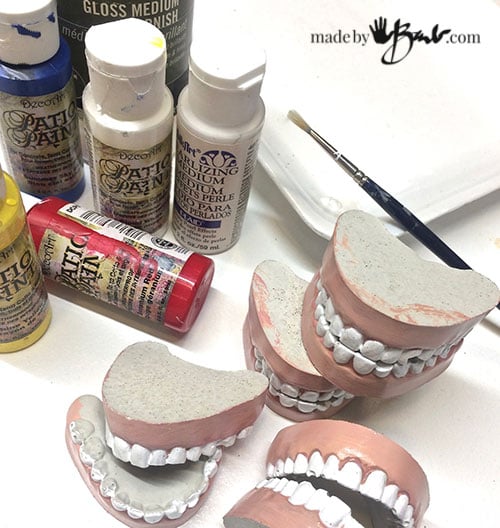
You will need:
- Denture Shape silicone ice mold
- RapidSet Cementall concrete or similar
- Tin foil
- Hot Glue Gun & glue sticks
- Duct Tape
- Acrylic paint (white, black, yellow, blue & red)
- Clear acrylic Gloss medium optional
- Acrylic Pearlizing Medium
- brushes, water
- metal zippers (longer can be cut) & scissors
- Palette knife or similar

Step #1: Make the teeth
Mix a small amount of the concrete mix. This RapidSet Cementall sets very quickly; in only a few minutes and does not require as much water. It is recommended to add the water first and then add the dry mix. I’m a bit of a rule breaker so I had been doing it backwards for a while. Then I always needed to add more mix because it was too wet… figures.
The ‘teeth’ parts tends to get bubbles so make sure to tap it very firmly to rid of the bubbles.

The impatient part of me loves that it can pulled out of the mold in one hour. No need for a mold release either as silicone works great with concrete. I am so impressed with this mold, as it is quite realistic.

You could leave it as is or give it some realism by painting it.
To mix a flesh tone mix some white and red acrylic paint, add some yellow, and then a tiny bit of blue. Compare it to the colour of your hands, but a bit more pink.

You can be fussy or not. The inside won’t be seen, nor the back.

I added a bit of gloss medium to make it ‘saliva-shiny’. Even a bit of acrylic pearlizing medium makes the teeth shine. You can’t help but chuckle through this…

To set the upper and lower teeth I separated them a bit and glued with hot glue at the molars. This won’t be seen so be sure it holds well by filling well.

To prevent anything getting in the mouth opening I taped the back closed with duct tape.

Step #2: Making the form & Zipper
Any length of zipper can be used as long as it is enough for the smile. The excess can be cut off. Use some old zippers from discarded clothes, as the colour does not matter. The 2 open ends of the zipper need some gluing together. You can adjust the smile as you like.
Glue the top and bottom at the centre point. I leave the sides loose to build up with some concrete ‘cheeks’.
From my sculpting days I learnt to use tin foil as a bulking agent. It is great since it can be formed easily and is quite stiff. Make the shape you prefer and glue to the teeth. Add more if needed. You can now imagine how it will look. Be creative, as stones come in all sizes and shapes.
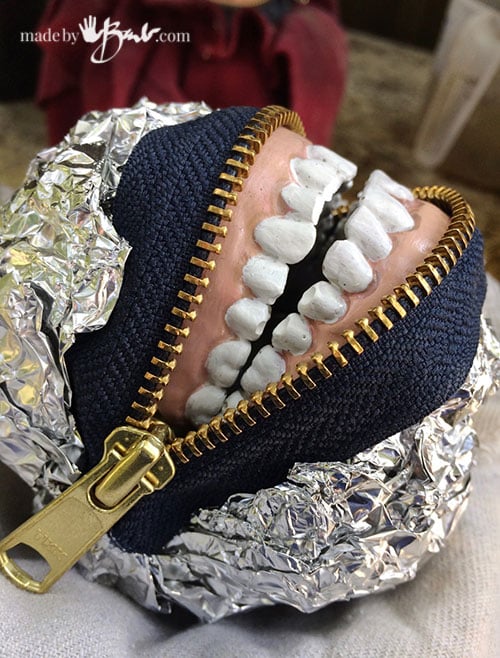
I tuck a bit of the foil around the zipper to keep everything snug before I start with the concrete.

Step #3: The concrete
Using the same concrete, this time mix it to a thicker consistency. I find that it will slightly stiffen in about 30 seconds and be quite moldable and able to hold it’s shape. I do really love this stuff…

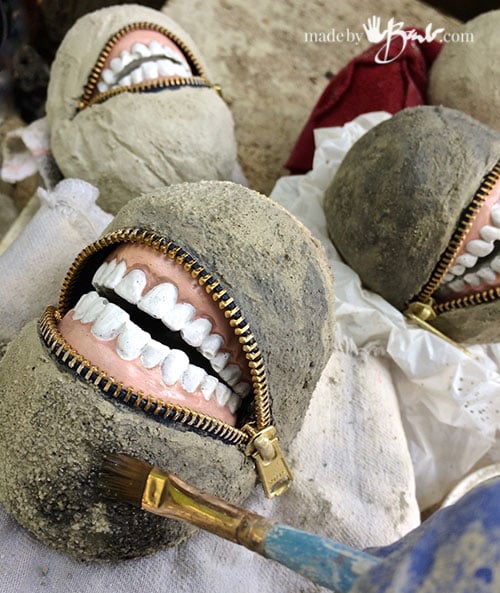
It’s not a mystery what to do next. Cover the form with the concrete and work your way around. It can be a round type of stone or more angular. Poke it, put dents & holes. The more rough the better and realistic it will look. It will start to get firm after a couple of minutes or so.

At that point I will start to get fussier and finish the ‘lip’ edges. I like to use a painter’s palette knife as it’s thin and flexible. ‘Smear’ the mix up carefully to where the zipper teeth are. You can also brush any concrete off with a brush and water if need be. Try to keep the zipper pull clean.
Trust me, it’s not that hard at all…
Step #4: Finishing the Colour
Yup, I am always in a hurry. I figure if the paint is added earlier it can sink into the concrete even better. I mix a bit of black acrylic paint with a tiny bit of concrete and brush it on very loosely.

Let it run and be mottled. The mix tends to be a very light colour if no staining is done.

Laugh out loud! These guys make me chuckle.

So, now what? You can put them in the garden, add them discreetly between the rockery and make someone jump.
I could not resist seeing them frolic on the beach with their other rock friends…

I would like to plant up a bowl with some succulents and beach stones. Perfect for the orthodontics/dentist office!
And Halloween is fast approaching. Perhaps you just add a few under the house plants to give you a smile every day.
I may be a bit silly… bit we keep using emojis everywhere but these are real ‘stone’. We all deserve a hearty laugh now and then.

I just can’t help myself… A bit of fun before I have to head back to teaching!
Barb… I have been getting your email for a while now and LOVE your idea’s and how well you explain how to create them. I am going to make the eye and smile rocks to add to the dry river bed in my front yard. Your whimsical projects are so me ! Thank you for your creativeness and making it available 🥰 Since my husband very recently passed I plan on diving in.
That sounds great! I have some in my rock garden as well and am amazed at how well even the zipper lasts in our Canadian winters! The colour may fade on the gums if you do not use an outdoor paint but still quite creepy! Happy Making!