DIY Concrete Face Garden Sculpture – Part #2 Mold Making
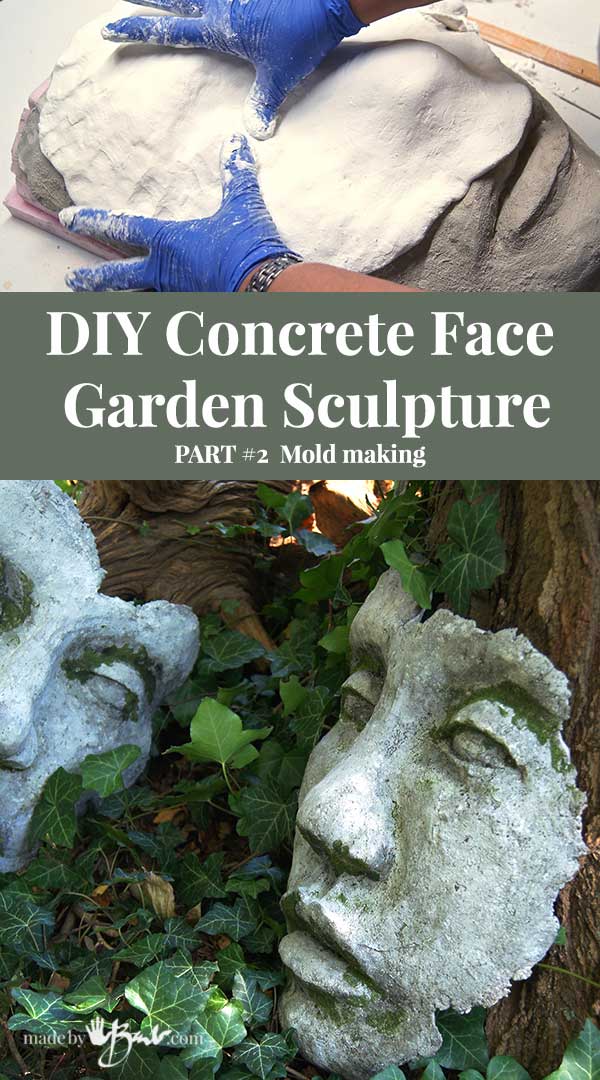
Why not be able to share your great designs by making a mold from them?! My huge face sculpture will now be able to be duplicated as I’m sure you have a few spots in your garden that could use a bit of ‘personality’! Each one of these will be unique even though they are cast from the same mold. One of the easiest casting projects to make your own mossy DIY Concrete Face Garden Sculpture Mold.

You will need some type of mask or one that you made yourself (like mine here) It was not as difficult as it may seem; you can interpret a face so many ways to be completely original and even more ‘artsy’! I decided; go big or go home! (over 2x human size)

DIY Concrete Face Mold Supplies:
- Your original ‘Sculpture’
- Large (non precious) bowl
- 100% Silicone Caulking (I used 3 tubes)
- Corn Starch (3 boxes)
- Caulking gun & xacto knife
- rubber/nitrile gloves
- rolling pin
Step #1; Get the form ready
I have not added any release agent such as grease or spray to my original shape. (yes I like to live dangerously sometimes) However feel free if you suspect that your surface is going to be sticking.
This concrete is somewhat rough but I also did not like the idea of greasy film on either piece. IF, you would like to add some, I would NOT suggest any cooking spray. I like using a stiff mixture of beeswax and petroleum jelly (vaseline), and scrubbing it in with a stiff brush if you want a release agent.

Step #2; Make your Molding material
I have had much success with this method of mixing 100% silicone caulking with cornstarch. It will create a rather stiff but still flexible mold. Squeeze about as much as you think you will need (may mix up more to add if needed) This large mask used about 3 tubes total. DO have good ventilation for this as the fumes from the caulking (vinegar smell) is quite strong.
Work the cornstarch into the caulking gently and keeping it as one mound. Try to keep starch between your fingers and the caulking (like working with bread dough) Keep adding and working until it starts to lose it’s stickiness. It will set fairly quickly once it does so be aware.

Give the mix a good kneading to make a consistent dough (yes, I used to work at a bakery).

To make covering this large area easier I rolled the ‘dough’ with a rolling pin. A thickness of about 1/4″ – 3/8″ was my goal. Feels almost like making a pie…

Step #3; Cover your form
I then transfer the slab to the shape and work it into the details. You will feel if you are thinning it too much and edges start to poke through, manipulate the ‘dough’ to cover.

I had run out of caulking and had to go to the store (duh, not the best idea) and then added more afterward. It joined quite well. However if there is a repair or join that you need to make use some caulking directly as a ‘glue’.

Once it is set; does not ‘squish’ when poked, it has cured. Start to peel back the edges and carefully work around all directions. It was quite ‘attached’ since I used no release agent but I was able to slowly pull it up without breaking.

Step #4; Casting the concrete
Since this mold is fairly thin you will need to provide some support for it. I dumped a couple bags of sand on the ground and wetted it. I can then nestle the mold nicely into it and it will hold the shape. FYI; historically, sandcasting was used quite often, even with molten iron.

I casted quite a few ‘faces’… I used the Rapidset Cementall entirely, a mix with reinforcing fibres and a mix with some peat moss. All castings worked successfully.
I like the rustic textured concrete look so added the peat into the concrete mix. It is already a very strong concrete to this did not weaken it too much.

It now resembles hypertufa and is also lighter. Since this will not be that thick weight was not the issue.
I have also used some colour to add some ‘age’ to the really white concrete. You can customize as you like.

To distribute the concrete, just plop an even amount around the mold. The goal is to have the edges look broken, as if it was part of an ancient old sculpture that fallen to the ground. Varying the edges will also create different looks.

Smooth it into the crevices and aim for about 1/4″ – 3/8″ thickness. I am not too concerned about bubbles as it adds to the rustic texture.

I have not used a mold release (again) so gently work to peel it out of the mold. When I used to use the spray it left residue that I did not like at all. It may take a bit more manipulating however it will be clean!

There! I like the shapes, the broken edges, and the old-looking texture! However… I want moss on them!

I’m not a ‘pink flamingo gal’. Garden art should look like it ‘belongs’ to the setting. It should feel natural, related to the media and colours… Like a pondering ‘rock’.

Evoking some simple thoughts…

‘Hidden like archeological find. From what century did it belong?!

Yes, moss! But this post already long enough, so it will be posted soon separately. Go… make your own DIY Concrete Face Garden Sculpture!
Hello Barbara, I was going to create Plaster of Paris 3D tiles but I like your process. Did you come up with the idea of using silicon caulk or if you found out about it elsewhere could you let me know any websites you find as useful references? Thank you, Shane
You may want to check this out as well. I have used it in many projects. Happy making!
I love it! You should sell the molds!
I know I would definitely buy!
Hi, thank you for your generous instruction. I want to make a foam structure, cover it with rapid set mortar (since I bought it already) and then mosaic on top of that. Do you think that will work?
That sounds somewhat reasonable. what stands out to me is the fact that the mortar could crack and fall off. I think you need some type of mesh or fabric to make the layer less likely to break. You could dip some fabric and cover like I did for these bowls. You could then add more cement to ready the surface for the mosaic. It’s always a good idea to wet cured concrete so that the new mix does not have the moisture ‘stolen’ by the cured concrete. Good luck!
This is so well done and interesting. Really like how you explain the entire process. Thank you.
Thank you! I enjoy working with concrete but have also been trained as a technical illustrator and also taught in an art college for decades. I think I can anticipate what the questions are… Enjoy!
Mir gefällt ihre Gesichtsmaske für den Garten sehr. Kann ich von Ihnen diese Form erhalten, ich würde im Voraus bezahlen.
Ich würde mich sehr freuen und bedanke mich im Voraus bestens.
Mit freundlichen Grüßen
Rosmarie Spähn-Merk
Thank you for this and the original garden face post!!!
Enjoy! I hope you try it and maybe a Greenman! The mold has been in my shed for years now and is still perfect!