Wonderful Wool Eco Printing

Many years ago precious pure wool blankets used to be the staple of a household. Nowadays they are being given up as the newer lightweights push them out of the linen closet. Lucky for us eco printers as they can now have quite the second life! You will love the Wonderful Wool Eco Printing and then go raid some linen closets…

Wonderful Wool:

As with the mittens wool can be used for so many things. These blankets came in many weights, quality and even colours. Some have been carefully stored and some have been washed and used. Depending on the weight they can become coats and jackets or accessories such as bags and scarves. Wool wears great and is not as fragile as you may think. Some have developed quite a ‘felting’ over the years. There is a lot of yardage in a blanket as well!

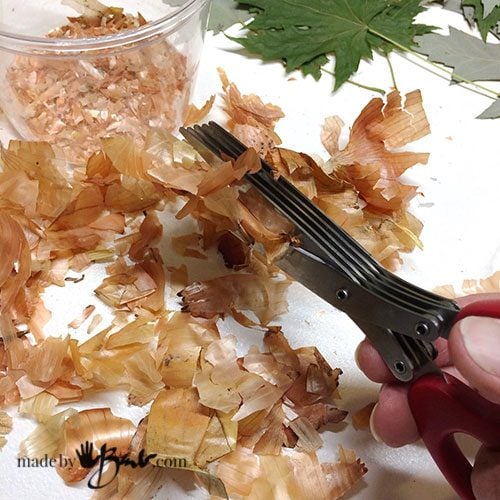
One of the easiest plant materials to dye wool is onion skins. Even with just a bit of pre-mordanting with vinegar (50% water for at least an hour) the wool prints oranges & reds easily with the skins. As a way of making shapes I cut them with some spice scissors.

I relied on my favourites such as maple and rose leaves as well as a newcomer; ‘wine weigela’. They have been pressed between newspaper until ready to use. Even after quite dried they can be reconstituted again.

This time the iron mordant is in the form of a soak in rusty iron water. I maintain a bucket of railroad spikes and water that I refresh with some vinegar now and then. I soak the leaves for about 30 minutes at least. Don’t be too strong with the iron as it will be harsh on the wool fibres and make it feel even scratchier. As with most of my projects I will do small test runs before investing a huge precious piece.

The wool tends to soak up a lot of moisture. It will keep dripping out the excess water as you work so its best to squeeze as much out as possible. Do not wring it as that may distort the wool. The prints will not be distinct if too wet. A towel to squeeze in will help wick the excess water.

Blot excess ‘iron-water’ from the leaves as well. Keep in mind that front and back print differently.

My intention was to have some background colour using the small flakes of onion skin. Be creative and unique. There are so many possibilities.

As an assurance that any prints will not bleed through to other layers, I cover in plastic (drop sheets are easily cut to the width and can be reused many times) before rolling.

The Rolling:

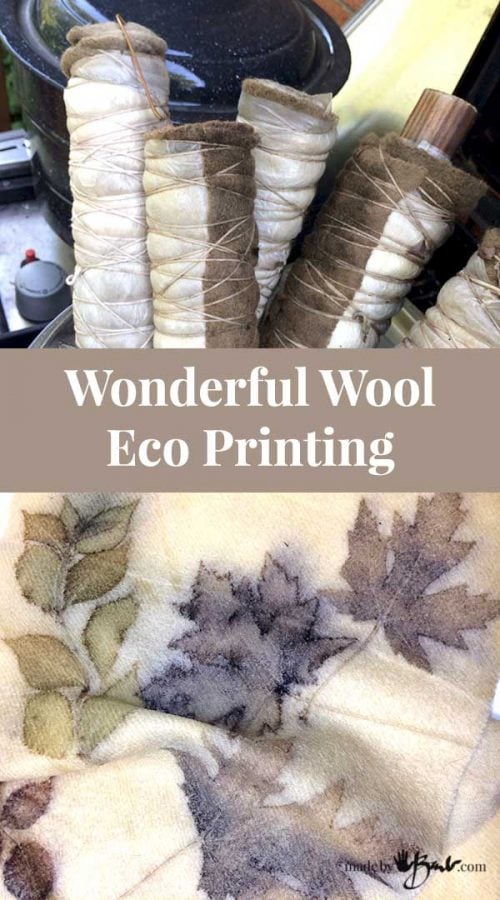
The wool blanket starts quite thick and fluffy. I find that tying tight with string can cause deep indentations that are pretty permanent. I came up with my own unique way of keeping the roll flat but also still able to breathe. Much like sushi rolling, I use a bamboo placemat on the outside of the roll. As you see wool can get bulky quite quickly.

Processing:

Another option is to leave some wool exposed to create interesting edge design by immerse boiling in some dye colour. The string/twine will act as a resist and I have often see it look like wonderful fringes on the edges.

If you would like a cleaner background and distinct prints then steaming for about 2 hours would be best. For some variation of colour and edges boiling would give more results. The addition of some dye stuffs ( leaves, onion skins, iron ) in the pot will add some colour.

The Reveal:

Once you have steamed or boiled they can be opened. I often like to keep some of the heat and let it cool slowly by wrapping in a thick towel/blanket rag. Anticipation… until the reveal!

Such wonderful reds! Since wool is a protein fibre it prints great. The pressing of the rolls also changes the feel of the wool and it becomes a more dense fabric.

They remind me of wool coat melton; thick and sturdy.

You just never exactly know what you are going to get! The wine weigela printed with slight reds and mauves. 

The Amazement:

Wonderful wool eco printing!

Oh, what to make with the great prints? How can I sleep with so many ideas floating through my head?! Pillows? Bags? Jacket? Journal? Vest? Quilt?

Alright, alright, here’s a sneak peek… I had better do this before we hit the heat of summer again…
Leave a Reply

Your email address will not be published. Required fields are marked *

This site uses Akismet to reduce spam. Learn how your comment data is processed.

42 Comments

  1. Impressive! I was attracted to my interest!
    You also soak the wool and plants in 50-50% vinegar? How do you record when you’re done, do you understand, steam? How many degrees can I have in the oven? I’m really curious to try it.
    Thank you for responding!
    I wish you good luck!

    1. Thanks! I do not use the oven, I steam above boiling water or you can also simmer in water. I do not dip the leaves in vinegar, only the wool. Do tests to see what works best for you. Have fun

  2. Hi,
    You really surprised me with your lovely behaves, not selling each information you know, not only this, but you even share all what you have learned through years without hesitation.
    I sew many famous names in eco printing refusing even to reply to a question with no or yes, not to mention an information. You feel like you are asking her to give her kidney!!!

    Many thanks and my best wishes.

    1. Yes!! I know, when I started I felt like I was solving a crime bit by bit until it started to all come together in pieces. I am sure some are not too happy with my free sharing. I do spend a lot of energy so any support is appreciated and you may also see my store

  3. WOW I read every word you write with anticipation – thank you so much for the effort you go to to freely share your knowledge with us all I found you on Printing with Botanicals fb page when you posted about microwave printing Ive tried it and love it thanks so much. Ive just read the post above and am a little confused which happens easily lol what is soaked in the 50/50 vinegar and water and what is soaked in the iron water. Im in Northern Australia and wool is not as prevalent as it used to be and as Im in a tropical climate we just don’t need it nor wear it so its hard to acquire. Im a thrift shop regular and occasionally pick up a wool blanket but have been donating them to the wildlife sewing group that I volunteer at to use for kangaroo and wallaby stands to replicate a mothers pouch for orphaned joeys but Ill be keeping the light coloured ones from now on – sorry wallabies lol. I have hundreds of eucalyptus with the mandatory koalas in them on my property so have no shortage of those leaves but not much else sadly everywhere I go now Im always eagle eyed at the leaves on the ground and whats growing Ive pulled the car over many a time to grab something that I think might produce a result – its all a learning curve I guess. Once again thanks for your time and effort – regards from Australia Ill pop over and donate to your blog

    1. Such a nice story! It is amazing considering how far away you are from me! I can’t imagine Koala’s in your trees! Well, I guess we each have our pros and cons!
      The stuff that is dipped in the iron water is the foliage. As you see in the groups it can be one of a variety of combinations and more are being discovered every day. I am an illustrator and could just paint what I want but there is some magical allure to the uncertainty that this Eco Printing gives! Thanks for the donation! I’m itching to get an order of silk… having some withdrawal.

  4. Thank you so much for this detailed page. I see on another page you have mentioned Eucalyptus leaves. I am based in Sicily and have them in abundance. I was wondering, do I need to put them through an Alum process like you have with your leaves? Or will they print on simply Alum mordanted fabric with Vinegar? Other notes I have read don’t mention actually mordanting the leaves which is why i’m curious.
    Thank you!

    1. I do a fair bit of research and the euca can print amazingly especially on a protein fibre. It does depend on the type though. Wool and silk sound like they need little prep for euca. It might be worth a small test run… The alum is usually for the fibre not the leaves. Good luck…

  5. Hi Barb,
    I am so excited to have found your wonderful site with so much knowledge and inspiration. I can’t thank you enough for being so generous to share! You are a gift! You have made this art form so much fun and exciting for me!
    I would like to ask where you found the plastic that you use when you bundle your leaves? I have been using the crock pot oven bags but not reusing them and I’m not sure if other plastic will melt to the garment during the steaming process.
    I’d also like to know where you purchased the cochineal, the root madder and the indigo? I would like to try my hand at these beautiful colors.
    As always, thank you for your help! Gail

    1. I use strips that I cut off plastic drop sheets meant for use when painting.They are quite thin. It allows me to just cut the width I like. I don’t use a pot or steamer lately; I use the microwave and I reuse the plastic many many times as it does not melt. I’m pretty sure there may be some who are not too happy with my free sharing as workshops are very expensive! I am self taught… with the help pf the ‘net!

  6. Hello! Your work is beautiful! I recently purchased a wool blanket and would love to give this a try…I have a question; do you roughly divide the wool pieces dyed for each pattern piece (allowing for shrinkage of course) or do you dye first and then cut out your garment pieces?

  7. Thanks so much Barb for sharing your information so freely..it’s much appreciated,
    I’d like to eco dye a thrifted wool blanket….I guess I mordant it in alum then add leaves dipped in iron? It’s so big I’ll have to cut it up to steam it though!
    Any suggestions..?

    1. Yes, that’s one way. Wool generally is pretty receptive to eco printing, but there may challenges with how wet the wool is, level of iron dip. Wool can also be emerged in the pot. I like to do a small test run. Those blankets can get crazy big if folded & rolled. I used smaller strips and then sewed afterward when I make this jacket However I do love seeing those ‘lines’ from the string on the outside.

  8. I want to make these this year. I have wool, leaves, and ferrous sulfate powder. ( as well as the birch logs, fur, and polymer clay for the noses. But I’ve never attempted eco printing and have watched many videos and read what I could…and I’m confused! Can I simply soak my leaves,put them on the wool, bind tightly and microwave? I haven’t found anything that walks me through this particular medium. Or do I need to steam the bundle, or boil?
    I feel like such an amateur but am excited to try!
    Thanks for any advice

    1. You can read through the posts about Eco printing on wool (use the search tool). Wool takes the prints quite well, but you do need some type of heat process (like my alternate microwave one) The leaves can be dipped in the iron water, placed vein side down, rolled tightly with a barrier and heat processed. If new, do a small test piece to see if your leaves have much tannin. It’s difficult to be exact due to so many variables…