Eco Printed Art Quilt

Can you see all those leaves?! These fabrics are all the by-products of my journey into Eco Printing; the ‘Iron Blankets’ that I used along the way became all shades of neutral. Who knew bedsheets could look like this amazing and come together to make such a great Eco Printed Art Quilt?!
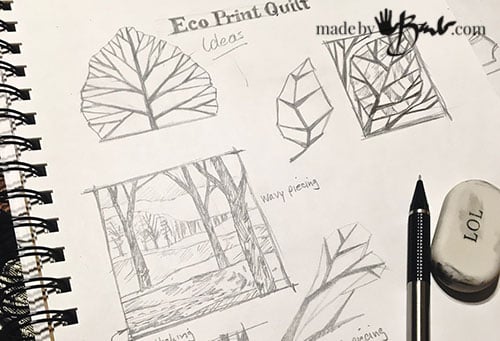
The design:
Every good thing starts with a plan. If you know me or see my site you will see I have a rustic flair to my design and take much inspiration from the outdoors. I never cease to be amazed at how beautiful a forest can be; in any season. ‘How lovely the shadows dance across the hill…
The concept comes from the fact that as you move back into a landscape the tones/shades become more grey. The foreground is darker and then feels more intense.

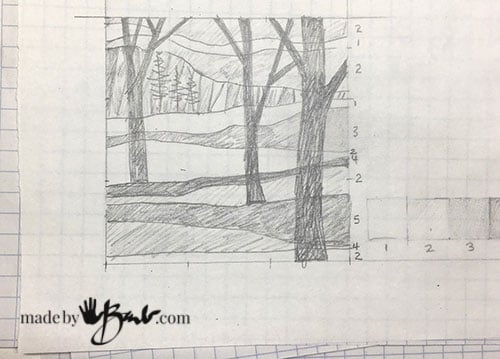
Make a grey scale of the overall tones to figure out where they are best in the space. If you squint your eyes you will see less detail but overall ‘value’ of the grey. That is how artists plan their designs. I use the grey scale to plan each fabric to it’s place in the plan.
The Fabric:
After much ‘Eco printing‘ I had amassed quite the collection of ‘carrier blankets’ (iron blankets) and eco prints so this design just seemed perfect.

The supplies:
- Eco printed fabric & accent colour for border (yes, all were once a bedsheet)
- good scissors
- rotary cutter (makes it so much easier)
- cutting mat (to save your table)
- pattern
- sewing machine (basic straight stitch type will do)
- Thread, ( obviously, matching colours and also some invisible thread )
- pencil
- tape measure
- Quilt Batting (polyester or cotton fibre)

Enlarge the Pattern:
Once you have the pattern, you will need to make a large full size version.
The trick to scaling up an image is to use a grid system. Make the same number of squares on both sizes and then follow roughly from small to large working square by square. They are just wavy lines anyways – that’s why I l LOVE this design; can’t really go wrong. My main image square is 36″ x 36″

I made 2 copies of the pattern, one without the trees.
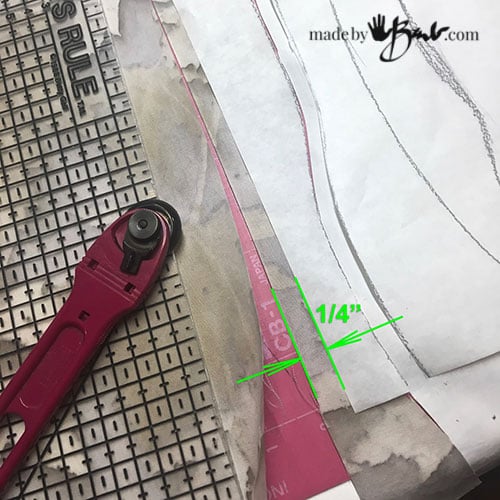
Sewing the Curves:
At first I was scared of sewing curves, but it really is quite simple! Who knew?!
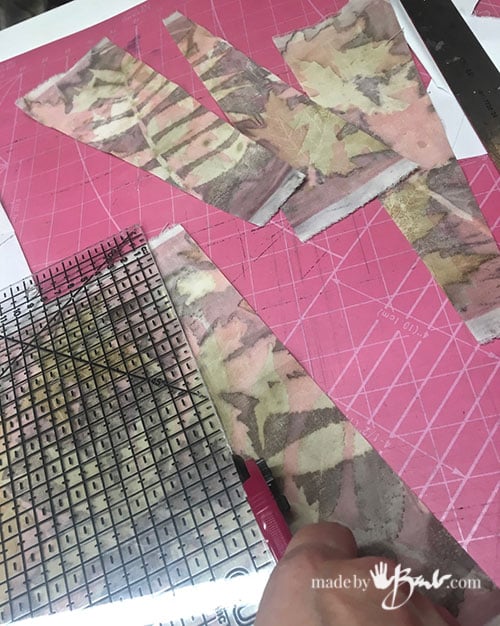
Lay the pattern on the fabric and leave an extra 1/4″ of fabric at the top. This will be the extra for the 1/4″ seam allowance. (note green dimension). Pin if necessary and use rotary cutter to cut through the paper and the fabric. You may place 2 layers to cut the next edge at the same time. Or you can just run the cutter again along edge with other fabric ganged up under it.

Work one curve at a time. I taped the paper back (few pieces of tape) to keep it all organized.

Marking some short lines to make sure you match the curves also helps.

Lay the curved fabric next to each other and match up edges. You can pin and also follow markings. It is a 1/4″ seam and will allow easing the edges together as you sew.


As you sew make sure to keep it smooth and no little folds happen. Easing and slight pulling helps to flatten the curves. Since they are quite long curves I did not need to clip at all.
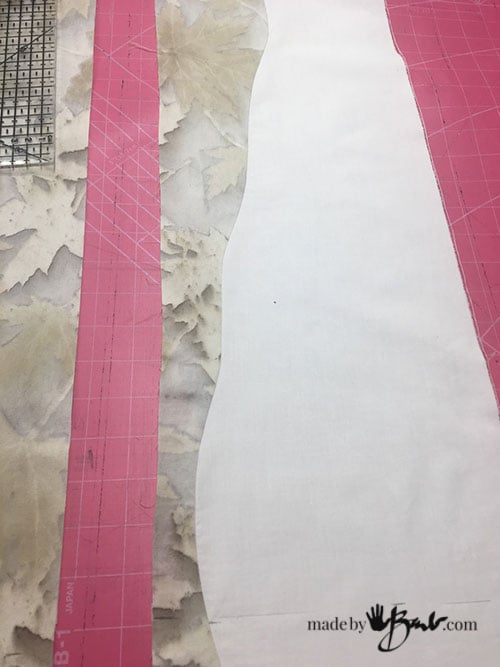
Press seams to one side.
Repeat:
Once you have sewn one curve you will notice how easy it is. Follow the same idea with the rest.
Do remember to allow the extra 1/4″ at top of pattern to give the seam allowance.
- Lay pattern on fabric with extra 1/4″ of fabric at top (working top to bottom)
- Cut curve through paper and fabric
- remove excess and place next fabric under curve edge and cut a copy
- match edges and sew together (right sides facing)
- steam press well to one edge
— repeat — with next curve.

The Tree Line:
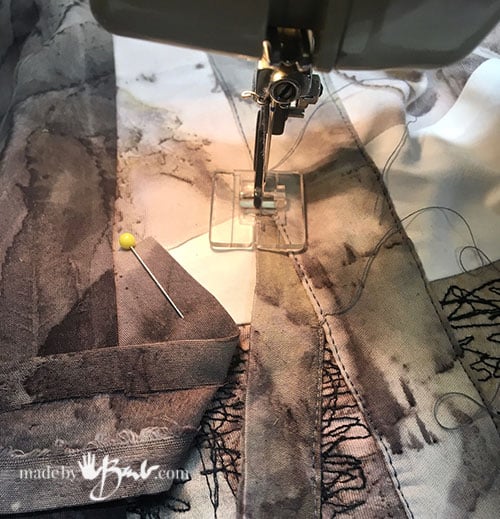
The pattern has a distant tree line that is made of strips to form one curve. To mimic trees they look like some triangles. Choose some mid-tone (not too dark or too light) shades
Cut some random triangular strips alternating patterns. Make sure they are longer than needed as it will be trimmed later (MUCH easier than fussy exact pieces!)

Sew the pieces together alternation the direction of the triangle. This will make the strip relatively straight and create some tree-like shapes. Press seams nicely.
Follow the previous instructions to cut the curve shape.
Repeat with the next curves to the bottom. Test the tones against each other each time.

Free Motion Sewn Trees:
For fun I have been doing some free-motion-sewing so I decided to sew some ‘crazy trees’!
Adjust the presser foot to have very little pressure (loose enough that you can slide the fabric as you like). I did not have to change the foot ( there are some available)
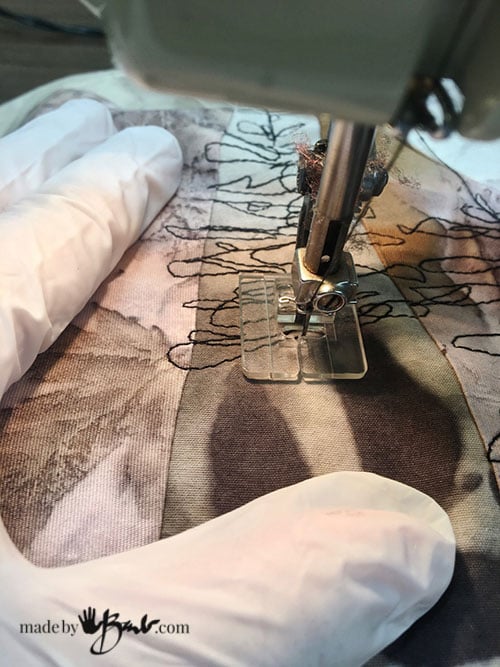
Also, there is suggestion of using a embroidery hoops. Sure, if you would like to. I used a pair of rubber gloves to keep a good grip and keep my hands around the fabric while sewing to endure that it stays flat.

The fabric does not get turned, you just slide it in any direction that you like. Yes, it is a bit messy looking but it IS a tree!

Big Trees:
I saved the darkest eco prints for the trees. The biggest foreground tree should be the darkest and lighter as they go into the distance. (yes, I also paint sometimes…)
Cut strips that taper as they rise and have enough to fold under about 1/4″ or less
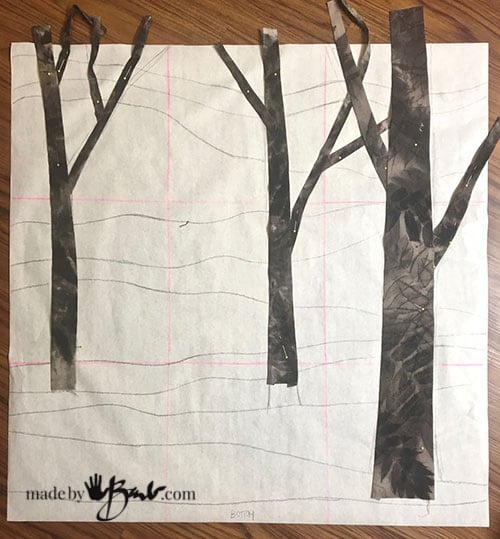
Plan the pieces on the pattern. Fold under the edges and iron well.

Transfer the trees to the fabric and pin. Pay attention to overlap. Closest tree should overlap etc.
Top stitching is a great easy way for the trees. Sew in matching thread or invisible quilting thread as close to edge as possible without falling off.
Again, pay attention to the layering of the back ground trees to the foreground and lift branches to sew back ones first.

Nice thing is that they can be as wavy or straight as you like. Perfect!

The Accent border:
I like to be free form exact shapes so I cut a bunch of random width strips or a variety of prints.
My mother used to do some strip-quilting. The idea is that you sew strips first and then cut as you like to then piece those. That makes for WAY less fussy piecing together. (one of the reasons I was not into making quilts)

The original drawing has a thin white border (2.5″ – 3.5″) around the main image and the accent. That keeps it fresh and outlined. (bed sheets again)
Sew the white border to bottom and top of main image (press) and then add the accent strips.

The medium grey larger border (another bed sheet) is perfect to keep grimy finger prints from showing… Make it as wide as you like.
I like to rip long strips for borders as it ensures that it is perfectly straight. Easy-peasy.

The Warm Fluffy Insulation:
There are many options for batting for quilts. You can super thick or thin, cotton or polyester or even silk. I think about storage, washing and also sewing through the quilt.
I choose a thin batt.

Cut a back panel the same size as your front panel. Piece it together if needed.
Lay out the entire quilt on a large flat surface (probably the floor) with the back and front panels facing each other. Either lay the batt on floor or on the top and pin quite well.

Sew all the way around except for an opening to turn (like making a pillow). Sew with the fabric side up for ease of getting the batting stuck in the foot.

Birth the Quilt:
In the quilt world they use the expression ‘birthing’ the quilt for the turning inside out of the large rectangle pocket.
Use a running stitch that alternates top and bottom and is well hidden. This closes the quilt body.

‘Stitch In the Ditch’:
Gee after the ‘birthing’ it’s stitching time.
Pin all the layers quite well making sure it’s all quite flat.
Invisible thread is great as you don’t need a matching colour. It is super fine as well.
I am an impatient person, so the finishing is all machine done. You could also hand-stitch all the quilting. For this design the ‘stitch-in-the-ditch’ worked quite well. The stitching is meant to hold the batting in place inside.

Roll the sides the quilt to lessen bulk as you need to get to the centre. My mother used to use pants clips. This is a fairly small quilt so it was easy and quite quick.

Enjoy:
Move over stodgy old fashioned quilts and welcome new age ‘Art quilt’! Great shades of grey and neutral.
‘Not to mention that no fabric prints were bought (super inexpensive) and only bed sheets were used. Go check the linen closet…
The unique prints are so interesting to gaze at, so much detail from each cell of the leaves. ‘Just magical! I also love how random and unexpected the prints are. In our modern high-tech world we just love adding the ‘warmth’ of nature, especially rough and textural ones like live edge wood. These rustic prints are so perfect as an accent.

And so functional to keep you cozy warm… like ‘Mother Nature’ has her arms around you!
If you like this you can also buy yourself a silk scarf or actually make one yourself.
super!
Thanks! I marvel at all the details each time I look at it…
This is marvelous, can’t take off your beautiful quilt. Congrats!!!
I constantly marvel at the details that eco printing gives me; and that’s coming from a person who has painted and drawn pretty well all my life. So many possibilities! I have a bunch of my ‘makings’ up in the shop Happy making!
Hello again – your website is an amazing resource. I’m a quilter and have never heard of this method of making the quilt sandwich. It seems a good way of doing it though and you don’t need binding. Thank you.
Irene
Muchas gracias, tus explicaciones son estupendas y muy inspiradoras. Eres genial!!!
Ich staune immer wieder über Deine Ideenvielfalt. Es ist unglaublich, was Du immer wieder Neues für uns bereit hältst.
Viele liebe Grüße
Are you impressed that I can read that?! Yes! I understand German, it’s my mother tongue! Vielen dank! Thank you from Canada!
Barb, you are an amazing maker in so many mediums! This tree motif quilt speaks to my soul. Trees are my source of calm and solace. Your combination of theme and leaf motifs is just splendid!
The quilt pattern download button is no longer functional but I would be happy to purchase the pattern from you if it is available.
Thank you for many hours of delight at your website!
It’s a funny story; as I seem to keep circling back to images of trees too! I have my oil paintings of forests on the walls and now print with leaves. I even cast leaves in concrete and embed in resin. I guess it’s my style. I guess it speaks to my soul, better that than just mimicking the trends that are not authentic. ‘Glad you enjoy!
Wow… It’s very beautiful ❤️❤️❤️❤️
Thank you! Sometimes simple colour schemes help to relax the eye and mind.