
Crazy Carved Easter Eggs

Another Easter holiday and I’m excited to decorate… It might be a bit late but I’m sure it can be done. The chic simplicity of white is so refreshing. These super impressive carved easter eggs are simpler than you think. It’s my exclusive design. See it first here!

Yes, I know that I might have waited until the last minute but sometimes ideas come to my mind when they feel like it. AND I actually tried another version of this first; the ‘real egg’ drilling kind. I went to great lengths to use a dremel and drill ever so carefully to then have one little hole crack the shell. Oy, much too delicate and time consuming!
Reality:
So, forget the real eggs! I remembered I had bought some fake eggs last year that claimed to dye like real ones. I had marvelled at how real they looked too, barely a noticeable seam line. I’d rather have real but sometimes practicality wins out.

How cool do these look?! And they cost less than real eggs! ‘And they boast that they are fully recyclable. They are available online as well. They also come in a quite large size!
Love My Tools:
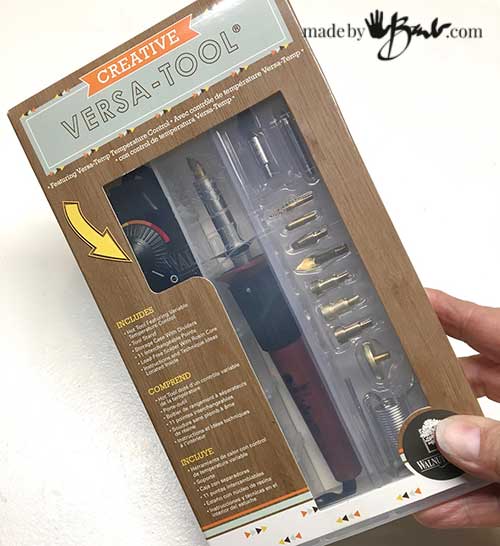
Another thing that sparked my idea was a tool I have been itching to ‘crack open’. As a kid I used to do wood burning and this ‘Versa-tool’ is a deluxe version of that. Dremel also makes one.

The great thing is that these tools come with a lot of different tips and the knife tip will allow cutting any plastic almost as easy as ‘cutting butter’. That part is called a ‘hot knife’. It is also very helpful to be able to adjust the temperature of the tip.

The Designs:
For some strange reason I tend to be in a hurry all the time, trying to get so much done. Many of my designs were figured out as I went along. It’s up to you if you want to be exact or not. ‘Pysanky’ are very controlled and I did not want to invest that amount of time. These eggs are a matt finish so they take pencil drawing the rough design well and erasing quite easily. Whatever type of egg design you choose make sure to keep some framework so that it does not fall apart.
To aid in pattern making you can use elastic bands to make divisions quite easily.

The Hot Knife Cutting Magic:
The nature of the knife blade makes cutting wedge-like shapes the easiest. At the end of the cut you can just ‘flick’ the piece out. If it sticks to the blade have something handy to wipe it on. If the plastic is getting too soft and ‘stringy turn the heat down a bit. I use the medium hot (3/4 of max) setting.

During the egg carving only a small bit of the blade tip actually goes onto the shell since the plastic shell is quite thin. That allows some nice curves to be cut as well. I found it easier to turn the egg than the knife at times. Be aware that you must NOT TOUCH the front of the hot knife!


Crazy Carved Easter Eggs
Equipment
- Creative Versa Tool (Hot Knife)
- Pencil
- Eraser
- Metal Spoon
- Round-head Pin
- Tea Light
Ingredients
- Faux (Plastic) Easter Eggs
- White 'Crayola' Crayon
Instructions
- Gather your materials
- Plan your design, draw it lightly on the egg
- Plug in and rest Hot Knife on stand to heat up (3/4 full heat)
- Carefully holding the hot knife tool follow the lines drawn to cut out shapes
- Finish cutting all shapes
- Melt some crayon in metal spoon elevated over the tea light
- Poke pin into eraser of pencil and dip into wax
- Make dimples on eggs in designs as desired
- Erase pencil lines or carefully wash off.
The egg is quite sturdy even when much matter is cut away. There are so many options of designs and also the possibly of images. Patterns can be inspired by lace or graphic design or anything… (hmm, just thought of a few more ideas)

The Embossing Secret technique:
Well, if that was not enough… I also wanted to have extra detail look of embossing. My mother used to say I always designed everything, ‘I could not leave well enough alone’ – what is wrong with that?!

There are some nationalities who take egg decorating quite seriously. As well as using special wax to emboss with. I tried a few different waxes, but I wanted something that was readily available. The good-old crayola crayon worked the best.
A metal spoon suspended over a tea light worked out just perfectly. You can adjust the height to prevent burning or turn away for a bit.

The Ingenious Special Tool:
There are special tools available but I did not have the time to wait. Soooo, I just stuck a round-head pin into the eraser end of the pencil. Holds well and can be dismantled afterward.

Dip & touch, dip & touch… Perfect little dimples that harden right away. How perfect is that!?

These little dimples add such character and much easier than carving wooden eggs.

This subtle dimpling is so exquisite that it could decorate enough even without the cutting or before a dip in dye. Hmmm, more ideas. If you drag the tip it will make a little swoosh.
Designs can be quite simple as the repetition makes any shape a pattern.

I like some relief from colour as my life can be so hectic. White will always look fresh and serene! But, imagine some teal paint after cutting and then white embossing… Hmmm.

Keep the decor easy for Easter celebrations!. Go grab that brown paper (from the packing of all those online purchases) and run it through the pasta machine – instant pretty Easter Grass!!! Not that awful coloured plastic stuff. Perfect!
And guess what; these eggs will last til next year and onwards. I just won’t want to put them away. If you drop one it will not break either!
I’ll have to give some away to warrant me making some more; as it was just too much fun. Happy Easter and keep making…
Don’t you need a mask when burning into plastic? My experience is that toxic fumes are emitted as the plastic melts. I’d love to try this but definitely suggest in a ventilated area with mask.
I did not find that I noticed any fumes, but yes do work in a ventilated area.
Your carved eggs are soooo timely! I am trying to think of something different this Easter to help the Easter Bunny with baskets this year! Thanks for the instructions. You always make things so understandable! I only have one question…are the crayon “bumps” dimples or pimples??
Thanks! I love these eggs! The bumps are protruding, so even a thick paint could make a ‘pimple’. I could even envision some pastel colours… there goes my vivid mind again!
Barb, you are the Best! I just finished wrapping plastic eggs with strips of print fabrics, they are very colorful and all you need is cotton fabric from the stash and hot glue to hold it down as you twist the strip and turn the egg. Now I need to go to the hobby store and get another dozen eggs so I can carve them, I have the white Crayola. Thanks so much for all your special ideas.
Candace Barr,
You can dye the real eggs with silk ties too. Have fun!