Concrete Faux Bois UpCycled Chair – Part 1
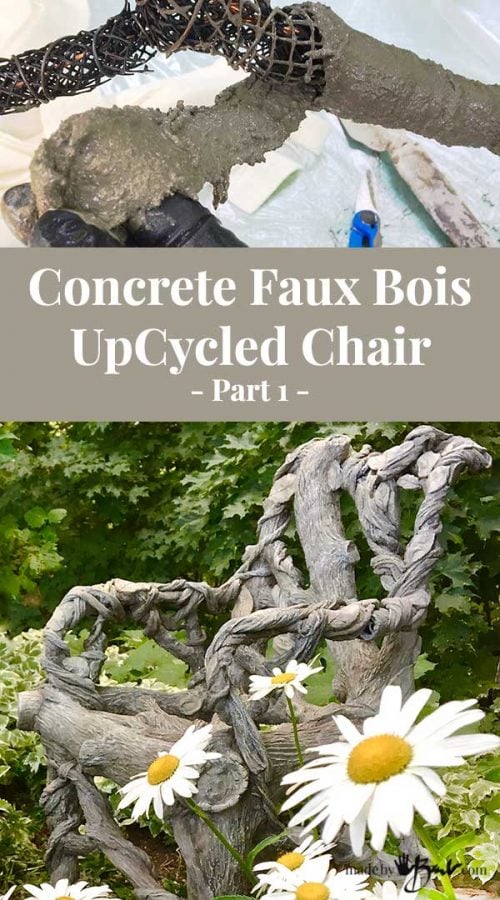
This concrete takes on a new form as it becomes a bit french; Faux Bois which means fake wood. It lets me take concrete design to an even more tactile interesting level. This detailed project spans a few stages… But let’s get started; Part 1 of making this Concrete Faux Bois UpCycled Chair!

The Frame:
I have always marvelled at some of the amazing Faux Bois furniture that has been built by artists. It does however usually involve a welded heavy frame; something that I don’t do (maybe someday!) yet. However I did save a couple iron chair frames that are sturdy and have lovely lines. I knew someday they would hit their full potential.

As you see, they did not have any seat or back since they used to have rattan there. I have seen many a chair with this fate but now they will be a perfect starting point.

The Materials:
There are many ways to add some structure on the frame to hold the concrete. I chose to use whatever material I had on hand; wire (thick & thin tie-wire) metal mesh, plastic gutter mesh, hardware cloth etc and some filler like pool noodles and styrofoam. Only some basic hand tools like pliers, wire cutter, xacto knife, gloves are needed.
I made myself a raised platform (few mild cartons) to be able to work easily as a table would be too tall and the ground too low.

Oh, and did I mention pool noodles too? I had some images of branches in my mind so the round shape would work well. They are hollow in the middle and cut easily to allow placing over the wires. You can even use some pipe-insulation. The rules are pretty lax here.

It’s a Wrap!
Wrapping the mesh and filler around the frame was done with the tie wire. Here’s a tip; to give it a sturdy start make a hook that can be anchored into the mesh or styrofoam.

The Branch & Wood Designs:
Go look at some trees, really look. Branches are usually reaching upward and get thinner as they go. Alternatively they branch out etc. Trees are usually not symmetrical or perfect. I planned a thick branch to travel up and across and added new branches across the seat by first tautly stretching and twisting strong wire. Envision that there will be thicker branches there eventually. Any styrofoam can be used as it will allow it to be lighter and not absorb any moisture in the future.

The leg is like a tree base and curving along. Luckily I have much inspiration available all around me but you can even use the look of old driftwood.

Make sure everything is secured tight and no wires poking out. The plastic gutter mesh was very easy to work with but chicken wire is very similar.

There, do you see the new branches travelling across the seat?! The pool noodles are wrapped tightly with wire as well.

Can you imagine it? DOn’t be too fussy as there will be ways to liken it to branches even more later.

I had some ‘sneaky’ tricks that will help transform the arms later on so I left them for now.

Utilizing Fabric with Cement:
You may know my Step Spook, he has held up great so I am utilizing this draped concrete method as a base coat. To start it is key to find the right fabric as my draped concrete tests as taught me. I prefer something with some way to absorb the portland cement but not be too fluffy and bumpy. An old polyester blanket was just right, thin but takes the portland nicely.

As with the Step Spook I used a Portland Cement slurry. It’s about the consistency of thick cream. If the portland is lumpy it helps to put it through a sieve.

If the fabric is very absorbent it may ‘steal’ the moisture from the concrete but I found that this could be added dry and massaged into the Portland mix.

Let’s get messy!
My intention with this Faux Bois is to wrap the branches well with the cement dipped fabric. Using thicker or thinner strips spirally wrap the branches smoothing as you go along.

This will be the first layer so you can be less fussy. I like the smoothness of the portland cement as I find the sand tends to not get absorbed.

It’s already taking shape… you just need a vision! As long as you can see it, is all that matters! Any parts than seem a bit thin can be coated with some of the Portland Cement slurry painted on so that once cured it’s a good strong shell.

I bet some of my neighbours were wondering what I was doing out back each day. It’s messy sometimes, so I keep these jobs for summer projects outside. Keep the mess down with some of my tips. You should wear a big apron and my new tip; double nitrile gloves!

It’s been brutally hot here so I covered the chair lightly to allow the portland not to dry too quickly as it cures. I even mist it regularly to strengthen it.
It’s not done, but the hard work is done! The next steps will take it over the top! I promise! Won’t you join in my journey of making beautiful permanent furniture out of something that could have ended up in the landfill! Let’s all make a Concrete Faux Bois UpCycled Chair…
Looks fantastic as usual Barb cant wait to see the finished masterpiece. Only the table and 5 more chairs to go hahaha. Alice in Wonderlandesque 💙 Half way thru my lil witch but the weather here in Perth is cold n wet so waiting for some finer weather.
Cheers Kaz 😊
Thanks! A Table; possibly! Concrete doesn’t mind a bit of humidity, that’s better than super hot. I’m now obsessed at looking at all kinds of wood textures. Artists don’t only improve their ‘making’ skils but mostly their observation skills!
Wow! I love, love, love this! I too have been admiring the cement Faux Bois furniture of old and have been wanting to give it a try, but like you, I didn’t want to deal with welding metal. Great idea on starting with a frame of an old metal chair! The plastic gutter mesh is also a great idea. Looking forward to part two of this project!
Yes! even other pieces can work. I’ve got my eye on a table… and oh and then there’s planter ideas… if only there was an off-switch. ‘Sometimes I need to just sleep!
Love, Love this – Thank you for sharing!!! Can´t wait for part 2
I’m happy many share the same enthusiasm! I’m channeling my inner ‘Mother Nature’! If only ‘life’ would not get in the way of making cincrete!
Wowsers! I don’t know how you come up with this stuff, but this is spectacular 🙂 Can’t wait for part 2.
Love this! I’m in search of an old metal chair now. I’m anxious to see how you finish it, especially the top of the chair. Great idea and craftsmanship!
When you think about it (always in my head) it does not even need to be a chair, could be anything that has some sturdiness and good lines. I’m eyeing a table…
GASP!!!! ….. this is amazing ….. can’t wait to see the next stages!!
I sure wish I were your neighbor Barb………I would be at your house all the time…….I hope not getting in the way, but working with you instead. But since I’m not your neighbor, I want to thank you for sharing your UNIQUE projects with us, clearly and step by step!!!!!! You are a gift to us all!
Funny you should say that; I did have friends that had requests from others to be able to come along whenever they would come over; many many years ago. Part of that led me to start this site, making it easier to provide instruction. Thanks for the kind words! Spread the word so I can continue doing this.
Just started following you a short while ago and I must say you are a great teacher and an inspiration! I have taken a couple of your ideas and created my own projects from them, sometimes it just takes someone to give you that ‘right idea’ for the light bulb to click on! I enjoy your work and the detailed steps you post, very easy to follow! You are a talented lady!
That’s a nice compliment. I think my experience teaching in post secondary over 20 years has helped me understand what usually are the issues.
Love this! How do I see the next step?
It will be posted as soon as I get it written and will be linked from part 1. Lots of photos to edit…
I am so blown away by your ingenuity and talent. Amazing.
Thank you so much for sharing your ideas and talent
Thanks! I liken it to being really stubborn to get things to work out! Lots of practice does help…
Wow! So inspiring. I can’t wait to see the next parts. I’ve been making rhubarb leaves, for a waterfall feature, then made the spook as per your instructions – my husband was so awed that he thought we needed to chain it to the step so no one would steal it! My next project is to crest a giant geode shape for my front garden to be lit inside with our house number. I couldn’t figure how I would get large enough numbers for the inside, but this post has given me the idea to make the numbers look like drift wood! I’m eager to see the next parts of this chair in order to be inspired and instructed in making faux bois house numbers! Thank you again for such wonderful instruction and inspiring website!
Soon I’ll be seeing my spook sitting everywhere! Did you see my post for house numbers ? It always fools people. Happy making!