Botanical Relief Casting in Concrete

I’m not sure why I think everything is ‘better in concrete’ but here we go… I figured out a way make Botanical Relief Casting in Concrete so it can be beautiful forever!

And so the Casting Starts:
I though that maybe I could just use concrete in my pressed clay just like the plaster… Well, that did not end well – it would not come out. It may be that the concrete heats up during curing, or the oil base clay does not play well with concrete.
Anyways… I’m determined so I first made the master casting of plaster or Hydrocal casting and then make a reuseable mold of it. This way I could also make sure that the ‘masters’ (the ones used to make the molds) are quite perfect. I can fix any bubbles with some extra brushed on plaster mix and sand out any bumps. (video coming soon)
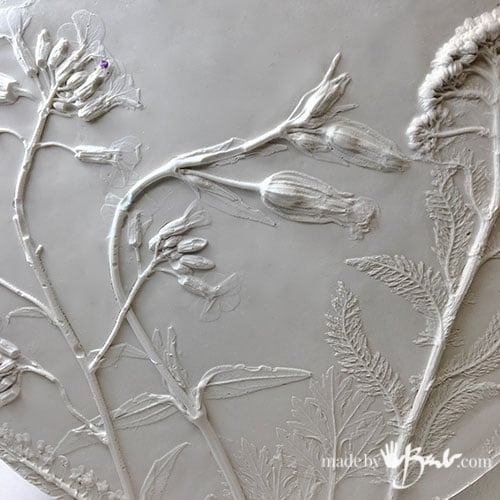
When I design the arrangement I like to ‘futz’ with how each leaf etc is placed. (that’s the artist control freak in me) It’s so much fun. I also decided I like Hydrocal much better than the cheap plaster. It will hold much better strength and has a much smoother finish with less dusting afterward, not to mention less tendancy of bubbles. There are sculpture supply or pottery supply places as well as amazon. Hydrocal is a mix of plaster & Portland cement, no wonder it is hard.

Choice of Plants:
So now when I take the dog for a walk you will see me bent over touching & feeling all kinds of leaves and plants. Yes, pretty well anything will print but the ones with a bit more definition of veins or thickness will work so much more dimensional. Flowers are very delicate and thin. The Allium blooms were like big ‘fireworks’ but did need a bit of thinning so to not be too deep into the clay. It may take a bit of experimentation. I often have a few flubs to get the hang of things… really. If you’d rather just buy one check out the ones I’ve cast so far
Before you make the mold:
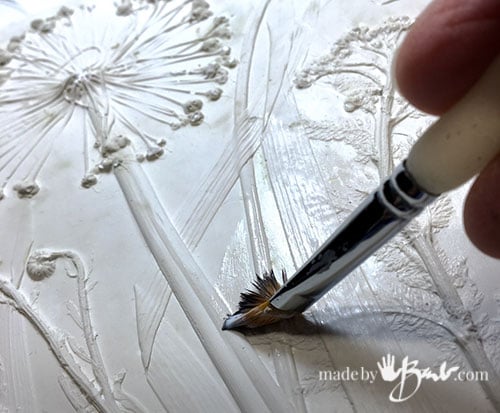
Whether you use the plaster or the Hydrocal, the ‘master’ needs to be sealed before using a mold material. I know the hydrocal is really smooth but I did not want to chance anything sticking. I used a gloss finish ModPodge to seal and provide a non absorbent smooth shiny finish. Make sure to brush well so that the details are not filled with the ModPodge, thin coat as possible. Let dry well.

Mold Release Agent:
Some consideration should also be made for how the edges will be (before the outside barrier). I could make a large box to encase the entire master but I wanted to make a few molds so I decided to keep the mold as a flat shape so I put a barrier (masking take) around the shape I was casting for the mold. I can late place the mold into a shape for pouring
To be sure there is no sticking I use a mold release. I have made a Mold Release with Castor Oil and rubbing alcohol (about 1 : 5 ration). I have been loving it since it thin, no spraying toxic stuff around and I know what’s in it. The alcohol evaporates quickly so it leaves a thin coating.

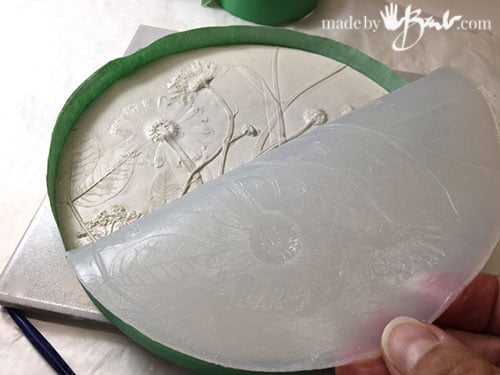
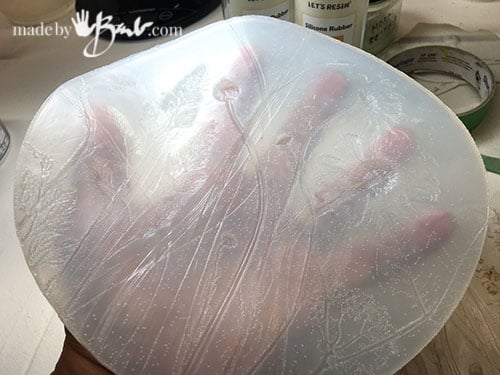
The Magic of Mold Making Silicone:
Yes I have made plenty of molds with the cornstarch and silicone caulking but this time I needed something different that would capture all the details. .
I used a pourable silicone material (clear silicone is unavailable) that did not need a degassing chamber as it boasted to not have bubbles. It is a simple 1:1 ratio measured by weight. Use a good digital scale to measure and stir carefully without bringing too much air into the mix. It is translucent so I could see through. Make sure that the mold pour is at least 1/4″ thick and none of the parts are above the silicone. Thicker is better but also more expensive. Make sure everything is level!
Wait for the Magic!
It will take about a half a day to cure depending on the humidity. I like to check the leftover in the mixing cup instead of sticking my finger in the mold. Once cured, it peels back really easily. Maybe I do not need a mold release…
This mix is really easy to use but I am sure many brands are similar. It boasts that there are no bubbles and the only ones I saw are ‘inside’ the mix, not effecting the casting.
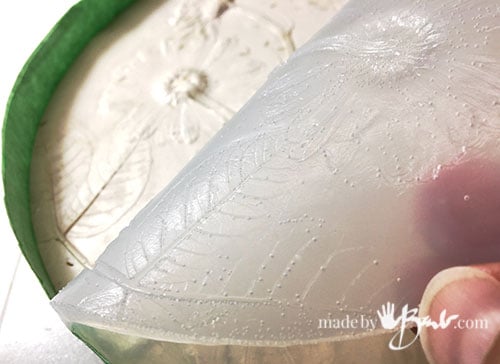
These silicone molds are very flexible but strong. They can be washed and cleaned.
Pouring the Concrete:
Congrats! You now have a mold. Once you are happy with the mold, you will need to put it in the shape that you are casting. I placed it in the proper fit frame and make it level.
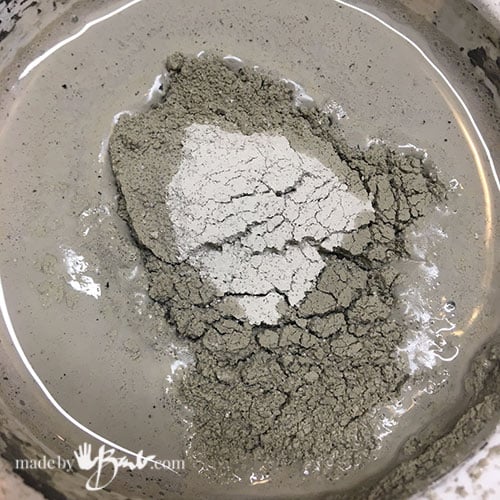
When mixing the concrete, treat it like plaster by adding the mix to the water. (remember to wear a proper grade dust mask for working with concrete powder) Sprinkle it on top until it does not absorb any more. Give it a minute to let the water penetrate and then mix without adding bubbles. This Rapidset Cementall mix is a quick setting strong mix. There is no aggregate as it is a high strength mix. Another option that seems quite viable is just using portland cement as it is very fine and has no sand. I have yet to test it.
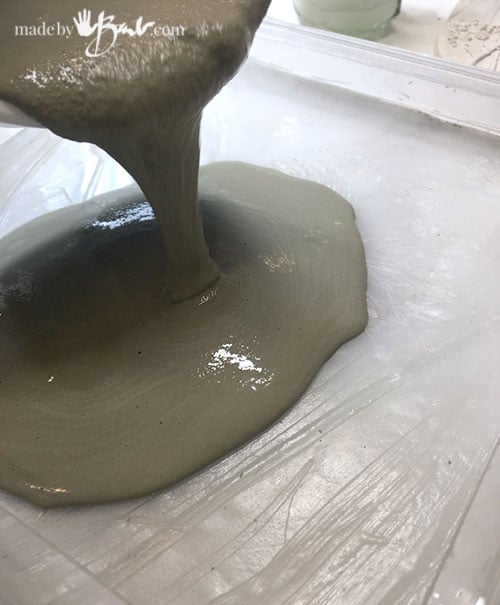
Pour it into the prepared shape with the silicone mold in the bottom. Tap and make sure it has flowed across well. I tap and bang and hit the mold with a rubber mallet so that bubbles can rise. It helps to put the whole frame on a ceramic tile or board so you can pick it up to tap. Bubbles are the enemy!
Lets’ Hang around:
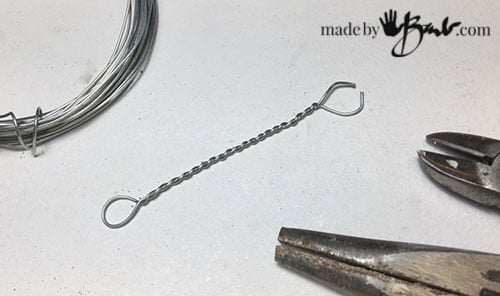
There’s many ways to use these tiles and hanging is probably the easiest. To make a hook I double twist the aluminum wire and curve the ends.
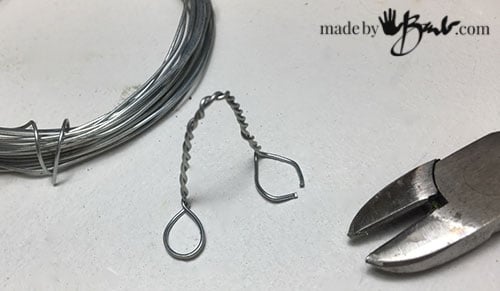
Then bend it into a ‘U’ shape and flatten the ends so it will stand. Sink this into the top area of the tiles concrete when wet and it will stand until cured, then bend as you like to hang on a nail etc.

Ypu can now make as many as you like from this mold. You can also use it for the plaster or Hydrocal. I do use a the Mold release just to be sure.

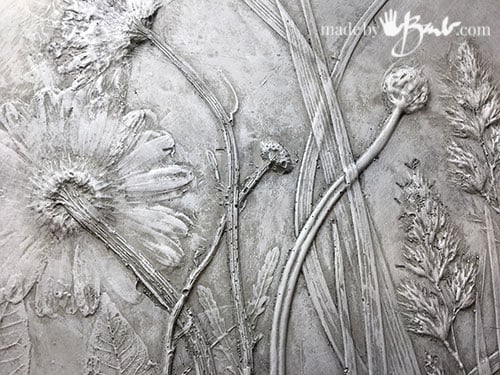
Ah the circle! It’s a simple shape and has no corners to chip or bang. I think it’s my favourite, but then again I’m quite an orb girl! This is uncoloured Rapidset Cementall which tends to be a light colour mix. You can also tint the concrete with some concrete colour. I’ll admit; I much like the simple grey uncoloured casting as the texture & design are the stars here.
‘But, as an illustrator I do have to try some painting techniques… If you’d like your own I have a few to spare
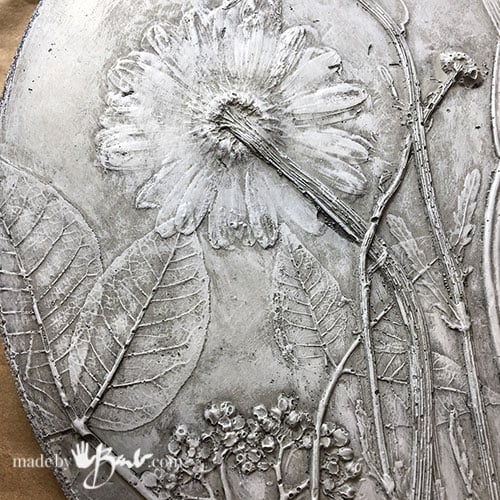
Even though this is concrete, not cast from the clay it still has great details and texture. I am quite happy with the level of detail the silicone mold has been able to pick up from the ‘master’.

There’s just something about being able to inspect so many fine details. It reminds me of the German B&W macro photographer Karl Blossfeldt. There’s no limit to what you can find… press… cast & mold! No drawing or special skill needed; just your eye for what design you think looks good. Have a go… and let me know how much you love it. Since perfecting the instructions usuallu involves a lot of time & money; check out some that I’d love to share to offset costs.
I would love to buy a few of these to hang on my side garden fence. How do I go about doing that? I find them very beautiful!
I will be putting some on Etsy soon! I am in the process… ❤️
Hi there, you have been an inspiration to my art! I am curios on your bass relief tiles! The first step is to press the leaves into clay? Plasticine?
Thanks. Steph. Looking forward to experimenting with this!
Haha, there is a link that shows that process to make the plaster master tiles! Yes, casting the masters first… It’s super fun!
Barb,
I love,love, love this. ❤️❤️❤️Thank you for sharing your talent and knowledge.
Gail
Barb,
I am constantly amazed at the different projects that you come up with and this is no exception. I love it!!!! Looking forward to more.
Shirley
Ya, I think I dream in ‘concrete’… 😂
Again you amaze me with your determination to get it right and your quest for learning something new. You are an artist in the truest form.
Because of reading your posts and learning from you, I have shared your simple process of making draped pots with my horticulture club. We had a blast mixing the cement and my yard had dozens of pots drying in all different sizes and shapes. One lady even made her’s into a rabbit with a chicken wire sculpture.
Awesome! A sight I’d love to see! It’s almost like playing in the muck as aa child…
Wow, you keep amazing me with your talent and creativity. This project is absolutely gorgeous. Thanks for sharing
Thanks! I must say; it has become quite the obsession lately. There’s containers of plants in the fridge all the time!
Soooo fun BarbMaker! Do you know if these would be strong enough to use in a garden path? I’m guessing not.
If you make them thick enough and from a good dense mix like Rapidset Cementall I bet they would do well. It’s worth a try! Use larger plants for more thickness.
Oh, Barb! This is the best idea you have ever shared. I love it because the lovely details are taken directly from nature and because they are permanently preserved. I am (for me) speechless; everyone who knows me will thank you. nv
Sounds like it’s the start of something…
I’m working on these! It’s so much fun and I LOVE the way they are turning out! Thank you for your generosity in sharing how to make projects such as these.
That’s great to hear! I have to stop my self from collecting more & more plants. So many options…
I started practicing today and I have a plan for groupings of step stones! Flowers (I tried sunflowers today, but I ended up not having enough clay and the beautiful petals didn’t really come through enough for my taste.), vegetables and their leaves (think broccoli with the wonderfully veined leaves to little broccoli florets, carrot leaves and stems, cabbage, etc. herbs for several stones, maple tree leaf varieties and more! I can’t get started soon enough!
Thank you again!
Yes, as soon as you start you’ll look at all plants in a new light. ‘And yes, some petals just don’t hold enough thickness unless you do some faux adding of depth. Fun wow!
Barb
My Girls and I (all who are Master Gardeners of SouthEast Missouri) follow your concrete things. We have been doing concrete now for 3 yrs. we love this new project you have created, Our love of plants makes this out next project to try. The question we have is.?
How much of the pourable silicone did you use for one mold.?
How much of the Hydrocal did you use for one mold?
We don’t want to mix too much or little to save cost and waste.
Thanks Barb
I’ll admit that I do not like to measure that much… But, if you want to spare using too much yo could do the trick of using water first to see how much you’ll need. The brand of mold material will state what they suggest as the minimal thickness. Oomoo is also a great silicone. Hydrocal is quite strong so 1/4″ thickness was adequate.