How to Grout Glass on Glass Mosaics

If you have enjoyed creating the glass-on-glass mosaics art you will want to know how to finish it. The next step brings out such amazing definition. Let me share how to grout Glass on Glass Mosaics.
What Can you use?
To fill the spaces in between the odd shapes of glass you can use a grout or even other tiling products like thinset. Grout is an industrial product usually used to fill the spaces in between ceramic tiles on floors or walls. Grout is usually available in a sanded or un-sanded grout version. My first thought was that I did not want to risk scratching the glass with the sanded version but that really does not happen. The formulations of grout often have a polymer addition for strength and adhesion and can also include cement. The sand is like the aggregate that makes concrete stronger so it is advisable to use a sanded Grout.
Do not confuse Grout with Mortar. The adhesive that bonds the tiles to the base is called a Mortar and since I worked on glass I used the clear silicone as my preference of adhesives on glass.

Another Product that can act as a space filler is also thinset. It also has some sand in it and often has polymer for adhesion. Thinset is versatile since it can also be used as the base to adhere opaque mosaic tiles on a substrate other than glass.
Versabond Thinset:
I did a few tests (as I learn a lot by trying) with this to see how it compared to a grout. I (yup, I’m stubborn) had used it to tile a bathroom floor and it has held well for years. Tinting grout with acrylic paint was also something I wanted to try.Eventually I will be trying some variety of things to make mosaics so I wanted to test the bonding. This brand of Thinset states in the manufacturer’s instructions that it can be used for outdoor exterior use mosaics.
The stones and glass adhered very well and adding the colour also worked well. I used an artist acrylic paint since I only needed a bit. This thinset has excellent workability with quite fine sand in it.
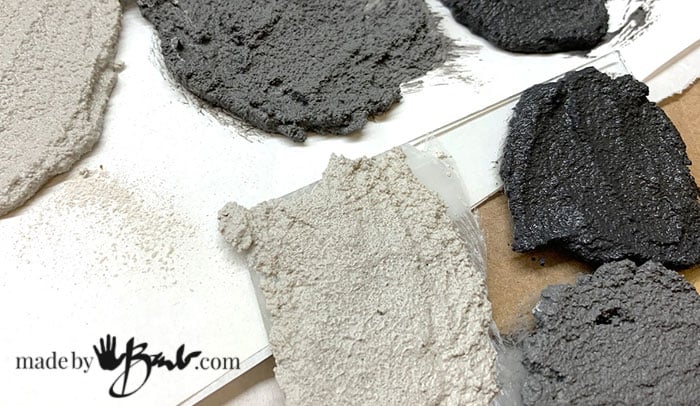
Mapei Sanded Grout:
The grout that is available locally at Home Depot is Mapei Sanded grout. I also tested if it would allow darkening the colour. The addition of the paint did significantly darker the colour to my liking. You can also buy this grout in various colours.
I decided to use the Mapei Sanded grout for this project. Both products did cure (not just dry as there is cement that needs the water to cure) really well and hard.

It is always a good idea to read the instructions on the package. The grout powder is mixed with water to a consistency similar to peanut butter. (use a dust mask when working with the pwder) Be careful to not use too much water as it can cause the grout to crack when curing. Let it sit for a few minutes (to activate the polymers) stir again and then use. At that point I mixed in the bit of black acrylic paint.

How to apply the grout:
There are many ways to get the grout into the spaces. If you have professional tools like a float you can use it or just whatever you have on hand that can force the grout into the spaces. Make sure to wear rubber gloves. Inexpensive kitchen spatulas can be useful or even just a gloved hand. When spreading enough grout over the surface of the design be aware of possible sharp edges.

Spread it well but do not over work on the surface. Pressing helps it fill the small spaces.

Make sure all spaces are filled, a gloved hand will help. For this reason it is advisable that the thickness of the tiles and glass is very similar. Let it sit for a bit of time (about 30 minutes) so that it can start to cure.

Using a damp sponge wipe the surface without being to aggressive. Do not add excess water on the surface with the grout sponge or the grout will weaken. Skim across the surface and rinse the sponge in a bucket of water, not the sink. Be very careful about this type of product not going into the drains and creating plumbing issues.

Once the surface was getting cleaner, a dry cloth/rag can take off the last film with circular buffing.

Fold the rags a flat as possible to keep it from digging out the grout. The idea is to just remove the thin grout haze from the tiles. Refold it when it gets soiled.

I love seeing how it looks after the grouting. It is now so well defined as the dark spaces act like an outline for the mosaic designs.


How to Grout Glass-on-Glass Mosaics
Equipment
- Mixing Container
- Mixing Stick
- Rubber Grout Float (or similar tool)
- Grout Sponge (or similar sponge)
- Clean Soft Rag or Towel
Ingredients
- Grout
- Water
Instructions
- Prep surface area for mess. Fill Bucket with clear water for sponge and hand rinsing.
- Read the manufacturer's instructions for how to mix the grout. Mix just enough grout that can be used within the recommended time frame. Grout may dry quickly.
- Using a rubber grout float or other rubber tool (spatula) apply the grout to the mosaic. Spread the grout over a small section of the mosaic keeping the tool at a 45º angle. Push the grout into the crevices.
- After filling all the spaces between the tiles, use the rubber tool to scrape off the excess grout from the surface of the tiles. Working at an angle will make sure not to dislodge any glass pieces.
- Let the grouting set for 15-20 minutes (or according to manufacturer's instructions)
- Using a well-rung damp grout sponge to wipe away any excess grout from the surface of the mosaic. Be gentle or you may scratch the surface of the glass art. Rinse out the sponge frequently. A circular motion will help from taking out too much of the grout from the crevices.
- Once the surface has been wiped well enough use a dry or slightly damp soft rag to clean the surface.
- Make sure to allow the grout to cure completely according to the manufacturer's instructions.
Consider Types of Glass:
When I look back at this design I came to some conclusions. Glass is available in more opaque and transparent colours. Even when a glass is a light colour (like white) it may look darker if it is in a window. For that reason it is important to know where the piece will be displayed.
Since this the Glass-on-Glass version I concluded that the best to use is the transparent glass; the more opaque is great for solid surface mosaic designs.

Setting into the frame:
To set the glass art into the frame there are 2 options. Depending on the frame the grouting can be applied when secured in the frame or afterward. I used some glazier points to secure the piece into the frame afterward. If too much pressure is against the glass in a frame it may break more readily than if on a flat surface.

I am very happy with the result! I may consider sealing the grout but do not think it is necessary. If there is any residue left a light buffing with a fine steel wool and dry rag will take it off.

This frame was up-cycled by getting a new coat of black paint. This eliminates the problem of finishing the edges and also makes it more stable & secure. The fact that it is not ‘super perfect’ makes it more abstract.

Notice the difference when it is set in a window? The light blue/green glass is actually darker now. If there’s concern of any moisture or stain resistant a sealant can also be applied to the grout. Generally indoor mosaics are quite stable.

I know that stained glass may be losing some favour nowadays but I think it’s beautiful. Adapting more modern colourways and designs can certainly bring them back! They have so many possible applications! What do you think?
Wow, what a beautiful project! Love the grout colour, it makes it all pop.
Thank you! It’s a funny thing; when teaching in the art college the young students always wanted to outline everything in black. I said if they felt it was needed it was that the values were not strong enough on their own. ‘But here it does add character, I’ll go with that…
Thanks for the wonderful project. You are so talented and I love getting your E-mails
I have the Versabond … makes me want to acquire glass shards!
Universal nuget of advice “values were not strong enough on their own.”
Back-lit and wall hung would be perfect.
Pine Island at Night by A .Y. Jackson would be a hit.
Oh, I do have a few of those battery light sets that are as thin as a wire. That would be quite easy to hide behind the frame. I love art that has reflections and shadows of colour, especially landscapes… I may give that a go!
Barb, I so enjoy getting your emails! You make the neatest things. This will look wonderful in 3 clerestory windows that I have in my dining room that get too much sun in the summertime. I have always wanted to do stained glass in them, but I don’t know how so this is perfect. Thanks!
I respect inboxes… So glad I’ve inspired you!
Hi Barb! I just discovered your website through an email I received from Apartment Therapy and I’m so glad I did – I love your mosaics! I can’t wait to try making one myself! And, the level of detail of your instructions is so helpful and appreciated!
I’ve never done mosaics, but I used to do a lot of stained glass work, so I have boxes full of scraps – I just have to dig them out of the storage shed. lol 🙂
One thing my stained glass instructor taught me was to buff the finished piece with car wax – it adds some protection and makes the piece sparkle! Do you think that would be a good idea for mosaics as well?
Thanks for sharing your wonderful artwork! You’ve inspired me to try my hand at a new craft!
Well, Apartment Therapy?! Strange how the internet works!(I’d love to see that) Oh, so this project is perfect for you then! Sure, the waxing would be great I bet and provide a bit of water resistance to the grout areas as long as it doesn’t end up staining too white. Perhaps it has to be a clear type of wax.
Your bee is beautiful. You are so inspiring. Have you ever tried to make a mosaic with eggshells? A friend gave me some wonderfully colored eggs. After enjoying breakfast I’ve saved the shells. They are too great to throw away…
I have not tried egg shells but I am sure it could be beautiful! Being a realistic painter for decades I am surprised how much I am enjoying the freedom of mosaics and even abstract… The more I accept the more I think I can visualize ideas in my mind!
I love your beautiful ideas! I made several outdoor DYI concrete orbs that I would now like to apply mosaic to. One is made with layers of concrete & tape over a ball & one is solid concrete. I sealed them both with a concrete sealer & they have survived two Mn winters. Given that I have sealed them, can you recommend what adhesive would be better for a mixture of glass, ceramic & stone pieces?
Thanking you in advance
Sue
I do wonder how much of the sealer is really still there as many re-coat almost every year. I do not coat mine. I have read that the Versabond Thinset can be used for exterior uses. But having said that I like to work by experience. My plan is to get going with my concrete ideas which also involve the mosaics. Perhaps it would be best to stick a few pieces on and see how they hold. If the thinset attaches to tiles it should attach to the concrete. Perhaps a bit of rough sanding will help. My mosaic orbs will be added to the garden very soon…
Love your work, just beautiful. Also love the way you explain everything is so clear,simple and to the point.
I’m getting ready to start my fisrt glass on glass and by following your tips on the process and getting the right silicone and grout I feel more confident. Thank you,
Jocelyne
Thank you kindly! Whenever starting something new be kind to yourself & don’t over-expect! I like to do small test pieces as I prepare… Best of luck!
Great instructions & videos! When doing GOG mosaics, do you have to grout it? What if you fit your glass pieces right next to each other using a good glue? Is the grout just decorative or does it actually help to hold the stained glass pieces in place?
I always think there are ways to customize the way that you like. Sure, if you fit them tight then grouting would not be needed. I would test the wood glue as sometimes the glue will not dry (or take a really long time to dry) since it will not be exposed to air. Also, will anyone run their fingers over it? Will it be exposed to the elements? Those are just things to consider….