How to Paint a Custom Wall Mural
It’s done! ‘Look at how stunning & dramatic it looks! This tutorial will explain how I took my design, transferred it to the wall and painted it; without a projector. Here’s how to paint a custom wall mural.

Why paint your own art on the walls:
I’ve had this idea in my mind for quite a while since did not really see what I wanted in any wallpaper choices. I also wanted to be able to pick my own colours (yes I am a bit fussy) and make it quite dramatic as well by having it very large scale. It does take a bit of planning and figuring out exactly what ‘speaks’ to you.
I realized that peeling wallpaper is not much fun so I didn’t want to do that again; another reason to use paint. ‘And oh wait; it is quite cost effective compared to ordering a custom wallpaper print.

Out with the Old…
This curved wall was always getting touched by my kids fingers so I wanted something that would not show any stains, marks, or finger prints. This old wallpaper did it’s job for way too many years! I did like the dark colours though.

Since my wall can stand alone as an accent, also made it a great place to put a mural & focal point. I did not have an excessively huge expanse to cover or very high reach. I could sit on the stairs as I worked which is perfect! The wall did need some filling as the wallpaper & border pulled off some of the drywall.

Hmmm, I see that there was some layering happening. The last border was put over the earlier one which may be why it was not stripped right back. Whatever your situation, make sure to prepare the wall well before paint. We know that preparation is key to good final outcome when doing any household paint job.
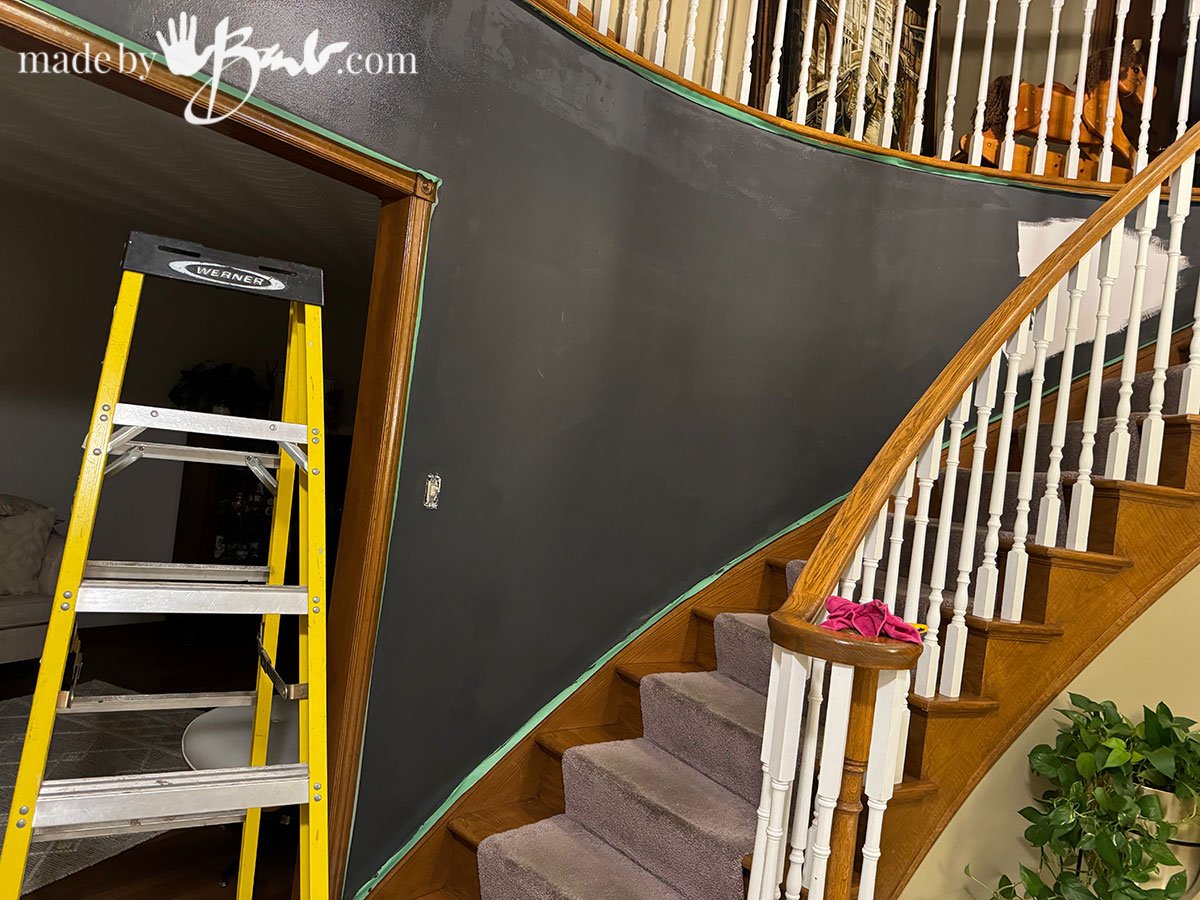
The Base Colour and Design Concept:
I chose another dark colour; ‘Cracked Pepper’ by Behr Paint. Since the wall is small and set against oak wood staircase I like the depth that this colour gives. (more reno’s coming on stairs)

When making my mural designs and sample boards I knew I wanted some way of adding an element of ‘motion’. The way gold paint changes depending on light would give me this. Everyone has their own rationale for choosing what they like. I wanted simplicity, little colour and options to blend in colours later if I like; essentially almost neutral – monochromatic.
The colours I used:
I kept the colour choices simple; only 3 colours plus the Cracked Pepper by Behr base.
- The light paint colour is True Taupewood by Behr
- The medium paint colour is Iron Mountain by Behr
- The darkest paint colour is Black by Behr
- Gold paint by Modern Masters
After some other interior painting I was very impressed at how well the Matt interior Paint covered a dark red in one coat. This Premium Plus Paint was great to work with!
The Design and Planning Stage:
It did take me a while to decide on my design artwork; do not rush that stage! Try sketches variations and look at them again another day until you are happy with the design. I measured it out and then made a miniature version template of the wall that is to scale. Scale is important as you want to make sure it does fit the proportion of the wall. There are many tools that you can use, whether digitally or traditionally.
I used a combination of Adobe Illustrator to make the template of the wall shape and then Procreate (with an Apple Pencil) to draw the lines. The software allows the use of layers to be able to help you draw the shapes or images that you like, as then you can ‘trace’.

How to Get your design on the wall:
As with any type of art there is the challenge of taking the chosen design and having it transferred to the wall. There is the option of using and age-old system of using a projector (over-head type or digital) to shine the image to be traced onto the wall. This would be difficult here since the wall colour is very dark. (See Video)
It is difficult to use a grid method since the scale is so large. If you are courageous you could draw freehand, but that would take some practice. If your design choice is not hinged on perfection then it is not that crucial to have very detail right.
I decided to try the Da Vinci App – Mural Maker. This app uses a system that employs 2 devices to be able to see what you are drawing on the wall by looking at a handheld device. It takes a bit of getting used since you look at a device but has quite the promise. I did have a few snags so I had to improvise as the wall is curved and also covered by the railing. I plan on using the app again for large area paintings.

Since my wall is dark I could not use a pencil, so a white chalk worked great. It is easy to see and wipe off if errors happen. It is also absorbed quite well by painting over. You could use a white pencil but most have some sort of wax in the lead which may repel the paint later.
In this method you require two iOS devices: one acts as a camera to live-stream your canvas, while the other displays the reference image you want to draw, allowing you to essentially “trace” the image onto your large surface by overlaying it on the live camera feed, enabling precise scaling and positioning without needing to grid out your wall or canvas. You can compare colours and shades directly on your painting surface with the reference image on your screen.
It takes a bit of getting accustomed to looking at the tablet/iPad while drawing on the wall though.

Draw on the walls!:
It was quite fun to draw on the wall with the chalk, and the design style was quite forgiving as well. Tip; If you do not want any criticism then choose a design that does have a finite sense of perfection, be kind to yourself.

Knowing that the chalk can wipe off easily allowed the freedom to add as I liked.

The drawing stage came together quickly once I figured out the procedure. That odd little drawing is the anchor that the app uses to allow you to move around in the design.

The Simple painting sequence:
Since I did not have a lot of area to fill I chose colours from the paint swatches and then bought sample size pots of latex paint. They actually cover a lot since the paint is so opaque it would only need one coat and I did not have to mix colours at all! I have used many types of acrylic paints over many decades and the coverage of these sample paints was fantastic. Simple artist brushes worked great.
There are reasons for my design choices… If you choose a very detailed type of art or image you will be more pressured to be exact. If you choose something that is less ‘perfect’ then you can be much more free to adjust as you like. That is a trick I use often in my ‘making’ since I have heard the expression ‘I can’t do that‘ way too often in my career of teaching art! Who ever said that everything has to be so perfect, add some imperfect charm!
The areas of value are quite random so I filled them in as I saw fit at the time. I did not want to be too botanically perfect, rather more abstract and impressionistic.

After adding the black and medium tone I also decided to add another neutral light tone. I liken this to filling in like a colouring book… and it was very therapeutic! If you need extra light have a lamp nearby.

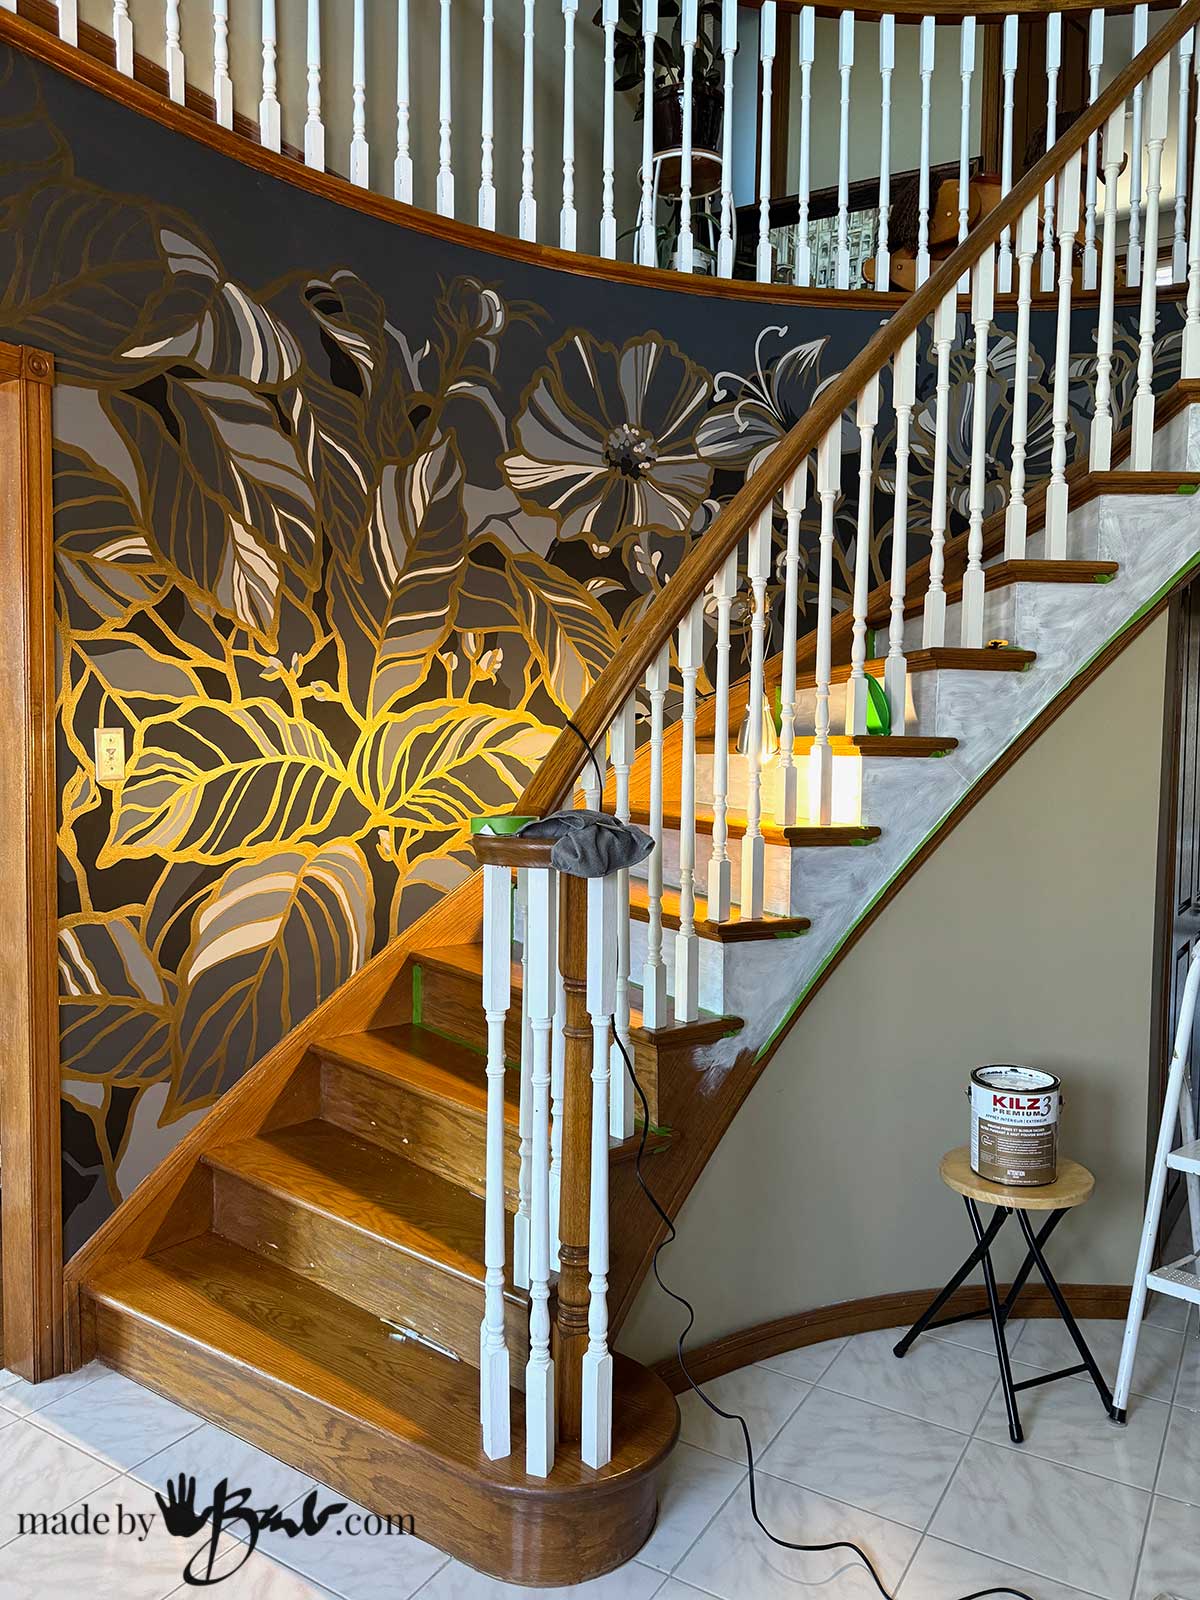
The Gold Outline:
I always look forward to the final stages where it starts to look amazing! The contour lines also have much variation in width which makes the task so much easier! In the illustration world that is called ‘Line quality’; a term for using the weight of line to convey some extra dimension. It is also much easier to paint when you there’s less stress of having a consistent line thickness = win!
The Modern Masters Gold paint gave me the brass colour gold I wanted but there may be others in your area. Look for a better quality of paint for more metallic particles in the paint.

The Gold Shimmer:
Since this is a metallic paint the light will react with it. That allows the art to look different depending on light and time of day. It is also quite dramatic against the flat dark Grey (Cracked Pepper) base colour.
After finishing the painting just take a damp rag and wipe off any extra of the chalk lines.

Deciding on the stairs redo:
Part of the hallway makeover is the renewing of the stairs. Since I can use software I like to visualize what it will look like before I commit to the painting of the risers and carpet runner.

That old carpet just had to go… Hmmm, what about the stairs?
Please don’t hate me for painting wood! I am going to keep the other mohogany wood trim. I believe that the future will have a resurgence of wood again as it will be cherished since more rare. Sand, prime and paint… not the artistic type though.

The painting white of the risers adds such a new sophistication to the dark wood stairs! I am so happy I did it before the new carpet was installed!

This front hall project was a labour of love! I am happy with the design and the colour choices! I believe the neutrality makes it be able to stand the test of time and it makes me smile every time I climb the stairs! The living room is also updated with the new Modern Coffee Table that I made.
My new eclectic style is unique to me; some modern, some antique and some abstract. It should not look like a furniture store… What do you think?
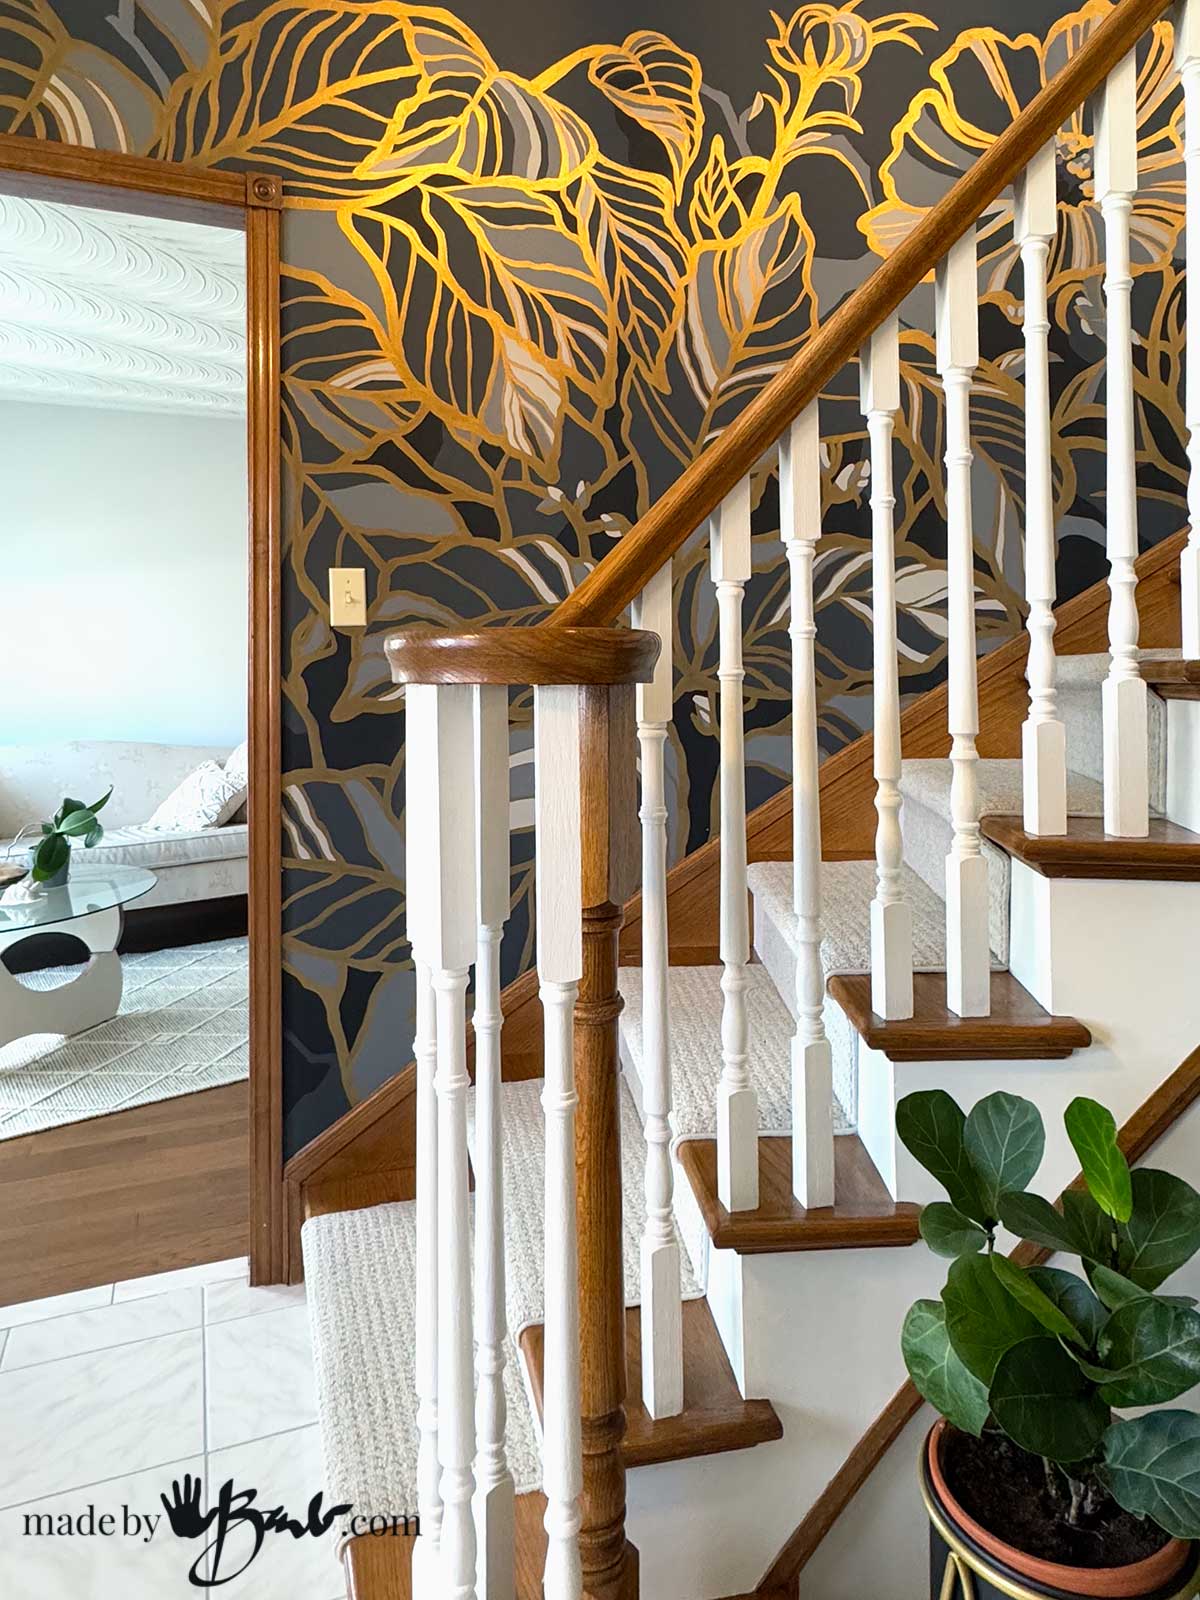
The final Hallway Makeover reveal;
This Mural painting, carpet installation and riser painting has given this hallway much ‘bang for the buck’. Most of this job was my labour so costs were quite low. I am so happy as it looks completely different and fresh!

The old ‘Grandma house’ look is gone, says the grandma who painted my own mural on the wall! If I can do it, you can too! Go for it and let me know how it goes…
Beautiful!, Hi Barb, I am not one for murals on walls but yours is absolutely beautiful! Not sure if I will do this to a straight staircase wall I have. I have a very small cape and I will have to think about it. I have two questions please. 1. What did you do with your wing back chair? Will you be recovering it and if so will you be doing a tutorial on it? 2. Is your stair carpet a berber? If not can you give the information on it, please? I have to redo the stairway that I mentioned before and I do love the simplicity of your new rug. :). Thank you for taking the time to answer.
Thanks! When I redid the floor in living room I decided to sell some of the furniture since I wanted to update. I’d had it for 35 years but was never really sat on. The pair went to a nice new owner. I would have covered them (I had done that once) but I wanted a different style. I had made a tailored cover by pinning/cutting fabric onto chair and then sewing. Reupholstery would be a crazy amount of work on a wing chair. The canvas cover that I had sewn wrapped around and flaps would be pushed into the insides of the wings to hold it. It still is a lot of sewing but better than reupholstery. These chairs were much easier. On another note, depending on the fabric, you can also paint them! I painted these chairs!
The rug is from Beaulieu Sultana II #A6761 Colour; Democracy #13238. I am very happy with it!
Thank you so much for the info Barb. I have my Aunts Thomasville wing back and the red velvet is no longer viable. I have a temporary cover on it but it is on my to do or to die list lol. I have been researching how to recover it and YES it is a daunting procedure. I just might end up making a slip on cover for it. The other thing I am considering is stripping it down to the wood and just remaking the back and seat cushion for it and making arm cushions for comfort. It is low man on my to do totem pole but the more I think about it the more I like the thought of stripping it. I have reupholstered my antique bamboo patio couch and two chairs that need that done again. Both chairs had scalloped backs but different designs and were. not hard to do. Thank you for the info on the rug it is perfect for your staircase and again your mural is gorgeous.
Fantastisch, Ihre Arbeit ist wirklich toll!
Dadurch sieht der Eingangsbereich modern und trotzdem Stilsicher aus.
Mit Ihren Tipps kann man es leicht umsetzen und ich kann meine eigenen Ideen, an die Wände bringen! Machen Sie weiter ich bin schon lange ein Fan.
Vielen Dank! Ich kann tatsächlich Deutsch lesen! (Fantastic, your work is really great!
This makes the entrance area look modern but still stylish. With your tips it is easy to implement and I can put my own ideas on the walls! Keep going, I have been a fan for a long time.)
Just stunning…I adore this post. May I ask, what is the gold paint that you used?
I used Modern Masters Metallic paint. It is a bit darker than the usual gold metallic acrylic paint. It does not take a lot of paint so it could be substituted with an artist quality paint. If desired you can darken the gold with adding a bit of colour. The best bet is to make some test panels as I did here. I hope that helps!
Beautiful transformation! I love the colours you’ve chosen and painting the staircase, with the lighter runner, really freshens it up. Well done!
Than you. I agree, it was a bit scary to paint wood but it was worth it. Probably the whole redo was under $1000.
Gorgeous! You are so talented!
Thank you, but I believe it’s more about being persistent… Erasing that self doubt is key; put in the effort & getting results.
WOW! What a beautiful wall! Such a dramatic change. Thank you for sharing your process.
Thank you! I love how it looks different depending on the light!
That is fabulous! Love your designs and this one is the best ever!
Oh thank you so much! Since I’m usually much more detailed I wanted to be different than my usual illustrative self. It is a challenge to accept your own design and not be too critical as it is on the wall. As a therapy I forced my self to hang my own paintings on the walls, and be happy how they look. Most artists are never really completely happy with their art as they strive to get better. That is completely acceptable…
This mural is gorgeous! I love the colors you chose and the extra large design! This is my all time favorite post you’ve done! I keep looking at my walls wondering if I could pull off such a thing.
If you are nervous, try it on a piece of cardboard or foamcore. The sample sizes of paint are quite inexpensive. I would say that making the decision of the style was the hardest part. Through the world of software (like Photoshop) you can see it pictured on the wall if you take a picture. Good luck; let me know!