Concrete Garden Orbs
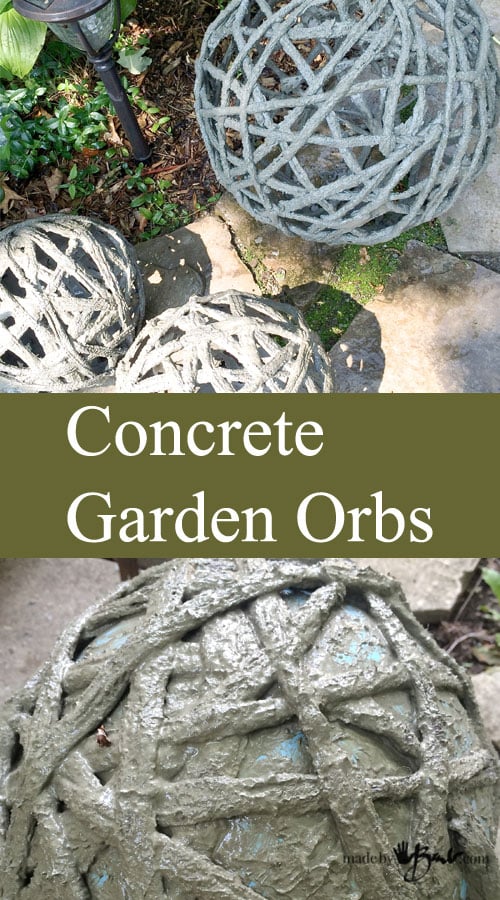 I was noticing that orbs are everywhere and for good reason; can there really be a better shape!? So that got me thinking in my ‘concrete ways’… I knew concrete spheres can be poured but how could I change it up a bit? Here are my DIY Concrete Garden Orbs inspired by draping methods but my own original exclusive design. These are not solid, don’t require fancy molds and are so easy to make!

The first large concrete garden sphere is made with a large beach ball and some polar fleece fabric that I had on hand. I have a lot on hand, fabrics, yarns etc.
I employed the rotary cutter to get that job of strip cutting done faster. The pieces were not a continuous string, but that was ok. Either would work. The pieces were cut ½” wide. The whole principle is similar to any concrete work.

The Materials:
- Portland cement
- Bucket or container to mix in
- water
- Rubber gloves, Dust Mask
- Utensil to stir, scoop
- Beach balls, balloons, inexpensive deflatable balls
- Strips of fleece, Fuzzy Chenille yarn, or multi-strand yarn
- buckets to rest spheres til set

The Portland cement is the ‘active’ part of most concrete mixes. The mixes do however also contain gravel and sand. In this recipe the sand and gravel is replaced by the fibrous yarn or fleece. The portland cement is meant to get into the fabric and once cured will create a very stiff shape.
My concrete Leaf stepping stones here are made of a mix that already includes sand as the material with the Portland cement. Do be aware that Portland Cement does have an expiration date and will lose it’s strength. The downside of Portland cement; it weighs A TON! It is a bit pricier, but you usually don’t use it by itself, so it can go a long way.

Step 1: Mixing
Inflate your forms and ready a place to set them once wrapped (like a bucket or container). Covering with plastic bags will eliminate sticking. Gloves and mask on…
Mixing this recipe is a little different since there is no sand or gravel. It will be creamier and almost like melted ice cream. A pudding texture is too dry, as the fabric will pull out some of the water as well. You can dampen the fabric or yarn to aid in the absorption of the cement.
Concrete is pretty patient, but sitting too long will start to set it. Plus, take my advice, once you get your hands in there, you can’t touch other things.
Plop the fabric into the slurry, squeeze and make sure it gets into the fibre. That is key to the strength. There shouldn’t be any air left in the fabric. You also want to keep track of an end, especially if it’s one long piece, because it may be impossible to find later!

Step 2: Dunk and Wrap
Here’s the tough part: we only have 2 hands, so wrapping and running the strip through fingers to remove the excess cement becomes a challenge. In my case I worked on the large ball one half at a time. Once the first was relatively hard I turned it to the bottom and incorporated the top half. The ends were wrapped or just hidden under another piece. Try to criss-cross to make a random pattern with similar size spaces. I was surprised that it ended with the strength it has. If need be a second layer can be added once the first one has set enough. The large size makes it more difficult than a smaller size.

Here it is, waiting to cure. The polar fleece curves nicely when somewhat stretched. The concrete texture camouflages the fabric and resembles grapevines.

Fleece strips and addition of the top of sphere.

Here you see balloons for the smaller forms, also resting on some buckets/pots.
In this case I again found some yarn that was quite “chunky”. I wanted even more thickness, so I tied it in double strand every 12” or so. I believe it was dollar store yarn. The fuzzier and fatter – the better.

Again, mushed into the slurry of portland cement.
Squeeze the cement into the yarn. Add water if needed, only a smidgen at a time.

Since this was yarn, it was longer and allowed me to just pull up as I turned the balloon above the bucket to wrap back and forth. Smooth the excess off or run through fingers. You WILL be covered in concrete at some point, so don’t wear your best clothes. I do now have concrete stains on my camera.
The amount of wrapping and coverage on these is more dense, so I’d say they are stronger. But who really sits or stomps on these anyways?!
Step 3: Cure and Wet
Spray the orbs with water to strengthen the concrete during curing. Don’t rush, they will cure.
The balloons were easy to pop, where as the beach ball needed some manipulation to deflate. If you aren’t cheap you could just sacrifice it and cut it. I decided to do the more difficult deflation.

Step 4: Remove the form
There will be some of the thin “extra” concrete in the spaces, but that usually chips off easily with any tool. It is quite rustic looking anyways, so it isn’t fussy.

In the design sense, larger simple forms are best. Imagine these in a minimalist garden, perhaps even filled with light strings at Christmas. AND the bonus, is that they will withstand the elements, and be able to stay in the garden. AND you will be able to say: I made them!
Oh, the possibilities of concrete… DIY heaven! Check out how I even made more for planter decoration. If you don’t want to crack out the concrete perhaps you would enjoy using stone to number your house. So many easy garden ideas…
Are they heavy?
When I embarked onto making garden things I definitely wanted to be able to move them around. I’m a senior so yes, I can carry them! All my designs are hollow, but make sue they also have enough to be strong. Here’s a variety! Happy making!