Easy Concrete Stepping Stones
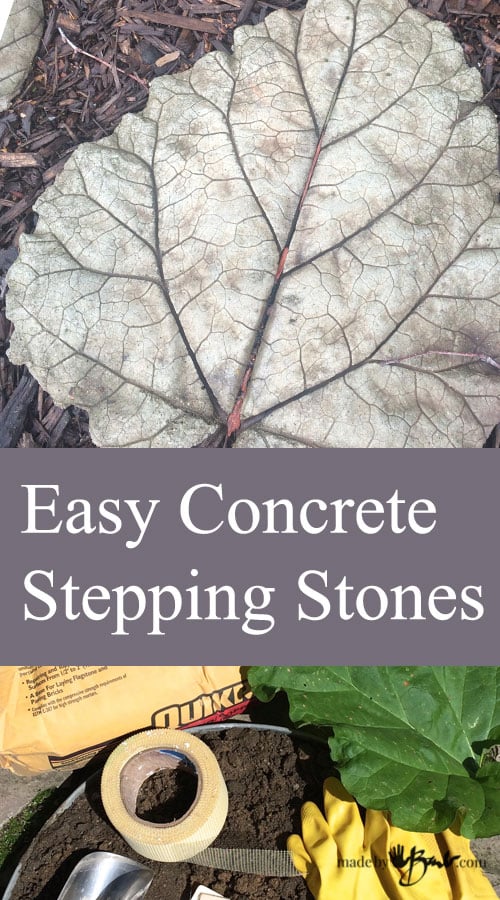 Gee, most people think of beaches when summer hits; I think of what I can do with concrete. Make some Easy Concrete Stepping Stones! Silly, maybe, but I like the permanence of these projects and the rather inexpensive supplies. It’s also time to admire the wonders of nature and make use of the gardens bounty; my Rhubarb plant!
I am sure you realized that you need concrete, but it’s even easier as you don’t need to mix separate components. This ready-made “Quikrete” mix is perfect for the job, and it comes in a size that I can lift! It’s available at most home improvement stores like Home Depot And Lowes.

If you don’t have access to any Rhubarb, you can also successfully use the large leaves from the thistle weed. They are in huge abundance at the side of the roads. They are just a bit fuzzier in final texture. I’ve used them when I didn’t want to sacrifice too much of my plant.

Some basic gear you will need:
- Quikcrete Sand Topping Mix (not mortar)
- A bucket of some kind to mix concrete in (plastic is best as dried concrete can be knocked out when dried)
- Water
- Rubber Gloves & Dust Mask
- Stir Stick or shovel
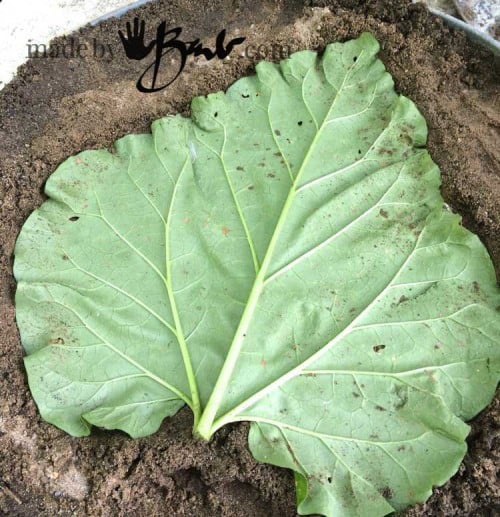
- Rhubarb Leaf or other large suitable leaf with deep vein texture
- Place to form leaf (I have an old garbage can lid full of sand, but you could use the ground in a pinch)
- Drywall Fibreglass Mesh & Scissors
Forming:
Start by getting your “form” ready. To get the natural curvature of the leaf form the damp sand under the leaf. Be careful don’t break the leaf. Build up the sides to have a rounded edge. At this point you can use a mound of sand if you want to make a bowl.
To have a nice smooth curve at the edge, I form the sand around the shape. Don’t get sand on the leaf. The veins should be facing up.
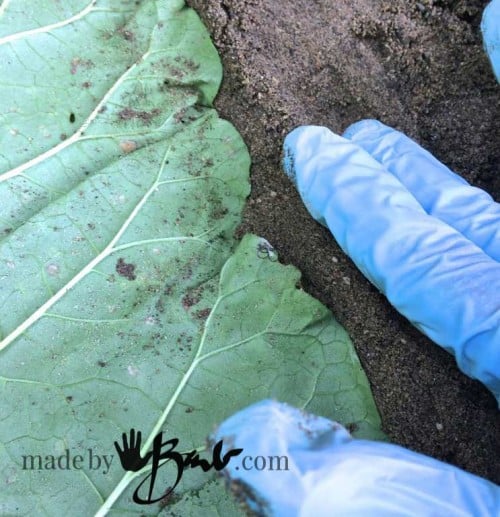
Wet sand is quite easy to form. More fussing now equals great results later.

I also get the drywall mesh ready so that I have it at hand when I have “concretey” hands. I cut a bunch of strips that are about the length and width of the leaf.

The Mix:
Now it’s time to get the concrete mixed
I add enough Quikcrete that looks like it would cover the leaf, ½ bucket or less. You’ll get the feel after doing one. This concrete is meant to be used in rather thin applications. I have some stones that are barely 1” thick and many years old.

Add water slowly, mixing deep into the bottom. At this point you probably would like a labourer, depending how many you are making.
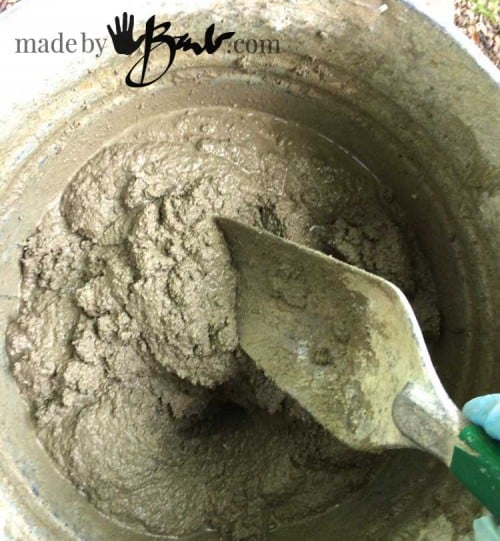
It is usually ready when it doesn’t have standing water on top, and holds shape a bit when stirring. It should have some slump (meaning that it will flatten itself by flowing outward) but not be too wet as to leak much water. Over watered concrete is weaker. Squish a bit in your hand and it should not crumble, hold a bit of shape and not be runny.

The Layers:
It’s now just a matter of glopping the concrete onto the leaf. No rocket science here! However, the trick to a very detailed imprint is the “slapping”(vibrating). The pros have agitators that vibrate the cement to get rid of voids and air bubbles. You have your hand! Slap, slap, slap… It also makes the water come to the top, which is a good thing, I’ve been told.
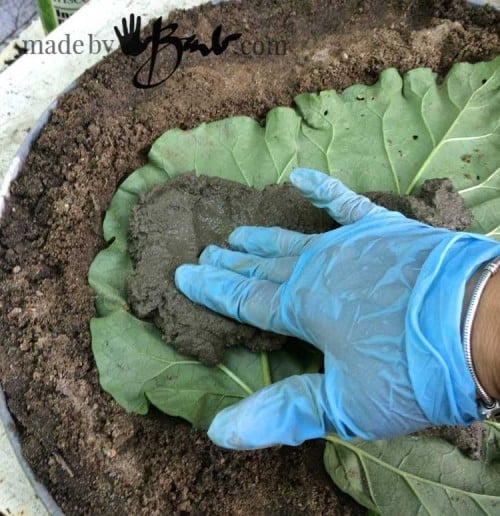
Stay just within the edge of the leaf and keep it on the thin side as you will be adding another layer. Perhaps about ½” or more.

Once covered, criss-cross the mesh paying attention to getting it over the main stem area. Since the main stem (artery) is thick, it is also the weak point since it will leave the biggest void. It’s even best to mound up extra thickness there.
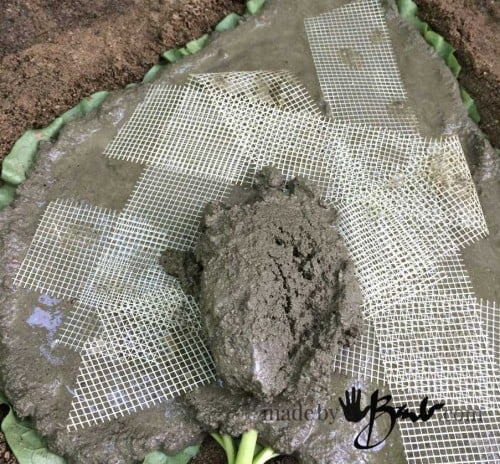
Now just add your other layer, covering the mesh enough and smoothing out.

Curing:
Good job! Now it’s time to let it do it’s thing. If it’s going to rain, cover lightly to prevent washing away prematurely. After a few hours you will feel that it has hardened. It may not be ready to lift, but if you wet it, it strengthens the concrete. It also helps if it’s too sunny. Apparently concrete likes to be wet. I usually wait til the next day to flip it over. Better safe than sorry…

Note the sandy texture on this one. I should have slapped (vibrated) it more! I use some dental tools to aid in the removal of the veins, but they will eventually decay away anyways.
You can continue to wet it to strengthen and help ease the veins out. Isn’t nature wonderful and now it’s permanent! Concrete leaf stepping stones perfectly suite the garden, always look right and will also get a patina over time. Look into some of my other concrete projects…
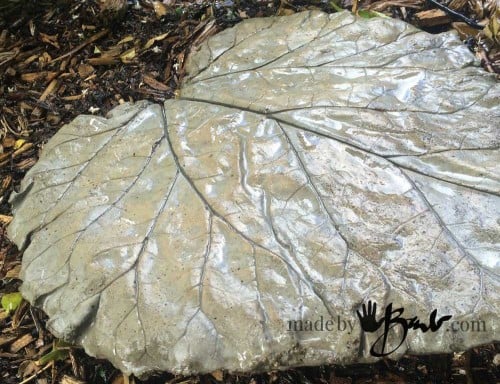
Wonderful texture! If you would like to consider making your own reusable mold take a look here:
Hi, I have a metal trivet, maybe 3/8 inch or 1cm thick, not sure what it’s made of/rust a bit after 20 years – I’d like to try to use it as a stamp on a stepping stone – how do you recommend using household objects to stamp sand topping concrete?
I can’t imagine that concrete will come off of the steel, it likes to stick to metal. Stamping is difficult as the impressions do not stay that distinct. When I made the concrete artifacts I made a mold with the Silicone mold putty and then used that for the concrete, and it cures in/on the mold. With that method the final will be a replica rather than a negative of the object too, much better. ‘Hope that helps!
Wow, thanks for the instructions.
Maybe not for this klutz, though:)
Michele
I often think of working with concrete like playing in a sandbox. It’s a pretty forgiving media and quite inexpensive.
Love making rhubarb leaf things. My original is probably 20 yrs old & it’s a bird bath. I pulled all the other leaves around it to have one huge leaf to work with. Not realizing it would weigh a TON! Ended up we had to have a welder friend make a holder to keep it off the ground. Birds love it & it’s about 36” across by 28”. My husband hates mowing around it too. But I love it.
Yes! Great, I have one too that I ended up using the Rapidset Cementall mix to fix an old birdbath. Mine are very old as well! They get some nice patina as well depending on conditions.