Easy Concrete Stepping Stones
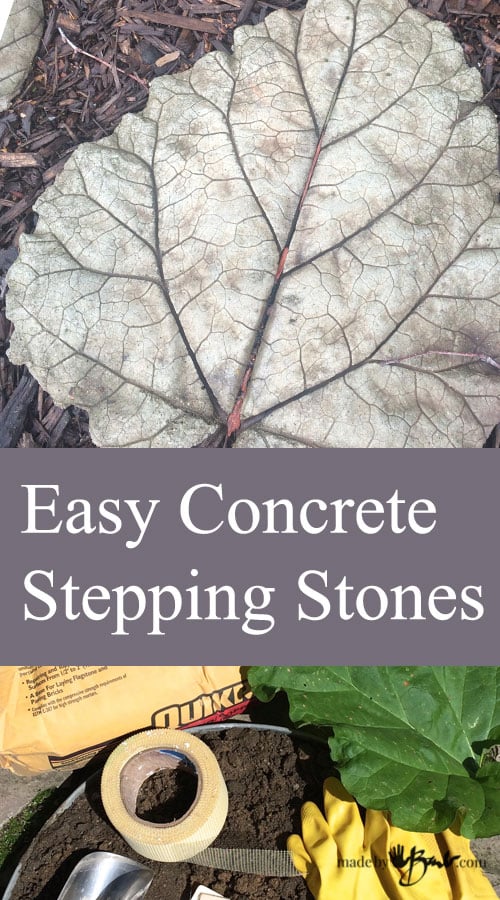 Gee, most people think of beaches when summer hits; I think of what I can do with concrete. Make some Easy Concrete Stepping Stones! Silly, maybe, but I like the permanence of these projects and the rather inexpensive supplies. It’s also time to admire the wonders of nature and make use of the gardens bounty; my Rhubarb plant!
I am sure you realized that you need concrete, but it’s even easier as you don’t need to mix separate components. This ready-made “Quikrete” mix is perfect for the job, and it comes in a size that I can lift! It’s available at most home improvement stores like Home Depot And Lowes.

If you don’t have access to any Rhubarb, you can also successfully use the large leaves from the thistle weed. They are in huge abundance at the side of the roads. They are just a bit fuzzier in final texture. I’ve used them when I didn’t want to sacrifice too much of my plant.

Some basic gear you will need:
- Quikcrete Sand Topping Mix (not mortar)
- A bucket of some kind to mix concrete in (plastic is best as dried concrete can be knocked out when dried)
- Water
- Rubber Gloves & Dust Mask
- Stir Stick or shovel
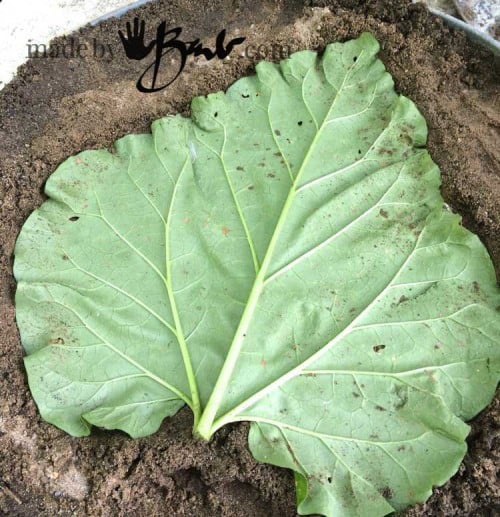
- Rhubarb Leaf or other large suitable leaf with deep vein texture
- Place to form leaf (I have an old garbage can lid full of sand, but you could use the ground in a pinch)
- Drywall Fibreglass Mesh & Scissors
Forming:
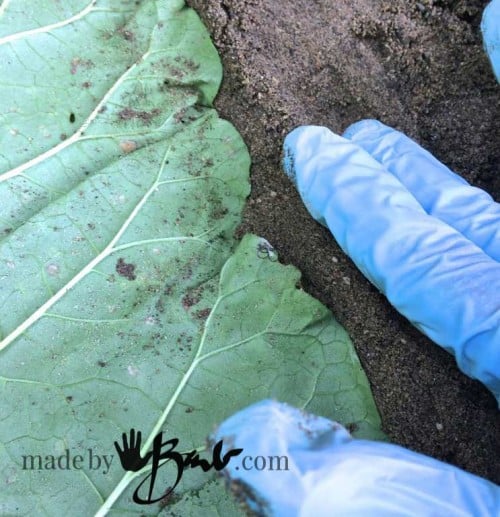
Start by getting your “form” ready. To get the natural curvature of the leaf form the damp sand under the leaf. Be careful don’t break the leaf. Build up the sides to have a rounded edge. At this point you can use a mound of sand if you want to make a bowl.
To have a nice smooth curve at the edge, I form the sand around the shape. Don’t get sand on the leaf. The veins should be facing up.
Wet sand is quite easy to form. More fussing now equals great results later.

I also get the drywall mesh ready so that I have it at hand when I have “concretey” hands. I cut a bunch of strips that are about the length and width of the leaf.

The Mix:
Now it’s time to get the concrete mixed
I add enough Quikcrete that looks like it would cover the leaf, ½ bucket or less. You’ll get the feel after doing one. This concrete is meant to be used in rather thin applications. I have some stones that are barely 1” thick and many years old.

Add water slowly, mixing deep into the bottom. At this point you probably would like a labourer, depending how many you are making.
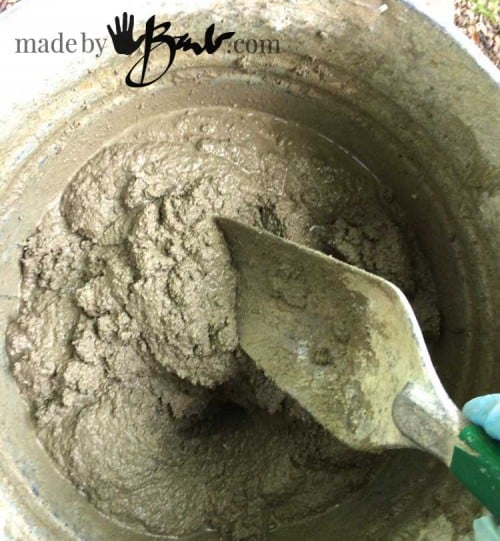
It is usually ready when it doesn’t have standing water on top, and holds shape a bit when stirring. It should have some slump (meaning that it will flatten itself by flowing outward) but not be too wet as to leak much water. Over watered concrete is weaker. Squish a bit in your hand and it should not crumble, hold a bit of shape and not be runny.

The Layers:
It’s now just a matter of glopping the concrete onto the leaf. No rocket science here! However, the trick to a very detailed imprint is the “slapping”(vibrating). The pros have agitators that vibrate the cement to get rid of voids and air bubbles. You have your hand! Slap, slap, slap… It also makes the water come to the top, which is a good thing, I’ve been told.
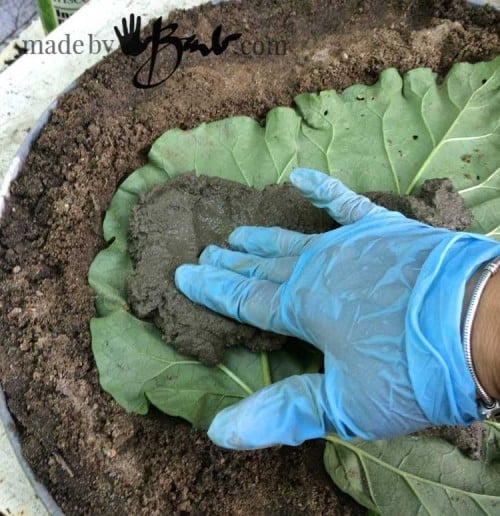
Stay just within the edge of the leaf and keep it on the thin side as you will be adding another layer. Perhaps about ½” or more.

Once covered, criss-cross the mesh paying attention to getting it over the main stem area. Since the main stem (artery) is thick, it is also the weak point since it will leave the biggest void. It’s even best to mound up extra thickness there.
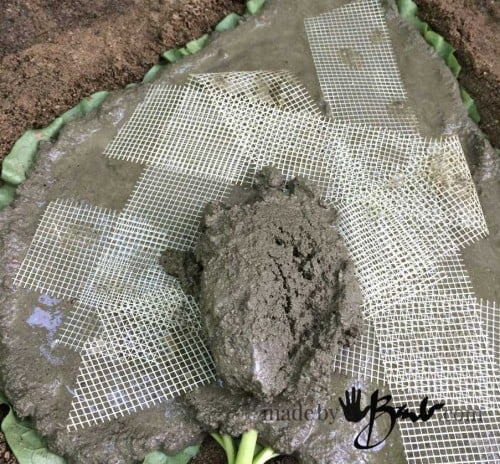
Now just add your other layer, covering the mesh enough and smoothing out.

Curing:
Good job! Now it’s time to let it do it’s thing. If it’s going to rain, cover lightly to prevent washing away prematurely. After a few hours you will feel that it has hardened. It may not be ready to lift, but if you wet it, it strengthens the concrete. It also helps if it’s too sunny. Apparently concrete likes to be wet. I usually wait til the next day to flip it over. Better safe than sorry…

Note the sandy texture on this one. I should have slapped (vibrated) it more! I use some dental tools to aid in the removal of the veins, but they will eventually decay away anyways.
You can continue to wet it to strengthen and help ease the veins out. Isn’t nature wonderful and now it’s permanent! Concrete leaf stepping stones perfectly suite the garden, always look right and will also get a patina over time. Look into some of my other concrete projects…
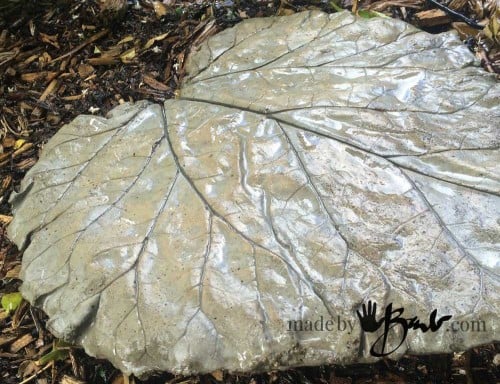
Wonderful texture! If you would like to consider making your own reusable mold take a look here:
Hi Barb, thank you so much for your great ideas! This is my first time working with concrete and it wasn’t as scary as I thought it would be. I made some stepping stone moulds from your silicone and corn starch recipe over some old tree stumps and they turned out perfect! I used the sand topping mix with some drywall tape in the middle for strength as well. Just wondering how to make sure they will not crumble and how long to wet cure them? I waited 24 hours to take them out of the moulds and one is a bit crumbly around the edge. Thanks again!
That’s great to hear! Depending on the temperature, 24 hours may have been early.Maybe the edges dried too quickly as it’s not about ‘drying’ it’s about curing. Slow damp curing makes stronger concrete, that’s why people spray new driveways often. Consistency can also play a role when the water rises to top and edges.
I have never used concrete before but I want to make a step stone well like one that stays inside so not to thick if possible. I want to use seashells that we got when my son got married can you help me? Do I put them down first or last I don’t want them to break.
I think you want them on the top so using a fast set mix will allow you more control than the SandTopping mix. I would use Rapidset Cementall and find a flat plastic pan as a mold. Im bedd the shells in/on the top carefully. Maybe do a small test piece.
Hi Barb,
Can I use Quickrete water-stop cement?
I have never used that mix. I think it is quite expensive for the large amount usually needed for stepping stones. Also, check the specs as that will tell you about strength.
Hi Barb,
I’ve made cement projects, stepping stones, bird baths, and hypertufas. I’ve had stones that have lasted for many years and some that have crumbled within 1 year (I believe I used mortar which caused crumbling. I don’t know why some have been successful and others have not).
I recently made huge rhubarb leaf castings, 12-18”, and 24 hrs later noticed huge cracks 😱! I used quickcrete sand topping mix for the first time. I did not reinforce the cement with wire or drywall tape…my mistake. It was also rather humid out.
Do you have any advice for me? Should I use Portland cement and mix pure white sand in instead? Or try the quickcrete sand topping mix again?
The sand in the quickcrete also had pebbles in it which concerned me.
Thanks for your great instructions 😊🍁
I have stepping stones that are many years old, all from the Quikrete Sand Topping mix. There is no aggregate in it, just sand. I use the drywall mesh as you know and unless I have made one really thin they do not break, especially right away. Concrete likes to cure slowly and not dry out too fast. Moisture during curing helps it strengthen, that is why new driveways need to be wetted down during the first a few times. I’d try again. Oh, another reason may that the mix is too old…
The detail and info you provide are unbelievable to me! Great project.
Thanks!
Planning to soon make the concrete hands. How do you make the fingernails and lifelike creases when they come out smooth from the glove molds? Thank you
Well, I do not think you noticed that the glove molds are useless… Always break Check this post It is more involved but that’s how you get the REAl look! You can use the alginate to cast the hands but then you can only do one. Good luck!
Barb, I made about 10 of the stepping stones last year and they were great. This year the first two crumbled like cookies after 24 hours of curing. I sprayed them many times over in the first 6 hours. The cement was a bag that had been in the garage from last summer unopened. Could that have been the problem? So discouraging!
I’ve made a whole bunch of rhubarb leaf stones and planter bowls. I want to paint them so they stand out better in my landscape. Any advice on painting concrete? Thanks a bunch.
Well, I have watched how many try to keep their driveways and walkways sealed and need to repeatedly do it. Concrete breathes so it’s tough to keep a ‘skin’ of paint on it as it naturally wants to peel off. ‘If’ I do want to add colour I make sure to keep it not so thick, more of a sparse accent. The leaves would look nice to accent the veins. Then if in the future it does wear or peel will not be very noticeable like a full coverage. Colours will fade in the sun, but acrylic (good quality, maybe even outdoor patio paint) Here are some posts with concrete paint techniques Oh, make sure not to let the bowls collect water that freezes over the winter…
Hermoso travajo Bendiciones
“Beautiful work Blessings” – Thank you!
Hi, I’ve been hoping to make the stepping stones for a long time. I’m so glad that I found your page & I’m looking forward to playing with your techniques.
Summer has finally arrived in Anchorage Alaska.
Have a great summer!
Donna
Great! Even though I have maybe about 100 of these, I just can’t seem to waste a rhubarb leaf! The Sand Topping mix is quite economical too. I’m in canada so I understand about weather…