
DIY Concrete Smiling Stones


No, I have definitely not ‘lost my marbles’! This craziness sparked from some recent funny things in my life. And nope, I still have my teeth! But a rainy family weekend away meant playing some games. ‘Speak-Out‘ is so hilariously side-splitting funny; I have not laughed that hard in ages!
I’m not sure how, but that crazy artist brain of mine somehow came up with this DIY Concrete Smiling Stone adaptation when I remembered a mold I had kicking around…
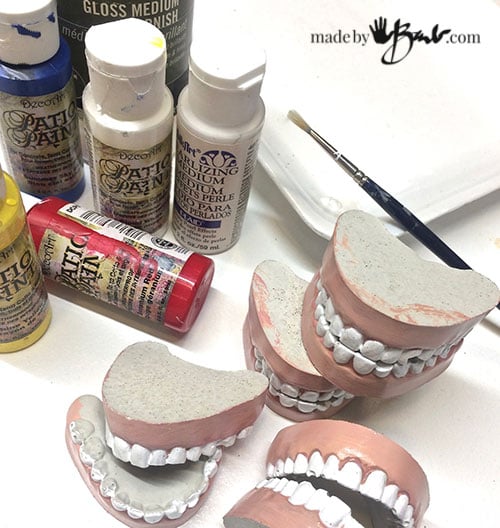
You will need:
- Denture Shape silicone ice mold
- RapidSet Cementall concrete or similar
- Tin foil
- Hot Glue Gun & glue sticks
- Duct Tape
- Acrylic paint (white, black, yellow, blue & red)
- Clear acrylic Gloss medium optional
- Acrylic Pearlizing Medium
- brushes, water
- metal zippers (longer can be cut) & scissors
- Palette knife or similar

Step #1: Make the teeth
Mix a small amount of the concrete mix. This RapidSet Cementall sets very quickly; in only a few minutes and does not require as much water. It is recommended to add the water first and then add the dry mix. I’m a bit of a rule breaker so I had been doing it backwards for a while. Then I always needed to add more mix because it was too wet… figures.
The ‘teeth’ parts tends to get bubbles so make sure to tap it very firmly to rid of the bubbles.

The impatient part of me loves that it can pulled out of the mold in one hour. No need for a mold release either as silicone works great with concrete. I am so impressed with this mold, as it is quite realistic.

You could leave it as is or give it some realism by painting it.
To mix a flesh tone mix some white and red acrylic paint, add some yellow, and then a tiny bit of blue. Compare it to the colour of your hands, but a bit more pink.

You can be fussy or not. The inside won’t be seen, nor the back.

I added a bit of gloss medium to make it ‘saliva-shiny’. Even a bit of acrylic pearlizing medium makes the teeth shine. You can’t help but chuckle through this…

To set the upper and lower teeth I separated them a bit and glued with hot glue at the molars. This won’t be seen so be sure it holds well by filling well.

To prevent anything getting in the mouth opening I taped the back closed with duct tape.

Step #2: Making the form & Zipper
Any length of zipper can be used as long as it is enough for the smile. The excess can be cut off. Use some old zippers from discarded clothes, as the colour does not matter. The 2 open ends of the zipper need some gluing together. You can adjust the smile as you like.
Glue the top and bottom at the centre point. I leave the sides loose to build up with some concrete ‘cheeks’.
From my sculpting days I learnt to use tin foil as a bulking agent. It is great since it can be formed easily and is quite stiff. Make the shape you prefer and glue to the teeth. Add more if needed. You can now imagine how it will look. Be creative, as stones come in all sizes and shapes.
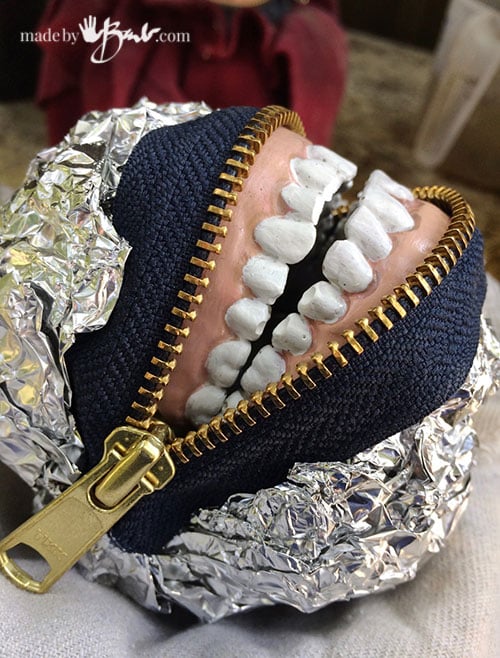
I tuck a bit of the foil around the zipper to keep everything snug before I start with the concrete.

Step #3: The concrete
Using the same concrete, this time mix it to a thicker consistency. I find that it will slightly stiffen in about 30 seconds and be quite moldable and able to hold it’s shape. I do really love this stuff…

It’s not a mystery what to do next. Cover the form with the concrete and work your way around. It can be a round type of stone or more angular. Poke it, put dents & holes. The more rough the better and realistic it will look. It will start to get firm after a couple of minutes or so.

At that point I will start to get fussier and finish the ‘lip’ edges. I like to use a painter’s palette knife as it’s thin and flexible. ‘Smear’ the mix up carefully to where the zipper teeth are. You can also brush any concrete off with a brush and water if need be. Try to keep the zipper pull clean.
Trust me, it’s not that hard at all…
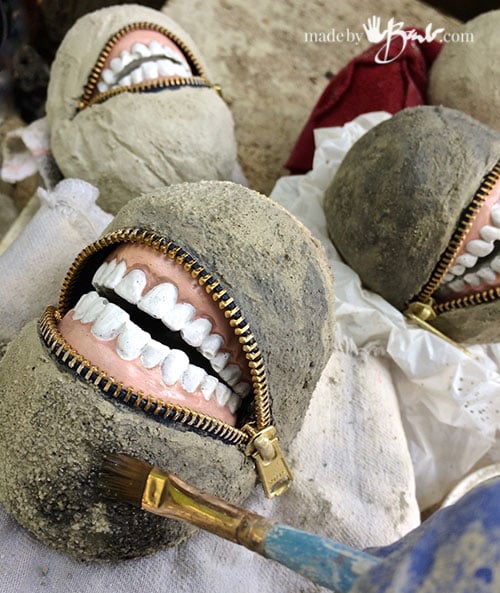
Step #4: Finishing the Colour
Yup, I am always in a hurry. I figure if the paint is added earlier it can sink into the concrete even better. I mix a bit of black acrylic paint with a tiny bit of concrete and brush it on very loosely.

Let it run and be mottled. The mix tends to be a very light colour if no staining is done.

Laugh out loud! These guys make me chuckle.

So, now what? You can put them in the garden, add them discreetly between the rockery and make someone jump.
I could not resist seeing them frolic on the beach with their other rock friends…

I would like to plant up a bowl with some succulents and beach stones. Perfect for the orthodontics/dentist office!
And Halloween is fast approaching. Perhaps you just add a few under the house plants to give you a smile every day.
I may be a bit silly… bit we keep using emojis everywhere but these are real ‘stone’. We all deserve a hearty laugh now and then.

I just can’t help myself… A bit of fun before I have to head back to teaching!
I’m obsessed with crafting, and constantly searching for something new and unique. These are FLIPPING hilarious! And beyond unique. Love it so much, thanks for sharing. *off to make some stones* 😂
Yes, don’t you hate the way everyone just regurgitates what they find on the net; I strive to be original!
Do you think a 4 inch zipper would be big enough?
(5inch zipper with 4 inches of metal)
Let me know! Thanks! Natalie 🙂
I have used up a lot of old zippers cutting them and imbedding the extra in the concrete. So having a bit extra is ok. Measure across the teeth shapes. It is forgiving as the opening can be smaller if need be…
Do you know how many inches the zippers are after you cut them down to size?
I’m getting ready to order the zippers (don’t have them yet)
The metal part is 4 inches, I was trying to get an idea if 4 inches would be too short?
I am fine with making them smaller if they are too big, I just don’t want to order them and have them be too small….
Thanks!
I can’t even with these! Thank you for sharing this utterly genius art work us! I’m going to make them with my five children and my husband. Can’t wait! Thank you again! Keep creating…
Sounds like fun! Just be sure to wear the gloves and dust mask. For some basic info see this post and see here about the various mixes.
Hi barb!
I made a couple rocks and the turned out great for my first try! The 5 inch zipper (4in) metal worked out great…anyways I added a picture of them sitting in my rock bed on the “tried” section….I didn’t have any zippers laying around so I bought a “lot” of them on eBay …..anyways! Thanks again for the fun idea!
My daughter is making them at Yosemite with the teens during their camping vacation…they are planning on hiding them around the trails!!!!! So funny
I asked asked to post some pix on the tried section so that you can see how they turned out!
As a registered dental hygienist who loves to garden, these are PERFECT! Can’t wait to make some! Thanks for your zany creativeness! Thanks for sharing!
Awe yes! I gave my dentist one.Maybe you also have great molds to choose from. I envy that you have a supply of alginate too! You could make these
Are you my twin??? I find this so funny, and the whole time I was reading your tutorial I was thinking of different places I could set these…in the house, around the “garden”, in the branches of my trees where someone would spot it walking by…oh what FUN! Thank you so much for this!
I have mine in a rock garden at the edge of the sidewalk, so fun to see the reactions when noticed. I like that they look natural – hate kitschy garden stuff!
Oh, oh, oh! Glow in the dark teeth!!!
Good idea! I have a version #2 in the works! Just wait and see!
I like the idea of just leaving a few at the beach or other public place a la Guerilla Art/Art Abandonment movements.
Great Idea! I had thought of that when I took them to the lake to photograph!
I just poured my first four. My sister is a dental hygienist so you know who’s getting the first one. I love the glow in the dark idea. Looking forward to seeing version #2!
Oh yes, my dentist got one too! Aren’t you lucky; you can get alginate easily from her! To make this
OMG!!!!!! This is the best thing ever!!!!!!!!!!!!!!!!!!!!!!!!!! I’m gonna make lots of them!!!!!! GRACIAS soooo much for sharing!!!
I just had a vision of the far future where they unearth artifacts from our civilization and come upon these… and wonder what the?!?!? Enjoy