Alternate Eco Print Processing

Well, I’m a bit nervous about posting this but here goes anyways… Yes, it’s unconventional but it works for me! Make it easier for yourself and possibly save as well. I’m happily sharing my Alternate Eco-Printing processing method.

What I love:
This amazing and mysterious art form called ‘Eco Printing’ or ‘Printing with Botanicals’ has got me hooked for quite a while now. How amazing is it to use nature’s gifts and try to decipher how to make it react according to your wishes! Check out some of my posts of the different techniques here. Let’s just say it’s like performing magic tricks…
What I did not like:
I love that I can use what nature discards and up-cycle fabric but the part that involved a high use of energy did not impress me that much. Sure, if you live in a rural setting and have tons of firewood and places to cook outdoors like India Flint you are very fortunate! I could try to do that but I may just burn down the forest. So I figured out another option…
Generally, there are 2 options for processing the tied bundles (in whatever format you’d like); steaming or boiling in liquid. I tend to prefer the steaming as it gives some nice distinct prints and there is more control of ‘wetness’.
How to Prepare your bundle:
Ok, please don’t shoot me for using plastic. I know I know, it’s not environmentally good. I DO however reuse the bags from food packaging and barrier sheets so many times, just saying.
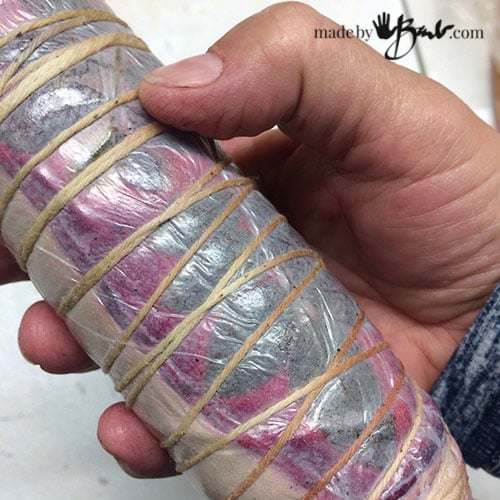
After the usual rolling and placing the leaves (pre-dying and/or using iron blankets) roll as tight as possible. I use a barrier layer and have used the same ones for over a year. Tie tightly.
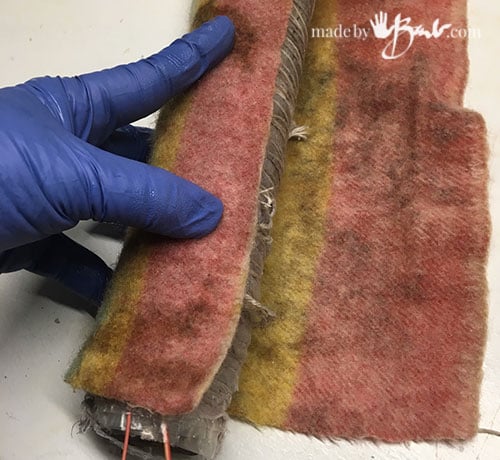
The fuzzy fabric that you see is a piece of an old wool blanket. Wheyn dyeing some wool I noticed how wool does not like to hold onto moisture; it kept dripping out. Other fabrics are not quite like that and wool can take quite a beating. I wet the wool and wrap my bundle in it. One or 2 layers is quite enough as I just want to create a nice damp place for the bundle.

Once its wrapped I pop it into a recycled bag and roll the excess using an elastic to keep it closed. (wrapped bundle on the right above) It is quite air tight.

The Secret Heat:
Here it is; I use a microwave! BUT, and a big BUT! you can NOT use any metal pipes or utensils in it! I use my wood curtain-rod dowels. You may also have some size restrictions; as with the width of the microwave. I measured the small one I have (dedicated to dyeing and eco-printing) and made sure my bundles can fit on the turn table.

It is a bit of guess-work to decide on ‘cooking’ times. I love my temperature gun for figuring out how hot a surface is. I set the microwave for 2 minutes and then I check the temperature with the gun and with my hand. Traditional steaming may build slower but will probably be around 180F or so. Turn the bundle and set for another minute if need be. A microwave heats by vibrating (exciting) the water molecules so it is important to have a damp environment (wet wool encased in plastic) and watch that it does not overheat. It is also important not to have your roll too wet if distinct prints are wanted. It will possibly start to ‘puff up’ which is signalling that it’s boiling. Stop it at that point as I feel boiling is too strong.
When comparing to steaming in a pot on the stove or turkey roaster there will be times when turning or checking that you will lose heat so it too does not hold a constant temperature.

Here the temperature gun is showing 154F but I aim for 160-180F as I believe the internal temperature will be higher. The encasement keeps the smells down as well.

The Other Secret:
If you ‘zapped’ it repeatedly it would be getting too hot and possibly start to melt things. Insulation is a great alternative to keep an almost constant heat. We all know it can work wonders as I use that to keep food hot when having people for dinner, a trick I saw when catering was dropped off. I keep a big thick wool blend blanket close to the microwave to quickly pop the roll into after it’s heating cycle. I snuggle it under many layers of the blanket and let it be for a while… A roll lets you also turn it easily and stick your finger in to see how darn hot it still is.

How long? Well that can vary to what I am doing, but it’s not using any energy so I am flexible. I may come back after an hour and feel how hot it is and just give it a ‘zap’ for a minute and then back under the covers. The moisture stays put and the heat lasts quite a while…

Many times I just let them ‘sleep’ overnight and have something to look forward to in the morning. They are pretty happy in there.

I realize it seems to be far from the rustic way that I picture India Flint over an iron cauldron on a wood fire and emitting quite the aroma. Since my bundles are encased I do not find excess aroma but some may be more sensitive than I. My microwave is in a large laundry room away from living space. The most aroma I have is when I unbundle.

I have used this technique for a very many bundles but I’d like any feedback that you’d like to share. As you may also find it is difficult to find exact information on this technique as many who have somewhat ‘cracked the code’ would like to only share in pricey workshops. I understand as it takes much energy and supplies to figure out a technique so freely sharing seems silly.
As many Eco printers will agree; sometimes it just works and sometimes it’s a mysterious flub. I don’t see that this method has had any negative impact on my prints but do proceed with usual caution and care and above all be safe.
Happy printing!
Superb methods. Thank you for explain in details. Let’s continue the eco friendly sustainable practice.
Yes, it is quite easy and doesn’t take the babysitting. Enjoy!