Amazing Ice Dye Color Splitting

Mankind has always had a love affair with colour and design! You can’t imagine how easy this is; just magic. Make your own incredibly amazing Ice Dye Color Splitting!

The Starting Point:
Summer holidays warrant a few larger projects, Quilting to be exact! But this project did not involve a trip to the fabric store… just because. If you know me at all now, you know that I like to do things a bit differently. I like to impart some uniqueness to everything I do. So, that meant that I would dye my own fabrics for the quilt. These 100% cotton sheets have a worn softness and a pleasant collection of hues.

Preparation:
As readying for the Ice Dyeing I soaked the fabric in a solution of Soda ash and water (1 cup to 1 gallon of water) at least 30 minutes. Hand wring as best as possible or use the spin cycle of the washer. This only works with natural fibres like cotton, hemp, linen, rayon etc. The soda ash allows the fibres permanently dye with a chemical reaction.
Since I am using only one colour here all the fabrics are arranged together, scrunched as finely as possible on top of a mesh or grate to keep it out of any collection of bottom dripping. To get as much detail the more smaller folds the better.
The Fiber Reactive Dye:
As you know I love my blues! But for this project I decided to switch things up a bit and bought some BLACK! Dharma trading has a few to choose from and ‘Raven’ (PR 200) was my choice. I am not a fan of psychedelic tie dyes, so shades of grey seemed perfect.
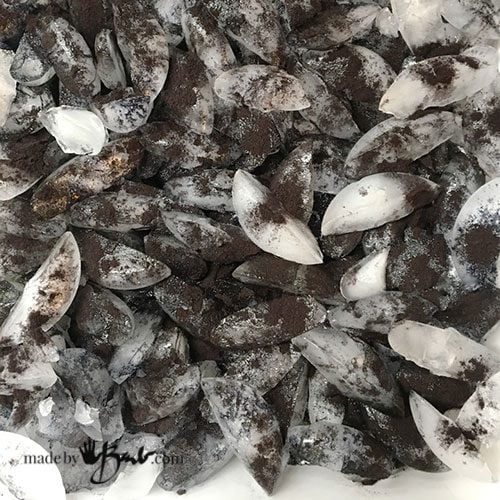
After cleaning out all my ice from my freezer I sprinkled the dye powder carefully (while wearing a dust mask) over the ice. How much coverage will determine the strength/darkness of the final product. The artist in me excitedly accepts whatever I get!

The Process:
With no rain expected I set it out on the patio table, in the heat, but that is not really necessary. Slowly the ice melts and the tiny rivers create the amazing ‘watercolour dye arts’
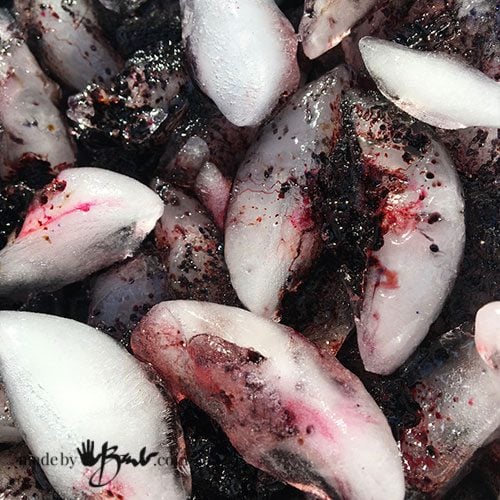
Looking closely at the dye after some short time I saw something interesting! I had some strange colours sometimes appear when working with my favourite ‘navy’ fibre reactive dye but I now saw all kinds of colours! How can that be?! Well, it’s because the dyes are made with a combination of colours, each has different densities and therefore travels or floats to preferred places. How perfect!

Batch & Rinse:
After waiting for the ice to melt and let it ‘batch’ (meaning sit long enough for the warmth to make the reaction finish) it was time to rinse. Length of batching times depends on temperatures so that’s why I like summer dyeing.
Remove the fabric carefully (gloved hands) and rinse under cold water until the water runs clear. It may seem like much rinses out since there may have been quite a it that did not ‘attach’ but don’t worry…
After the cold rinse the unreacted dye needs to be washed away with a hot wash. It’s so exciting to see all the amazing designs magically created with the flow of melting ice!

Absolutely Amazing:
But what is even more interesting is the way the colours split! As a watercolour artist I am amazed at how they still hold their hues and have such subtle blends!
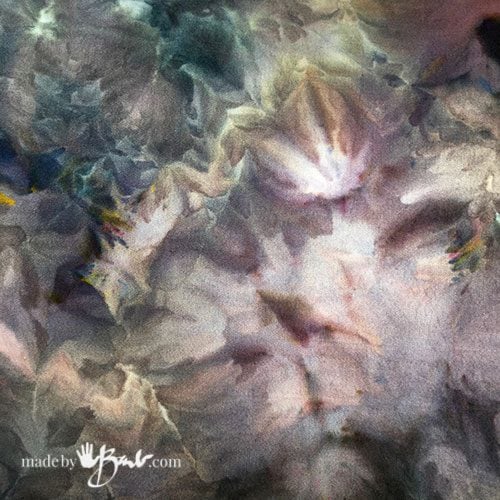
It seems as there is the full rainbow of colours, even little surprises of yellow and red.
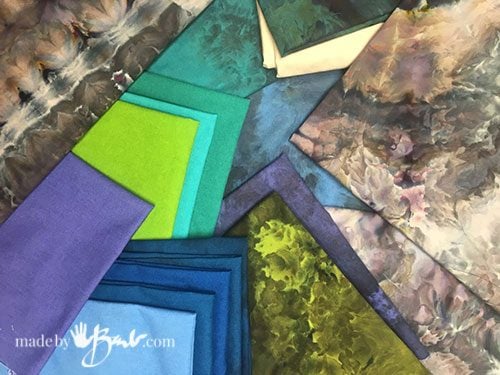
Yes, the tones are still quite muted especially when printed on an existing colour but that is exactly perfect for a modern day quilt. No flowers or polka dots here!
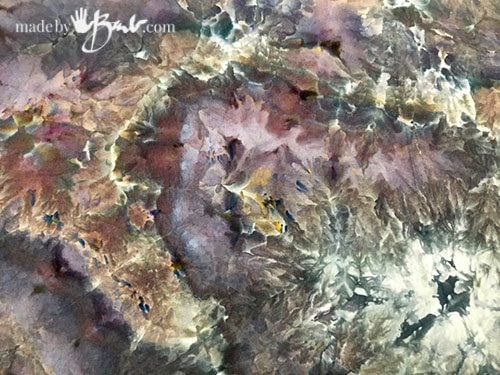
I could show you a ‘million’ images of intricate details much like the beauty in natural geodes and gems. Imagine a piece stretched over a frame and hung as ‘modern art’!
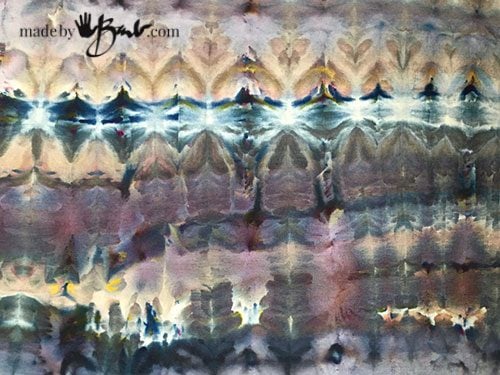
If you make any type of folding (accordion) or pleating the pattern becomes even more faceted.

Fibre reactive dye has held well on all my clothing that has been repeatedly washed. It has also held well on my shibori duvet cover so I am in complete confidence for using this fabric in a quilt.

Have you ever seen all the amazing way that Art quilts are now created?! Original designs should have original fabric! That opens a whole new design element to fashion as well! (just wait and see what I’m going to do next…)

Ok, I gotta run and get sewing; actually teaching someone how to sew! I’m happy to and happy that I’ve up-cycled some of my fabrics and made something that can’t be duplicated… perfect day!
Go make your own Amazing Ice Dye Color Splitting Fabric!
Wow! I love the multi-colored watercolor look this has! How lovely and fun! I can see it used as a piece of wall art! Like you said, “a piece stretched over a frame and hung as ‘modern art’!”
I’m obsessed! And it is on theme with my geodes! Stay tuned for what these become…
Beautiful…absolutely beautiful!
Yes! All those years I painted so meticulously with watercolour! Who knew!
Well done again…I have indeed tried this with Brusho as each “colour” splits into many many colours that make up the one…but Brusho powder isn’t a permanent fabric dye so stopped there. though I am testing other theories on how to make it colourfast. Maybe a mordant may work. It does however always stain when you dont want it too. Your results as always are lovely. I too am off to finish a sewing project. Happy Sunday Bx
Hmmm, I’ve never heard of Brusho, but let me say; when I started dyeing a few years ago (fascination of shibori) I bought a pound of blue Fibre reactive dye and have loved every minute! Simple colours I find best, and it washes like a dream, no fading! Even dyed some onesies for the Grandbaby! Sewing with your own dyed fabrics just takes it over the top!!!
Hi. How much dye did you use for this project and was the article wet or dry. My out coke was more navy blue Thanks
The items were damp and had been soaked in soda ash solution. I think you meant coat? I do not weigh the dye, I over-compensate a bit… If you are not happy you can repeat the procedure to add colours.
I just love all your creations. I must have a try at this type of dying… Will you try with “natural dyes, i.e., plants (onions, beetroots, avocado skins, all sorts of plants…) ?
Thank you for sharing.
I do a lot with natural dyes as well (see here) I love it all! There is a lot of magic chemistry in the natural dye reactions as well… I am hooked! The tones of these reactive dyes would even compliment the eco prints nicely, oh more ideas!
Dear Barb, beautiful work, it really surprises what you have achieved, congratulations. You are a great artist !!! I will try to do it in a good watercolor paper !!!! I like to try new ideas, we will see what happens.I want to thank you for your kindness for sharing each experience I thank you for a big hug, Hélène
I’m not sure how that would work as the paper will be quite flat won’t it? If you want something spectacular for paper you can try this eco printing It’s so much fun as well! Using dye on something that isn’t washed seems wasteful… Happy making!
How beautiful! You’re creativity never ceases to amaze me!
I always believe there’s some creativity in everyone if they allow themselves… It can’t get easier than this one!
I have often enjoyed using the straight dye powder sprinkled on a soda washed and wet dyed fabric. I sprinkle some on, then scrunch it up to sit for a few hours. It usually is a harmonious group of colors to the dyed piece, not as contrasting, more subtle. But now am anxious to try this, too!
I’m sure there are many variations and ways to be even more unique! There are no wrong answers!
Dear Barb – I’m going to ask what most of you would probably consider an ignorant question, but that’s because I truly am ignorant about this form of art. I understand that this method is different from “conventional” ice-dying, but “why” is it different? In other words, what do you differently in this process than you would do in the standard ice-dying process?
When I google photos of the results of regular ice-dying, every once in awhile I come across one that vaguely resembles your results, but not nearly as vibrant, doesn’t show nearly the color variety, and not nearly as beautiful as yours. What do you differently?
Well, that’s a good question. When I first started ice-dyeing I knew I would get interesting results but they were mostly the same colour of the dye. I bought black ‘Raven’ initially to get some nice greys. But when I opened the fabric I was so surprised and realized that this phenomena happened and why. I should have known that there are various colours blended to make the black and they decide to venture where they like when given the opportunity. Each black is different. The amount of effect would be dependant on amount of dye and how long/wet it gets I bet… magic involved!
Thank you, Barb. I did a little research this morning, and found out that the “pure” colors (whatever that means), will not split much. But that almost all colors that are considered ‘mixed’ (again, whatever that means) will split beautifully … big time. Just a small example of specifically ‘mixed’ colors are: Black, Olive, Sapphire Blue, Blue Violet, and Camel.
So, the solution seems to be that if we (the dyers) can look at the outside of the dye containers and know immediately if they are pure or mixed, we can figure out for ourselves which ones will be duds, and which ones will be winners – and won’t have to waste a ton of material, experimentation time, and money trying to figure out which colors will split and which won’t. (You know, like not having to buy a dozen cans of green beans and opening them all before knowing which ones are whole or cut; regular cut or french cut; no salt or low salt; GMO or non-GMO, because it already says it on the label).
I hope that makes sense. 🙂
I will keep researching!
Thanks again, Barb, for everything you do for us.
I understand completely since I have very vivid memories of art college and projects in colour theory. I should have know the blacks are a combo of colours! Funny how my ‘navy’ spits & splits fuchsia pink when it feels like. Maybe Dharma could divulge the mixes… It’s all fun and games!
The pure colors are the primary colors of red, yellow, and blue. Every color In the rainbow comes from these three colors. That is why they’d not split. They are the “original colors”.
Yes, you are right. That is what I learnt in art college. There is also primaries (CYMK) for printing which work similarily. Here is some info for the colour splitting. After decades of having exact control over the media (paint) I am actually enjoying the refreshing unpredictability of this type of creative design. Enjoy colour!
Barb I just tried the Raven ice dying on silk. And it came out a rather light mauve, purple with some splotches of color. No black and all and none of the lovely variations you had. Soaked in vinegar water before. Do you have any suggestions for me to get more vibrant and varied color?
Silk is a protein fibre so it reacts differently. Soda ash should not be used on silk as it will damage it. When I dye wool or silk I use an acid like vinegar. Black is a tough one on silk, and even Dharma states that the blacks are not protein fibres (silk and wool) I used cotton and some bamboo rayon.
Thanks Barb. I did use vinegar and water for the silk. I dyed it a second time and it made it darker shades of purple. Pretty but not quite what I want. I will try rayon and bamboo. Thanks for pointing that out. You ate a great help and inspiration!
It’s odd that black on silk is so elusive. I get the black on silk when I eco print though!
Loving your work, and seeing all sorts of possibilities for it. One quick query, when you use a hot wash to wash away the unreacted dye do you wash it by hand, or in the machine, and if you use the machine, do you put all the fabric in together or wash them separately, please?
Many thanks, and keep on posting