Tips for Great Eco Prints on Paper
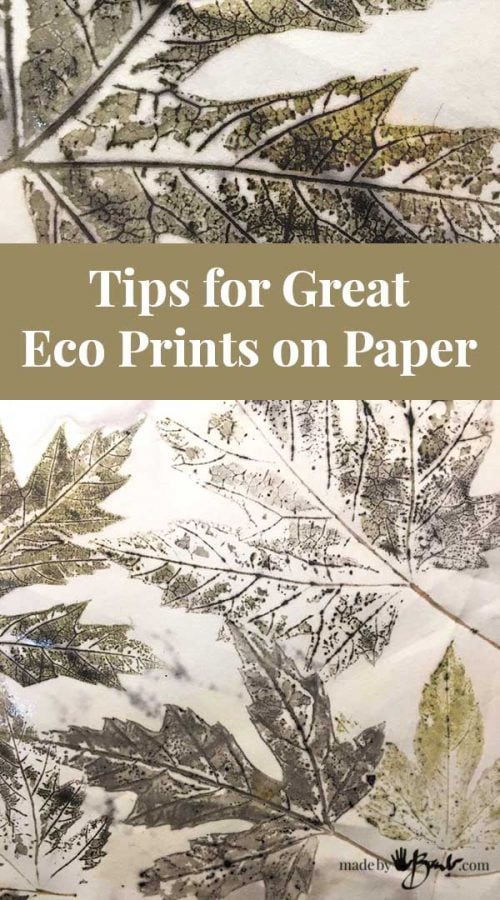
Nature just drops amazing stuff at our feet all the time! Did you know that beautiful prints emerge from those leaves laying on the ground?! Rather than raking, let’s learn some tips for Great Eco Prints on Paper.

How Easy:
As you may know I am a bit obsessed with Eco printing. Where can you make something so pretty with just found windfall? Recently when unrolling some bundles I hated to throw away the leaves as they looked well enough to be able to print again.
Paper is relatively inexpensive so perfect to test eco printing on. I often use the regular card stock from the office supply store. I have a simple no-fuss system to print on paper using my microwave that I use often because it does not involve a lot of time.
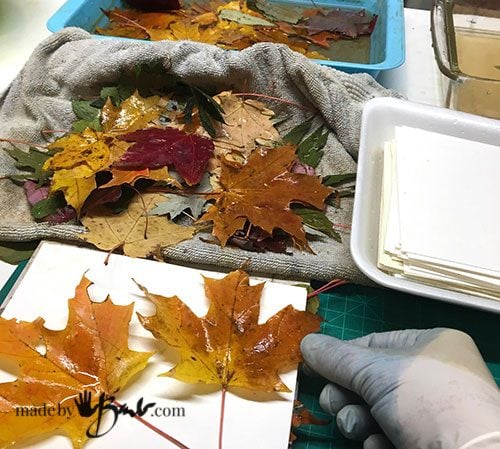
A quick slip through some alum and iron sulphate solution to wet the paper and then stack with my favourite printing leaves. TIP: I try not to have the paper too saturated especially if it is cheaper paper.

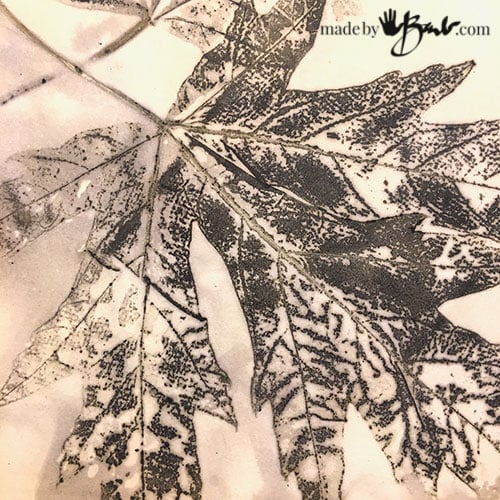
Great prints involve the reaction of the tannins and iron. If in doubt then an extra reassurance is the addition of some tannin rich tea or natural dye. TIP: Myrobalan is always a great performer as well as any of the readily available black teas. Be creative and let the magic happen… A little squirt lets the ‘tea’ find it’s way through the stack around the leaves & gives great results.

What if?
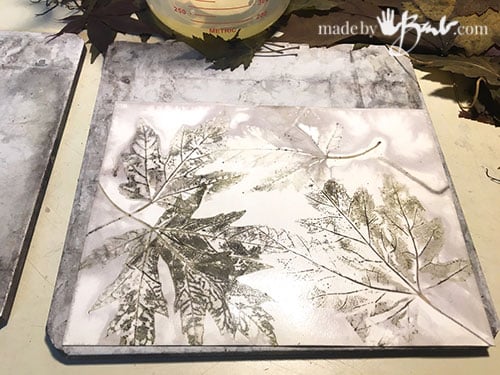
Maybe, just maybe the print is not quite to your liking; so it can still be saved. ‘Not to mention the awesome texture the leaves imprint into the paper like some high-end custom embossing!
Don’t despair; iron to the rescue.

Iron Modifier:
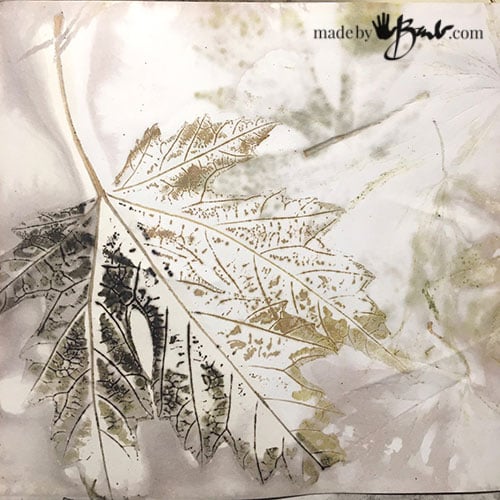
Basic principle; iron + Tannin = print. TIP: Mix a touch of iron sulphate into some warm water and selectively paint it onto the sections that are not as defined as you’d like.

Lovely greens and subtle design… but I’d like more punch.

It is quite a magic to watch it change as you paint on the iron solution, right before your eyes. Such chemistry.
Iron is called a modifier, not a mordant. It will help the prints along, and ‘sadden’ them. This means they will become darker but also less saturated in colour; more brown/black/grey.

TIP: If paper is not super saturated/wetted it will give more defined prints. It will also be much easier to keep flat. The amount of veins that print is mind-boggling!
A little addition of iron and voila; such definition.


TIP: The underside (where veins are visible) is the side that will print the best/darkest as the cells have thinner shells.

You have the control to decide where to darken. TIP: If you have a print that is too dark you can lighten the dark iron with some citric acid (like lemon juice) Which incidentally will also clean your fingers of the iron stains. Just cut a lemon and stick your finger tips in it (you’re welcome!)

TIP: When stacking the papers put leaves between each sheet. Then when unwrapping you will have prints on both sides and can choose which side is better.

TIP: Reuse leaves. I’m quite amazed that these were prints from leaves used once before!
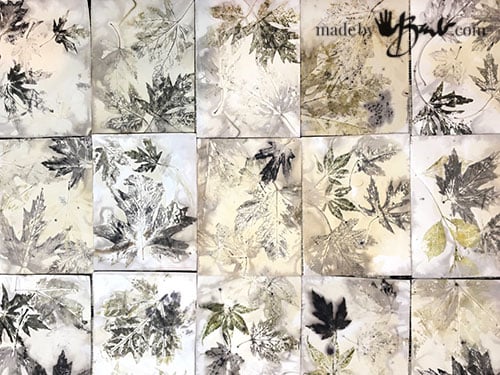
Wonderful detail on simple cheap card stock. If you were patient you could print ‘One of a kind’ business cards…

TIP: Iron is great but also be aware it will also stain, but it is a lovely golden ochre colour. (bring on rust-printing…) Over time iron can degrade the fibre. These great Eco prints on paper are made into cards so I am not that worried.
Gather, print and Enjoy!
Excellent! Thanks for sharing
I have also used cast off manilla paper envelopes, made my own rusty water and used found leaves = NO COST. How perfect to make some one of a kind art!
Thanks Barb!
Any tips and tricks with ecoprinting are surely appreciated. Can’t wait to see what you share next. Hoping to see maybe in the future if there is anyway we can do ecoprinting with leaves on silk with regular dyes….if that is possible.
Always enjoy reading your posts when they drop into my inbox and I keep saying I must do this!! I have everything to hand, but not sure I should be using my microwave because it is the one I use for cooking my food. Recently purchased a one pot induction plate and hope to steam something on that. x
Yes it is recommended not to use the food stuff items. I have an old one in my laundry/eco print area. I like that I don’t get any steam coming off the bundles since they are enclosed. I also use so little energy, since the majority is under blankets keeping the heat. No bundle-sitting…
Thank you for more great tips! I spent the afternoon playing with lemon juice and iron water! Do you dilute the lemon juice? I used it straight up then rinsed it off after several minutes. In addition to having fun with some eco prints, I have clean fingers!
BARB
I WANT TO DOWNLOAD THE ECO PRINTS ON PAPER AND THE IRON BLANKET BUT CAN’T FIGURE OUT HOW, CAN YOU TELL ME HOW? THANKS
I WILL DONATE FOR ANYTHING I DOWNLOAD.
I have those only as posts on my site, not downloads. You could bookmark them and then revisit when needed. I may eventually offer an eBook for sale…
Dear Barb,
Would love to see some e-books for sale.
You have a wealth of expertise and information. I have bought many of your beautiful scarves and given these for presents to my friends.
Thanks for your posts here.
Kathy Clem
I’m so glad you love them! I may have some eBooks soon. If I want to be able to sustain this site & go fulltime, I may need to sell some eBooks. Nice to see such great support! Thanks so much!
I would love an e-book I could print out and refer to (and would be happy to purchase). You are a bit of a genius I think. I haven’t been able to try any of the eco printing (YET) but I would love to. Thank-you for sharing.
Yes, eBooks are on my radar! I can’t get enough from this crazy eco printing art form. My problem; what shoukd I do today? print or write? ‘Writing usually loses out! But will try very soon…
I love what you’ve done here but I’m confused (doesn’t take much)! Is the alum and iron sulphate two separate items and if so how much of each do I use? Do I mix them together?
Thanks
When working with fibres they get rinsed before the subsequent dips. But since rinsing the paper is difficult I had justed mixed it together. Iron levels can vary quite a bit. The proper way is to calculate is by weight of what the material weighs… I work like an artist, not a scientist so I just wing it in most cases. I’d say I had used about a quarter teaspoon to 3 cups of water, that had about 3 tablespoons of alum dissolved first in the water when warm. Have fun experimenting as the tannin levels will not be the same in all leaves, or how the paper makes contact. You can also use rusty objects to make iron water. Check the posts in the Eco Printing section Have fun!
Can you steam the paper bundles over a stove or does this method only work in the microwave. I don’t want to sacrifice my microwave to the art gods so wouldn’t mind having a go over the stove if its possible
Thanks!!
Yes, stove, oven or even outside on side-burner of the BBQ. Just no plastic when using the stove/elements. Lots of Eco printing resources on my site.
I love this post and thank you for sharing! Can you let me know how long you keep the paper with leaves in the microwave and whether the microwave is set to high or some other level? Thank you!!
I just use the regular level so it must be high. The key is to just get it hot enough without bursting anything. Watch for build up of steam as that is getting to boil point. Take out and insulate… It will depend on the amount and strength of your unit.