Snug Nose-Bridge DIY Fitted Mask
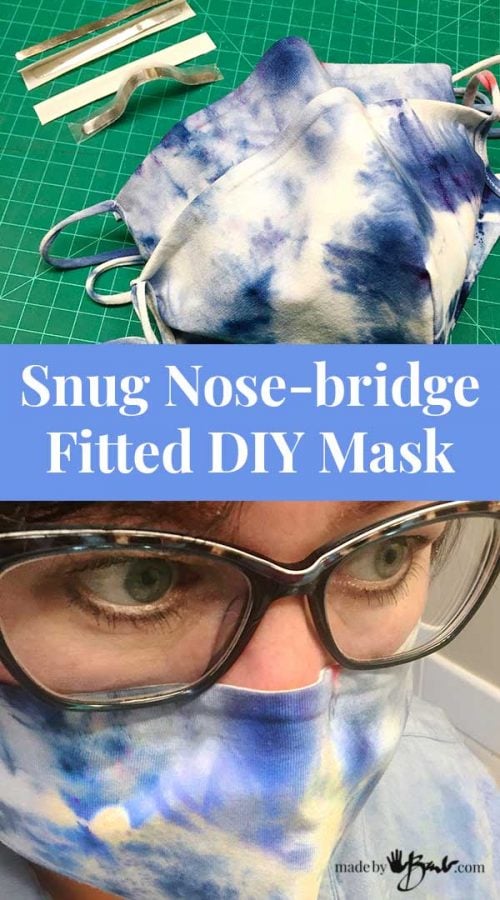
I believe there’s always a way to improve. A mask has to fit well over the nose or it will leak and then fog up my glasses. Here’s a way to make a Snug Nose-bridge DIY Fitted Face Mask.

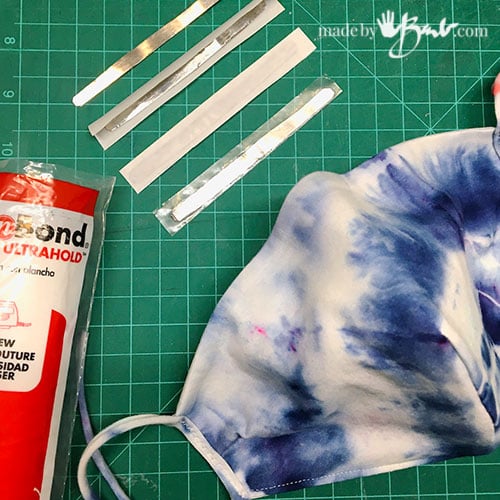
Make your own Nose Strips:
Mask making has been going crazy… My previous pattern has been a great success. But due to the restrictions we don’t have access to many materials so we need to use what is easily available. Who knew that you through some out all the time? A simple soup or tomato can has good metal in it. Tuna cans are slightly different type but can also work.
Caution: Cut metal can be sharp but with a bit of care it can work quite well. The best section is the top or bottom areas that have flat metal. It is easier to cut down the sides (4″ apart) after taking the top and bottom off. Tin snips are best but some heavy duty scissors can also work. (DO NOT use your wife’s sewing scissors!)
Cut strips that are approximately 1/4″ wide and snip off the sharp corners. You can get about 12 from one wide can.

Sand the sharp edges to prevent cuts. If you have no sand paper just rub on some concrete (like a sidewalk) or a rough stone/brick. Amazingly cheap and easily available!
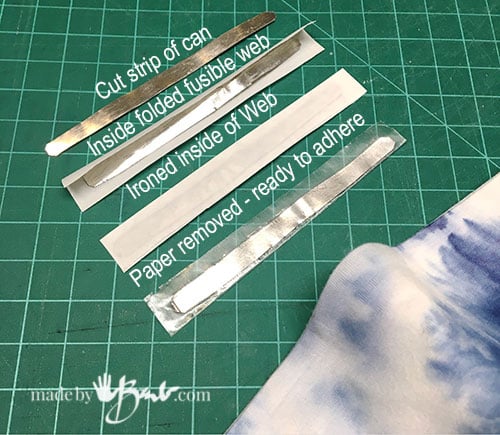
Make it Iron-on
To make it easy to adhere cut a 1” strip of fusible web (it comes on a paper to allow fusing when ironed).
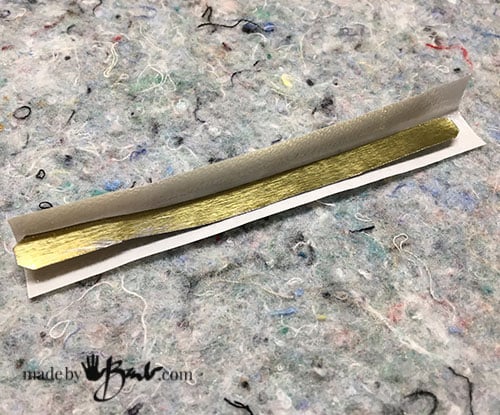
Fold the fusible in half and place the metal strip inside. If you don’t have the type with the paper, use a piece of parchment paper to hold it. There may be an alternative use of double sided tape or other type of glue but this web is the easiest. I love this stuff as it is handy for many projects in the house.
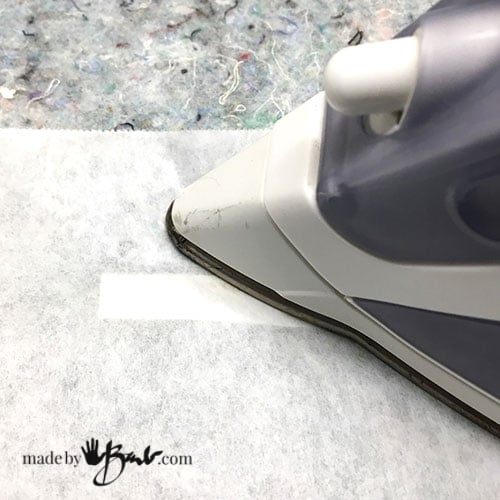
To protect the iron use a piece of parchment paper and iron the strip to melt the webbing to the metal.
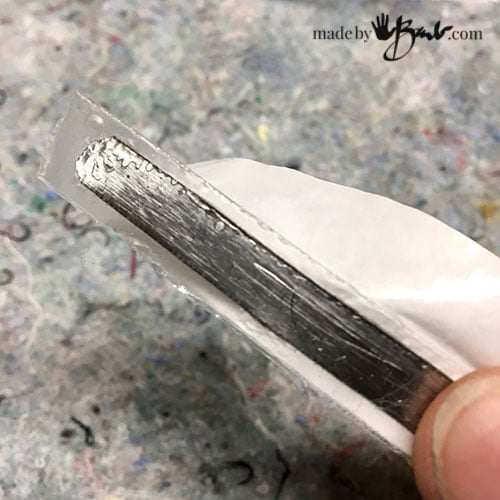
Once cooled, the paper can be peeled easily and there you have an iron-on metal Nose Strip! Depending on your preferences it can be thinner or wider. The extra web will help adhere the layers.
Considering Fabric:
I can’t make any specific claims about what the best fabric is but the professional surgical and N95 masks are made with Non-woven Polypropylene.
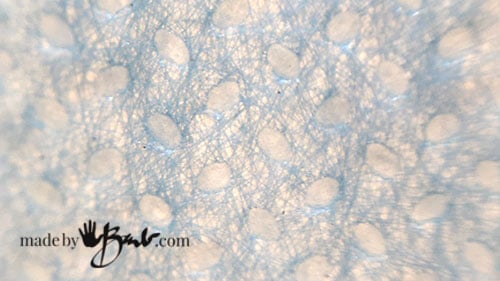
If you look closely there are spun fibres that are stamped to hold in place.
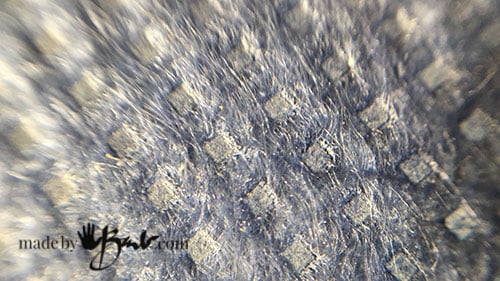
This fabric is hard to find but is sometimes used in garments for painting, car covers, etc. I test the breathability by putting it over my mouth directly. It’s no use to make a great mask that is so dense that the only air is what sneaks from the edges.

The fabric that I have that is similar is non-fusible interfacing as it also not woven. Hold your choices to the light to see if there are tiny holes.

As I see with my N95 mask there are many layers. This featherweight interfacing is not that dense but when added to other layers will provide more protection. (DISCLAIMER; make your choices with research that you trust)
Snug Nose-bridge Mask Pattern:
This pattern is much like my last one but has less bulk because there is only a partial nose seam and then sits across bridge snuggly. Find the Pattern & Illustrated Instructions here

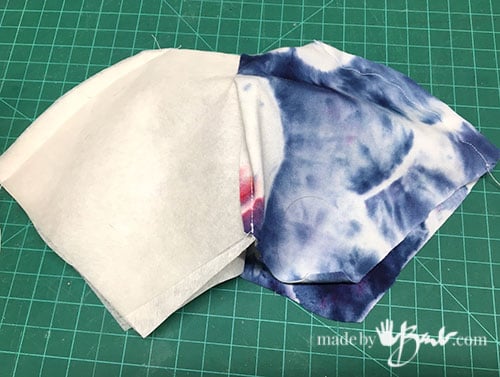
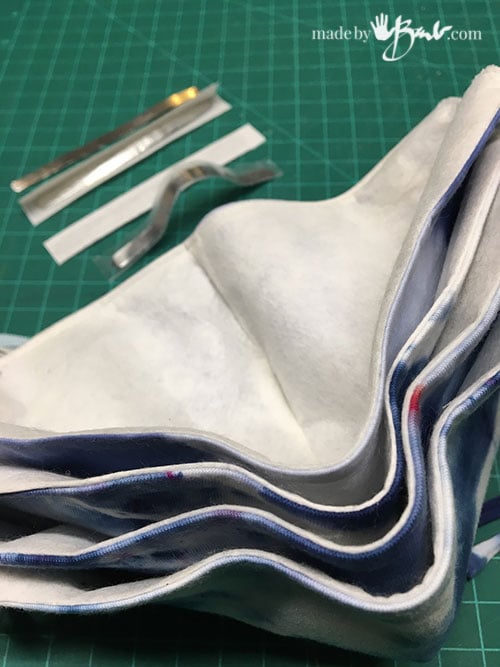
Step #1: Make your fabric choices and cut the layers. These are the multiple layers for the lining. Depending on the density more than one can be used.
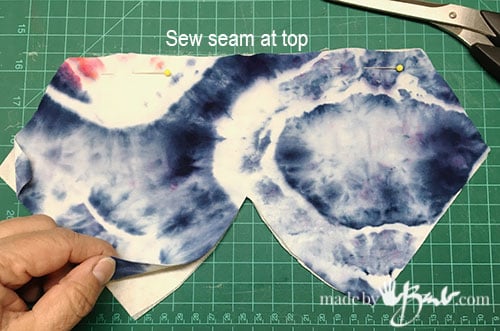
With rights sides together, match the top seam and stitch across. If you desire an open end for a filter, fold one end back 1/2″ before this step.
Trim the seam to 1/8″ or so for less bulk.
Step #2:
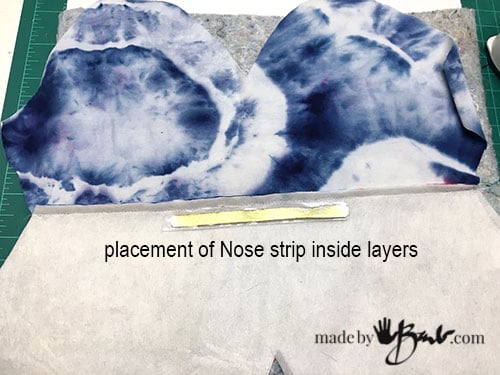
Open to the inside and place the fusible metal strip next to the inside seam allowance.
Step #3
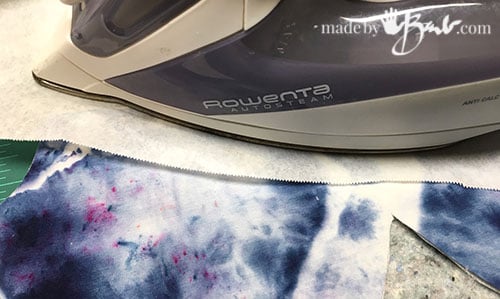
Carefully fold over and press (use parchment to protect fabric and iron).

The strip will adhere to both layers nicely. If you like to top stitch you can at a later stage. I find the fusible web keeps it in place without stitching.
Step #4:
With right side together match centre front seams on both lining and outside and sew seams ending on fold (secure with back-stitching)

Step #5:
Open front seams and match up bottom edges and sew across bottom.

Step #6:
Turn inside out (ends are still open) and top stitch bottom seam close to edge.
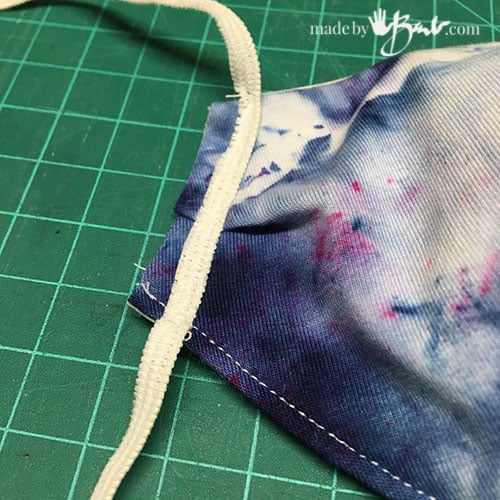
Step #7:
To keep the edge as flat as possible, the elastic or ties (your choice) is stitched with zigzag 3/8″ from the edge and then cut close.

Adding a pleat here will pull the chin up higher depending on the desired fit. I like to test as I go along.

Tip: If you do not have thin elastic it can be cut between the ‘lines’ to make a wider one thin.

If you do not have elastic any knit t-shirt can be cut in 3/4″ strips across the knit and pulled to roll. This has some stretch to it and soft feel. If you use one with spandex in the fabric it has a great stretch. I used a tie-dyed camisole.
The fit across the nose can be fitted to you specific shape and holds well. I hate my glasses fogging from air leak to this helps a lot. (also use shaving cream on glasses to prevent fog)
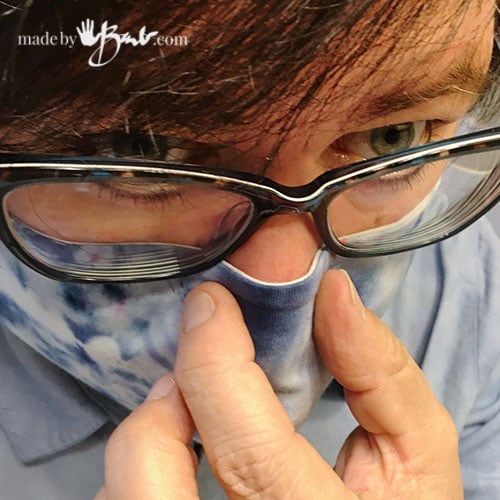
Press into place before any chance of contamination and then you will be less likely to touch later.
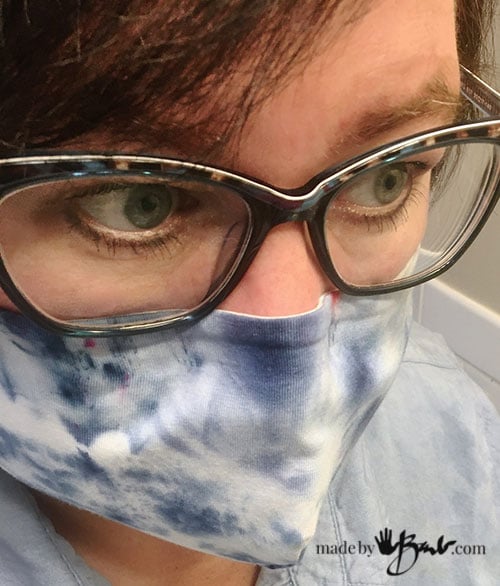
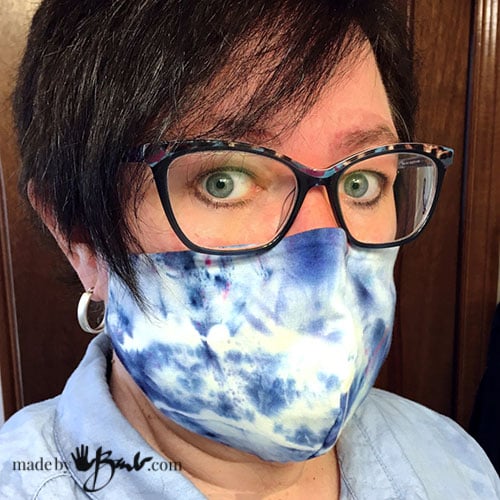
Since there is no seam on the top of this fitted face mask the leakage and fit around the nose is pretty tight. The fusing also keeps it quite flat. I am happy!
‘Just a bit of fear in my eyes… But on a small note; I like my ‘Ice dye‘ so make your mask something that pleases you. Good luck with your making & Fitted Face Mask!
It keeps shape and fits my nose… Stay safe; we have a lot of projects to get through… 🤷🏻♀️😷
Thank you for continuing to perfect your face mask design. I have a friend who cuts her nose strips from disposable aluminum baking pans. The metal would be easier to cut, but not as sturdy as that from the cans. Also, a layer (or two) of non-woven, non-fusible interfacing inside the masks would give extra protection. I appreciate your fusible web technique for inserting the nose strips. Thanks for sharing your great ideas!
I’m sorry Barb. I was so excited by your new mask design that I skipped over your great explanation of the interfacing weights. You are the best! Happy creating. Thank you.
Thanks for sharing this pattern. I am going to try it today. I am searching for a mask that has “the true fit”. Thanks again, Be Safe!
You are brilliant! I love how you’ve improved on your previous mask. I wear glasses too and haven’t been wearing a mask precisely because of fogging. I’ll have to try this out 🙂
Hello Barb. I am so thankful for great artists such as you, who willingly share in order to help others. Your pattern is the best I have seen yet and cant wait to try it out. Ive made many different masks styles using 4 twist ties, pipe cleaners (chenille strips) but never could have come up with the cans idea on my own. Thank you for this.
Here in Ottawa Canada, 88 of us are sewing up a storm, making hospital gowns for street people as they prepare to open up isolation facilities for them to be able to isolate safely.
This pandemic was meant for evil but it is, I think, making us all better, more compassionate human beings. Thank you Barb, for sharing your expertise.
Great mask project. But what I REALLY wanted to say is, I love your haircut! 😍
Oh that’s funny; as I had to do a bit of a touch-up haircut MYSELF! Stay safe and don’t cut your own hair…
I sent it to you 😷
Do you sell these by any chance. It looks like a really good mask but I’m not a great seamstress.
I’m sorry but I don’t, not enough time as I still also teach. I do suggest that people just take the pattern to a local sewist. There are quite a few who have taken this on I find. Often fabric stores know people. Best of luck.
Thanks for all your creativity and sharing. Great info.
thank you for this new addition. i have a few that are loose and i love the idea of the pleat. it works great!!! i did that on my one mask. i have been making masks and giving them away in my area, as we are rural and they have no where to get them plus most of the what offered jobs left the area. this was a big coal mining area and all coal mining as been shut down. i will make my 100th mask today and it will have the little pleat in it.
thank you for your pattern and your knowledge and kindness so i can offer masks to people in need.
I’m so happy that many are making for others, but also that the sewing machines are getting a work out again. How lovely it would be to have sewing make a comeback!
Hi! I just got my 1st sewing machine and wanted to make masks. Do you have a video of this? I am trying to figure out what to do. At the risk of sounding stupid, I am lost and since I can’t go to classes to learn I need to rely on videos to copy.
May I suggest that you make the Mask for glasses There are 2 videos to show you how to make it and it has many great reviews! See the video here
Thank you so much for your incredible ingenuity and generosity!! I am going to try my hand at making a mask that doesn’t fog up my glasses! 🤓
So much more fun to know a ‘local girl’ is behind this creativity too! I’m in Bright’s Grove but come from Mt. Forest. 👩🏼🌾
Barb,
I have read interfacing is made of toxic materials and therefore should not be breathed in. I’m using an extra layer of pre washed material (usually flannel).
I’ve been using your original pattern but thanks for the updated one.
Maggie
Why not use coffee filters inside the mask?
You can change it out as often as you want.
There are many many trains of thought. Yes, I have head that as well. I am not a scientist but do notice if I put my mouth to a coffee filter it is very tough to get air through. When I compare that to a N95 or surgical mask it is quite different. If the fabric/filter is too dense then all the air movement will be through leakage. Using washed/cleaned wipes that are non woven works and are more breathable. I can’t comment on the science part but only the common sense (Non-woven Polypropylene). In whatever you choose they say it’s still better than no mask…
As far as the nose piece goes. I discovered that the plastic wire strip that is on the top of a bag of coffee to keep it folded sealed is absolutely perfect. Once I ran out of those I looked on Amazon, and what do you know, they sell them by the 100s for very little. Mine are on the way. Also, I got some spunbond material that is pretty thick and I’m using that. Will try your new pattern.
What a brilliant design!
Cotton is recommended for breathability and it’s ability to withstand high temperature sanitization. CDC recommends 15-30 minutes at 150ºF moist heat. Sandwich the mask between sheets of foil or cooking parchment, put a pan of boiling water in the oven set at 150ºF and just wait.
This is hotter than washing machine hot water, that is usually set for 130ºF, and you don’t have to iron it!
https://www.cdc.gov/coronavirus/2019-ncov/hcp/ppe-strategy/decontamination-reuse-respirators.html
Thanks! I would think that if it’s not soiled then the steam from iron would also sterilize it.