DIY Ultimate Fitted Face Mask
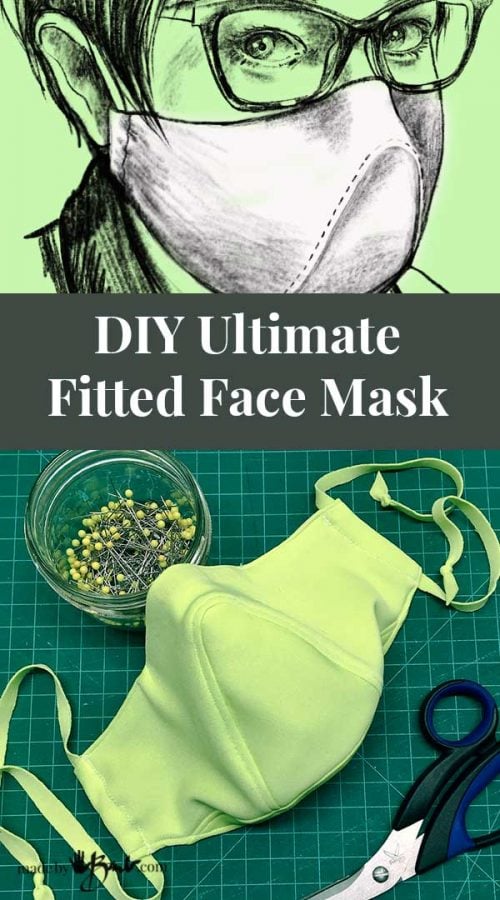
I love to design, and this pandemic has given me a new reason! You won’t believe how I make a pattern of a face. Here’s a new Ultimate DIY Fitted Face Mask & Pattern and how it came to be.
Funny face:
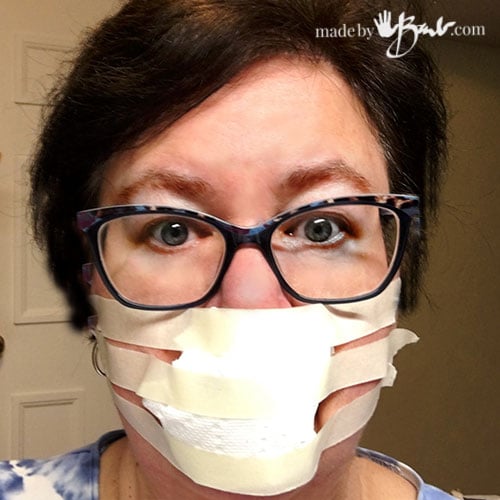
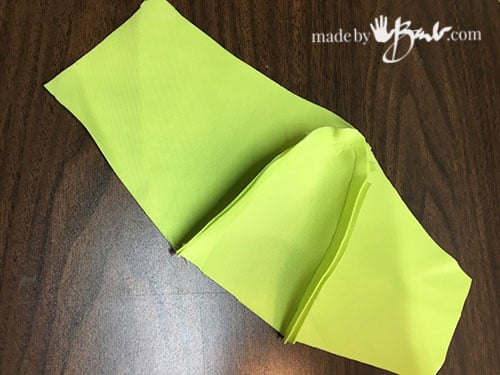
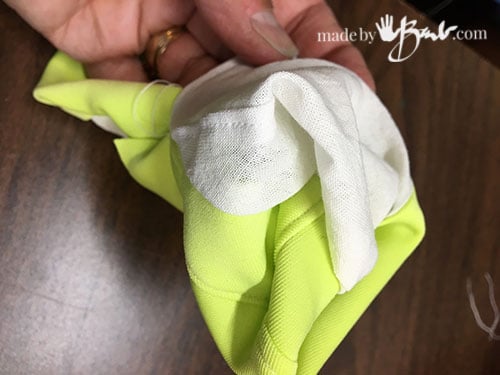
I hear you laughing… I was trying to laugh too. Yes, when you want to create a pattern from a 3D form what do you do?! I could not put my face in silicone soooo, tape is the next best thing. To create the ‘space’ that I wanted inside the mask I created (taped) a bunch of paper towel in from of my mouth and nose.

Next step is to cover my face with tape as close to the shape as possible. I know you are wondering if I could breathe – yes a little. But it’s all for the sake of making people a bit safer with a good mask so it was worth it! The masking tape underneath would allow this to come off a bit easier. Who needs facial waxing?! This pattern is great (thousands have downloaded) but our face does not have a centre seam. ‘And I love the challenge of forming a pattern. I have done that most of my life but never for a face! How unique the facial form is…

I have made forms of bodies and feet this way but never a face. I know it’s ‘my’ face but I think I’m pretty average… ok I have some cheeks!

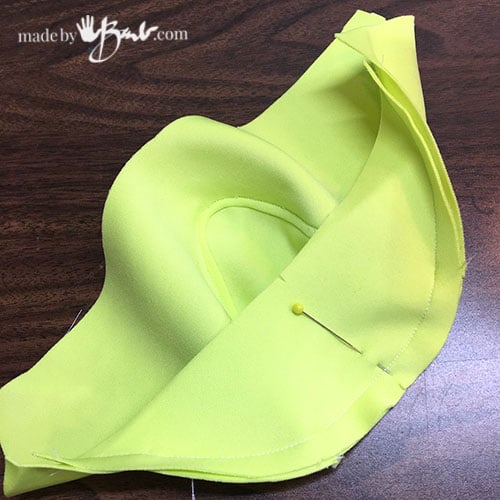
Before the digital age I had taught 3D design (when the dinosaurs still roamed the earth) and we would deconstruct shapes to flatten into fold up paper structures so this is much the same since fabric is as flat as paper.
It needs to be symmetrical and looking for the flattest planes helps to where to cut it into pieces.
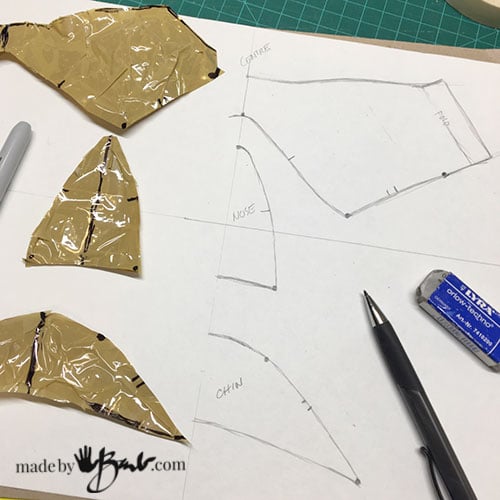
Marking where pieces attach & line up is the same as the notches in sewing patterns.

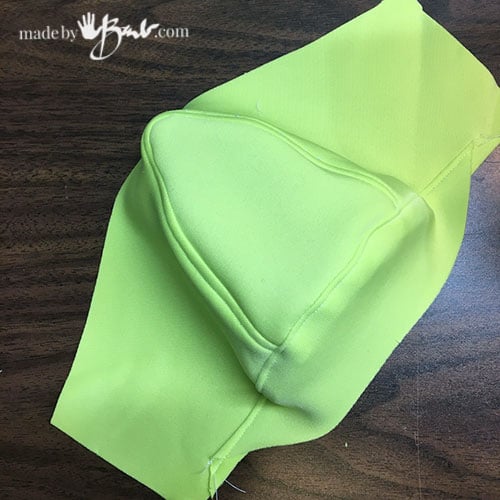
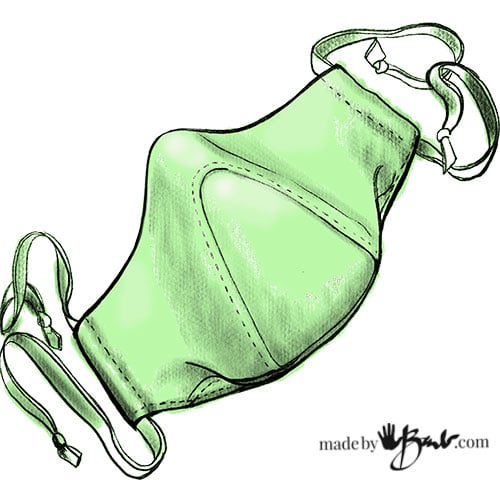
From these pattern pieces I added 1/4″ seam allowance to the DIY Fitted Face Mask Pattern.
The Pattern:
You can download the pattern here

Cut the Pieces for the DIY Fitted Face Mask:
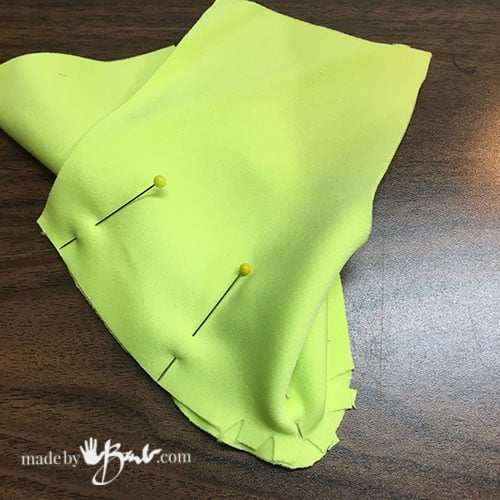
Once you have printed the pattern (100%), cut the pieces as marked. This pattern makes an inside layer and outside layer; pretty identical shape but the sides are open to allow easy turning and also to make a filter pocket if you want to insert filters.
**UPDATE: I have updated the pattern file as there may have been a layer that obstructed the view if printing. Feel free to download the fixed one.
Step 1:
The hardest part of this design is the top of front nose piece. To make it easy clip the top inside (as marked on pattern) curve so that it can stretch around the top curve of the nose piece. Matching notches, sew with the large face piece on top so that you can see as you slowly sew around the curve.
Step 2:
After opening up the front (press if desired) I topstitch it towards the outside. It will keep it’s shape much better and therefore not always be touching your lips and nose.
Step 3:
The rest to make this fitted face mask is quite easy. The chin piece gets attached to the bottom matching notches and centre. You can do a bit of a ‘fit test’ to see if you need adjustments.
Step 4:
Again to keep the shape I topstitch towards the bottom. This is a polyester knit so it keeps it’s shape well. I know many suggest cotton however I wonder about the way it absorbs moisture and keeps it. Why is all workout wear not cotton? I suggest that you make your own choices of fabrics and also filter products as there is so much conflict for each material.

Step 5:
Repeat all the same with the lining fabric. In this fitted face mask I used a cotton.

Step 6:
Fold the lining ends inward (edges can be finished if desired) and only sew top edge
The there is a nose wire/metal band ironed next to the seam as I did with the Snug-nose Bridge Mask.
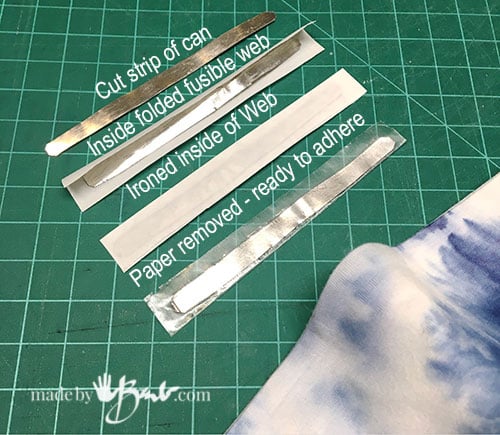
Fusible webbing and some strips cut from cans like sardine (top flap) or tomato work great.

Step 7:
With right side together sew the bottom seam again folding back the lining sides.
Step 8:
Turn right side out.

Carefully fold bottom and top edges.

Step 9:
I top stitch the bottom chin edge to keep it flat.

Step 10:
Fold inward and stitch the casing with straight or zigzag stitch.

Step 11:
I have started to not use elastic due to the irritation it can give and also I like to use up what I have. Cutting t-shirt fabric 3/4″ (across the knit) or so will make a nice round somewhat stretchy cord that is soft.

This fabric had so much stretch that I just used a strip as a tie.

Oh the stash of fabric remnants I have… Now I can have a mask to match each garment I had sewn prior.

This DIY Ultimate Fitted Face Mask pattern fixes some of the design challenges of the chin fit as well as the room for lips & nose. The nose bridge does not have a seam so it can be very flat incase your glasses it on top. All these make a little difference but over hours could be annoying.
When you make a mask for the first time for yourself, test the piece before you put the lining in. Adjustments can be made by slightly adjusting seam allowances as well or printing the pattern at a slightly smaller size.

I have been enjoying some sketching again as that’s how I best visualize all those ideas floating around in my crazy-artist-brain! Let me know how you like your mask. Stay safe and we all look forward to the future…
I have been scouring the Internet searching for face mask patterns that do not touch the mouth and can have a clear insert substituted in front of the mouth. This pattern appears to have potential!
With those goals in mind, would there be room to sew 1” or 2” braided polypropylene horsehair on the main pattern piece following the seam of the front inverted “U” pattern piece to stabilize the material? —Would I need to add a strip of horsehair across the chin piece too, or is that overkill?
I would then substitute clear vinyl for the inverted “U” pattern piece.
Next, these are being donated to a region where AC units are few and far apart, so I need to reduce the surface area of the mask. This means the sides need to be reduced and of course the chin area will need to match the reduction . —Do you have suggestions as to how to accomplish these changes? Do I need to maintain the same shape, or can I modify it to look something like the mask used for CPR?
Wow, that’s a lot of alterations. Sure the side could be shorter, as could the chin a bit. When in doubt I make a mockup to test. On another note, have you tried using zip ties as a stiffener? I’m not familiar with horse hair. This pattern has 2 seams that make a ‘V’, maybe there could be stiffening on each side. I worry about the plastic fogging though… Another idea: Use the flat pleated edge type pattern, and add a zip tie across at bottom and top of the vinyl square. It would bend outward when the side casing is pulled (use a casing rather than just added ties)
This looks like a great pattern! Thank you!
I make them from strips of the sardine can tops, and then ironing it inside a folded piece of fusible webbing. It is shown in this post It works well and is really easy. Some people use pipe cleaners or floral wire.
Thank you so much for sharing your design. Do you have any advice for a beginner sewer navigating around the curves of the piece, besides go slow?
Thank you again
Curves seem crazy to do especially when they are not clipped first. Clipping to pretty well the seam line makes it then be able to be flattened. Also having the clipped piece on top allows manipulation and also see where you are sewing. Sometimes if it’s not quite close enough I do a second stitching. It’s really not that bad, one time and you’ll be a pro…
I am very impressed. I have been making masks for NAS in Pensacola because they were all given those black one layer disposable masks, (which they hate). Since they have to wear their masks for 8 hours a day they have been coming up with small issues. 1. It keeps touching their nose making it harder to breathe,. And 2. It fogs up their glasses.
I did extra seams for the nose touching but couldn’t figure anything out for the fogged glasses. So I am excited to try your design.
I understand! I HATE fogged glasses! The key is a snug fit so that the air does not escape. The metal strip will help with that. See also this one and this pattern has no seam at nose, even better. Hope that helps!
OMGOODNESS I. Just wanted to report back and say so far the guys like having that different design option. They love it not laying on their nose. I did find some of those colorful sun blocking fishing shirts that are real silky feeling and cut them up and used actual mask filters for the inside fabric (just in case) and sent them today to see if they help with this Florida Heat. Now I am going to try your new pattern and see if I can solve their glass fogging issues.
Thanks so much for sharing all your steps.😄
Hi Barb!
Your Nose Gusset face mask pattern is awesome! Best fit of 7 different types of masks that I have sewn. I did not like the fit of most and after sewing your mask, I have ended my search for perfect fit. I have found it; your pattern!
Your illustrations are lovely and the stages you went thru to make the pattern are amazing. I recently did similar paper bag and masking tape pattern for a Kitchen Aid mixer cover. It was ok, but not perfection.
Thank you, Thank you!!
I enjoy your various artsy projects. Keep up your creativity.
Great! I am so glad! I love a challenge since I am stubborn. Enjoy!
Hello!
Thank you so much for sharing your pattern! This is by far THE. HARDEST. face mask pattern I have tried, but definitely worth trying. I’m sure that’s from my own incompetence in sewing since I don’t sew, and only started since this pandemic hit. I’ve sewn a few masks for my family and tried about 4 different patterns. I LOVE this one! Thanks again for sharing with this unartistic, unimaginative, barely capable sewer, trying to keep my family safe!
In one way this pandemic is making people learn to sew, and I LOVE ❤️ that! It is such a useful skill! I am so glad and thanks for sharing!
To be fair, I had to piece my fabrics together because my scraps are too small and for them to fit my teenage daughters, I had to print at 80%. But by the 5th mask…I had it down!! The first 2 had to be thrown out. We all love this pattern so much better though!
Glad you like it! Maybe after all this is done more will sew!
July 30, 2020,
Hi Barbara,
It is so luckily to see you cloth face mask 3-D design,.it is the best I even seen,
Would you please email me the patterns so that I can print them out.
Thank you very mush,
William Wu,
London, Ontario,
‘Hope you love it too!
Thank you very much pour this pattern !
I’ll try to sew it in place of an another with jonction on the nose that disturb me.
In France we’ll have to wear a mask everywhere soon because virus is coming again…
Take care of yourself !
I’m a little confused with step 1 on this mask you indicate to “clip the top inside (as marked on pattern)” but the picture seems that you have clipped the large face piece. I ended up clipping both.
The large curve of the bog front piece needs careful clipping so that it can lay flat to sew. What you may see is that I notch out triangles to let the seam allowance sit flatter on the centre piece. Any bulging round shape has too much extra seam allowance, any inside curve needs clipping to stretch flat for sewing. You’ll get it….