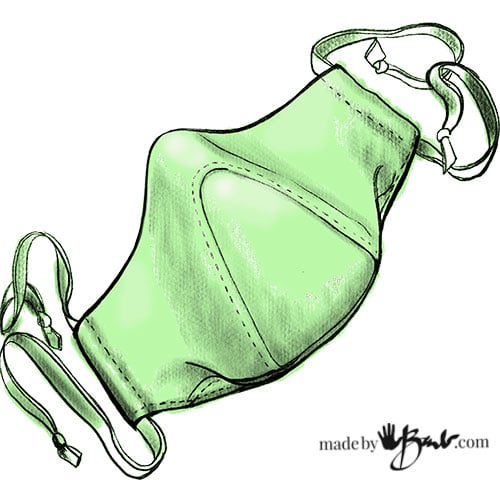
DIY Ultimate Fitted Face Mask
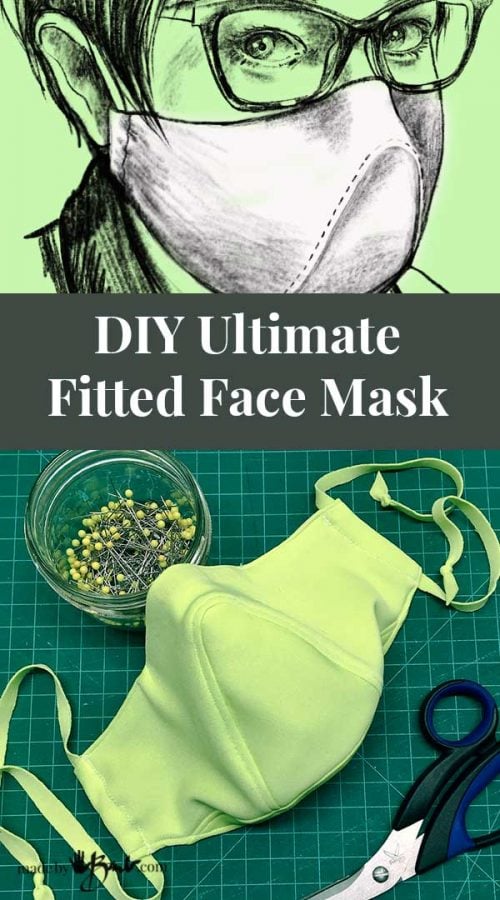
I love to design, and this pandemic has given me a new reason! You won’t believe how I make a pattern of a face. Here’s a new Ultimate DIY Fitted Face Mask & Pattern and how it came to be.
Funny face:
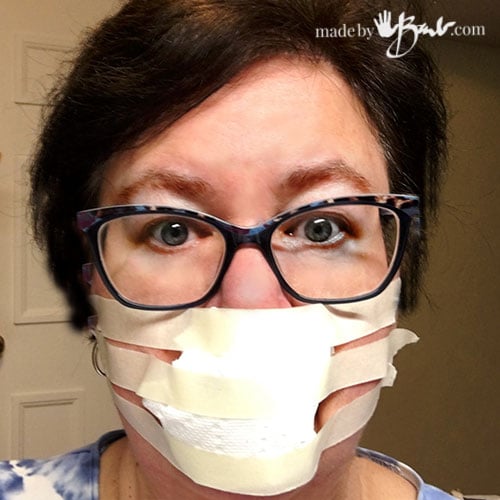
I hear you laughing… I was trying to laugh too. Yes, when you want to create a pattern from a 3D form what do you do?! I could not put my face in silicone soooo, tape is the next best thing. To create the ‘space’ that I wanted inside the mask I created (taped) a bunch of paper towel in from of my mouth and nose.

Next step is to cover my face with tape as close to the shape as possible. I know you are wondering if I could breathe – yes a little. But it’s all for the sake of making people a bit safer with a good mask so it was worth it! The masking tape underneath would allow this to come off a bit easier. Who needs facial waxing?! This pattern is great (thousands have downloaded) but our face does not have a centre seam. ‘And I love the challenge of forming a pattern. I have done that most of my life but never for a face! How unique the facial form is…

I have made forms of bodies and feet this way but never a face. I know it’s ‘my’ face but I think I’m pretty average… ok I have some cheeks!

Before the digital age I had taught 3D design (when the dinosaurs still roamed the earth) and we would deconstruct shapes to flatten into fold up paper structures so this is much the same since fabric is as flat as paper.
It needs to be symmetrical and looking for the flattest planes helps to where to cut it into pieces.
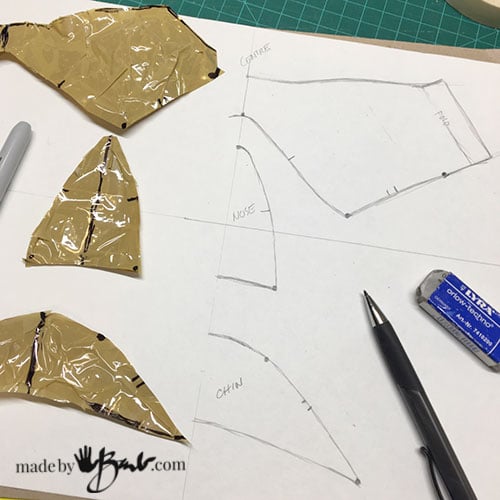
Marking where pieces attach & line up is the same as the notches in sewing patterns.

From these pattern pieces I added 1/4″ seam allowance to the DIY Fitted Face Mask Pattern.
The Pattern:
You can download the pattern here

Cut the Pieces for the DIY Fitted Face Mask:
Once you have printed the pattern (100%), cut the pieces as marked. This pattern makes an inside layer and outside layer; pretty identical shape but the sides are open to allow easy turning and also to make a filter pocket if you want to insert filters.
**UPDATE: I have updated the pattern file as there may have been a layer that obstructed the view if printing. Feel free to download the fixed one.
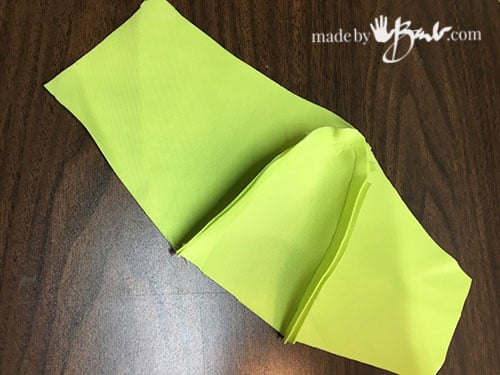
Step 1:
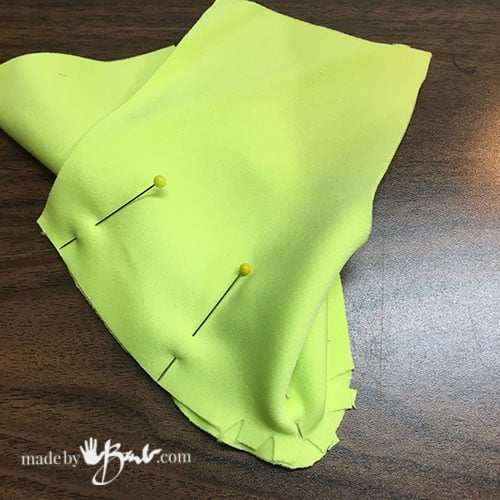
The hardest part of this design is the top of front nose piece. To make it easy clip the top inside (as marked on pattern) curve so that it can stretch around the top curve of the nose piece. Matching notches, sew with the large face piece on top so that you can see as you slowly sew around the curve.
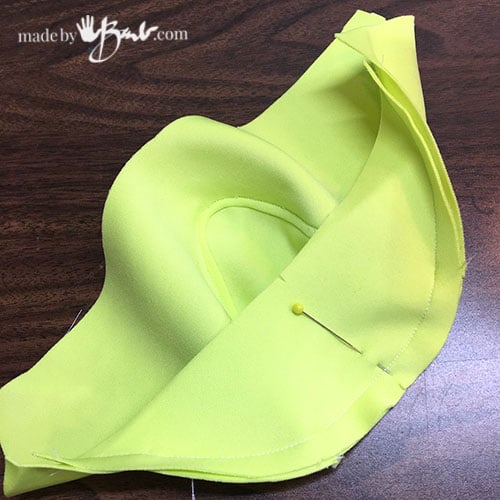
Step 2:
After opening up the front (press if desired) I topstitch it towards the outside. It will keep it’s shape much better and therefore not always be touching your lips and nose.
Step 3:
The rest to make this fitted face mask is quite easy. The chin piece gets attached to the bottom matching notches and centre. You can do a bit of a ‘fit test’ to see if you need adjustments.
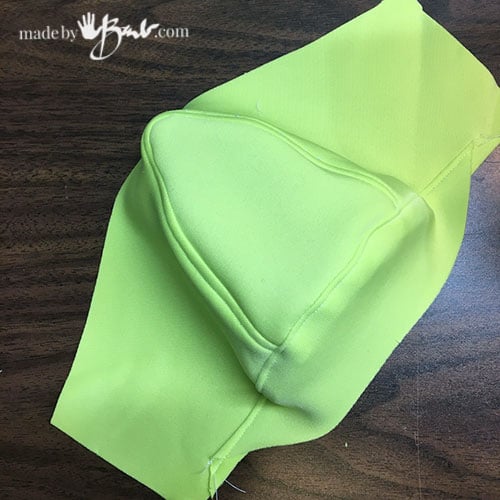
Step 4:
Again to keep the shape I topstitch towards the bottom. This is a polyester knit so it keeps it’s shape well. I know many suggest cotton however I wonder about the way it absorbs moisture and keeps it. Why is all workout wear not cotton? I suggest that you make your own choices of fabrics and also filter products as there is so much conflict for each material.

Step 5:
Repeat all the same with the lining fabric. In this fitted face mask I used a cotton.

Step 6:
Fold the lining ends inward (edges can be finished if desired) and only sew top edge
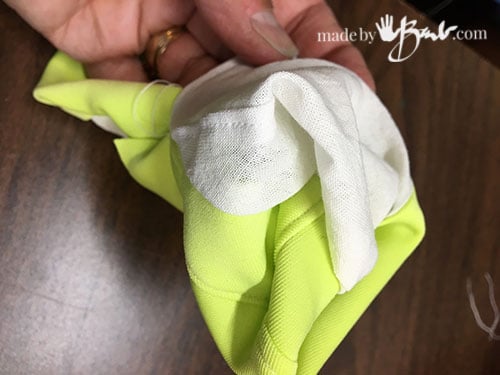
The there is a nose wire/metal band ironed next to the seam as I did with the Snug-nose Bridge Mask.
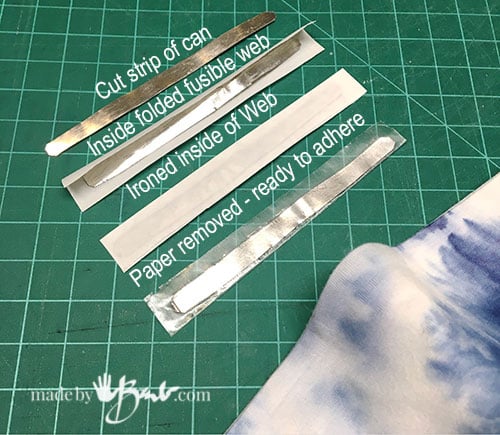
Fusible webbing and some strips cut from cans like sardine (top flap) or tomato work great.

Step 7:
With right side together sew the bottom seam again folding back the lining sides.
Step 8:
Turn right side out.

Carefully fold bottom and top edges.

Step 9:
I top stitch the bottom chin edge to keep it flat.

Step 10:
Fold inward and stitch the casing with straight or zigzag stitch.

Step 11:
I have started to not use elastic due to the irritation it can give and also I like to use up what I have. Cutting t-shirt fabric 3/4″ (across the knit) or so will make a nice round somewhat stretchy cord that is soft.

This fabric had so much stretch that I just used a strip as a tie.

Oh the stash of fabric remnants I have… Now I can have a mask to match each garment I had sewn prior.

This DIY Ultimate Fitted Face Mask pattern fixes some of the design challenges of the chin fit as well as the room for lips & nose. The nose bridge does not have a seam so it can be very flat incase your glasses it on top. All these make a little difference but over hours could be annoying.
When you make a mask for the first time for yourself, test the piece before you put the lining in. Adjustments can be made by slightly adjusting seam allowances as well or printing the pattern at a slightly smaller size.

I have been enjoying some sketching again as that’s how I best visualize all those ideas floating around in my crazy-artist-brain! Let me know how you like your mask. Stay safe and we all look forward to the future…
I love love love this pattern I was just wondering how to i large it for a mans face or small child. I have made hundreds of mask and find I like this one most. Fantastic job such a pleasure finding you on the web.
I have had a comment from someone saying that they feel this is sized for a man. I guess our faces are all so different! I have a pretty full face, so maybe start with that and then reduce 10%. That would be an inch smaller over 10″ length. Takes a bit of math but measuring would be best…
love this, thanx! what a beautiful drawing, congrats. regards from caracas, venezuela. Ari.
You don’t have to approve my comment for public. Just noting my research to yiu. I like the shape of the pattern. Saw some making the seam down middle then pressing both layers outwards which leaves only stitching between you and the air. The reaon it has to be tight woven cotton as per guidelines of CDC report is because it stops droplets at .3 microns. Sadly or stupidly th report has a first chart that everyone shared that shows first testing that tshirt material did that better but not in terms with covid 19. The next 35 large paragraphs show why they move tshirts to absolute bottom and cotton weave to top. Easy way to tell is hold up to light. Or a desk lamp. If you see light get through cannot use. For droplets in or out. There is no do what you feel ots science. Covid 19 is .1 to .05 microns. Half a micron but it exists mainly in droplets. N95 masks are only. 1. Ther is No mask material at .05 except forest fighters plastic cone types which Calif lent to our Los Angeles hospitals. Its not about thick or thin. Sweatshirt material is knit. Still would let droplets in. Athletic wear is purposely porous to let swear out. Why they say it wicks and keeps you cool. Using any athletic wear fabric is exactly counter productive. Plus in talking to a nurse in new York who started a sewing group. Told me I’m exactly correct. They are now ironing the cotton after bleach soaking 30 mins and washing and drying. Covid lives from 40 degrees to 149 in labs. Dryers go to only 129. Irons are up around 400 degrees. If I’m out 5 mins and no one sneezed around me I re iron my mask every time. I did switch to poly cotton 60/40 tshirts cut and rolled for ear ties. Besides hurting it doesn’t survive bleach washing and ironing. Most high poly materials also cannot be ironed. After reading 100s of science articles and watched more than that of YouTube makers from beginning I made end casings.. Then supply a long string if anyone wants to change out the ear ties. I make a pleated version and a sqaure version designed by a nurse. Going to work on a more shaped one. But again your pattern is great. Just materials not recommended.
Barb, may I make and sell masks based on your pattern? Please e-mail me at [email protected]
Sure! I really did design this to help others! DO NOT sell the pattern though. It would be great to give credit/links somewhere to the designer. It’s not the same as what these guys did as they gave no credit and reap in millions $ STAY SAFE
Hi, I would be interested in buying this mask if you are making them.
No, I can’t keep up with the site, designs and making. Perhaps you could take pattern to a seamstress. There are many many people making masks…
5 Minute Crafts never give credit to the originators. My suggestion is to create your own YouTube channel and do videos featuring your patterns/designs. Make sure you state that they are your own designs. The kicker is that 5 Minute Crafts make a fortune (literally) for sharing a ton of uncredited material!
We’d follow, watch, and share!!!
I am not seeing on your page anywhere to download the pattern.
There is also a section at the top for ‘Downloads’. I’ll email it…
I would love to have the pattern for the ultimate mask. I have copd and think this could help. I couldn’t find the spot to download. Please help. BTW. Your masks look awesome
Sent, Enjoy.
Thanks so much for making this pattern available, and I really admire your drawing skills. I just made a cotton mask from this pattern today, and I love the way it fits! I was feeling stifled by the masks with the middle seam, and your design is great because it actually takes into account that there is a nose and a mouth in there. 🙂 I have a smaller face, but I found that just tightening the elastic I use allows the mask to fit tightly enough that there isn’t any gapping around the mask. The ends of the mask do touch my ears, so that’s the only other change I might make if I sewed this again. Thank you again — this is an ingenious and unique design that I will be making again.
Wouldn’t it be great if we all were one size! But just like jeans, there will be hundreds/thousands of fits…
I saw your mask design on Pinterest. I love the design as it is unique! I am excited to sew one today!!
Thank you so much!!
love this post, thank you for sharing your talent. Looking forward to trying your pattern, thanks again, stay safe
Just got your pattern. Will try making this today.