Leaf-Cast Concrete Lamp
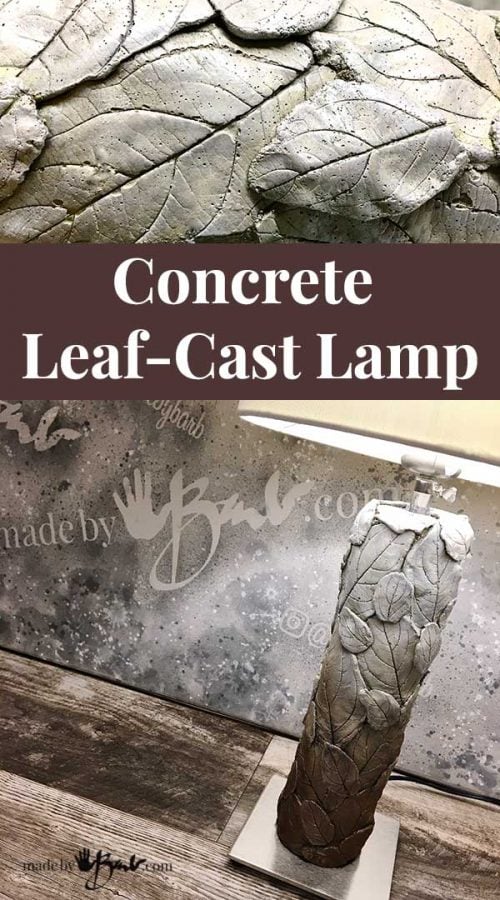
Too much time away from concrete makes me antsy. I’ve had this idea bouncing in my head for a while. I’m so happy to be able to share this Concrete Leaf-Cast Lamp with you, and no wiring needed!

Simple Supplies:
I decided to make things easier and not do any wiring, This lamp does not allow disassembly so I needed to keep it intact, which makes life easier for me anyways. Yup, those are cans from chips! Before I throw out anything I ask myself; can I use it as a mold?
Go look at some leaves and see what texture they have! My favourite Concrete mix always performs and meets my expectations!

Since this lamp is height adjustable, the cord needs to still be able to slide in and out. Use some Vinyl tubing to cover the wire and protect it from the concrete edges later on.

Cut the vinyl tubing in the length to slip it over the wire. If you are concerned there are other simple lamps available that would not need this adjustment.

I used some zip ties to attach securely as they will be inside.

To keep the base clean and not have any concrete stain, it should be covered with something like a thin plastic from packaging. Make 2 halves and slide them into each other to cover the base. Tape well to secure. Concrete does not stick to plastic so it can be pulled out after. Keep the tape accessible.

The form I am using is the simple but sturdy cylinder shape of the ‘Pringles Chip’ can. They cut easily and can be adjusted for height. They also come with plastic caps for top and/or bottom.
Cut the bottom one for the base and cord. Ad a slot for the top one and slide into place. Tape everything well.

Cut a cap for the top to be able to slip it one.

I cut the can of a second one to make it as tall as I wanted.

Tada! A nice simple shape and sturdy form. Lamps do not get wet so it will be perfectly stable.

Set up the form:
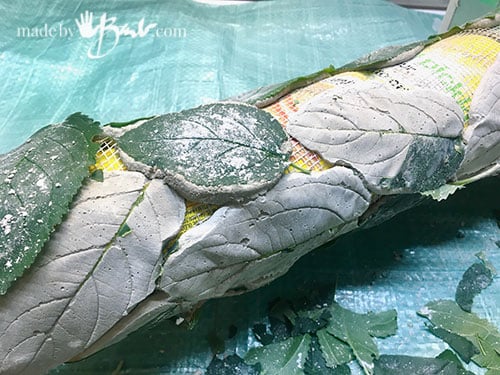
To make the concrete not slide and add some reinforcement wrap the tube with Drywall mesh. I have used that mesh in many of my orbs and have had good results
Set a place for it to lay horizontal. The square base allows it to turn nicely.

Concrete Time:
I use the underside of the leaves to get all the details from the veins! MotherNature is amazing at the amount of detail. The leaves do not need a mold release at all. It is much like my leaf coasters (while you are at it make those too!)
Mix some of the Rapidset Cementall with water and be aware it does set pretty fast. I mix enough that I can use in 20 or so minutes. It will need little water, mix until it slightly flows. It has a melted ice cream / sour cream consistency.
Let it sit a minute or so. It will start to slump less (runnyness will diminish). Put some on a leaf and then flip it onto the tube. Keep leaf in place until it is set.

Repeat all over the tube. There may be small spaces that can be filled later on.

Once one side is done, the mix is usually set enough to allow turning (it will be super hard in 1 hour)

As soon as it is hard enough you can start to peel leaves off. Some veins may stay and can be scrubbed out later.
I find that the trick to getting the leaves off easily is waiting until the concrete is just hard enough to not lose texture but the leaves are not too dry.

Leaves, leaves everywhere!
Take a look and see where there may be empty spots to fill in. Repeat the method to fill in any small places with another layer of little leaves. If it is really cured dampen the older concrete before adding the fresh concrete on top.

Once all the small spots are done fill the top with some leaves or a flat ‘buttering’ of concrete. I did a bit of both. It is very forgiving as there is so much amazing texture!

Time for a finish if you desire. It can perfectly stay as just concrete! This concrete is very dense and hard so it would be quite durable.
Paint supplies:
- Matte Medium
- Bronze Ink
- Silver Ink
- Soft Brushes
- Flannel Cloth
- Black Acrylic Paint
- White Acrylic Paint

Subtle Finish:
I actually hate painted concrete as the it looks like badly cast plastic. The whole purpose is to capture the details. So I used a very light dry-brushing of some metallic bronze colour with less towards the top. Apply a very thin layer of Matte medium to seal some of the absorbency of the concrete. That way the paint does not absorb so much.

The acrylic metallic inks give good colour with out clogging the detail texture

Since there is so much great details of the leaf veins it’s perfect to do some ‘antiquing’. Mix a small amount of thinned black paint and let run into all the crevices. Quickly take a rag and wipe off any excess and it will only stay in the veins

And more:
Since I have spent most of my life being an illustrator I can’t leave well enough alone… I just added a slight amount of dry-brushing of silver near the top. The key work is; ‘subtle’. You could add a whole protective layer of matte medium but I did not think it needed it.

The weight is not crazy heavy, but does feel more stable than before. Take off the tape and protector and clean well. A simple drum shade makes it a modern style without being so dull and boring!

Be creative! This is just one option, but I’m sure there’s many ways to adapt this design. ‘And no two will ever be the same! These will go well with my other leaf-cast orbs.
I think I am going to change my name to the ‘Crazy leaf Lady’! Enjoy & let me ‘light up’ your life!
I love your site and your creations!
Thanks so much!
Love your website!!!
It’s quite the labour of love. I just wish I would have started when I was younger!
Hi Barb, just wanted to touch base. I have had some really positive comments on my fathers mask – the mask you designed ! It’s a winner with the NHS dental and the NHS paramedics and the NHS Doctors, in our local area of Torbay, England. My gratitude and thanks for your dedication to this cause.
That gives me some comfort! So glad to hear it!
I absolutely love the orbs and the lights. Guess what I’m doing next summer. Thank you so much for your wonderful and easily understandable instructions.
I’m glad! Making things inspired by nature is very comforting at this crazy time!
I love this idea … haven’t played with concrete for 20 years and its about time. Its on my weekend project list with oh so many things, I am sure you understand. I was thinking that since one can go to Goodwill etc and find already shaped boring lamps for $5 it would be easier than dealing with adding the can and would be a bit more symmetrical to start with, and then you could add other shapeliness to the solid base. What do you think? I love all your contributions to our art world of appreciation and experimentation. Blessings!
That’s really beautiful! And so clever of you!
Thanks! Eco printing with leaves has opened my eyes to all of nature’s amazing prints
I just wanted to say that I find you simply amazing! I love your site! I find you to be quite informative! I was an admin my entire working life, had to retire early at fifty never knew I was an artist until then! I’ve been shocked at what seems to come natural to me but all your stuff is dead on….just absolutely beautiful! Do you ever have any faux paux’s (accidents) (uglys) lol?
I do have some flubs, but I have a very stubborn streak! I don’t give up until I get it to work! I have been blessed by having a mother who had so many talents that I saw how she managed and made so much. I am so happy to see how my daughter has started to also show that she can also do much herself! That’s really what it’s all about in the long run! Glad you are enjoying the art!
Wow…..just wow!!!!! I love working with cement sooooooooooooo much!!!!! Between making my rabbit, Estelle, and all of the other lovely things I have done, and given away, I also look forward to this summer to make a lamp. You are just so amazing!!!!!
I’ve often laughed at how much I love making with concrete… It’s ‘kinda’ like using a cake mix, but in the artistic world, and still making something wonderful! Thanks for your kind words!