
Lightweight Concrete Faux Rock


What do you do when you can’t lift those heavy rocks but you want ‘big’ rocks? You knew I was going to say; ‘make them’! Here’s how to make your own Lightweight Concrete faux Rock.

When you get a ‘new’ TV:
When you get a new appliance and look at that mountain of styrofoam; there must be something I can do with it?! The light material has been accumulating for a while… and hubby was bugging me to get rid of it, soooo…
I like large rocks; diamonds and the like, the bigger – the better. I know rocks are cumbersome and back-breaking heavy, so light weight ones are a dream. That’s when my problem-solver brain brought a few methods together.

I wanted to keep this as simple as possible. I did not want to fight with that chicken wire that always seems to poke & hook my skin. Simple – just attach a random shape of pieces of styrofoam. Wear gloves so you won’t be sticking to everything. I did not break many pieces as I hate the way it starts to cling and get everywhere.

Styrofoam does not absorb water, It’s light and pretty sturdy as well; so perfect as a form. Many glues will dissolve the styrofoam, so I found a can of ‘Great Stuff’ (as I was also incidentally also doing some window trim repair) It works well to attach the styrofoam as it quickly starts to set and also fills gaps. I was not fussy at all, just stuck random pieces together since I do not like the round rocks; I much prefer rocks with angles, textures and layers. There is another step for more detail so this is just a basic starting shape.

I was amazed at how quickly they all came together. I had 3 big bags full of pieces!
Base forms made!

These range about 18″ to 30″ in size. It’s ok to have a bit of flat sides as natures rocks often break off in layers as well.

Messy hands time!
I have used draping of concrete soaked fabric for a few projects now. The (famous) Spook, The Faux Bois Chair, the Cat and even the Rope Orbs all have some part of this method. So I realized that it would make for a great way to get a base shape, a stiff concrete skin.
My favourite way is to use only portland cement as it gets really smooth and can absorb well into fibres. Since I have a lot of used flannel from Eco printing, I found that it works well. It is a bit thinner but nicley absorbent. No problem to have extra layers or wrinkles either.

To make it less messy (a bit) I used smaller pieces, not really sized at all. ‘Think of it like paper-maché, layer and smooth out.
I found trying to wrap all the way around was a problem, as it would fall off. So I only did the tops and sides and then let cure. Remember, do not let it dry out too fast. Misting with water does not hurt, it helps.

I know they look strange, bit it’s just a base shape… you can be fussier if you like but usually the more contrived then the less it looks like nature..

Once the tops and sides are cured (usually overnight) you can wrap the bottom and even up the sides if it’s weak. There will be another layer so a few weak spots are not really an issue. It all depends also where you plan to put these. Mine are going to make a waterfall structure, not be climbed on. If you want them pretty indestructible, add more layers of the cement soaked fabric. If you choose thicker fabric it tends to get stiffer since more cement is impregnated, but also uses more mix. See my tests here.

These still look a bit boxy but looking pretty good considering how easy they were so far!

Some simple Tools:
To make some rock-like texture some simple tools can be used. An old brush dipped in a bit of fast setting cement or whatever else can make some good pebbly divots. Knives, like putty or pallet knives help spread the next layer, trowels help apply as well.
When adding any new concrete to existing it needs to be wetted, and if you want extra reassurance a bonding layer with a Bonding Agent can be painted on. I generally don’t use it bit did try for a couple to compare in the future.
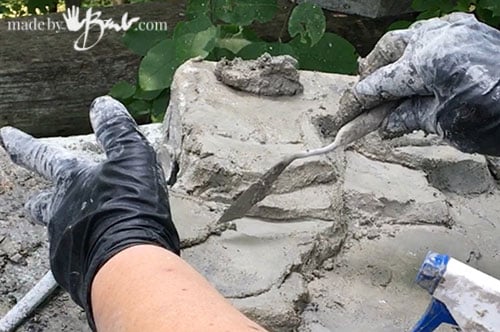
The Second Concrete Layer
To make the texture and detail layer is made with Rapidset Mortar Mix. I have used their other product for many things so I trusted this one as well. It feels sandier than the Rapidset Cementall which makes better texture for rocks! BEWARE – it does set really fast! So use small quantities.
Add handfulls, some lumps, some divots, some crack lines… Dab with brush for texture. If needed google images of rocks. If you overthink it, they look more contrived.


Even corners are ok, as quarry stone is broken in big blocks.
The palette knife lets you form the concrete like icing a cake. These rocks will become a waterfall so the top layer was to be more like split layered rock. It’s quite fun to make random ledges, cut some cracks and roughen the edges. HOWEVER, do not get too much small detail! You will notice that small detail generally gets lost from a distance.
As it starts to set it can be carved into to make crisp cracks or crumbly edges.
The Question about Colour
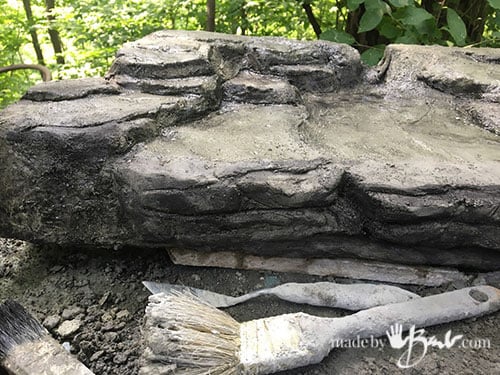
As an illustrator I know that rocks are not just grey. They have many undertone colours. It also depends where your rocks will be, are they going with other natural rocks? Even some areas have different tendencies of colour. I knew I may need some adjustment later on (it’s the artist in me) but for now I added some black concrete colour watered down and worked into the areas that would naturally get darker. Vertical areas usually get darker as well as cracks. It is tricky since it will dry different later.

Keep things damp; the spray bottle handy – it allows the colour to flow naturally into crevices.

You can mix some of the concrete colour into some of the mix as well and spread on. Colours changes are usually not that pronounced, they look more like ‘dirty’ parts of rocks. I bet there will be some natural darkening as mossy areas will develop from being in a woodland setting

Texture is one of the most convincing parts of a rock. Don’t make it look like an ‘iced cake’

Stay tuned to see how the waterfall all came together! There’s also a bit of a surprise since it’s the habitat for a certain ‘friend’ of mine…
Hello Barb, Thank you again for a great tutorial, I was wondering if after you made your bases did you try to just layer the Portland cement on instead of using the soaked flannel? I am wondering if just using my hands to make the cement layer by itself would work.. Also, after the top and sides were covered, did you enclose the bottom with cement? I am thinking it would keep water out of the openings. Thank you for taking the time to answer.
Thank you Thank you. I have been thinking about doing faux rocks for a few areas I am landscaping and in anticipation of my wish list water feature. I happen to have that foam. Didn’t think of it for rocks. Perfect. Love your content.