Make a Jacket from a Wool Blanket
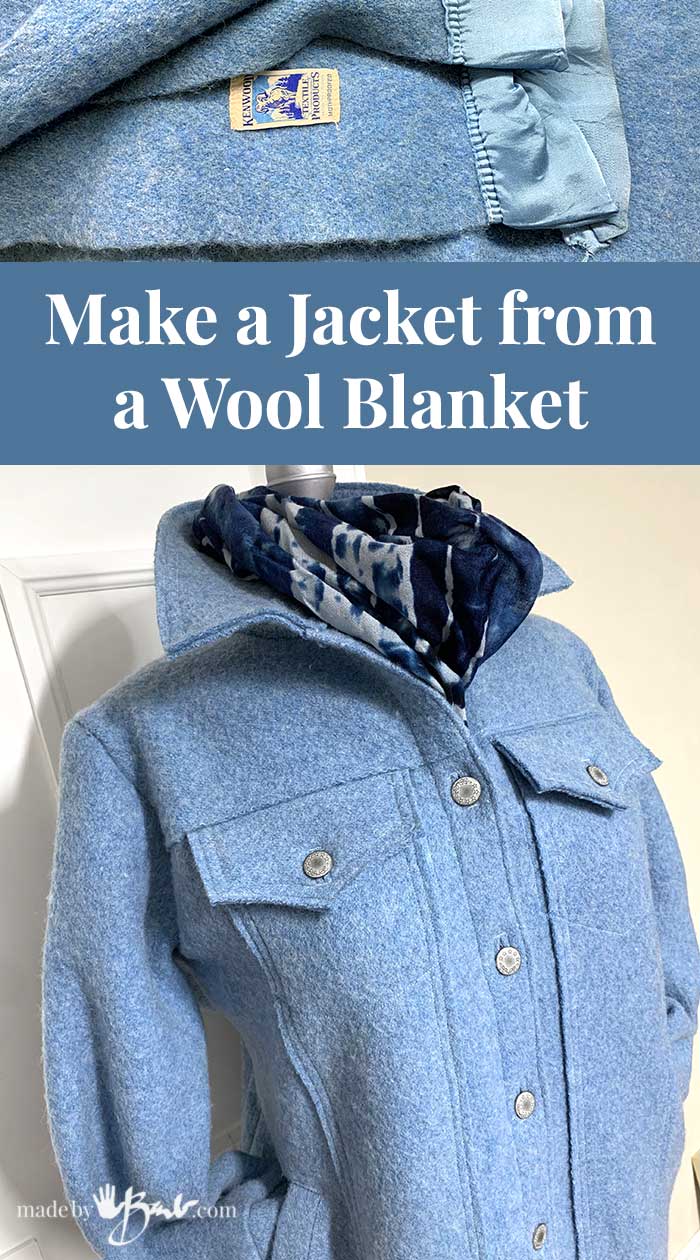
The more you make things with fabric, the more you appreciate certain fibres! Virgin wool blankets (felted) are a treasure and can be used so many ways! My fall project; Make a Jacket from a wool blanket.
Why Use Wool?
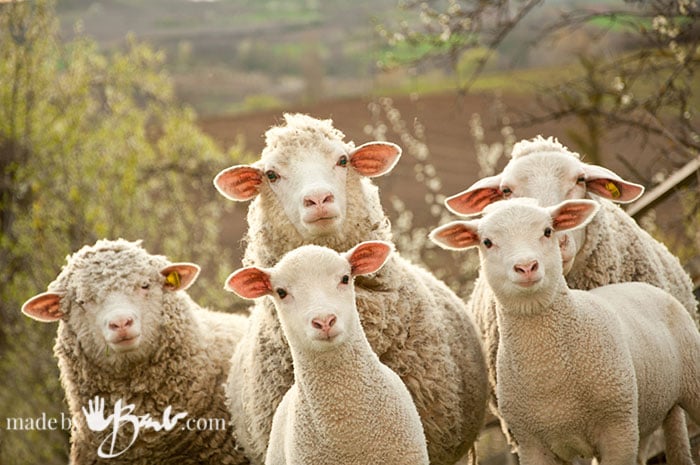
Look at those adorable faces! They gift us their ‘coat off their back’ so why not continue to use it for all the great properties of Wool?! There are many reasons that the old fisherman had their thick wool sweaters. I had no idea how strong it is; each fibre can bend back on itself over 20,000 times. It has the ability to absorb moisture to up to 30% of its’ own weight but resists building up bacteria since it releases it back into the air. The crimped nature of the fibres makes it able to return to its’ shape after wearing. It is biodegradable and each sheep makes a new fleece each year.

Virgin wool, what does that mean? It means it’s either from the Lamb, first shearing of the sheep or that it has not been recycled. I’ve been sewing for decades and as of late it’s almost impossible to find natural fibre fabrics in a store. These blankets have a lot of yardage when you find them in a thrift store so they are well worth the few dollars. I love using them for many projects
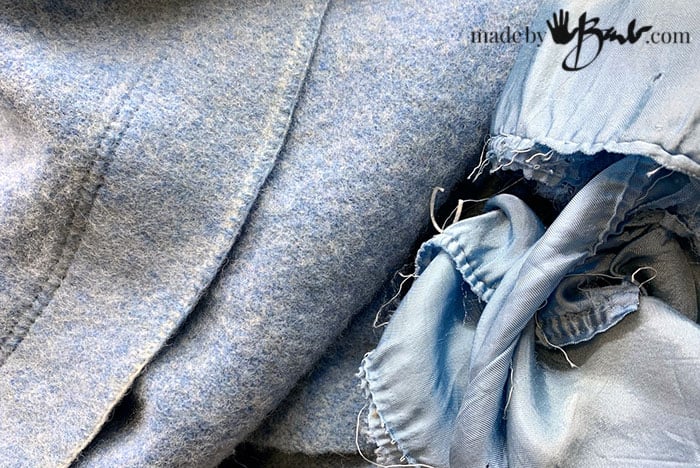
These vintage blankets often have a satin binding around the edges. If it seems puckered it’s probably that the blanket was washed and has shrunk a bit making the binding seem too big. It easy to take it off, and it will even eco print if you want. Some ‘Blanket Coat’ designers also reuse it to keep with the theme.

How to Felt A Wool Blanket:
This blanket was already washed but I wanted to ‘felt’ it even more. Felting happens when the scales on the wool ‘hairs’ start to get caught with each other. The heat of the water helps open the scales and the agitation of the process (either by hand or machine) gets them to tangle; to keep the edges from unravelling when cut. I felted mine in my washing machine (it may create a lot of lint so some put it in a pillow case etc) set to hot wash and cold rinse. To aid the rubbing of the fibres I added some jeans and towels to the load. I was pretty happy that the fibres now look like a piece of felt rather than woven threads so less work is needed finishing edges! Sometimes this process needs to be repeated.
Where do I get my Patterns?
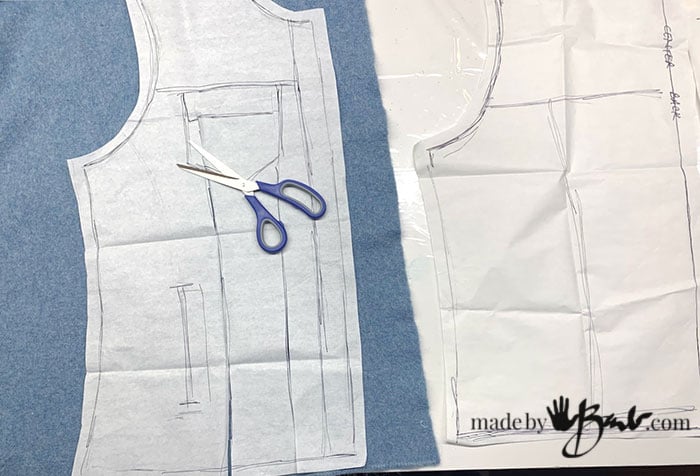
Ok, I’ll admit I am a bit of a lazy sewist. I remember the days of cutting those tissue paper patterns out and then trying to follow all the instructions… not fun! Nowadays I sew more intuitively; I use a favourite garment and trace it to make pattern pieces – much quicker and less mystery.
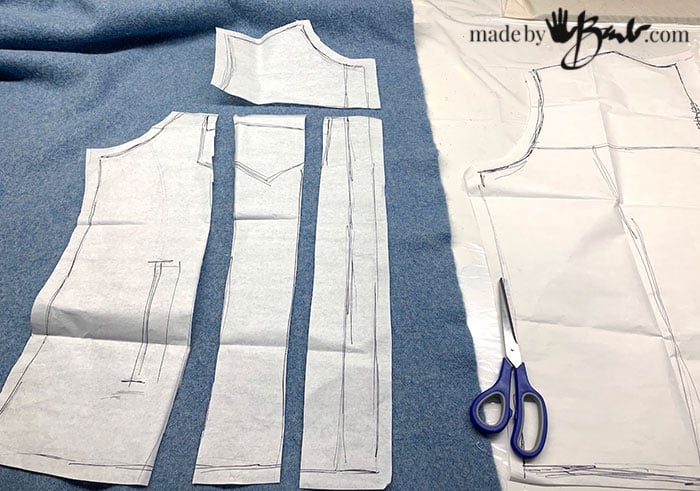
I know that it fits and am a bit generous (you can double check with measuring tape) especially at the side seams to adjusting can happen later (can always add a dart as well). I wanted to make a ‘jean jacket’ style of this wool. After tracing the pieces I added some seam allowance, even though the felted wool will only just need overlap at those seams. I like all the ‘lines’ and details that these jackets have (or should I call it a shacket?) I use scissors since the wool is so thick.
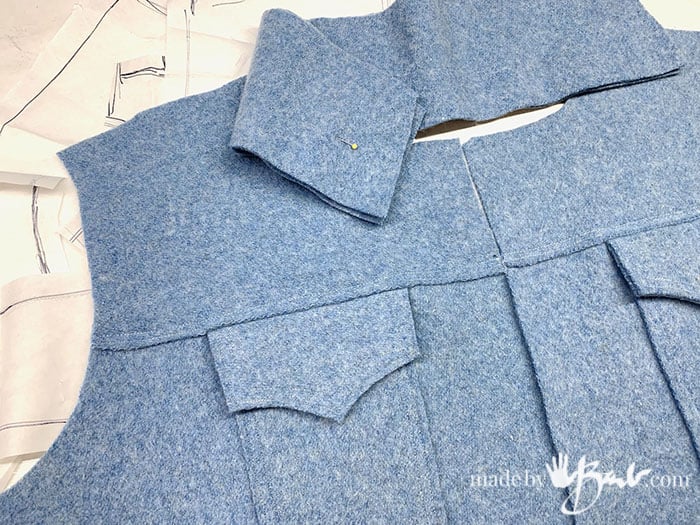
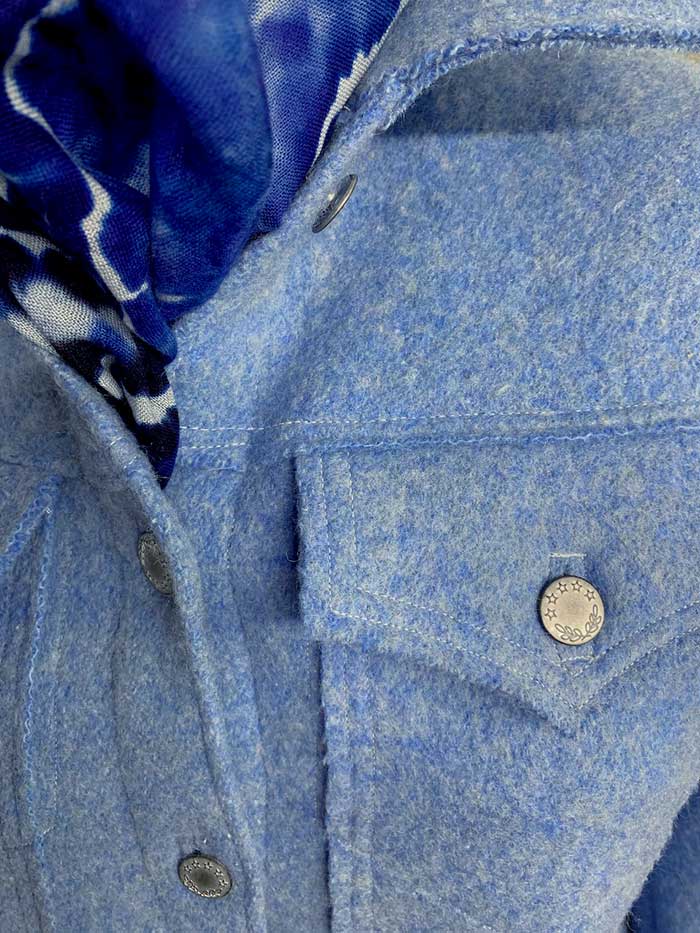
Overlap Seams:
Instead of right-sides together I used flat stitch overlap seams; much less bulky. The sewing machine handles it really well with a slight contrast thread colour. Sewing the dense wool is easy & I love top-stitching. The chest pockets are fake as I never use them. The front edges are cut wider so that a simple fold over & topstitch is enough to make the facing inside.
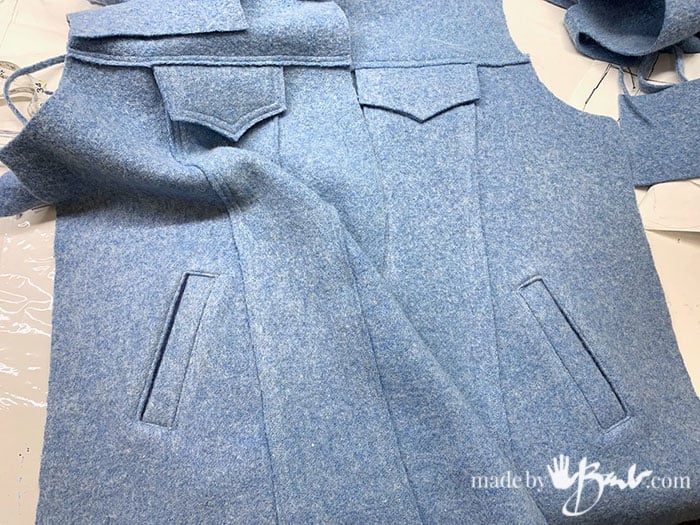
Good Pockets are a must!
The most energy went it these slash pockets, but it was worth it! There are plenty of instructions on the web, the pocket lining was a thinner fabric though. The back yoke and sleeves are assembled the same way.

All coming together:
The sleeves are attached in the usual way (right sides together). Ease the top round of the sleeve to give a nice shoulder. The collar is 2 layers but still raw edge stitched and attached by overlap. When it came to buttons I chose the hammer-in kind like you see on jeans – super fast and simple. These did cost me more than the blanket though. Toggles as buttons or a zipper would also suit the wool.
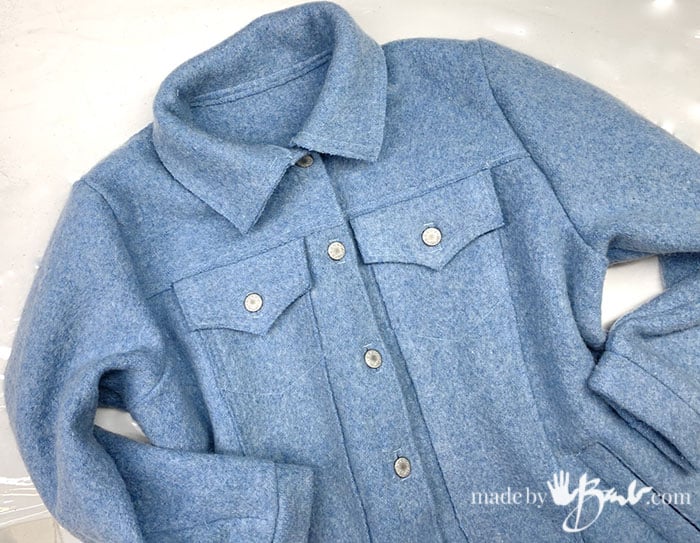
Another bonus from the felted vintage wool blanket is that the button holes are easy to do, just a rectangle sewn & sliced down the middle. They end up clean and simple. The cuff is simplified from the usual buttoned style to a folded over strip so it wears well. The bottom strip was also a overlap seam and some buttons at the edge. The edges/seam allowances did not need finishing with a zigzag stitch since the felting helps.
When I sew I do no not want to ‘fight’ with the fabric!

It turned out quite nicely even though it is not lined. I do not see an advantage to lining it. It is longer than the usual jean jacket, below the waist, no belt. You can easily make adjustments like having a hood.

I wear another layer underneath (at least a t-shirt) so the wool does not bother my skin. I especially like nice deep pockets. These fashionable coats of up-cycled wool are becoming quite the rage, as this Dutch company Hul Le Kes making jackets from all sorts of wool blankets.

The collar up, add a nice silk scarf and I’m warm on a wintery day. I now know why I’ve been a bit of a hoarder of wool blankets
These have been some of the easiest buttonholes I’ve made…
What a beautiful jacket! And would have never thought to use a wool blanket. Another great project!
Actually even other types of blankets will be possible. Happy making!
Beautiful! Your talent is so inspiring.
Awe thanks. I think it’s more about being stubborn and not accepting that I ‘can’t’ do it…
Hi Barb, Thank you for posting this tutorial. The jacket design is beautiful and am wondering if you will be making a pattern from it to sell in the future in larger & plus sizes? I would be doing what you said about copying what I have but I usually wear a hoodie. If you do decide to share thank you in advance for taking the time to do that 🙂
Well, funny you should ask that… I am on a roll of up-cycling which also includes other blankets so I have a hack to make a hooded version with minimal seams. It will be coming soon, i promise. There always seems to be some spin-off idea I get while working on the first…
Thank you, can’t wait for both patterns to be finished. All that you do is truly appreciated.
Lovely, Barb. So many people need a warm coat like this these days. Nothing could be more classy and classic. Home-made can, actually, be more fashionable than store-bought – and made with love.
I love this post. Thank you for creating this. I am pretty sure we have a vintage wool blanket in storage that I’m tempted to see if it may work. I like the look of the design and I’m tempted to making it a vest instead. Now that I’m getting some hot flashes, I think having a vest this fall/winter here would be ideal for me!
Oh yes, I also made some vests with a hood from some other blankets… that post is in the works. The weather change got me wanting cozy things. I bet there a lot of those wool blankets hiding in linen closets for decades…
Barb, that jacket is gorgeous. Thank you for sharing.
What a great jacket – your talents are endless . Love the outside look of the pockets – so well done.
Kristen- as a hot flash veteran, my experience was that a quick escape via zipper was just as important as a lack of sleeves. A fan with a remote control pointed at my side of the bed was even more important.
Barb- I think the reason most wool coats are lined is two-fold: to short circuit the wool is itchy whining and to maintain the integrity of the fabric. While wool is flexible, it is also stretchy, and the knees of pants and elbows of shirts/jackets can get deformed or get holes. I’ve had to put those leather patches over holes in my husband’s shirts. Washing, and the blocking afterward, ‘resets’ the wool fibers and returns the garment to its original shape.
The edges of the fabric inherently have cut fibers that can be short enough to fall out if rubbed repeatedly. Lining fabric is slippery so that it glides over the garment under the coat, as well as the seams.
Tips on washing wool I learned from the sock knitting and wool soaker worlds: Wool is hair, so you can wash it with shampoo and, more importantly, conditioner!!! Oooh, baby, that’s some soft and good smelling stuff when you finish, lol. This is also great for getting rid of the itchies.
Wool soakers are the natural world’s covering for cloth diapers. They capitalize on the water absorbing and repelling abilities of wool, which depend on the lanolin in/on the wool. Those fishermens’ sweaters weren’t washed with our new fangled detergents which strip all the oil out of things, they were washed with fat based soaps that left the lanolin on the wool. Searching the web for “lanolize wool” will provide resources for improving or replacing the lanolin that gives wool its weatherproofing.
Thanks Patti! So much good info on wool! Yes, I have used the hair conditioner on wool as I remember how bad the soap we have nowadays (really not soap anymore if you look at the label) is on our hair so I do use some shampoo. And in all my soap/lotion making I also actually bought lanolin. I wonder how I can use it to re-lanolin-ize the wool. Shampoo has the strength to get rid of oils which is prob not the best for the wool but at least it is the right PH level for hair. I’ve made kinds of soaps but I’m wondering how the olive oil soap would work, I should test the PH… Good topic!
This is very timely for me and I love the idea about working intuitively. Being a guy and recently creating womens clothing, I worry about the cuffs being the right size for a woman, any ideas? (I know you do, lol) thank you for being so open with all of your creations. Good luck with everything you do!
Well, personally I do not worry that my cuffs are perfect fitting as I know that during all the crazy (and messy) things I do in a day I want the ability to be able to push them up my arm. I hope that helps… happy making!
Great jacket, more useful than just lying under it!!!
Love all the detailing.