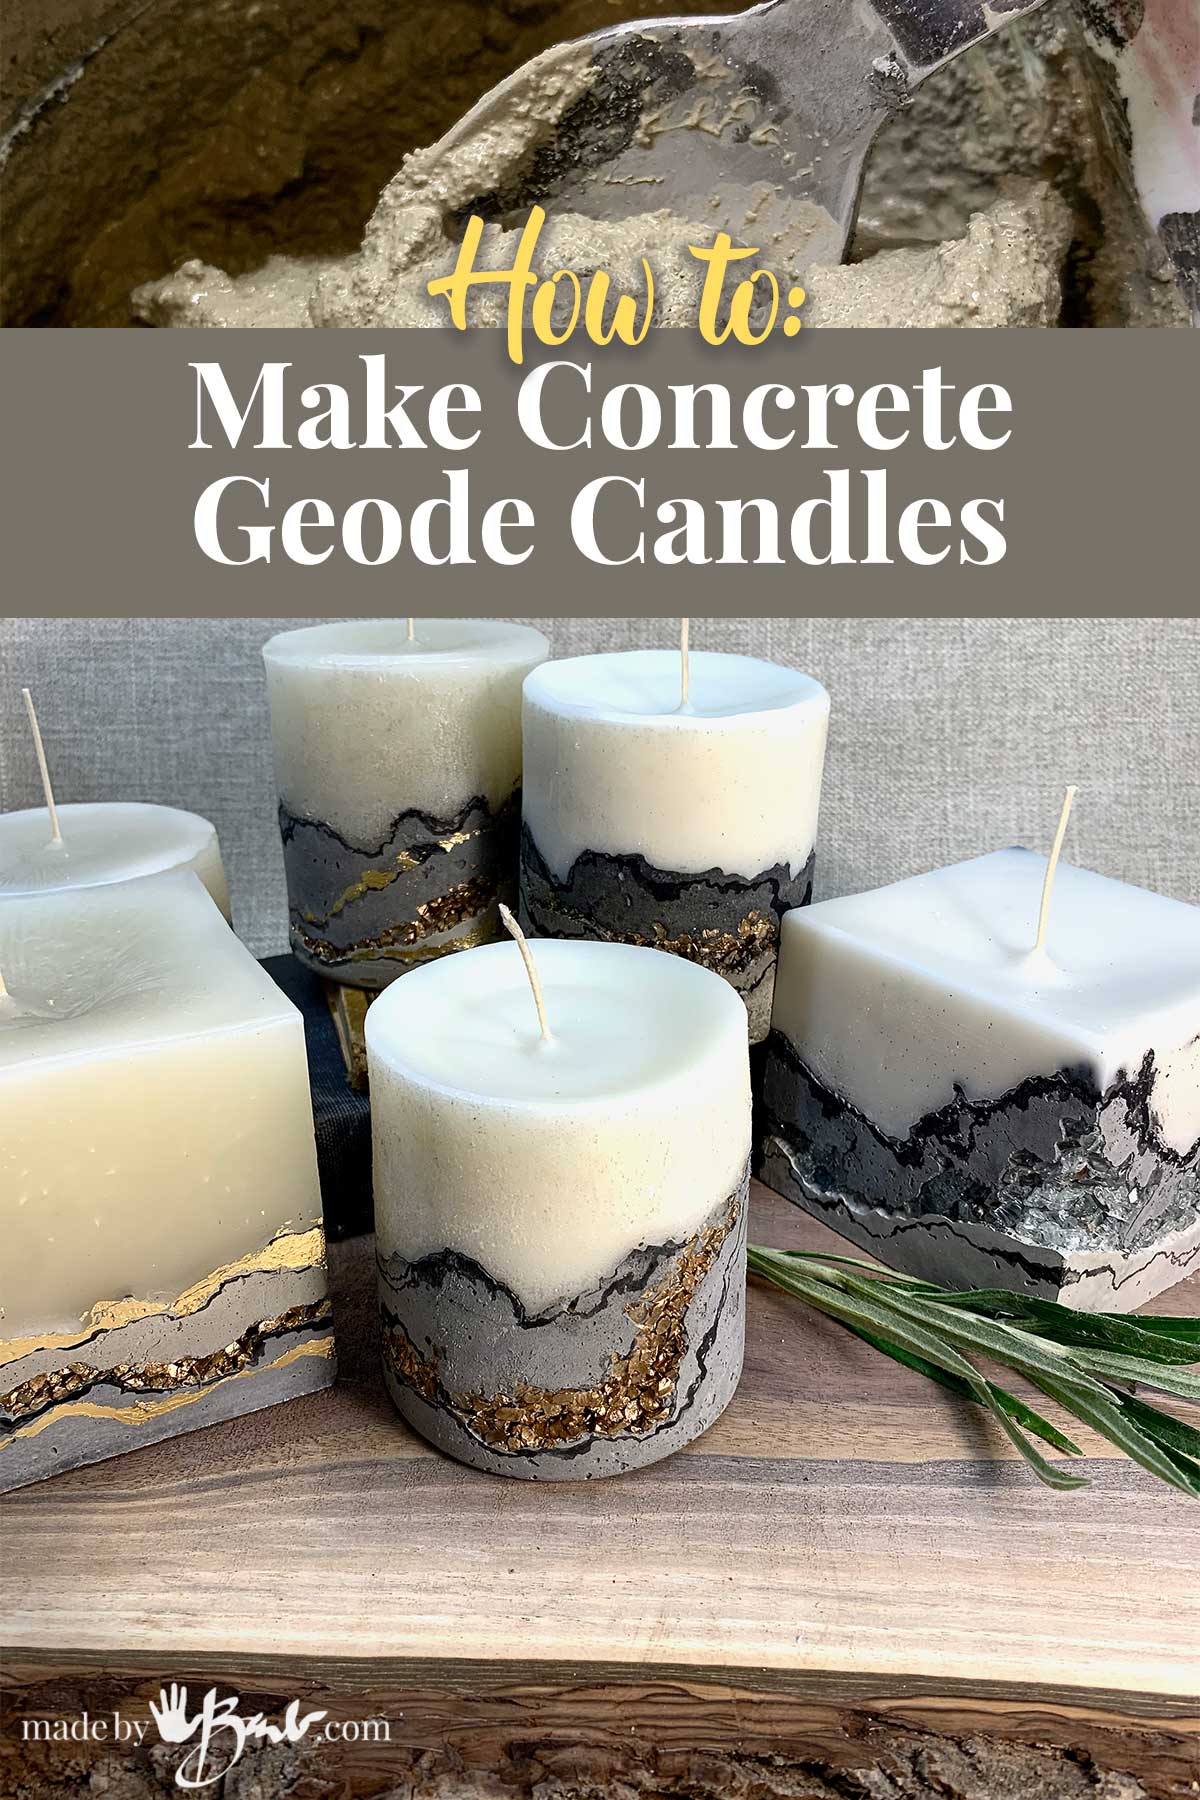
How to Make Concrete Geode Candles
Once you use molds to cast things eventually you will also use wax. The great thing about molds is using different materials together… Welcome wax & concrete! I’ll show you how to make concrete Geode Candles.
Taking Cues from Natural stone formations
As you know, nature provides great inspiration! Rocks and stone layers can be replicated as Geodes. Don’t fret, almost anything goes in this art form.
What can you use as a mold?
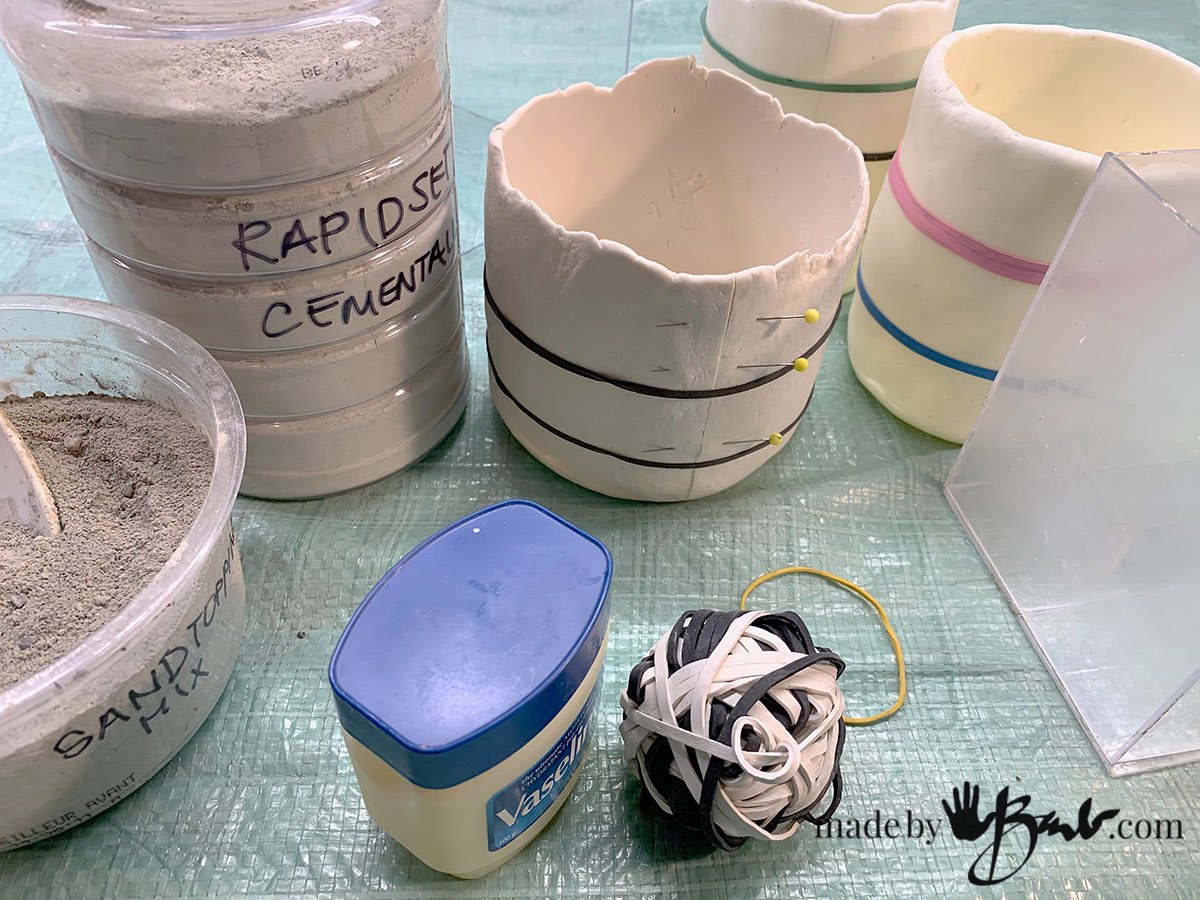
Since wax and concrete do not heat up to really high temperatures, many options exist for molds. The problem that arises when you try to pull a vertical concrete shape out of a mold is that it does not like to slide. I would rather reuse a mold than using paper tubes. You can make your own silicone mold with my silicone mold putty over a preferred shape. If it requires extra seams the mold can easily be cut and then held together with elastic (and pins) when pouring.
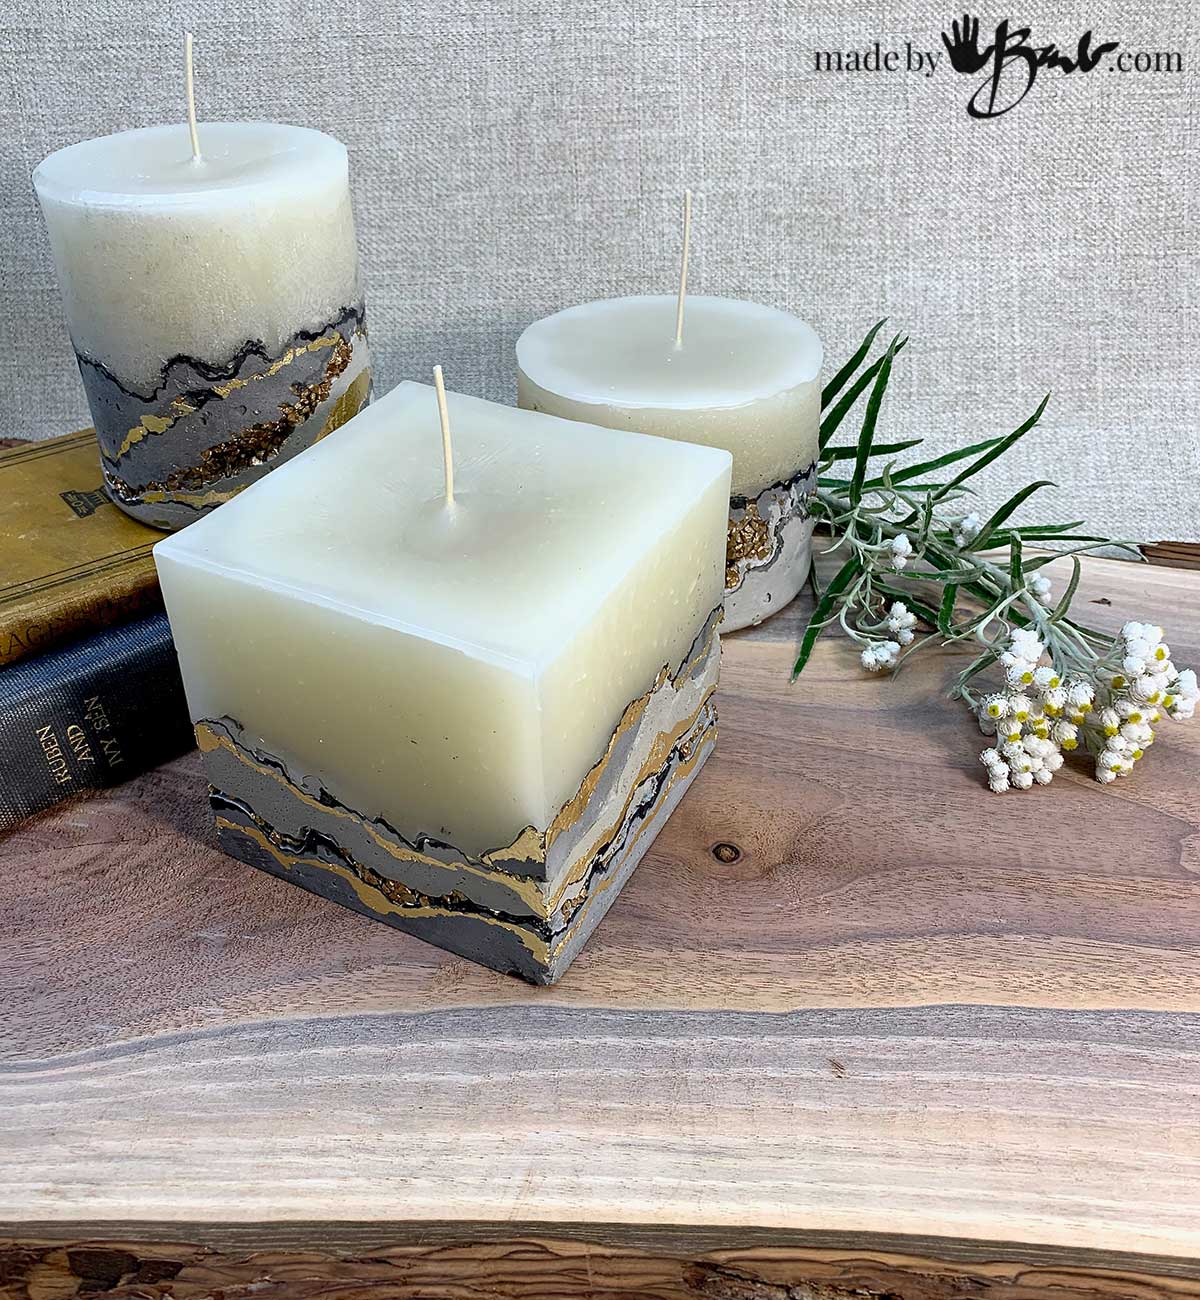
I like the vertical cylinders or square candles. To create a square plexiglass (plastic) mold, clear sheets can be found as cheap frames. Score the sheets with an xacto knife multiple times and snap at the line. Tape the corners, and plan for an opening on one side. Here’s a tip, leave a folded section of tape to easily pull it open. It is advantageous to be able to see through the mold when planning your layers.

Which Concrete should I use?
To imitate the layers of stone and rock the concrete needs to be able to somewhat keep it’s shape. This can be achieved with a few difference concrete/cement mixes. I have used simple Quikrete SandTopping mix to create layers when I made my concrete planter bowls. The consistency can be adjusted to be able to allow the layers to not flow. The only drawback is that it does take quite a while to cure so finishing a candle will take a while.
My favourite mix to use here is a fast-setting one; Rapidset Cementall. It allows me to create the layers very quickly and pour the wax after an hour or so. Quikrete makes a similar product; Fastset Allcrete or Quick-Setting Cement. I find that giving the mix a test will give me the best information of how it works. The specifications will state the amount of working time and whether there is aggregate (stones/gravel) in the mix.
For security, it is best to use some type of mold release; vaseline or coconut oil works well.

What can be added to create Geode Layers?
There are so many options of what can be added between the layers of concrete to imitate natural geological formations. There are many stones, gravel, & crystals available at craft stores but natural stones work great as well. Glass can be cracked (see my concrete geodes), tumbled and used in place of real crystals. The only caution is that plastic ones do not ‘stick’ to concrete. You could also watch for some of the broken windshield glass (tempered glass) as it cracks in tiny little cubes.

Mixing the Concrete:
This fast setting mix can be mixed & used at a very thick consistency. Rapidset Cementall is a very fine concrete mix with smooth finish so I added some coarse sand to create a more grainy concrete texture, but that is optional.

After mixing (add mix to water), let it sit a minute to start to stiffen. Ideally, it should not flow but rater keep it’s shape. Spoon small sections into the mold and spread around.
The layers will be applied at the edges of the vessel. The middle will stay quite empty, almost like a bowl that will be filled with wax.

After the first layer of the concrete, gently add some of the stones and rocks close the outside walls (to be visible later) Tip: try to keep the sides of the mold clean to make sure the candle part will not have smears.
Adding Colour to the Concrete:
There’s a few ways to colour concrete, adding a colourant, paint or pigment. (See the video) These methods work quite well but sometimes if the paint has polymers & other ingredients it may affect the concrete consistency a bit. The idea is not to add a high percentage (less than 15%) so that the general chemistry of the concrete will still make it cure.
I used an iron oxide as a black pigment and it did give me some darker layers. For whitening the mix Titanium Dioxide can be added, but I’ve yet ti try it. I have used TD as an additive to make white paint quite opaque for good coverage.

Creating the Concrete Geode Candle Layers:
The transparent mold will allow you to see how it looks. Do not be too forceful when adding another layer on top. If the mix is too wet it will cover up all the stones and crystals.

Add another layer or more depending on your size and preference. Pushing it up the sides creates the look of thick layers without the extra weight.

To be more realistic give the layers a fair bit of character. Use some tools like chopsticks to push the mix into organic shapes. As the concrete mix starts to cure it will be almost like a pliable clay. Tip the vessel sideways, toss some of the glass or stone at the side and then ‘plop’ a bit of concrete on top to hold it. I developed this method when I made the layered Jewel Vases with glass from chandeliers. I have so many ideas that it is difficult to keep up with them…

Once the concrete ‘bottom’ has cured; the candle wicks need to be added before pouring.

There are glue dots, hot glue or a bit of wax that can anchor the base until you pour. There are also commercially available candle making tools that include almost everything. I have fashioned from my found items pretty easily.
Which candle wax should I use?
I have not been that interested in making candles as I thought the market was very saturated. At first thought I chose soy wax for it positive eco-friendly properties. Soy wax does not hold scent well or ‘throw’ scent while burning either. It seemed like an easy craft; melt the wax, pour and wait… Well, as a true candle crafter may know; it does take some careful practice. The soy wax melts easily in a microwave but after pouring it cooled with cracks everywhere! It is a very brittle wax so I changed to a combination of paraffin /soy wax blend.
Pillar and container (jar candles) wax making is different. These are pillar candles so 7 parts Paraffin wax to 3 parts Soy wax is a good recipe, or look for para-soy waxes that are formulated for pillar candles.. Special attention is also needed for the pouring temperature, curing area temperature, mold material & shape. Wax can shrink when cooling, cause craters, holes and valleys. The good thing is that you can remelt wax, so any error can be fixed by redoing or just using a heat gun to remelt the tops.
As for fragrances, I did not add fragrance oil at this point since I did not want to complicate things. I do know from my soap making that it is another science to figure out.
(If you would like to avoid the melting of wax, here’s my technique that uses ready-made candles)

Pouring the Wax:
Using some tin cans set into a water filled old pot or pan to slowly heat (as a double boiler) I poured my blend of soy and paraffin wax at about 140ºF. Take care to not stir too much air into the melted wax either.

The cured concrete layers are quite tight against the walls of the mold so that the wax does not pass through them.

As soon as the hot wax touches the cool concrete it will set it and create a seal as well. Have patience & let the candles sit undisturbed. If the top surface needs some levelling a second pour or some heating with a heat gun can flatten the top. It all depends on your preference. I am a bit more about the ‘Wabi Sabi’ type of thinking than pure perfection; as these are nature inspired.

How to Make Concrete Geode Candles
Equipment
- Mixing vessel & utensils for Concrete mix
- Heat Proof vessel for melting wax
- Double boiler or pot (not for food use)
- Heat source for melting wax
- Brushes for Gold leaf adhesive/paint
- Heat gun (for remelting top layer)
Ingredients
- Silicone reusable mold or Plastic box mold (see post)
- Wax; paraffin and/or Soy wax
- wicks with wick base
- tape or glue for wicks
- Gold leaf & adhesive, acrylic paint for embellishing
- Concrete mix (fast setting preferred)
- Colour for concrete (Iron oxide, paint, or pigment)
- Stones, rocks, crystals, glass or gravel to create voids and layers
- Wood or metal Wick holder (may improvise)
Instructions
- Make silicone mold (see Silicone Mold making Putty) or create plastic box mold with sheets of plastic (tape in corners)
- Coat mold with thin layer of vaseline or coconut oil. Spread concrete around bottom of mold and irregularly up sides
- Mix small amount of concrete for first layer (let sit until pliable and not running)
- Add some of the stone/crystals to imbed into first layer & let stiffen
- Mix another small amount of concrete mix and make another layer, adding stones/crystals between. Spread mix up sides of mold, try to keep vessel sides clean above layers (wipe if needed)
- Set (Hot Glue or tape wick into centre bottom) and use something to keep in place
- Melt wax in double boiler (or set tin can in water bath) Paraffin wax or a combination of paraffin and soy wax.
- Pour (at recommended temperatures for your wax) carefully into mold above the concrete.
- Let harden completely. If valley or crater forms use heat gun to melt top layer flat
- Once hardened, remove from mold by opening sides/seams
- Add gold leaf with adhesive, or some definition of layers with brush & acrylic paint.

Taking out of the Mold:
Whether you open the side (plastic box mold) or you use the open cut sides of the silicone mold it pops out pretty easily. Concrete generally does not stick to either material. Some of the extra stones/glass will fall out as they may not be imbedded into the concrete. That is ok since it will give some voids between the layers. I you are very particular you could glue some in place with a fast setting epoxy glue.

As you may recall this (Unique Layered Concrete Vase) was a very similar project. Look at te lovely crystal glass layers here. I’ve seen my idea copied and used a votive candle holder with many voids throwing the candle light; looks quite amazing.

How to Finish off the Geode Inspired candles:
These unique pillar candles already look quite finished but I can’t resist adding… There’s quite a gold trend lately so some gold leaf is perfect with the gold rocks.

Have you seen the huge number of geodes that are just not natural in shape?! Natural layers are not exact ovals or too contrived. It’s actually easier to make some very wiggly lines with the gold leaf adhesive.

There are a few way that gold leaf is available. It comes as thin sheets, flakes, and even sheets where the gold is adhered (transfers when you press it on prepared places).

This time I found that the carrier sheets worked really well and less waste. I used a somewhat stiff paint brush to remove the leafing from the concrete. ‘But feel free to add whatever you like, but think of natural colours.

Adding details with Paint:
Since I like painting, another option is to add a slight definition of layers with a bit of paint. Follow the layers around and make your own unique marks as organic as what you find in nature. The colour combinations are endless, but keep it subtle.
The candles that are all paraffin wax have a more translucent look but still pretty. Incidently, I reused a lot of wax from old candles. The little black bits tend to sink to the bottom so no worries when pouring new ones. ‘Waste not, want not…’

What do you think of these crystal concrete candles? They bring some nature to your table-scape or bookshelf. I bet they will become some welcome gifts! Once it has been used and burnt down, it can actually be put back in the mold and filled again. Just chip out the old wax, use a heat gun and re-pour it! How amazing is that?!
If you like the idea of making candles with concrete but would rather not melt any wax I do have another method; How to make Concrete Geode candles without melting wax
Barb, these Multi-media Candles are absolutely Fab and Stunning! I love everything about them. Especially the Re-usable aspect! Thank you for sharing, another one for my To-do list.
you are a very talent artist!
I love the things you make. The Concrete Candles are one of my favorites. Thank you.
I am doing a new method of design and make that I think will be quite a winner! Stay tuned and thanks!
I have a couple dozen pillar candles. Can I somehow use those, maybe melting the sides with a small torch or such?
Funny you should ask… I am working on a new way to make the candles! Sign up & you won’t miss when it’s out!
Love this idea, if the candles do get used instead of being decorative, does the wax make a mess when burning, run down the sides of the candle??
That will depend on the type of wax used… Working with wax is quite a procedure too! So, I did just finish a new tutorial for making concrete candles with premade candles! Soooo great!
Gracias por todas tú explicación de cómo hacer velas de geoda, me gustaría muchísimo hacer un curso formal para aprender más si tienes cursos por favor indícame tu página para buscarte o si sabes de cursos porfis te agradezco me indiques donde mil pero mil gracias (Thank you for all your explanations on how to make geode candles. I would really like to take a formal course to learn more. If you have courses, please let me know your page so I can find you. Or if you know of any courses, please tell me where. Thank you so much.)
I do have a PDF available for easier candles without melting wax.