How to Sculpt with Paper Mache Clay – Mushrooms
Now that I have discovered how wonderful Paper Maché Clay is I have put it to the test with a few projects! I’m sharing some of my experience of how to sculpt with Paper Maché clay.

What is paper-mâché clay?
Paper-maché clay is surprisingly strong, but there’s a few things you should know before working with it. There are many recipes but the common factor is that it has paper fibres in the mix. It is not like a modelling clay that can be applied very solid and thick. My test piece made with this recipe exceeded my expectations but I am sure similar recipes yield strong results as well.
The traditional paper mache method was to apply paper strips with the addition of a glue or paste (often just flour and water) that would make a sturdy outer shell of your structure or design. This Clay version is similar but does not use sheets so some adaptations help. This clay is used as an outer layer rather than a solid form.

Make a Base Structure:
Since this clay has the ability to be quite strong and malleable it is used as an outer layer of the structure. In order for the armature or design to be able to hold the clay it needs to have a strong stable core structure. A variety of materials can be used but I hesitate to use things that can absorb water since the moisture may then encourage mold to grow or take it away from the clay.
A centre structure of wire is a versatile way to create a strong structure and allow you to design as you desire. Do keep in mind how you plan to set your sculpture, perhaps it needs a way to attach onto a base, that is why I used extra wire for the base of this mushroom.

A long known trick to make a centre structure has been the use of tin foil. It is great as it can be molded quite well and also not be affected by heat or moisture. With pressing and squeezing it can become quite dense and also have more added as needed. I had used it under polymer clay when making my geometric bunnies.
Light weight Forms:
Alternatively you can use things like styrofoam that comes in many forms. It can be from packing material, building products like sheets or even the spray type (comes in a can). It can get messy of you plan to cut or shape it a lot so I prefer tin foil if at all possible. Waste material like plastic bags can bulk up if needed in the large centres.
Using chicken wire is a popular way to make a form since it is light and easy to bend (wear gloves). Adding masking tape & cardboard can also create a form. Bottles; plastic or glass have been used as centres for some paper clay sculpting. A Bowl, ball or balloon can provide a temporary structure for making a paper mache bowl too!

Adding the Paper Maché Clay:
Once you are pretty satisfied with the substructure you can add the paper maché clay layer. When applying; keep the layers quite thin depending on the end purpose. Don’t feel that there is only one way to apply it. The size and sturdiness of your sculpture may dictate how much clay you use as well. Small objects can have as little as 2mm layers of the clay applied.
To make the ‘skinning’ easier I find that rolling the clay between some clean dry cotton fabric into sheets works well. It can then cover larger areas quickly and evenly. This also hides some of the telltale dimply texture that the paper clay tends to have.

What tools to use:
Before you know it there will be certain tools that just seem to work better for your particular structure and texture. Fingers, spoons, old plastic kitchen utensils, tooth picks and commercial sculpture tools work well.

The technique you use can be done in stages if you find that the clay it too soft in the initial application. More clay can be added once the first layer is dry or starting to dry. I like to wet it slightly between layers so that the dry areas do not take the moisture from the fresh clay.
A Palette knife works well to apply the details onto the stems. The very thin layer of the rings are quite rustic and textured but will have enough strength when dry due to the paper fibres. The texture of the clay works really well for making fine details and natural looking elements.

Making the Mushroom Cap:
Using a wad of tin foil shape it into a domed cup shape. The hollow shape of the mushroom cap allows the gills to be added later.

Test the size of the shapes against each other.
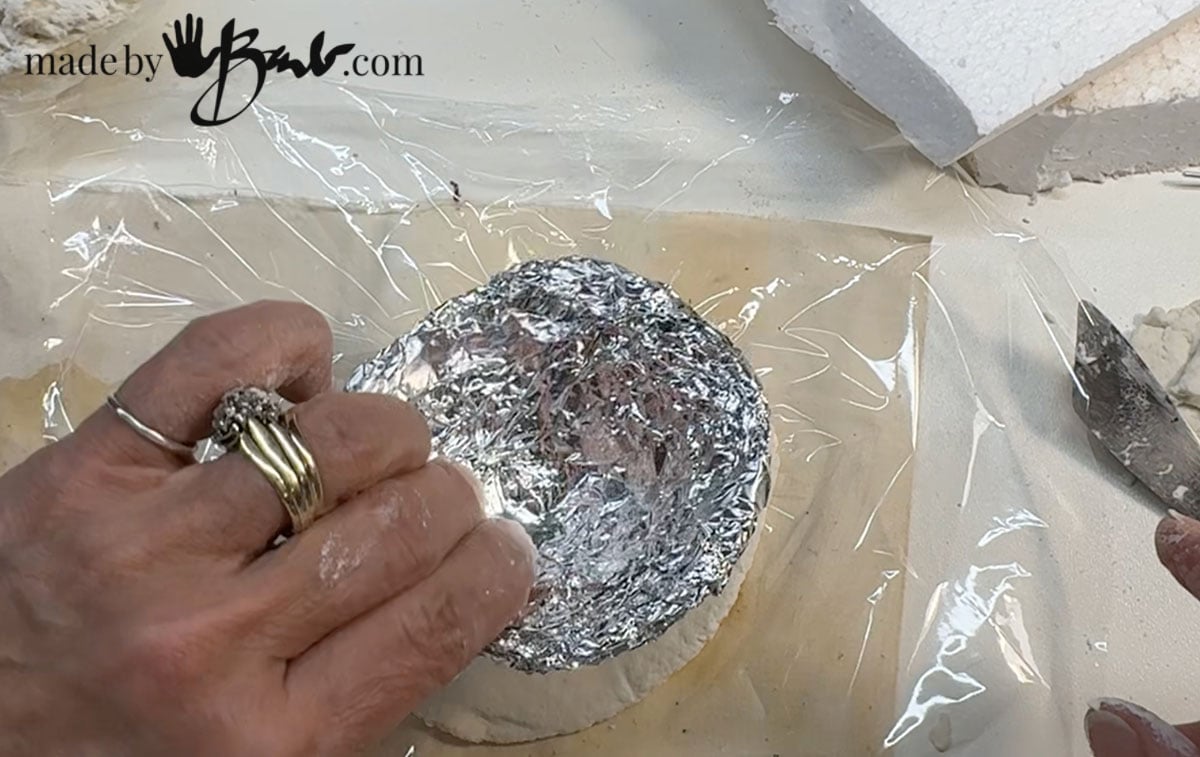
Roll the clay between some cotton sheeting to make flat sheets and then add a layer of cling film over top of the cap.

The Cling film allows the smoothing of the clay and also adds some unique texture to the edges of the cap.

Pushing the clay is easy since the cling film keeps it from sticking to fingers. Manipulate it as needed until it has a rounded edge around the cap edge.

Pull off the cling film and allow the pieces to dry. (The tin foil is left inside the form) Allow about 24 -48 hours to dry depending on humidity.

Finishing the Mushroom details:
For the gills I decided to use paper for the most realism. Fold and cut many, many shapes that will be glued into the cap.

The stem is tested for fit but not attached yet.

The tin foil remains inside the cap since it is eventually covered.

Fold and cut many, many shapes that will be glued into the cap. Measure the size from cap centre to edge, excess may be trimmed later.

A few gills are hot glues into place around the circumference of the cap. Apply some PVA glue into each section, one at a time.

Individual gills are set into the wet glue radiating outward from the centre. I aimed to have them quite dense.

Once there is sufficient amount of gills allow the glue to dry. Trim all the paper.gills to create a domed bottom.

Adding the Colour:
Acrylic paint work wonderfully on paper maché clay since it has flat finish and is very absorbent. Using the colour theory I mix the colours from the 3 primary colours and additional white and black paint.

You can decide if you’d like to assemble the clay form before or after painting. I opted to assemble before painting since I can then get under cap easier.

What colour to paint a mushroom?
I chose the bright strong colours for my mushrooms. Mix the colours with some mottling to look more realistic.

These were painted quite quickly since the coverage is quite good. The paper content in the mix makes it take the paint very well.

For a natural realistic look mix the colours to be less saturated. Add some complimentary (green to red) colours to add colour diversity.

Mix white, bit of black and orange paint to make that ‘mushroom’ beige colour.

Dry Brushing Details:
The technique that works great for making details stand out is dry brushing. Apply a tiny bit of white paint to a dry brush and just skim the surfaces to catch only the parts that stand out. This will make the deeper sections stay darker. It is the best way to get so much texture to show!

The Paper Maché clay is a perfect media for these mushrooms since they are naturally a similar texture.


For a base I used a piece of driftwood from the beach. You could also sculpt a piece of wood with the clay. Drill holes into the wood and insert the stem wires.

‘Where did you pick those?’ Call me crazy but this is quite fun!

Adding the ‘Dots’:
Since this specie of mushrooms; Amanita muscaria has the characteristic dimensional whites I mixed some drywall joint compound with white paint. It worked perfectly! For the extra gloss that this specie often has I added a layer of gloss Acrylic medium.
Once ready, hot glue made attaching them to the wood piece easy and some moss (dry reindeer moss or curly moss yarn) gave that nod to realism.

Wow!
There is something about natural light… but do realize that these are not able to stay outdoors. I am working on an outdoor version of paper maché clay that will stand up to the elements.

This paper mache sculpture has impressed me so much that I am sure to try to challenge this media more. Who would have thought that a roll of toilet paper could make such a good clay.


Perhaps I have given you the confidence with this tutorial to see that you do not need to be a sculptor to make these. I am pretty sure Jonni Good would be proud! With simple ingredients you can make your own Paper Maché clay easily. The only limits are your imagination…
What have you made with your own clay mixture? Hmmm, snails? frogs? Nature provides great inspiration!
Wow! Your talents amaze me!!! Excellent work . Thank you for sharing.
Thank you! There’s a funny thing that happens when you ‘get creative’; you keep wanting more of that good feeling that it generates! It’s much better than some of those other habits! I really hope to spread that joy!
“I’m an artist & I make things… all kinds of things.” – and you do it so beautifully! Love to read all the way through your wonderful tutorials even when I know I’ll never do that, lol! Thanks so much!
Well I am glad you take the time! Even though you may not try it you are building knowledge for creative things, IMO. Enjoy!
Wow, is right! You’ve done a beautiful job, very realistic. And the gills!!! Wow! Very nice.
Thanks so much for sharing😊
Oh thanks. It is so gratifying to be able to make my imagined vision come to life.
Bonjour,
Totalement fantastique et si bien expliqué !!! merci pour ce tuto qui donne des petites astuces 😉 je ferai ce champignon, probablement cet hiver car à la belle saison, le jardin et mes fleurs m’appellent ! bonne journée, merci
” Totally fantastic and so well explained!!! Thank you for this tutorial which gives little tips 😉 I will make this mushroom, probably this winter because in the summer, the garden and my flowers call me! Have a good day, thank you”
I know what you mean! You can also make Concrete mushrooms for the garden
Do you think one could use paper mache in IOD moulds instead of air dried clay? Interesting concept and one I might be interested in trying.
I tried some in a silicone relief mold that I’ve used for plaster and concrete. I tried to pull it out to dry and it stuck too much. Leaving it to dry may work. Something to consider is the mold release, perhaps some corn starch? Generally a bigger mold won’t let it dry but if I can get the vessel off a bowl it should work the same. Try it, as if it’s a fail there’s hardly any waste and the mold can be soaked clean… I will try and post my findings!