Simplified Shibori Dyeing
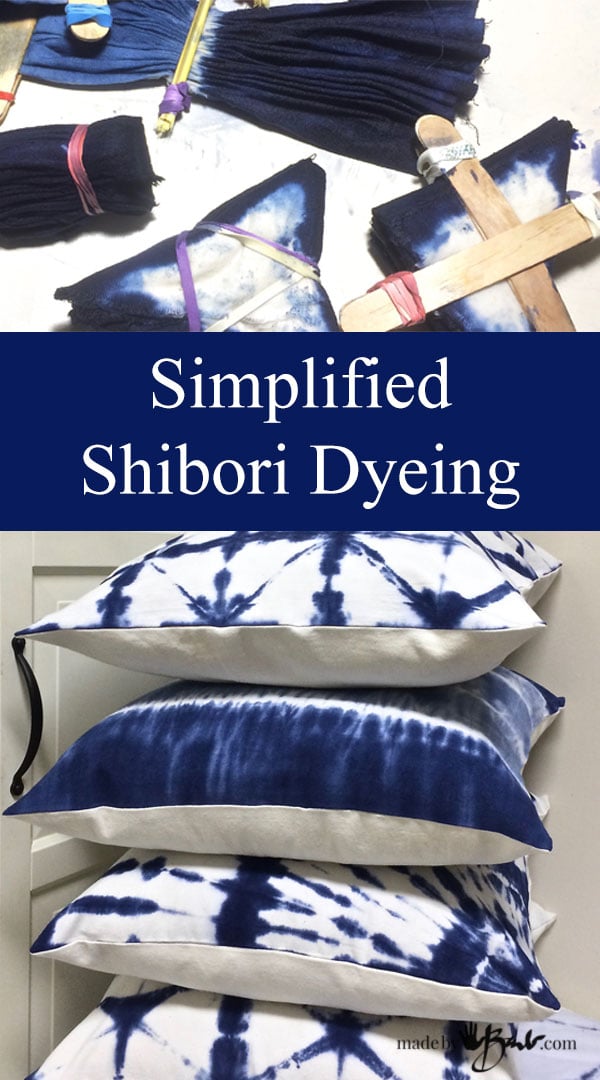
My apologies; I have been so busy engulfed in my new art form; Shibori style dyeing. The idea came to me when I realized I had too many white blouses. If you know me, you know I LOVE to repurpose. What better way to give a new life to clothing or anything white than to Shibori dye it?! After many attempts, some not so good, I have perfected and simplified the complexity of classic ‘indigo’ dyeing. It’s quick, easy and quite manageable in a kitchen or laundry room. Don’t you just love a fresh bright blue?! I do warn you, it may become an addiction…
There will more tutorials coming up, but to start let’s keep it simple. Here is the instruction for these 4 patterns.

What you will need:
- Washing soda (aka sodium carbonate, NOT baking soda)
- Procion Fiber Reactive MX Dye in Navy blue 078
- Elastics, skewer sticks, tongue depressers/popsicle sticks
- container to mix in
- measuring spoons
- water
- waterproof gloves
- paint brush/eye dropper
- Fabric (natural fibre) of choice (I used 20″ squares of unbleached cotton canvas/duck)

I had experimented quite a bit with different dyes when starting Shibori Dyeing, but have come to love this one; Fiber Reactive Dye. It had been so disappointing to use some of the other dyes and see it wash out constantly. You can use the traditional indigo dye but that seemed like it was going to be quite an ordeal. This dye is quite easy and small scale.
Step #1 – Prepare fabric
You must however realize that you need to use natural fibers. Cotton, silk, bamboo, rayon(ramie), hemp, jute, linen etc. For my project I am using a slightly heavy weight cotton.
Cut or rip the sizes of squares you would like. These are going to pillows so I used 20″ squares. If your fabric is new, it should be washed and no fabric softener used. Soak your fabric squares in a solution of 1 cup Washing soda to one gallon of water. It should soak at least 30 minutes.
Step #2 – Folding and securing

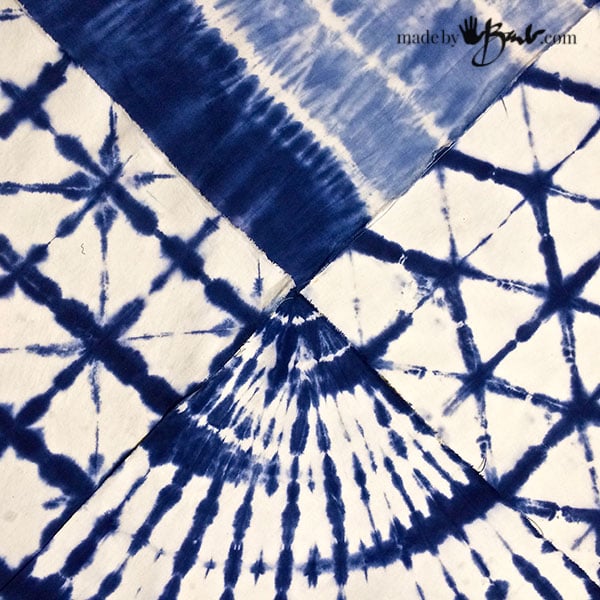
To start thinking about the folding method there are a few things to keep in mind. To understand the folding patterns practice with some paper. Most patterns start with the accordian fold; back and forth. The idea is to have folded edges near the side of the finished shape to pick up the dye.

Once the first direction is folded, then that strip is folded in the other direction. It is a really a lesson on geometry and angles. But don’t worry, you can just follow mine. AND the great thing is that even if it has mistakes it will look great! There are triangles that can be folded after the first accordian fold. Remember a triangle has a total of 180º for the corners.

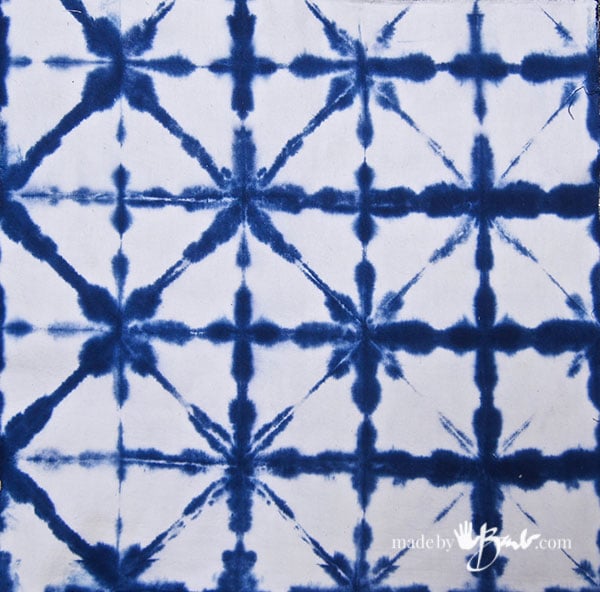
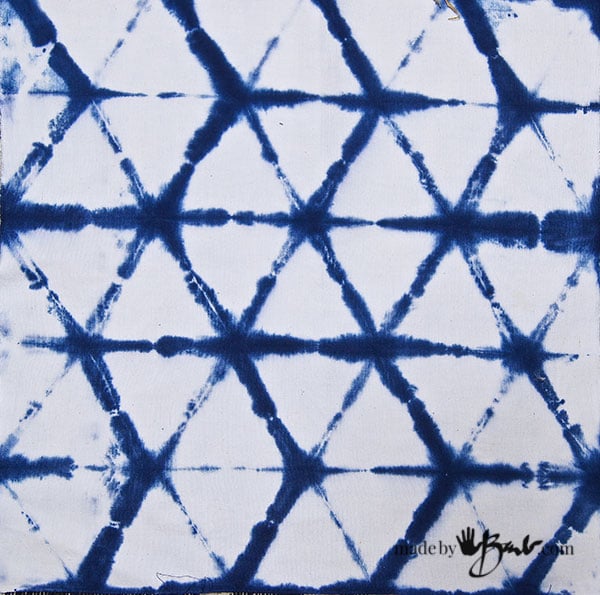
(SQUARE #1)
See these triangles have one 90º corner. The pattern created is based on squares
 (SQUARE #2)
These triangles are different with 60º corners. The pattern created is based on hexagons
 (SQUARE #3)
This square is also accordian-folded but it a fan way. Once that is done it is folded back and forth in the other direction.
(SQUARE #4)
Was not folded, see instructions below.

This is SQUARE #1
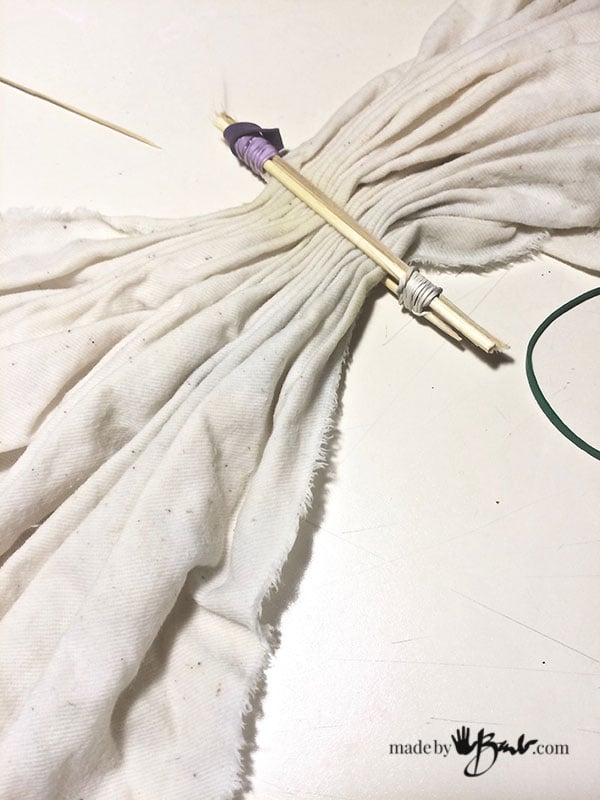
After the fabric has soaked, wring it out. Do wear gloves as it is quite harsh on your hands. Thin gloves allow better dexterity. Accordian folding and then back and forth triangle. Secure with the tongue depressers and elastics.

This is SQUARE #2
Accordian folded and then equilateral triangle folding. Secure with elastics.

This is SQUARE #3
This was folded accordian style but triangle shape, then accordian folded ending with the thin part on top. Secure with elastics.

SQUARE #4 was not folded, but shirred and clamped wit the skewers and depressers. Pinch the fabric into small folds, trying to keep it flat. Secure it with the skewers and elastics.
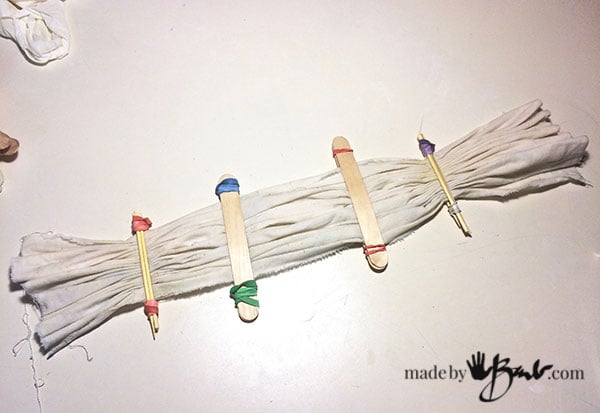
It is roughly divided into 5 sections.
Step #3 – Prepare the dye

Mix 2 teaspoons of Procion MX fiber reactive dye (Navy 078 is my favourite) with one cup of cool water. Do not breathe in the dust or please wear a mask. I try to not to mix too much so I usually mix half a cup first. This method is not immersion dyeing so it takes much less dye. Use a brush or spoon to make sure it is well mixed. You had better put the gloves on or you will have blue fingers for a while!
Step #4 – Applying the dye
This may get a bit messy so I like to use a plastic wash bin or the like (styrofoam meat trays also work well). I like to use a large brush to apply the dye to the edges. Each fabric acts a bit different for how it wicks up the dye and spreads. It is somewhat of an experiment; but that is the fun. You just never really know what you are going to get. It is a good idea to do a few small test squares until you get the ‘feel’ of how much colour you prefer or amount of bleeding the fabric does. Each fabric reacts differently to the dye. Trust me, I know…
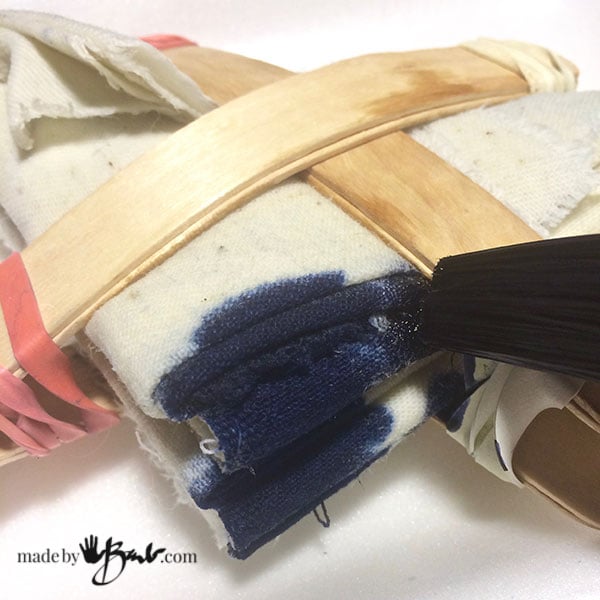
 ‘Paint’ the dye around the edges of the folded shapes. To distribute the dye better, you may also squeeze gently. There are so many options for applying dye in on different sides to get a variety of patterns when unfolded.

 The Square #4 is painted on differently. The dye in the centre sections has been slightly diluted to achieve a lighter colour than the end sections. The skewers and depressers separate the areas. The ends are dyed full strength navy.

Great job! Doesn’t that look interesting and mysterious?! To keep the dye damp the pieces are placed in plastic bags carefully to keep dyed sections from touching too much.
Step #5 – Heat set the Dye
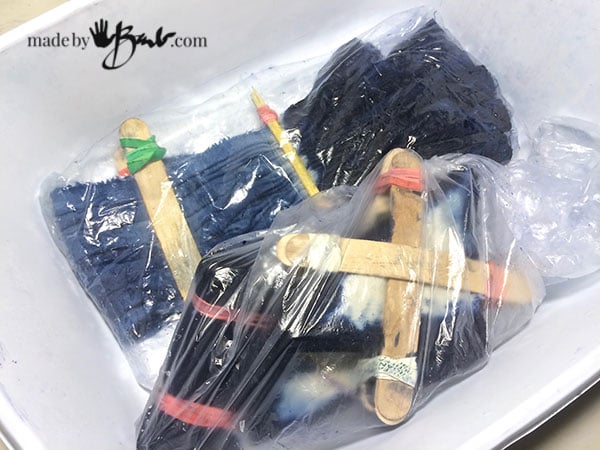
It is now time to set the dye with heat. There are few choices. You can use a small amount of heat (20ºC+) for a long period of time (24 hours) or a higher amount over less time. Being the impatient crafter I am, I choose to work as fast as I can. I double bag the pieces and place them in a (dedicated for dyeing) microwave. I microwave for a small amounts of time till I see it start to puff up meaning that it is at the onset of boiling the moisture. I then set them under some towels to hold the heat and slowly cool.
Step #6 – Rinse and wash

Take the pieces to a sink where you can rinse them freely. Start to rinse in cool water with the bindings still on and then start to take them off. Depending on the amount of dye the fibers have absorbed there may little or more dye rinsing out. I have found that there is little release when using the cotton. Keep rinsing until it runs clear.
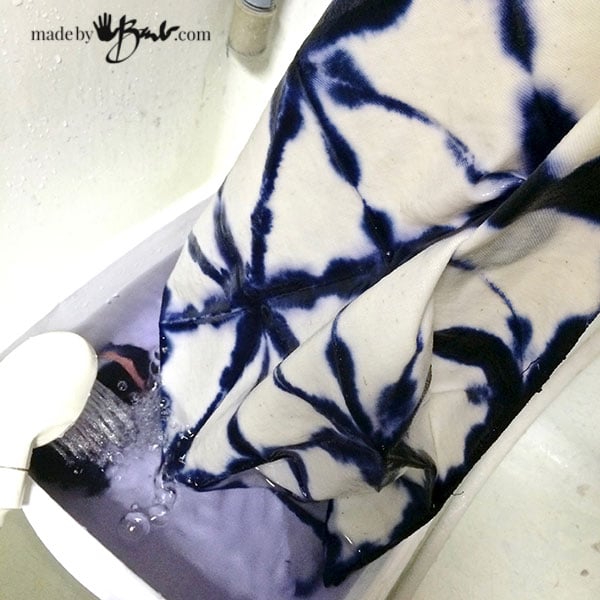
It is like christmas when the bindings come off and the pattern reveals itself! So much fun! Look at that great strength of colour!

After they have been well rinsed, they need to be washed. There is a suggested soap (Synthrapol) but I usually just use a bit of dish soap. The purpose is to use hot water to wash away any unused dye. I found that a bit of purple seemed to wash out and it ended beautifully blue. Wash twice, dry and you are set to use as you would any other fabric. This has much better staying power than Rit or Dylon, and I find it is easy to set with some heat.
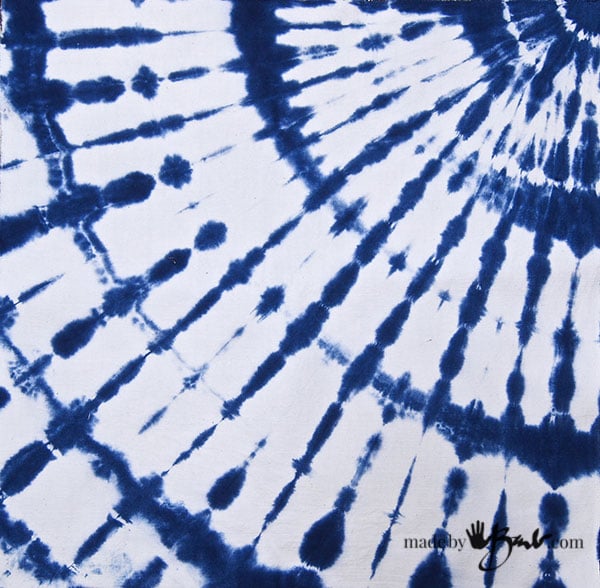

The details of the dye are so interesting! They are like small pieces of art, each one unique. My plan? An entire bedroom remodel… stay tuned. But for now a sneak peek:

One step at a time. Wonderful blue pieces of art that are somewhat created by chance. Such a lovely easy form of art!
The guest room is taking shape… as the Shibori duvet cover is also now done!
I love the look! Can this be done safely for table napkins? It would be upsetting to see blue mouths and hands on my guests!
This dye is very permanent! Even more than the indigo that your jeans are dyed with. Give them a wash before using anyways…Just make sure they are cotton or linen. Enjoy!
Well, I’m a tad late for this party! I must say, I truly enjoy the way you give a tutorial, it’s thorough but you don’t ramble about useless info (sadly, some instructors do – nor did I have to watch a youtube vid and try to listen to the person over loud music – another thing I encounter a lot)….I just don’t have a lot of patience. Your instructions are clear and concise and very helpful, thank you! Btw, even though you posted this over two years ago, I’m just as obsessed with shibori (real or faux) and shades of blue as I ever was! I also love that brand of dye. I will definitely give this a try. 🙂
I am so glad that you mention that! I have been thinking about more video but I don’t like the way videos ‘hold you captive’ for a set amount of time. I think pretty pictures are the best! I also teach at a college so I know how long(or short) the attention span is! It’s a lot shorter nowadays! I too am still obsessed with dyeing everything blue! I hope you saw THE chair. I have also crossed into another form of design dyeing which is also so captivating; Eco Printing! So much to make… so little time!
BARB, I WANT TO TRY YOUR TECHNIQUE. I DON’T HAVE A SEPARATE MICROWAVE FOR DYEING, AND I LIVE IN A VERY COLD CLIMATE. WHAT CAN I USE FOR THE HEAT WITHOUT DRYING THE FABRIC? ALSO, DO YOU EVER RE-DYE TO GET THE BLUE EVEN DARKER? THANK YOU!
It can ‘batch’ at a lower warm temperature for a long length of time (24 hours). I’ve even put it near some devices like the top of the fridge. Keep it in a bag to not dry out. Some use the sun and leave it in a black garbage bag to heat up. You can use more concentration for darker blue or even use a different colour. There are many to choose from. Be careful; it’s addicting…
Your generosity with this detailed sharing of information and instructions is evident.
Thank you
Aren’t you kind! Enjoy!
I am just amazed at the ways to dye. I just ice and waiting for it to melt to see how it turns out. So excited. Have never done anything like the ones you pictured. Amazing idea.
I am not that fond of the hippy look, but the shibori is so amazing. Basic shibori is pretty boring compared to this!
I absolutely love your work displayed here. I’ve gathered my list that you recommend. My question is regarding the first step: I understand that I soak for 30 minutes in the washing soda…….what happens after that? do I rinse off the soda? dry the towels? use them wet? I don’t want to assume anything and have it effect the process. Thanks so much!!
Oh, did I miss that part? I’ll have to edit. Only wring out the fabric as best as possible and do not rinse off the soda ash, it needs to be there for the dye to attach to the fibres. I am confused about the ‘towels’, it is heavy cotton fabric, not towels. Hope that helps!
What a fabulous post. I bought a kit for the original Shibori dye but the instructions did look overwhelming. I am so grateful you went through all the testing of dyes and came up with this one as it looks exactly like the results I have been hoping to achieve. I can’t wait to get the ingredients and finally try it. Thanks so much for posting!
Thank you for this technique! I cant wait to try! Very generous explanation
Once you see how much fun it is there is much more ways to use this great dye!
Je suis tombé en amour de votre travail de teinture! J’aime la magie de la teinture depuis longtemps, mais là c’est de l’art et soudain je souhaite me transformer en artiste, en magicienne, donc c’est sur je vais essayer, alors merci de m’avoir donné envie.
Translate:”I fell in love with your dye work! I have loved the magic of dyeing for a long time, but this is art and suddenly I want to transform myself into an artist, into a magician, so I’m sure I’m going to try it, so thank you for making me want to.”
I too love that there is some element of surprise, that’s what give that excitement! You would also like Eco Printing and Ice Dye Happy making!