DIY Life Cast Concrete Hands


Let me tell you; Life Casting is a magical thing! I have played around with it in the past but this time the purpose was to make the ‘master’ for a concrete mold; DIY Life Cast Concrete hands. There are many steps in this tutorial but in the end you will have the most unique and personalized concrete sculpture!

I had to wait til I could find a suitable subject; someone who would let me use their hands. I can’t do both parts myself. So when my daughter came for dinner, the payback was a bit of Life casting of her hands!
The Supplies for the Master Casting:
- dental grade alginate (I used about 1/2 pound )
- a vessel of some sort that will fit the desired shape
- plaster of paris
- some carving tools (simple knives, files, sandpaper)
Life Casting the hands:
Practice the shape that you are hoping for, trying not have too many odd voids. Alginate is the material that is used in the dental industry to cast the mouth quickly and safely for making retainers etc. This product is amazing for Life Casting since it picks up the finest details but is also ‘rubbery’ enough to allow removal of some pretty complex forms like hands. It is however considered a one-time casting media.
It is always a good idea to do a small test to avoid any expensive mistakes later on. If you are really curious how Alginate works; make a tiny test sculpt of a finger. The working time will depend on your brand and kind of alginate, but in general it is REALLY fast since it is made for those kids in the dental office. Some even have a colour change to let you know it’s ready to unmold. I’d suggest finding the closest dental supply place to order from or here.

I envisioned that the bottom didn’t matter too much since it was going to be a flat botttom in the end. I needed a bowl to contain the mix around the hands since it is pretty fluid when poured. Once set you can just gently wriggle the fingers and pul the hands out. It has a fair bit of ‘play’ since it is flexible. The bowl is vertical since the shape would collapse once the hands did not hold up the middle, this would keep it’s shape.

Pouring the Plaster:
The alginate is best used right away (not the next day) as it would dry out. Mix some simple plaster of paris and pour into the mold making sure to ‘slosh’ it around to get into all the finger cavities. The tin foil was my attempt to fill some extra since I had run out of plaster. (that’s what happens when you get over-excited)

The plaster will warm up and set. Once it is hard you can peel and break up the alginate.
This is so much fun to see the details. Don’t worry about small imperfections, as you do have a chance to fix it. You will be amazed at how this Life Casting picks up each wrinkle in the skin! Again, it can easily become an addiction. I have had craft fun with kids casting shallow imprints of their feet and hands in plaster and putting in a shadow box frame.

I was squealing with joy as I was breaking it out…

I’m totally Impressed Every time!
A few bubbles, but that is ok! All fingers were there!

Success! The plaster may still be damp and need to dry out. My impatience had me cleaning up some of the small bits right away, but be careful not to break off any fingers!
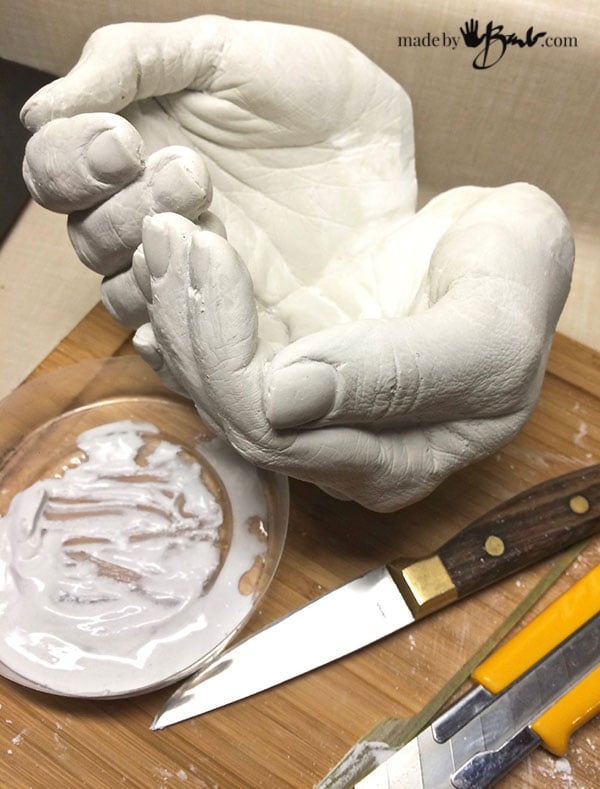
Plaster is soft enough to carve into to adjust any small details or fingernails. I also filled some of the bubbles with some mixed plaster. Yes, I know, I’m a perfectionist…

This is the stage where I decided how they will sit, flat bottom. So I cut and shaved off the bottom and finished off the wrist ends. The bottom will be the pour opening for the new mold.

This is the final plaster cast; pretty amazing isn’t it?! Now, you could stop here but then you would only have one…

Plaster is porous and I was afraid my favourite casting material would stick so I brushed on the wax/vaseline mix.
Supplies for making the Mold:
- ‘Your amazing Plaster-Cast hands’
- 100% silicone Caulking & caulking gun
- vessel/bowl to mix in
- cornstarch
- sharp xacto/matt knife
- release agent (vaseline, or wax/vaseline mix)

Use a sharp object to pierce inside the tube or the attached ‘doohicky’ on the caulking gun. Don’t forget this… as you will burst the tube if you try without poking it first! (Don’t ask me how I know)

This is a fairly large mold so it will need prob the whole tube, but still quite inexpensive.

Glove up and cover with cornstarch. Try to keep cornstarch between your fingers and the caulking; less sticking. Keep incorporating the cornstarch until you notice it not sticking and becoming a stiffer moldable material.

Mold it into a ball and then flatten enough to somewhat stretch over and around the shape. Push into the form and get even coverage. You will be able to feel the plaster poking through if it is too thin. This shape is unique as it has a hollow in the middle of the hands, keep it an even layer as well inside. The thicker the walls; the less flexibility the mold has to remove. Let it set for about 30 minutes or til not ‘squishable’ any more.
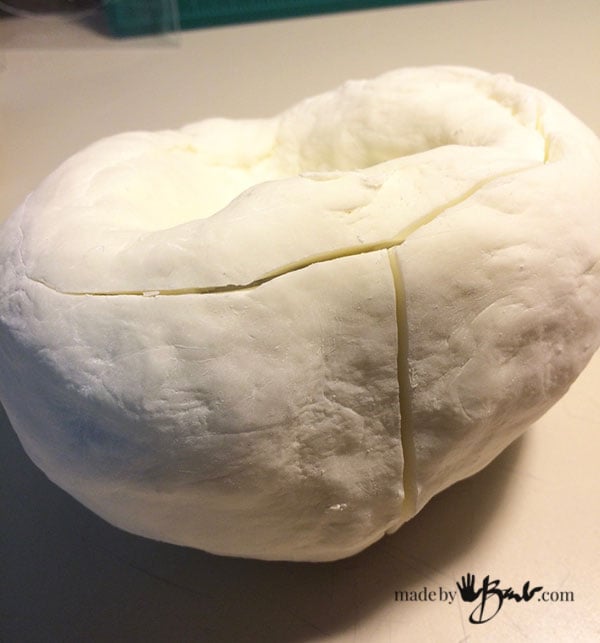
I figure the best way to open was a center cut up the middle and around the ‘bowl’ shape. Cut carefully until it touches the plaster. This silicone/cornstarch mix cuts nicely!

If you can get it out now, you will be able to get out the concrete later for these Life Cast Concrete Hands.

It took a fair bit of wriggling to get the center out. If need be, carve back the mold to allow more bendability. TADA! Mold is done!
Casting the Concrete:

I INVENTED a new way of readying the mold for casting. Yes, elastics work great if holding the outside together but I needed something better for the other areas. Professional molds have tabs and clamps which this doesn’t.

I tested long quilting pins and they do not leave any holes; ie they ‘heal’ themselves – great! Perfect for temporary attachment.
Supplies for Casting The Concrete:
- Rapidset Cementall mix (and dust mask)
- Concrete Reinforcing fibers (optional )
- A plastic bowl for mixing
- water
- mixing spoon/device
- elastic bands
- long quilting pins

“X” Pin the sides that hold the inside of the ‘bowl’. Only pin through the mold material, not through the voids.

All lined up and pinned

Turn over and secure the outside with elastics.

Now that is ready; mix the Rapidset Cementall. This sets really fast and is quite strong.

This mix uses less water and it incorporates quickly.

For extra assurance, add fibers. If you don’t have any, just be more gentle when unmolding. I have not had any fingers break either with or without. For the best flow have this mix on the runnier consistency.

Fill the mold (opening on the bottom) and tap/vibrate well. You have a lot of fingers and details in these DIY Life Cast Concrete Hands!

Level the mold and let for 1 hour or more (love this rapidset!)

All set and still warm.

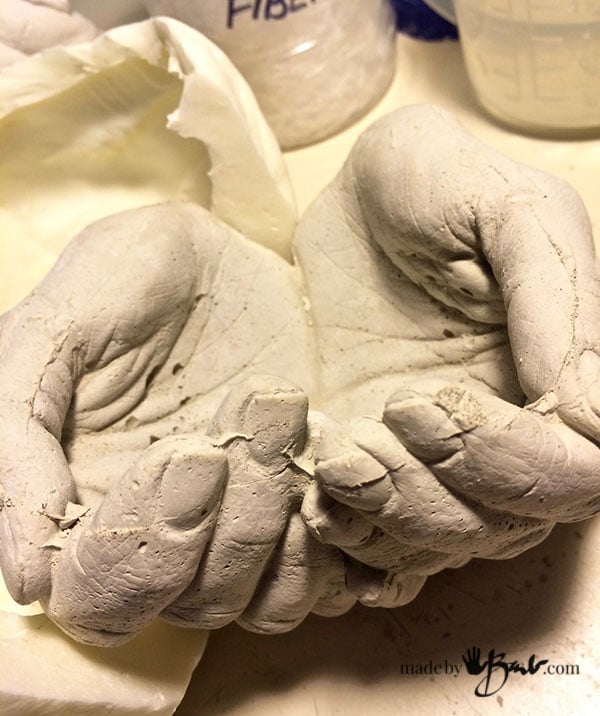
Take out pins and elastics. Open the front of the mold and peel back around to expose the sides.

The centre is a bit trickier to pull out, keep working it carefully around til it lets go.

There are some undercuts here that make bending the mold required. It will depend on your exact form. (The nice thing; you have an original plaster cast that can be remolded if this does not work)
There may be a few seam lines from slight leakage.

Use a file or some strong emery cloth to smooth the seams or bits. Do this before it is has cured 24 hours.
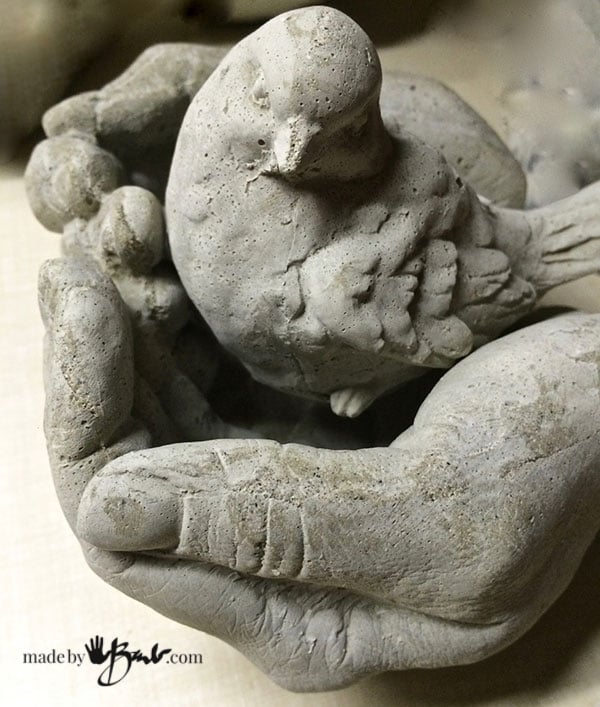
I love how rustic these DIY Life Cast Concrete Hands turned out. You can see details of skin but it doesn’t look like plastic! The bird just ended up sitting in there by accident. If you are new to this mold making perhaps you’d like to start with just casting a bird and then practice pouring your mold.
This could be a planter or a bird feeder or change holder or key holder… But will be a ‘concrete’ reminder of that special person!
Can you use the alginate to make a life mold of a face? I was thinking this would be really cool to do one of each of my girls.
Yes, you can cast all kinds of things with alginate. (look up alginate life-casting) Just remember that you need to put it on for a while so making sure eyes, nose, and mouth need to be addressed; like breathing etc. You will also need a way to contain the mold shape. Maybe start with a hand print, as they might be a bit scared of stuff all over their face. Fun stuff!
Wow Barb! I am learning so much from you and so excited to do this particular piece. Just made the doll head planter and it is so cute. Will be taking some to market this weekend. Can’t wait!
Thanks for everything you post!
Thanks for the feedback! Nice to hear!
Hi Barb, thanks for the tutorial! I’m wondering how you came up with the idea to mix silicone caulking and cornstarch? How strong and durable is it once dry?
I had researched some mold making ideas. I did eliminate the addition of colour. I don’t think that it has been a common method for concrete but it has worked quite well for me. I am surprised how well it lasts and how strong it is. I have some that are well over a year old and even left in the shed over winter. Once cure it is quite a dense flexible material that cuts easily but resists ripping. Give it a small test run… 🙂
Regarding using pins: I think the reason the pros use tabs and clamps is they don’t make shells anymore. They used to make the softer inner cast and then form a hard shell around that to hold the soft cast in position when casting. The pros have used all kinds of materials for the hard shells. I’ve seen fiberglass shells, but concrete or plaster would work. You could make a two piece shell around the silicone cast and dispense with the pins. Don’t forget alignment marks so everything goes together properly. It would be best to make the shell before you removed the living hands from the alginate, but the hand model might object to the additional curing time of the shell.
Oh, I understand! I like the consistency of this silicone mix since it is stable enough when working with smaller amounts of concrete but also flexible enough. This method is geared to the hobbier rather than the professional mold caster. Pins are an odd thing but they work great for me and I can see the alignment of the opening quite well. Thanks for the tips!
Hi Barb! It’s me again telling you “thank you again!” for such clear instructions and sharing your crafting experience. So kind and unselfish!
Questions for my project: I want to make something for a neighbor who’s helped me tremendously. He’s a handyman so I was thinking of making decorative casts of something like a screwdriver and screws, or nut and bolt, etc. Originally thinking of doing it with no-bake porcelain but I’m concerned about breakage. I thought the pure white and fineness of porcelain would be pretty but…
Do you think this type of concrete will pick up details like the ridges on screws? Do you think that concrete will be stronger and have little likelihood of the detail parts breaking off? Is a screwdriver handle too thin and long for this?
Is it possible to put gold leaf on raw concrete such as making the handle of a hammer gold?
What thoughts do YOU have for a handmade gift for the neighbor? (his help was with my hurricane shutters – both up and down and they’re HEAVY with the wrong connections. He did lots of help!)
Thank you again for any advice, thoughts, help you can share!
You must be really thankful to consider such a project! I think casting tools in concrete would be quite troublesome as the pieces will definitely break. I do have an idea though (no shortage there) If you made a ‘master sculpture’ of tools half submerged into plaster you could use that to make a silicone mold for a flat plaque type art. Then when you pour concrete into it (Use RapidSet cementall) it would be an interesting way to see tools formed and then you could add gold leaf as you see fit. You could also maybe cast some words with dimensional letters. It would look a little like this If you break the edges it would look even more ‘artifact’ like! Can you see it now?!
Love the project. Thank you very much for sharing with great details. Have you considered doing a video of this project as I am a visual learner.
Truly appreciative of your great work.
Leslie
Hello,
Thank you for the post and detail.
I’m hoping to create a mold from something made of styrofoam, will your mold mix of corn starch and silicone work?
I’m hoping to create some grave stones
Thank you 🙂
Interesting… It will depend on a few things. Does the styrofoam have a good surface that does not let the molding compound get into the cells (too much texture) and is it strong enough to push the compound into. When I made the bunnies I used polymer clay and it worked fine, but it’s smoother than styrofoam. To remedy you could coat the styrofoam with a good coat or more of a paint AND make sure you use some mold release (vaseline or wax combination, old chapstick) before the using the compound. When I am nervous about a technique I do a small test swatch… Good luck
It didn’t work 😂
But I learnt a lot
I am having difficulty making my mixture both smooth and strong though 🤦🏼♀️
Any suggestions?
Oh wow I came across your site and have been trying to make a set of these hands out of cement. They always broke. I am sure going to try this. Great info. Thank you so much.
The rubber glove method is flawed as the fingers are separated by glove. This is tedious but once you have a mold… Good luck!
Hello,
My child’s teacher would like to do the two glove hand method in the class. Do you have and tricks for that one? Also if I’m using Quikrete sand/top how many pounds per pair of gloves?
I did try it once and it was not as you see on the sites since the glove between the fingers tends to get stuck. Even once pulled out, the fingers were weak and broke off. ‘IF’ you insist on making them, then I would use a strong mix like the Rapidset Cementall but beware that it’s working time is really short – minutes! You could get some of the alginate and make some hand prints that get filled with plaster or concrete, rather than a mold like mine. I love the details alginate gets. When in doubt, make a small test. An easy project would be to make some draped concrete planters Good luck
Barb,
Just “WoW” and Thank You!!!! No words to describe your talents!
Jaweb
Many don’t give their talents a chance. I tend to be determined, and that usually makes it work! Don’t give up! you can do it too…
You do beautiful work. I’m in love with this.
Thanks! This medium casts amazing details! Happy making!