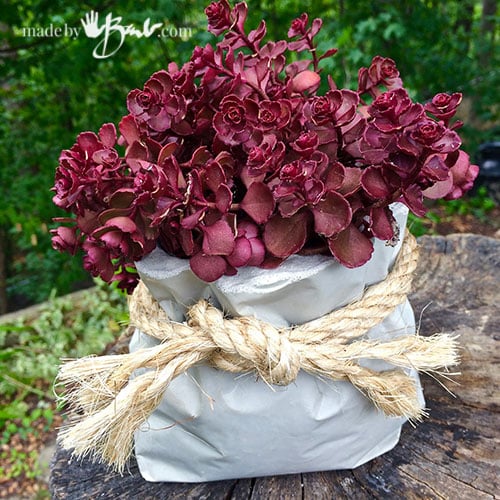
Tied Concrete Bag Planter
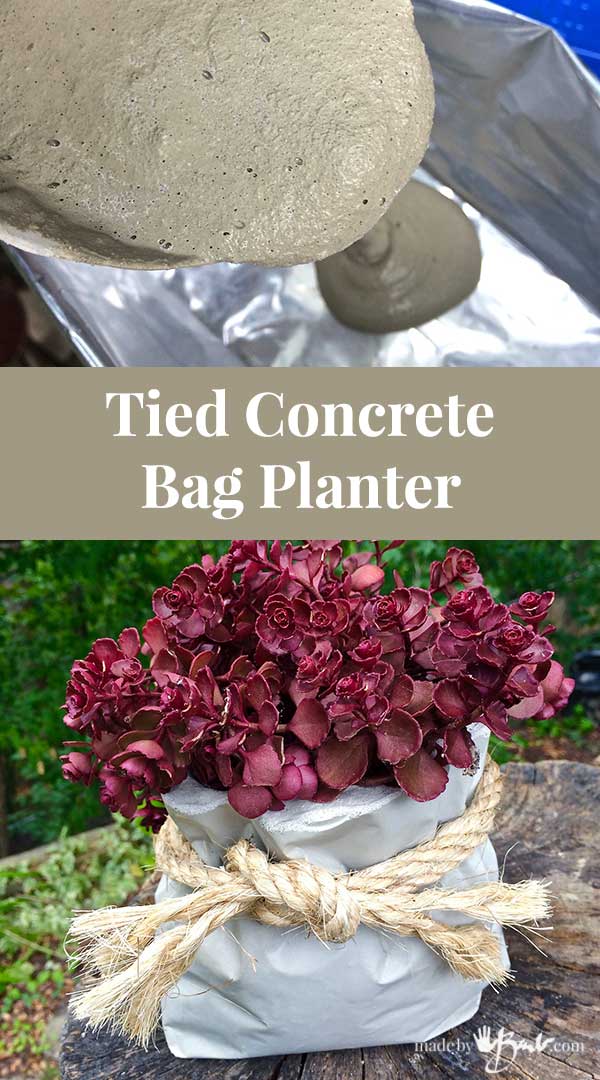
Autumn is in air, soon the snowflakes will fly so I have to squeeze in the last outdoor concrete projects now. My ‘concrete-ideas-brain’ is always looking at every container and vessel to imagine of it can be part of a concrete project. So when putting out the recycling I ‘eagle-eyed’ the foil bags… Yes; another easy, no mold type of way to use concrete! Check your recycle bin and then follow how to make your own Tied Concrete Bag Planter!

Tied Concrete Bag Planter Supplies:
- Heavy Foil bag from things like coffee, dog food, cat food
- Plastic container that fits well inside the foil bag above
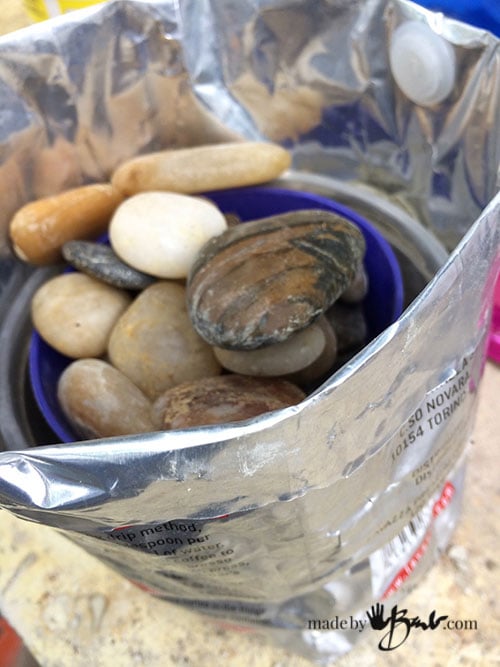
- Stones or something similar
- RapidSet Cementall
- Mixing container, water, mixing spoon, Gloves & Dust Mask
- Sisal or Jute Rope
- Pliers and Sanding disc (as seen in my tips post)
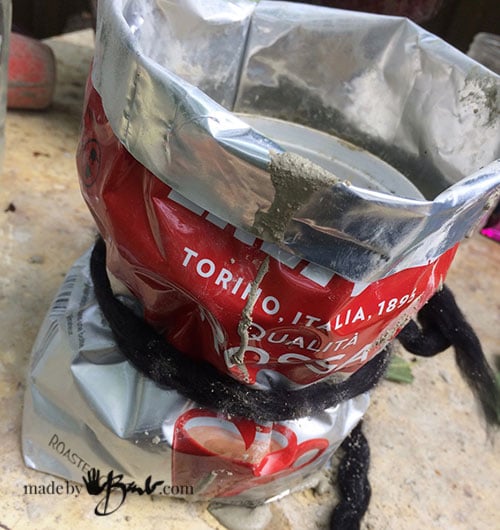
The hardest part of this project is finding the bag and a plastic container that fits inside the bag. Coffee and dog food bags are made of a heavy foil that holds some of its shape. Potato chip bags could possibly work but they do not have a square bottom shape. Clean the bag and scout for a plastic vessel that will be the inside void. I used a large yogurt container as it is also very flexible.
Step #1 Ready the bag
After washing, fold over the top rim and plan how tall it will need to be according with the inside vessel. Ideally the amount of size difference should not be too large or it will need a lot of concrete and become quite heavy.
Have something handy that will weigh down the inside vessel like stones or even water.
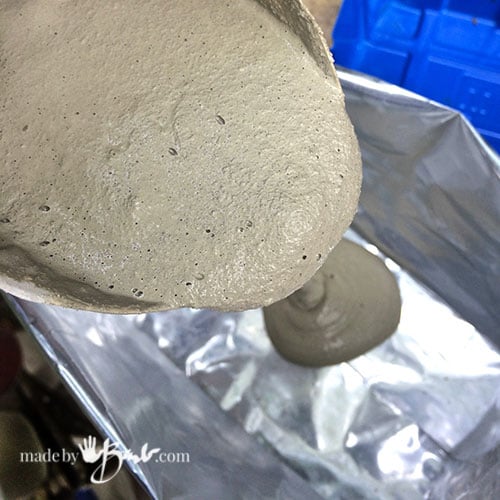
Step #2 Mix the concrete
Place the empty bag on a level surface and mix your concrete. This Rapidset Cementall mix sets quickly but can be used at a consistency that is quite fluid for this project. It will be a bit of luck to figure out how much to mix, generally a bit more than you think you need seems like the magic amount.
I do not use any release agent as the concrete does not stick to it at all.
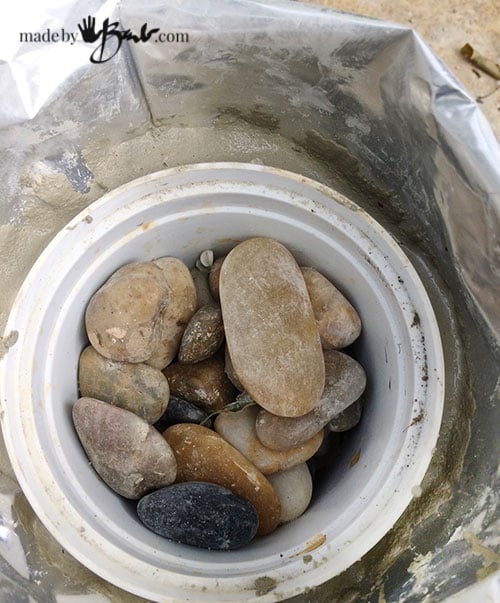
Pour it into the bag. Work fast and insert the interior form vessel and push down to leave about a 1/4″ to 1/2″ bottom thickness. It will be a bit by ‘feel’ if you look into the bottom of the inside. To keep it from floating up, weigh it down with stones or water. (I find stones are most convenient)
Step #3 Cinch the rope
Working quickly, use some rope or yarn to tie at the height relevant with the inside concrete height. Do not tie extremely tight as then there will not be enough concrete to make the wall there. I squeeze the bag into folds and shapes that seem even.
Since this stiffens in minutes, you could hold the shape for a couple minutes to assure how you like it. The more you push the sides the higher the concrete sides will end up. Don’t worry as it is pretty forgiving as a shape.

Step #4 Finishing the Tied Concrete Bag Planter
Since this mix sets in one hour it can be unmolded then. I find that you can’t reuse the bag as it would be a lot of fussing to pull it out without cutting (you can try if you like)
I cut it and easily removed it.
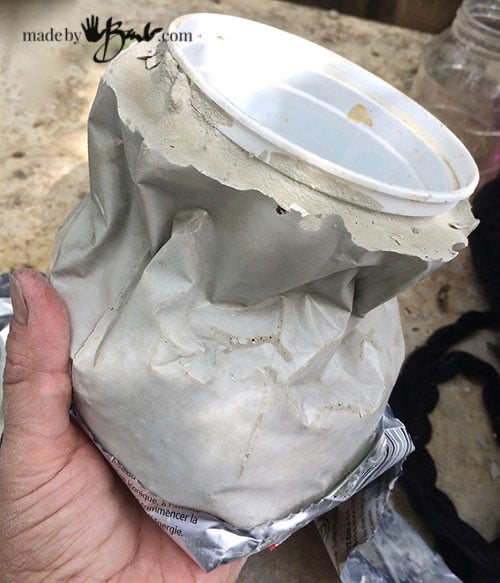
Looks great once the foil bag is removed.

If the inside vessel is being stubborn it can be twisted as it is q flexible plastic.
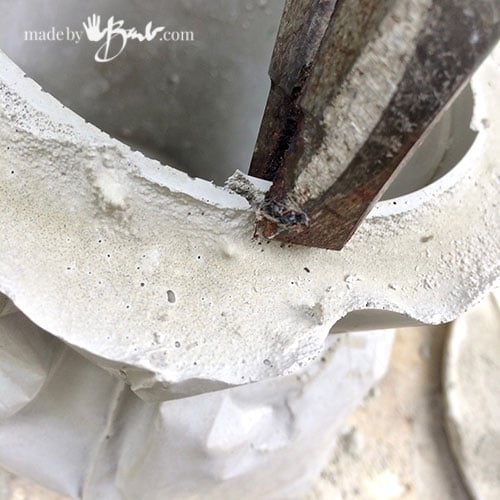
The edges do end up a bit ‘haphazard’ due to the pouring and filling. No problem! Just take some pliers and chip away any parts that protrude too much. It is quite easy as it has not yet completely cured (24 hours). I like the random top edge, as it looks more like a bag.

Once you have an edge that you are happy with use a piece of concrete (like the discs I make with leftover concrete) or some emery cloth to just sand the rough spots out. Oh, my poor hands! Do wear gloves…

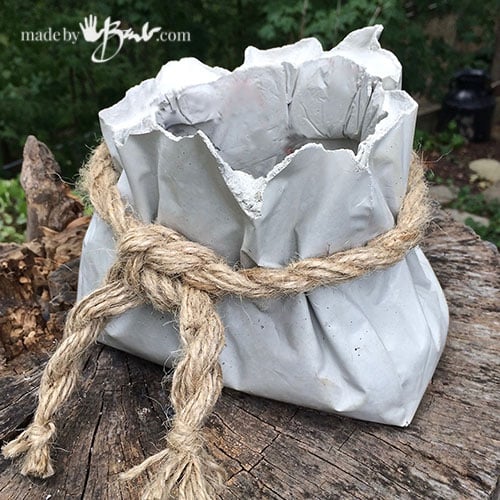
Step #5 Add the rope
To create the final look, add some nice chunky rope. If you can’t find any just twist up multiple strands into one heavy thick rope. Tie the knot and marvel at your creativity!
This one was poured using a dog food bag. It is a larger bag and the inside vessel was a combination of containers in a plastic bag. (as you can see the wrinkles from the plastic) Each one will be quite unique!
I am hoping to explore the ideas of sealer in the near future, but for now I have left it natural. This concrete is so dense that I see no seepage through the walls. Use as a planter or any other use…

Such a charming outdoor vase! Super easy, unique and quick Tied Concrete Bag Planter! Hurry up and make it before the snow flies!
Happy Concreting!
Excellent job and brilliant tutorial – as always! I’m in the UK and we have to seal concrete things due to our inclement weather to stop them cracking apart during a freeze! Also, to stop the lime leeching into the plant roots which is harmful to a lot of plants. X
Thanks! I have been tossing some ideas about testing some sealers but I may run out of outdoor-concrete-time! We get crazy temperature changes here in canada too! From what I have seen, the Rapidset Cementall is so dense I see little leaching of the water. When I cast a planter I soak it for a few days in water. I have yet to find a sealer that I think would not peel or be toxic to the plants. Food safe countertop sealers sound promising but usually come in larger quantities. I have not sealed my stepping stones, or sculptures. The only times I have seen cracking is if the vessel is full of water/wet soil and it freezes which makes it expand. Even the metal buckets blowout the bottoms…
Happy concreting!
These are beautiful! So simple, but make such a ‘look’, even for cut flowers.
Thanks! I’m a rustic gal at heart. There’s something about a big thick knotted rope…
OMG! You are a genius! Love It!
Thanks, I wish I was! I had always liked the ‘bag’ idea but fabric would be too sticky. You have to think ‘outside the box’, or as in my case ‘inside the recycle box’! Try it!
Wow! You did it again. This is a great idea.
Thanks! I can dream up new ideas quite easily but getting them all done is more difficult!
Once again you come up with a great project, and your instructions are always easy to follow. Thank you! I can’t wait to try this! My want to try list grows ever larger!
Could you tell me what succulent you have in the bag? The reddish maroon one. Just love it! These would make great gifts!
Thanks,
Pam
Glad you like it. The red plant in the ‘bag’ is a outdoor hardy creeping succulent here in Canada. Stonecrop Red creeping Sedum”- Voodoo or Dragon Blood Sedum Spurium – Coccineum – It is great as I can just cut some and stick it in soil and it just grows/propagates so easily! There are many succulents and most will propagate easily… Have fun
Thank you for this info about the lovely red plant. I never seem to find any hardy succulents for sale around me. I think they only sell the ones that can not take the cold weather hoping that you will buy them again the next spring.
By the way, do you drill holes in the bottoms of the planters for drainage for the plants? If so, what bit do you use? Thanks!
Once again a wonderful idea. I’ll be trying this next. Here in Hawaii we never worry about freeze, however, finding days that are not too hot are challenging.
Barb,
Can I just say “obsessed”? I look forward to each and every email update.
That’s so nice to hear! Great to know there are people behind those emails…
BEAUTIFUL! It also adds a more natural look to the garden! Getting on this one soon!
My favourite part is the thick rope! Can also be a santa sack! Such fun…
You made a concrete ghoul that could sit on the step for halloween but I can’t find the instructions. I thought it was pretty amazing and I would like to make one. Where can I find the instructions on your webpage. Thanks,,,pam
Oh yes! It’s the Concrete Step Spook and he will be getting a partner! She is quite the darling!
Barbmaker I am extremely impressed by your work and the way you explain things so informative and easy as well .thanks for sharing your experiences.I am a beginner and still have a long way to go.
Thanks, but we all need to start somewhere. I remember casting plaster when I was little, and that fascination has stuck with me! Start small and easy…