DIY Concrete Face Garden Sculpture – Part #1
My garden is my paradise, so I love to add some sculpture to it. This project is a personal endeavour that has been brewing in my mind for a while. Contrary to what you make think, sculpting is not as difficult as you may think if you give yourself a chance. I’ll provide you with a few key points to keep in mind and then you too can also add ‘sculptor’ to your resumé and make your own DIY Concrete Face Garden Sculpture.

I fell in love with the huge faces by Igor Mitoraj! They are not complete, somewhat flat and can be placed just about anywhere. It’s a great idea as it does not need to be so perfect or so complete.

Step #1: Make a plan
As I usually do, I make some sketches to keep track of those many visions in my mind’s eye. This was not going to be a vessel or planter so it was really quite easy… Since it is a mask shape (halloween has many masks right now) you could possibly find one to make this project even simpler

Some memories of college crept back into my mind, drawing the planes of the face and basic proportions. You can always make an interpretation; be your own Picasso!
- Notice that the face is 5 ‘eyes’ wide.
- the nose ends about 1/2 way from eyes to the chin.
- the lips are about 1/3 from nose to chin.
- Take note of side view as well for comparison of depth

Step #2; Create a Substructure
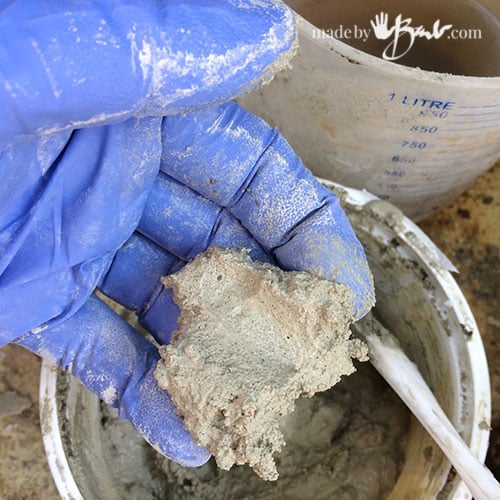
To give myself a starting structure that is light and sturdy, easy to manipulate (no heavy duty tools) I used styrofoam. I used that type meant for home insulation and comes in large sheets as I find it cuts cleaner than the white type used in packaging.

Plan the basic proportions on the styrofoam sheet. It cuts easily with a large exacto knife and glues quite well with a lower temperature glue gun. It was quite fun cutting and gluing, adding layers to also create the height of the facial features.
I wanted this DIY Concrete Face Garden Sculpture to be larger than life-size for maximum effect. Mine is about twice life-size; about 14″ wide by 18″ tall.

Cut and glue and cut and glue, slowly getting more details. The face is symmetrical, and can be broken into planes. Think of the flat planes first and then add the smaller details.

Check the depth of the nose and lips, use pictures as reference. Look in the mirror. It is quite an exploratory exercise.
Take a break and look at again with ‘fresh’ eyes to see what you may have not noticed before.
Step #3; Add the ‘Skin’
Once I had the rough ‘face’, I needed to decide how this was going to go further… My plan was to be able to make a mold of the final sculpture, so I needed something that would harden without baking (styrofoam melts). Well, air dry clay recipes did not make me feel confident that they would be quite workable. So, I fell back to my usual, RapidSet concrete.
A true sculptor would argue with me, as it is a medium that does not allow subtractive work. But it sets quick, can be manipulated and is darn hard when done. So it was fine for me…
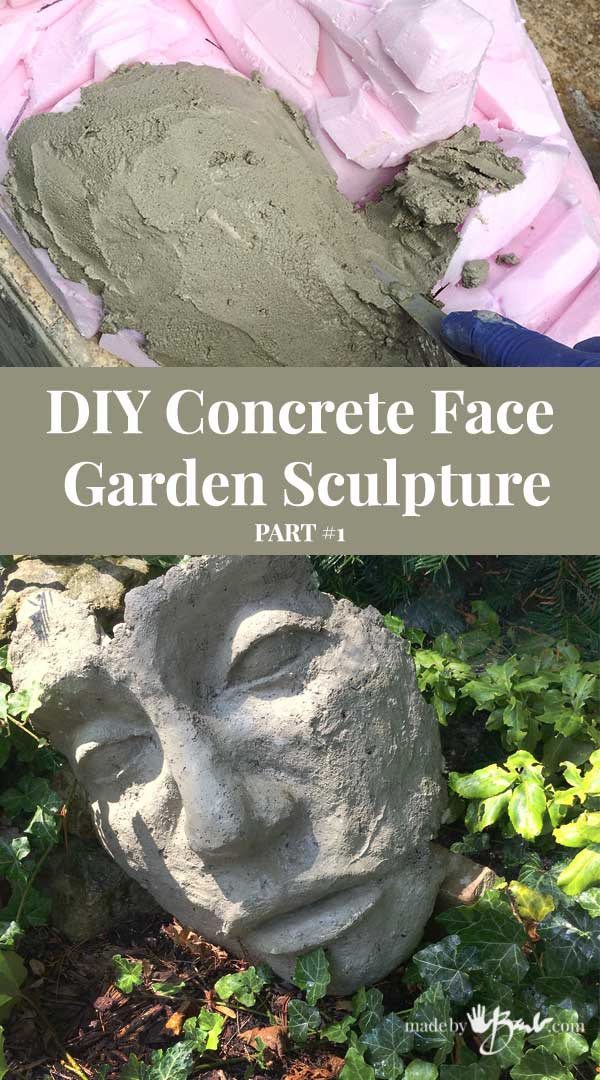
Mix up small amounts of the RapidSet Cementall (or similar quick setting cement) so that it does not set before you can use it up. It should be of a stiffer consistency that allows it to stay put. After about half a minute it will be a soft pliable ‘icing-like’ consistency.
If you need to continue and it has dried somewhat make sure to wet it (spray bottle works well) before adding wet concrete to it.

This was like putting the ‘skin’ on since the basics were already done. Smooth it on, use the gloved hands, trowel, palette knife, plastic utensils, popsicle sticks, whatever you can scrounge up.
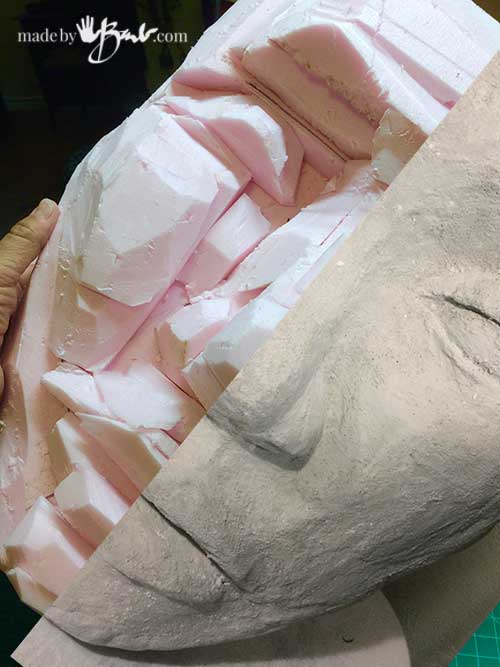
It is just a matter of filling in the features. I was not that concerned that it was super smooth as I like the look of aged and pitted concrete as then it looks more like an ancient deteriorating sculpture of an old master artist… If you need some reference, grab a simple cheap Halloween mask to look at, all artists use reference materials.

Those are some big lips! It was also easier to sculpt since it was so large.

Eye lids, simple open eyes, remember eye balls are round…

There are so many different noses out there! Pointy, squared, up-turned… whatever you like.

Use an old brush to get rid of any crumbles or brush on a thin layer to even out roughness.

Whew, the face is sculpted! It will still be light and the concrete holds quite tight to the styrofoam. You could keep it like this, however I did not want the bulk of the back so I will take it to the next level.
This will become the ‘master’ for the mold that I will make. See this post to watch how to make the silicone mold.

Really cool……Does the concrete need some sort of sealing or do you think it would hold up in the hot heat and snow just fine?
Sealers usually fail and need retreating. If you notice sidewalks don’t get sealed. Mine have been quite happy in our variety of weather. The only problem is if they are able to collect water, then there is the freezing/expanding issue. Good luck!
“The only problem is if they are able to collect water”
Oh thank you thank you for mentioning that. I was wondering why my birdbath bowls weren’t making it through winter while the pedestals do so just fine.
In regard to the people like me who couldn’t see the pictures on Pinterest, down at the bottom of Barbs comments, there are three dots and when you click on them, one option is to open in browser, which I did and could then see the pictures. Hope that helps.
Interesting! I’ll have to remember that! So much technology = so much to go wrong. Thanks for the tip!
Hi, I would really like to have a go at the concrete art that I have seen on here so I tried the simple start of fabric over jars, but they dried and crumbled and just collapsed. I followed the cement instructions of 4 parts sand to one part cement and added water to get a smooth mixture, dipped the fabric in and squeezed it over and over. Can you tell me what I am doing wrong ?
Oh dear! I wonder if your concrete was too old? Also I tend to not add the sand as the fabric acts as the aggregate in this case. See this post for help. I have not had any of those issues just using the portland cement and fabric. See these Good luck
Just discovered you! I am making a concrete pedestal plants and I’m wondering if o can add decorative elements after it comes out of the mold. Like a decorative edge with embedded glass chips. If I use mortar for the decoration, will it stick to the concrete? Can’t find a straight answer. Would I need a bonding agent? Thank you!!
The Rapidset Cementall does allow adding afterward if you dampen the cured concrete. It also does act as a grout. Try it on a small area. It cures quickly so you can see how it attaches.
Your work is gorgeous and it brings a sense of peace. Thank you for sharing your technique.
Oh thanks! It gives me much peace; my therapy… ❤️
Barb!
I was a ceramics sculptor back in my college days, and it was my greatest passion. But, when I left college and no longer had a kiln to use, I reluctantly moved from sculpture Into painting. Recently I started researching sculpting with cement, and I found your website. You are a GENIUS, and you’ve inspired me to go back into sculpting! I love how brave you are, experimenting and figuring out which mixes and materials work best for which projects. I am so excited to say that I’ve created my first Easter Island style head planter out of concrete, and I’m ecstatic about making bigger and better sculptures! Thank you so much for being such an inspiration, and for sharing your creativity and enthusiasm with all of us!
Wow! I am so glad! I wanted a potters wheel when I was in grade school, but my parents said no. Then I wanted a kiln, again no. Soooo, eventually after amassing so many other supplies concrete does fill that sculpting void for me. I also teach in an art college so I have amazing inspiration around me all the time!!! Thanks for commenting!
I’ve always wanted to sculpt. Just recently was suggested to try hypotofu. I made 3 Rhubarb leafs. I wanted to do a fountain ⛲ & imbedded metal hardware. I was just guna see & screwed just a lil too far. The hardware fell thru, I was holding both pieces, hollered for husband to come help. He brought a pipe wrench since I’d hand turned it too tight. Got it loose & said ok pull it up, when I did, the corner of the plywood fell right on the leaf vein & cracked my biggest leaf. I cried. At least I learned that I’m going to LOVE 💘 hypotofu scuplting! I’m going to try this now. Thanks 😊
Oh too bad! I have a lot of fails/accidents that I remember well. Usually that won’t happen again, as we learn from it… Happy making. I love fast set concrete, more my speed!
Does this break easily if knocked over? I am thinking of doing a 4 foot tall statue, but don’t want it to be too delicate.
Wow, 4 feet tall?! that’s quite an undertaking! I would think it would break. Even a pot would break. It also depends how thick it is and if it reinforced. Concrete gets crazy heavy, so keep that in mind! Good luck!
Dobrý den, jste hrozně moc šikovná a nápaditá, popis a postup Vašeho tvoření je perfektně popsány, jen bych se prosím chtěla zeptat, čím přesně se lepí ty růžové styrodur. desky nebo jaké to jsou a zdá na vyplnění mohu použít normální beton s vodou popřípadě zda přidat písek nebo koupit nějaký ten váš uváděny beton Rapidset, věcem je jeho výhoda. Moc děkuji za odpověď. Zdeňka Vojteková.
“Hello, you are very clever and imaginative, the description and process of your creation is perfectly described, I would just like to ask what exactly the pink styrodur are glued to. slabs or what they are and it seems to fill I can use normal concrete with water or whether to add sand or buy some of your featured concrete Rapidset, things are its advantage. Thank you very much for your answer. Zdenka Vojtekova.”
The Pink styrofoam are glued together with some low temperature hot glue, and they are cut from sheets. It is just a way of giving a base structure to then sculpt on. I do not mix my own concrete, I’d rather buy a mix. The Rapidset Cementall sets so fast that I can work quite quickly. Good luck!
Damn, Barb!