Alternate Eco Print Processing

Well, I’m a bit nervous about posting this but here goes anyways… Yes, it’s unconventional but it works for me! Make it easier for yourself and possibly save as well. I’m happily sharing my Alternate Eco-Printing processing method.

What I love:
This amazing and mysterious art form called ‘Eco Printing’ or ‘Printing with Botanicals’ has got me hooked for quite a while now. How amazing is it to use nature’s gifts and try to decipher how to make it react according to your wishes! Check out some of my posts of the different techniques here. Let’s just say it’s like performing magic tricks…
What I did not like:
I love that I can use what nature discards and up-cycle fabric but the part that involved a high use of energy did not impress me that much. Sure, if you live in a rural setting and have tons of firewood and places to cook outdoors like India Flint you are very fortunate! I could try to do that but I may just burn down the forest. So I figured out another option…
Generally, there are 2 options for processing the tied bundles (in whatever format you’d like); steaming or boiling in liquid. I tend to prefer the steaming as it gives some nice distinct prints and there is more control of ‘wetness’.
How to Prepare your bundle:
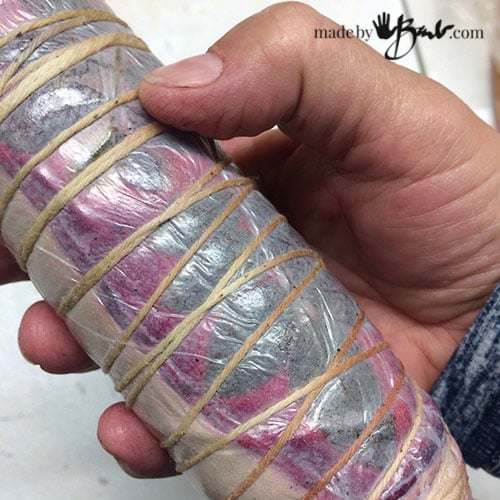
Ok, please don’t shoot me for using plastic. I know I know, it’s not environmentally good. I DO however reuse the bags from food packaging and barrier sheets so many times, just saying.
After the usual rolling and placing the leaves (pre-dying and/or using iron blankets) roll as tight as possible. I use a barrier layer and have used the same ones for over a year. Tie tightly.
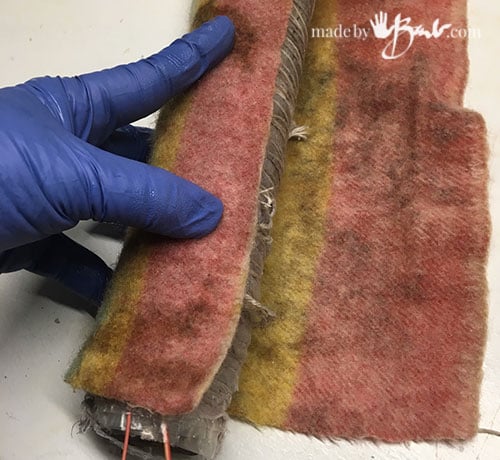
The fuzzy fabric that you see is a piece of an old wool blanket. Wheyn dyeing some wool I noticed how wool does not like to hold onto moisture; it kept dripping out. Other fabrics are not quite like that and wool can take quite a beating. I wet the wool and wrap my bundle in it. One or 2 layers is quite enough as I just want to create a nice damp place for the bundle.

Once its wrapped I pop it into a recycled bag and roll the excess using an elastic to keep it closed. (wrapped bundle on the right above) It is quite air tight.

The Secret Heat:
Here it is; I use a microwave! BUT, and a big BUT! you can NOT use any metal pipes or utensils in it! I use my wood curtain-rod dowels. You may also have some size restrictions; as with the width of the microwave. I measured the small one I have (dedicated to dyeing and eco-printing) and made sure my bundles can fit on the turn table.

It is a bit of guess-work to decide on ‘cooking’ times. I love my temperature gun for figuring out how hot a surface is. I set the microwave for 2 minutes and then I check the temperature with the gun and with my hand. Traditional steaming may build slower but will probably be around 180F or so. Turn the bundle and set for another minute if need be. A microwave heats by vibrating (exciting) the water molecules so it is important to have a damp environment (wet wool encased in plastic) and watch that it does not overheat. It is also important not to have your roll too wet if distinct prints are wanted. It will possibly start to ‘puff up’ which is signalling that it’s boiling. Stop it at that point as I feel boiling is too strong.
When comparing to steaming in a pot on the stove or turkey roaster there will be times when turning or checking that you will lose heat so it too does not hold a constant temperature.

Here the temperature gun is showing 154F but I aim for 160-180F as I believe the internal temperature will be higher. The encasement keeps the smells down as well.

The Other Secret:
If you ‘zapped’ it repeatedly it would be getting too hot and possibly start to melt things. Insulation is a great alternative to keep an almost constant heat. We all know it can work wonders as I use that to keep food hot when having people for dinner, a trick I saw when catering was dropped off. I keep a big thick wool blend blanket close to the microwave to quickly pop the roll into after it’s heating cycle. I snuggle it under many layers of the blanket and let it be for a while… A roll lets you also turn it easily and stick your finger in to see how darn hot it still is.

How long? Well that can vary to what I am doing, but it’s not using any energy so I am flexible. I may come back after an hour and feel how hot it is and just give it a ‘zap’ for a minute and then back under the covers. The moisture stays put and the heat lasts quite a while…

Many times I just let them ‘sleep’ overnight and have something to look forward to in the morning. They are pretty happy in there.

I realize it seems to be far from the rustic way that I picture India Flint over an iron cauldron on a wood fire and emitting quite the aroma. Since my bundles are encased I do not find excess aroma but some may be more sensitive than I. My microwave is in a large laundry room away from living space. The most aroma I have is when I unbundle.

I have used this technique for a very many bundles but I’d like any feedback that you’d like to share. As you may also find it is difficult to find exact information on this technique as many who have somewhat ‘cracked the code’ would like to only share in pricey workshops. I understand as it takes much energy and supplies to figure out a technique so freely sharing seems silly.
As many Eco printers will agree; sometimes it just works and sometimes it’s a mysterious flub. I don’t see that this method has had any negative impact on my prints but do proceed with usual caution and care and above all be safe.
Happy printing!
Thank you. I don’t own a mirooven, but now I migth think of netting an old one for ecoPrinting as I too has felt bad about the excess energy. My results do not come near yours, but I’m experimenting and having fun – and thatøs part of the goal isn’t it? I have gone with steaming them in the top of my dye pot tied to a string in the top.
And … I love your take on sharing. I do the very same thing. Thank you so much.
As usual, great information! I’m seeing all kinds of alternate methods such as a heat press on paper lol but the microwave sounds like a fun way to try a few pieces. Thanks for sharing!
I’ve done maybe 50 prints and don’t see that it has any adverse effect. I usually get too heavy with iron or something else that impacts. So much more I want to try!
Just gorgeous. Did you start with a white cotton sheet or was the background fabric already red? I love working with products from nature. Thank-you for sharing your creative process. I’ve already got too many projects going to start this one, but next year…..
The red one is actually silk that was dyed with Madder first. There are so many ways to do this art form. I think I’m addicted! Please by a scarf and help fund some more silk to print 🙂
Barb,
What kind of silk do you find works best for eco printing? That weave and weight? Where can I find the scarves, blanks and plain material to practice on? This has been a struggle. Any help is greatly appreciated.
I do like to keep my eye out at thrift shops for silk but the ones I sell are from Dharma Trading which can come finished, Habotai works quite nicely. I had ordered another silk online but it was so thin! I hope that helps.
Thankyou I have wanted to do some more printing for a while but there’s so much preparation with lots of bundles -this is a great way to trial just a few….can I ask was the last lovely pink print done on silk please and was it mordanted. Thanks for the inspiration x
The pink is cochineal and see how here It is my favourite! See more here too
Hi Barb I love your idea and couldn’t wait to try it- I have done a bit of conventional eco printing but have never achieved anything very clear on silk. This weekend I have tried your microwave method on silk scarf blanks a couple of times but sadly all I got was a few really pastel marks…I did wrap the bundle in plastic before I wrapped it in wet wool and wonder if my scarf got too dry inside….( I think the wet wool blanket should have wrapped around the silk scarf before adding the plastic???) thanks
You should be able to get some good prints on silk (hope it’s real) as it prints the easiest of all. Are you using iron water or an iron blanket? Rolled very tight and flat? Using good printing leaves? I don’t think it’s the processing if you are getting similar results both ways. Great thing is you can keep repeating the printing. I often do a second dye round if the first is ‘so-so’. Keep at it, it’s all a process! You should see what I got as my first prints!
Thanks Barb,
Def silk I used to sell dyed silk scarves…used iron water ( kept it weak as you suggested) laid out scarf covered half width with leaves (eucalyptus, smoke bush, geranium, all of which I had results with on wool) then I covered that half with plastic and laid out leaves on it face down and folded the scarf over that. Then I rolled a dowel in the end and rolled as tightly as poss. and bound it with string. Covered it with plastic then wet blanket then sealed it with plastic wrap. Maybe the roll wasn’t hot enough although it felt extremely hot. The blanket kept it warm for ages!! After about 1 1/2 hrs I zapped it again for a couple of minutes. Sue
Sue, are you wetting/dampening your silk? It won’t work if it’s dry.
Yes, the fabric is damp, as is the ‘blanket’ and then an insulation in wet wool also ensures a damp environment to mimic steaming. In the usual eco printing fabrics are also wet/damp. I don’t think anyone uses anything dry.
You are truly awesome. I wouldnt worry too much about India Flint. I read her book and its just over the top waffle to blind you with science . Its not that difficult.!!!
If I was a scientist I may not be so experimental… ‘rather just try and see! And my crazy brain keeps coming up with more ideas…
Hi,
Enjoying reading about your experiments ,also what your followers have to say. Haven’t started but I understand it is all about experimenting. Thanks for sharing!
Neeti Hegde
Of all the arts I’ve practiced it has been the most intriguing! Challenging yes, but so rewarding as well. I’m glad you have that understanding, you will enjoy it… Happy printing!
Could not agree more! I felt a bit ripped off by her book. If you wanted to keep it a secret, don’t write a book about it! This site is THE BEST!
Thanks, so kind! It feels like a bit of ‘witch craftery’ The wonders of nature!
Fantastic! I’ve been microwaving bundles without the wool layer for awhile also, seemed so wasteful to have the oven or stove on for hours (plus sometimes I’m not free to keep an eye that long). Only once did I have an issue with plastic melting into my fabric and I’ve stuck to thicker plastic I reuse and had no issue. Thanks for sharing!
Thanks for letting me know. I think you’ll find it a bit safer with the damp wool. And wool is naturally flame resistant. Some factories use it for apparel for their workers!
No imaginas lo feliz que estoy con toda la información tan valiosa que compartiste .llevo días ensayando diferentes informaciones. Hoy me tradujo el celular y pude leer toda tu información estoy ansiosa y muy agradecida voy a comenzar a experimentar. Muchas gracias.
“You cannot imagine how happy I am with all the valuable information you shared. I have been rehearsing different information for days. Today I translated my cell phone and I was able to read all your information. I am anxious and very grateful I will begin to experiment. Thank you.” Good luck! It’s a fun art form as it keeps you guessing… and interested!
Hi Barb, I live in Northern British Columbia and will find it hard to print outside this winter. I’m fairly new to this. I’ve been doing it for about 6 month’s and have become obsessed. This is a technique that will keep me productive over the winter. I’ve have good luck with your rust soaking and steaming process for cotton. Thanks for all the info. I’m finding it invaluable.
Yes, us Canadians have a bit shorter season and weather restrictions. I totally understand the obsession part… I now have to limit my ‘bundling’ or nothing else will get done. I do have a nice stock of leaves and know I can steam whenever I like. Just be cautious of safety 🙂
Great cant wait to try it, thank you for your generosity
Every microwave is slightly different so watch carefully and do a test run, good luck!
You can put metal in the microwave as long as there are not any metals touching each other or the turn table. The microwaves won’t pass through the metal, but if it is inside the bundle the outer layers should get hot.
I just avoid any metals, just to be safe. There are usually alternatives ways to work without metal. Happy printing!
Buenas noches, disculpe las molestias, me llamo Roberto Giménez y vivo en Mendoza, Argentina, no se leer ni hablar inglés, pero por las fotografías se ven lindos trabajos de teñidos, me gustaría saber si usted tiene la explicación en español, desde y
a muchas gracias, y le deseo un muy bien 2019.
‘
Good evening, sorry for the inconvenience, my name is Roberto Giménez and I live in Mendoza, Argentina, I do not read or speak English, but for the pictures you can see pretty dyeing works, I would like to know if you have the explanation in Spanish, from and
Thank you very much, and I wish you a very good 2019.’ There are translate help in Google, as I used that to translate this… Good luck. There may be way to translate full sites…