Alternate Eco Print Processing

Well, I’m a bit nervous about posting this but here goes anyways… Yes, it’s unconventional but it works for me! Make it easier for yourself and possibly save as well. I’m happily sharing my Alternate Eco-Printing processing method.

What I love:
This amazing and mysterious art form called ‘Eco Printing’ or ‘Printing with Botanicals’ has got me hooked for quite a while now. How amazing is it to use nature’s gifts and try to decipher how to make it react according to your wishes! Check out some of my posts of the different techniques here. Let’s just say it’s like performing magic tricks…
What I did not like:
I love that I can use what nature discards and up-cycle fabric but the part that involved a high use of energy did not impress me that much. Sure, if you live in a rural setting and have tons of firewood and places to cook outdoors like India Flint you are very fortunate! I could try to do that but I may just burn down the forest. So I figured out another option…
Generally, there are 2 options for processing the tied bundles (in whatever format you’d like); steaming or boiling in liquid. I tend to prefer the steaming as it gives some nice distinct prints and there is more control of ‘wetness’.
How to Prepare your bundle:
Ok, please don’t shoot me for using plastic. I know I know, it’s not environmentally good. I DO however reuse the bags from food packaging and barrier sheets so many times, just saying.
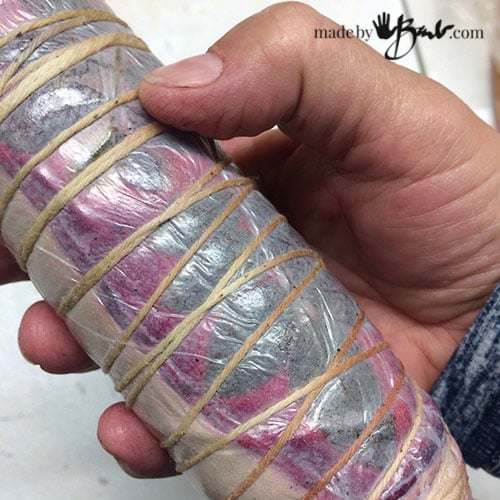
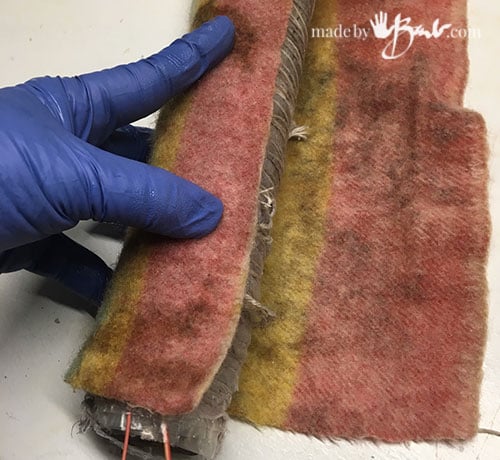
After the usual rolling and placing the leaves (pre-dying and/or using iron blankets) roll as tight as possible. I use a barrier layer and have used the same ones for over a year. Tie tightly.
The fuzzy fabric that you see is a piece of an old wool blanket. Wheyn dyeing some wool I noticed how wool does not like to hold onto moisture; it kept dripping out. Other fabrics are not quite like that and wool can take quite a beating. I wet the wool and wrap my bundle in it. One or 2 layers is quite enough as I just want to create a nice damp place for the bundle.

Once its wrapped I pop it into a recycled bag and roll the excess using an elastic to keep it closed. (wrapped bundle on the right above) It is quite air tight.

The Secret Heat:
Here it is; I use a microwave! BUT, and a big BUT! you can NOT use any metal pipes or utensils in it! I use my wood curtain-rod dowels. You may also have some size restrictions; as with the width of the microwave. I measured the small one I have (dedicated to dyeing and eco-printing) and made sure my bundles can fit on the turn table.

It is a bit of guess-work to decide on ‘cooking’ times. I love my temperature gun for figuring out how hot a surface is. I set the microwave for 2 minutes and then I check the temperature with the gun and with my hand. Traditional steaming may build slower but will probably be around 180F or so. Turn the bundle and set for another minute if need be. A microwave heats by vibrating (exciting) the water molecules so it is important to have a damp environment (wet wool encased in plastic) and watch that it does not overheat. It is also important not to have your roll too wet if distinct prints are wanted. It will possibly start to ‘puff up’ which is signalling that it’s boiling. Stop it at that point as I feel boiling is too strong.
When comparing to steaming in a pot on the stove or turkey roaster there will be times when turning or checking that you will lose heat so it too does not hold a constant temperature.

Here the temperature gun is showing 154F but I aim for 160-180F as I believe the internal temperature will be higher. The encasement keeps the smells down as well.

The Other Secret:
If you ‘zapped’ it repeatedly it would be getting too hot and possibly start to melt things. Insulation is a great alternative to keep an almost constant heat. We all know it can work wonders as I use that to keep food hot when having people for dinner, a trick I saw when catering was dropped off. I keep a big thick wool blend blanket close to the microwave to quickly pop the roll into after it’s heating cycle. I snuggle it under many layers of the blanket and let it be for a while… A roll lets you also turn it easily and stick your finger in to see how darn hot it still is.

How long? Well that can vary to what I am doing, but it’s not using any energy so I am flexible. I may come back after an hour and feel how hot it is and just give it a ‘zap’ for a minute and then back under the covers. The moisture stays put and the heat lasts quite a while…

Many times I just let them ‘sleep’ overnight and have something to look forward to in the morning. They are pretty happy in there.

I realize it seems to be far from the rustic way that I picture India Flint over an iron cauldron on a wood fire and emitting quite the aroma. Since my bundles are encased I do not find excess aroma but some may be more sensitive than I. My microwave is in a large laundry room away from living space. The most aroma I have is when I unbundle.

I have used this technique for a very many bundles but I’d like any feedback that you’d like to share. As you may also find it is difficult to find exact information on this technique as many who have somewhat ‘cracked the code’ would like to only share in pricey workshops. I understand as it takes much energy and supplies to figure out a technique so freely sharing seems silly.
As many Eco printers will agree; sometimes it just works and sometimes it’s a mysterious flub. I don’t see that this method has had any negative impact on my prints but do proceed with usual caution and care and above all be safe.
Happy printing!
Do you describe the iron water somewhere? Does iron act as a mordant? Do you pre-wash your fabric and/or is it PFD (or is that even necessary? I’ve not done this before because I thought it was too messy (limited space) & took too long. But your method sounds more manageable., and your results are gorgeous! Thanks!
I am not sure what PFD is? Personal Flotation Device? Or Post Fabric Dye? This post is really just meant to explain the alternate way of processing. There are more posts under the ‘Home’ menu > Eco Printing. Iron water is a rusty water made with rusty found objects or you can also use iron sulphate. Yes it helps mordant but will also affect dyes in various ways. There are a multitude of ways to print so experimentation is best. Messiness depends on how much and how diverse you want to get. Printing on paper is also easy. Good Luck
PFD means : Fabric you buy witch are prepared for dye. Somebody still wash them. I have used Procion mx dye and did never wash PFD fabric before dyeing. 🙂
Oh yes! I knew that… The way the fibre reactive dyes work is much different than the nature-based. Altering the PH makes them adhere to the fibres. It’s all so much fun!
PFD = “Prepared fro Dyeing”, usually for synthetic dyes like Procion. 🙂 I still scour it for natural dyes and ecoprinting.
Of course! Not ‘personal flotation device’!
Hi barb
Thank u for sharing info
I Hv made several silk scarves by steaming but do not get distinct prints like u do
Do share on those lines pls
Check out some of the posts here and here There are many factors that could affect better prints…
Barb, adore this post and the other eco printing posts. I need more time… finals are the first week of May. There will be some time then.
Keep these coming. Awesome projects.
Oh, I know! Teaching at a college also has me busy until may. I’m looking forward to the burst of greens soon! And some pleasant walks of gathering…
I am very keen to try your micro method for eco printing .. when I use the conventional steaming method, I use a piece of plastic down pipe to wrap the cloth around .. can I use the same in a microwave oven? Thanks for sharing x
I would test it in the microwave to see if it heats up too much. It’s like how some dishes just heat too much. I use the wood dowels (old curtain rods) and they work great. I’m hoping to find a flexible type to use in the micro as well. Good luck!
Your information on process and tools is so helpful; thank you for being so generous with your knowledge and skills. Your work is just beautiful. I haven’t done any eco printing yet, but I’m thinking of two other alternative methods in addition to the microwave: my Instant Pot (pressure cooker), and my crock pot! I’m off now to google both, and see if anyone is having success with those two appliances. Ann, in Raleigh, NC.
Eco printing is quite intriguing & magical! Just be aware that whatever you use should not be shared with food. Many will use an old turkey roaster which is like a crock pot and also long enough to hold longer rolls/bundles. Good luck and don’t be discouraged if results are a bit evasive as it will keep you interested! Happy printing…
I did my first piece and is a bit dissapointed. Some of my leaves didn’t print at all. I’m on a farm and have a wood stove, so I used the long steaming method and ferrous sulphate to soak the leaves. I’m still trying to figure out which plants will be suitable, because our vegetation here in Namibia is very different from yours. I’ll keep trying. Thank you for sharing your expertise.
There could multiple factors, as having prepared the fabric properly is also quite crucial. My first pieces looked like dirty fabric. I find that the leaves print best from the underside (vein side). Do you have any eucalyptus? Rose leaves (not petals) usually print well. Don’t despair, it’s a process to learn but when things work it’s glorious. I’m hoping to post some methods using tannins as well which may help get better prints. Even try some use of pomegranate My favourite method is using the iron blanket Good luck!
Barb: me encantaron tus ecoteñidos. Es una solución mas fácil para quienes no tenemos como opción el fuego y la leña. He tenido que experimentar mucho porque en donde vivo solo hay eucapiltus que tiñe café oscuro. Con rosas he conseguido algunos tonos mas rojizos. Suerte y sigue compartiendo. Saludos desde el fin del mundo.
“Barb: I loved your ecoteñidos. It is an easier solution for those who do not have fire and firewood as an option. I have had to experiment a lot because where I live there is only eucapiltus that dyes dark coffee. With roses I have achieved some reddish tones. Good luck and keep sharing. Greetings from the end of the world.”
Thanks! There are even spices like carrot tops that will print. If a leaf does not have enough tannin you can still use them in a different way… I’ll be posting some methods soon! Keep experimenting!!! Good luck
I have been doing a little eco printing on paper. So far I am not really pleased with the results. I was so excited to start and was so disappointed when I revealed the. Any suggestions?
I know when I started I needed to find the best printing leaves, have the right concentrations and have the fabric/paper prepared right. Have you looked here Myrobalan can be an easy ‘help’. Hang in there, my first prints looked like ‘dirt’!
Thanks for sharing your method. I’m brand new to this wonderful art and gathering supplies to do my first eco-print (my rusty chain is currently soaking as per your suggestions). My questions is, after the printing process, do I need to wash or soak my silk scarf in anything special to help to make the print permanent, or is a simple wash in soapy water sufficient?
If it is a new ready-to-dye scarf then you can do one of a few things; mordant in some Alum solution (15% Weight of fiber), or 50% vinegar solution, or nothing (silk loves to dye) If it is a used scarf then a good wash would help rid any oils or grime. Don’t use washing soda, it will harm the fibers. I’ll admit I’d rather be an artist than scientist so I tend to ‘wing-it’ often and see what surprises I get! It’s a learning curve so embrace what you get and keep experimenting! Good Luck!
Thank you so much for sharing. I’ve never tried this before but am excited to try! You explain your process very clearly and I appreciate that you’re willing to share your secrets!
I warn you… It’s addicting and a lot of fun! Do many tests and keep notes!