DIY Fitted Face Mask
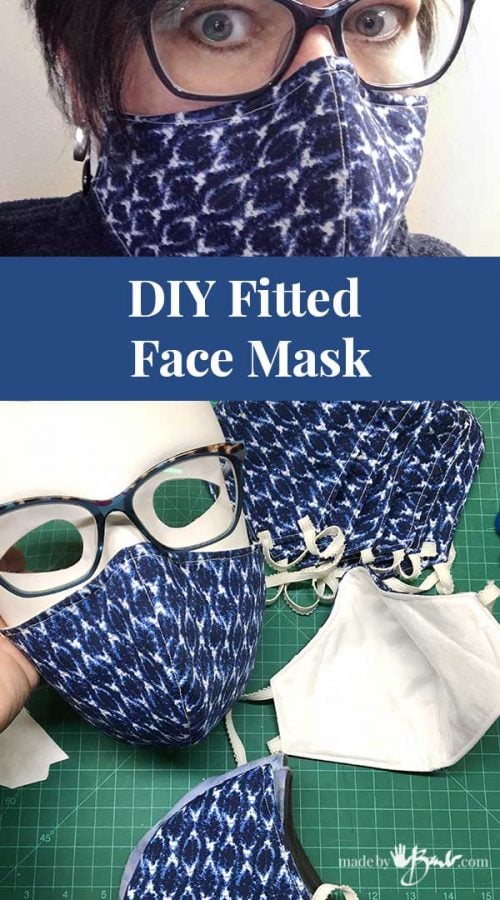
What has everyone been up to?! Yes, do not roll your eyes… I have a lot of fabric and abundance of ideas. I’m just keeping hands busy and mind content. My gift to you; a DIY fitted face Mask with pattern.
Yes, I know!
I know, I know; before you tell me that this mask will not replace a N95, I know. Depending what fabric you use will depend on the amount of particulates it will filter. There is some interesting data here. I’m not a scientist, but I can draft a pattern.
I’m a maker, and spending safe time in my house I wanted to be productive and make a difference for those I care for if even just a tiny bit. DISCLAIMER: I am not giving any assurance that this will protect you from all airborne virus or like. Research carefully and make your own decisions.
My main purpose is to make a mask that fits me as I like. My international students have the etiquette to wear masks even in the best of times many years ago and I have marvelled at how stylish and comfortable some are.
You will need:
- Fabric (t-shirt knits, tight weave cotton, dish towel fabric, vacuum bags)
- Thin elastic (1/8″ – 1/4″)
- soft bendable wire
- sewing machine, thread scissors…
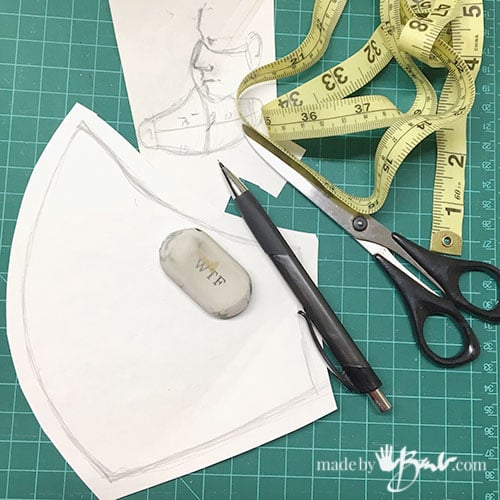
- PATTERN
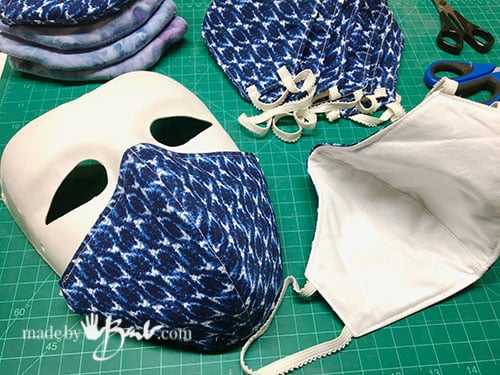
Using my ‘mug’ and a mask I designed this pattern (print full size, no reduction on letter size paper) to fit over the nose and give space for the lips. Yes, it has a seam down the middle, you choose. Some have pleats and are quite flat. I find the leakage around the nose can be a problem, and this has a wire shaping as well.

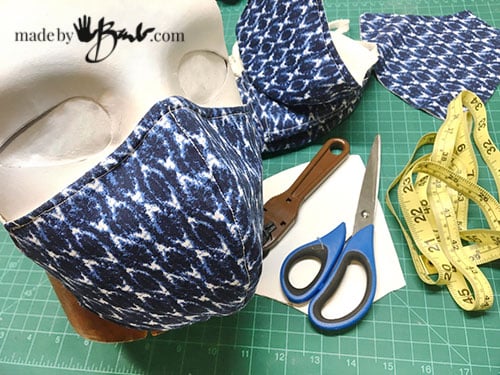
In my research for fabric and material I found that vacuum bags provide good filtration. I do have some HEPA vacuum bags, which have 3 layers. One thing to consider is comfort and breathability and the vacuum bags work quite well.
UPDATE: I am getting a lot of comments about the possibility that these vacuum bags have fibreglass in them. It seems to be a debate, so please choose wisely. This article also addresses it.

One way to help make them more efficient is to layer, as I did here with 3 layers. Cut 2 pieces of each layer. Such a great way to use up some of the scraps of ice-dyed t-shirt fabric.

Easy Assembly:
Double up 2 layers and with right sides together, sew the front centre seam. Sew a 3/8″ centre seam of lining as well.

Since every face is different, it a good idea to make a test one. Adjust as you like from there. Here centre seam is sewn.

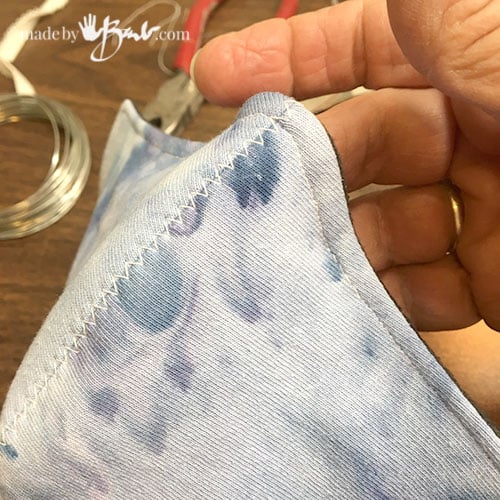
To keep the shape I press open the centre seam and stitch flat.

This will keep the form of the mask firm.

Since the seams may get thick trim back at top and bottom.

Just like a Pillow:
To join the inside to the outside, is much like making a pillow; sew all the way around (right sides together) and leave an opening to turn right side out.
Note: If you want to attach elastic before turning add to each piece at dots marked on pattern and loop inside. I like the option of adding later so that adjustments can be made; your choice.

After sewing clip corners off without cutting stitches and trim seam allowance as close as possible.

Such a nice shape:
Turn right side out and push corners out with a chopstick or skewer.

The nose bridge fits better if wire is inserted. I used a thin floral wire that it a slight bit stronger than a twist tie. Bend in the ends for safety. An alternate way is to use wired ribbon. Another great option is to use strips cut from tin cans (like the top flap of a sardine can or tomato can) See this post for details on how to make it iron-in.

Before top stitching the perimeter of the mask, insert the wire as close to edge as possible and pin/clip. Top stitch all around and close the opening.

To add elastic after turning loop a bit under so it is 2x secure and stitch on.
UPDATE: Due to some shortage of elastic, An alternate is using some t-shirt fabric cut in 3/4″ strips. It rolls when pulled and has some stretch and is soft on the ears. You can also adapt this Pattern to have a casing and open ends for filter pocket. See this post.

The Form & Fit:
The fit is quite comfortable. To size smaller a slight reduction in print size can work.
Everyones nose is different! If you like, you can reduce the height as seen on pattern. The nose wire can be shaped well to fit around your’s.

I wear glasses so I always find issues when wearing my masks for concreting! Yup, when you are a ‘designer’ you are much fussier!
If you would like an even flatter fit over the nose for glasses see this pattern as an adaptation of this pattern. We are all quite different (imagine how many fits of jeans we have)

This mask scoops under that chin of mine as well!
TADA! I can feel a bit better. I especially like the ‘vacuum bag’ face masks. They should be cleaned washed after each use. I would not just through them in the washer due to the wire. If you put them in a bag the heat of the dryer will hopefully kill anything.
Some more effectiveness can also be had by spraying the fitted face mask with a solution of citric acid and allowing to dry. Leaving them in the sun lets the UV also disinfect. Again, do your research and make good choices.

I’d rather be making pretty things than medical supplies or a fitted face mask… But this gives a bit of comfort anyways. DO be careful out there my friends!

See the look in my eyes!? The wonder, the caution, the hope of better times soon… but as a very very wise person said to me quite often; things coud be much worse so be grateful.
Yup, it’s odd, I’m a grandma now but I really wish my ‘Mommy’ was here to reassure me right now…
As a chid I used to watch my mom design fashionable hats from scratch; so now it’s my destiny to design some masks… like this and this.
I’m a complete novice with a room full of my late mothers sewing equipment and I figured I’d learn and help my family at the same time. I like your pattern and instructions. The only wire that I have is in the form of a pipe cleaner. Any thoughts on using this to line the entire border of the mask to form a better seal and make it soft for comfort?
Thanks again
I think it can work as some have mentioned that. Do bend the ends as well though. When in doubt, try it. There is also the idea of using some wired ribbon. We need to be resourceful right now.
Hi, thank you for this pattern, I’ve even managed to adapt it to make a child size mask but i am struggling to figure out how to fit the wire. Do you possibly have a photo of you inserting this prior to top stitching?
Do you place it inside the layers once turned RSO?
Many thanks x
It doesn’t show well since I blindly slip it into place by feel next to the seam after turning RSO, pin or clip until topstitched in place.
That’s what I thought but I wanted to check. Thank you again for this pattern. I’m using it to make masks for my husband who serves with the British Army and isnt being supplied masks and my children and family. Stay safe x
Hi I think I missed something. If I sew the middle together as shown in the first couple steps and then sew most of the outside edge it will no turn inside out because the middle is sewn together. Please help Thanks
I think it confuses as I did a double layer on one side, sew centre on it, then sew to the third layer around outside with opening.
I must’ve missed something. When do you add the 3rd layer? In your design it was the black fabric layer.
The first 2 layers are treated as one and then the other layer as one. Now, since it’s warm 2 layers would be enough I believe.
If you stitch the centre you can’t turn inside out!
I will make a note; I sewed the centre seam of what looks like both layers, but it is actually a double layer for outside, not both eoutside AND inside. Sorry for the confusion.
I don’t understand this step: Before tops stitching the perimeter of the mask, insert the wire as close to edge as possible and pin/clip.
Where and how exactly are you inserting the wire?
Slip the wire in place between the layers as close to edge as possible. I should be at top edge near the sewn seam. The tops stitching will hold it in place. Another adaptation would be to hand sew it in approximate place before turning RSO. Or another; use some fusible interfacing to sandwich the wire between and then it can be sewn with the seam. I hope that helps.
hi Barb,
thank you for the post. but i’ve tried many times to d/l pattern but its not letting me. please help
thank you
‘Sent 😷🤞🏻
Thank you so much for the pattern! I’m not an expert sewer by any means, but I found your pattern very easy to follow and my mask turned out great! My husband (who also has problems with his glasses fogging while wearing masks) and few other family members are essential workers so I made masks for them to wear at work. I sized the pattern up a bit to fit the men’s faces a little better, and so far everyone is pleased with the fit! Now I’m making them for family who aren’t working right now, to wear when they need to go out or possibly when we go back to work…. I used craft pipe cleaners that I had laying around and they worked pretty well to shape the nose. I’m so glad I found your site, you share some beautiful things! 🙂
Oh that makes me so happy! I have figured out a great way to make a nose wire and a bit flatter fit at the nose with this one. Kudos to you for making them for everyone!
I want to make a 3rd layer on this mask to put a filter in it. I wanted to make both side of the third layer one open on each side. By doing this I can also put the nose piece on when I sew the third layer. I am not sure if I am reading your instructions correctly but you did say you used 3 lawyers? I can not see on the instructions where you sewed it.
I am a volunteer and making these mask so if you can get back to me asap I would appreciate that. [email protected]
When I made those I used 3 layers and treated 2 of them as one. Depending on the breathability of the fabric you could omit one layer. Also to adapt a filter pocket you could leave the bottom open or revise to a folded-in lining (at sides) and then use a folded over casing to thread the elastic/ties through. Much depends on your individual choice of breathability and length of wear. I always like to make a test piece for size etc, Happy Making!
Thank you for a great pattern. Also many have been using home furnace filters which actually do have Fiberglass so please if others had heard using furnace filters is a great way for more protection please look at that package on the filter and read it. A friend made hundreds of masks for a small hospital and because furnace filters were suggested on almost every single mask making site, she decided to do the same. I told her it is not safe and contains Fiberglass but she read if you wash the filter it will remove the fiberglass which is completly false. Please do your research
The vacuum bags work but only the very inner most layer and you have to change them every 4 to 5 hours and they are made of the same material as the n95 masks. After awhile they stop working and need to be replaced. You should not sew in the vacuum bag filters and use at least two of the inner most layers.