DIY N95-Style Face Mask Pattern
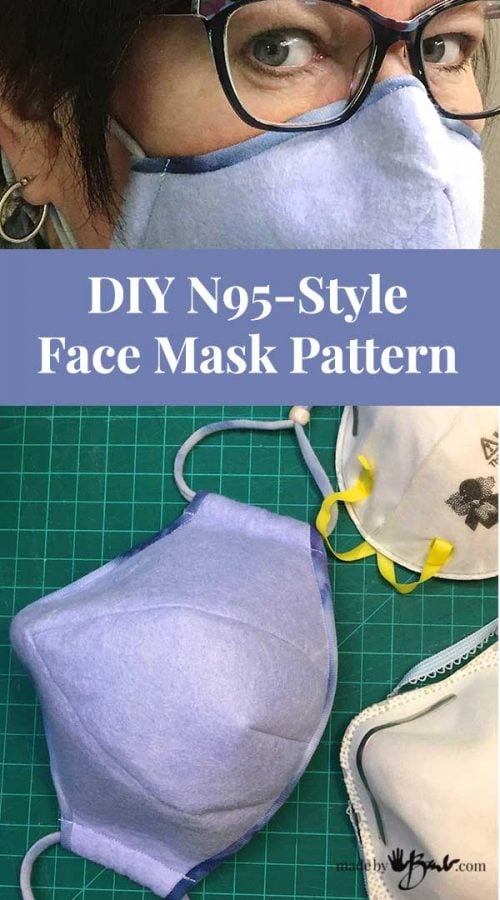
After having my mask keep sticking to my face I knew there was a better way… Welcome the next in my series; the DIY N95-Style Face Mask Pattern. It closely mimics and holds shape as the N95’s.
Am I a mask expert? No, but I am one of those particular people. When I see something that is not functioning well I want to make it better. It’s how I have been pretty well as long as I can remember. The curve of the Ultimate Face Mask also scared some sewers so this only has a point.
What fabric?
I have been going through my stash of fabric (trust me, it’s a pretty extensive collection) and holding it up to the light (to see the holes) and over my mouth to test breathability. I question the high thread count cotton as it’s so difficult to breathe through!

I saw some advertising of using faux ‘Shammy’ fabric. These brand-name products are a non-woven felt like fibre made of rayon and polypropylene. It’s quite thick as it can hold a lot of water. Since I do a lot of dyeing and sewing I have to know my ‘fibres’. Rayon is a natural fibre made of wood products, absorbent as well. You may have a blouse that is quite comfortable to wear and also very silky soft; it’s probably Rayon. Viscose is almost the same as well. Craft felt is often only polyester and much thinner. There are some wool felts but I am not sure of the comfort level.
I was told that cotton can take the moisture from the covid partical where as polyester does not. Odd, as any professional N95 masks have no cotton in them. (Do your research)

These shammy’s (like Sham-wow) are machine washable and some even bleachable. I love felt type of fabric since it does not fray at edges, can be sewn so easily and hold shape well. I have used industrial felt for purses and containers often.

Back to Designing:
My N95 mask (from concreting) is sturdy and stiff. I like that. It stays OFF the face and he round outer edge rests pretty well around a wide variety of face shapes. So, from that shape I took my inspiration.
I teach a technical type of drawing so I understand form quite well. I love the challenge of working with forms (I guess that’s why I like concrete) and constructing or deconstructing them.

Fabric is flat and then needs to fit a rounded form. How ‘cool’ is pattern making?! I have never had to ‘fit’ faces; usually just my ‘bumps and lumps’! Round becomes flat… awesome.
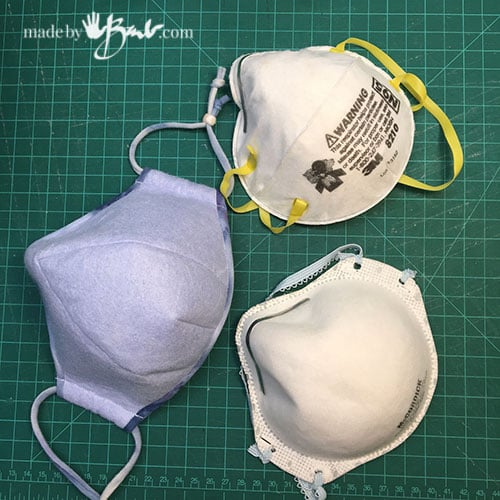
I have fond memories of my mother working as a milliner, over a wooden head form making exquisite hats for some very sophisticated ‘dames’. She would cut and sew and steam and get such amazing shapes. It’s been over 50 years but it must have made an important impression. Look how similar to the N95 the shape is!

I have made a pattern for you; download it here:
The DIY N95-Style Mask Pattern:
- Can be left unlined
- Bias edge finish, no turning
- Optional extra stiffening insert
- Very flat Metal Nose Piece
- Keeps form & shape
- Innovative 2 piece Pattern
- Adjustable tie casings
Print the Pattern at 100% (note folded piece) and cut the pieces. I like to trace it on the felt with a fine marker as then I can cut it more accurately.

As with the ‘Snug-nose Mask Pattern’ I love using the iron-in nose strips. You can put it in place before assembly if not lining or between the layers if lined. For the unlined version cover the inside with some folded bias fabric. Keep it .25″ from the edge.

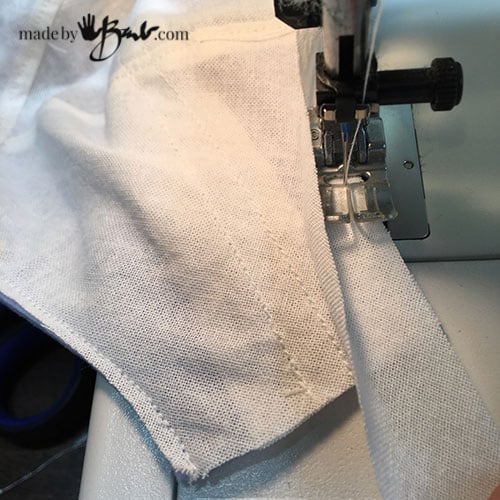
The Scary ‘Point’:
The nose section is sewn in 2 stages. Match the dots after clipping to the dot.

The stitching starts at the ‘dot’ and continues to the edge. Clipping around the face curve helps sewing the curved seam.

Not so scary… 1/4″ seams.

After the first half, open at centre and match the other side and sew to the matched dots again.

It is like 2 seams that meet at the dot, and clipping is vital. If, it is too complicated, feel free to add seam allowance at the centre and then treat as separate seams (but still match dots)

The bottom centre seam is much like a dart; and ends curving into the edge at the dot. Trust me, after one, it’s super easy.
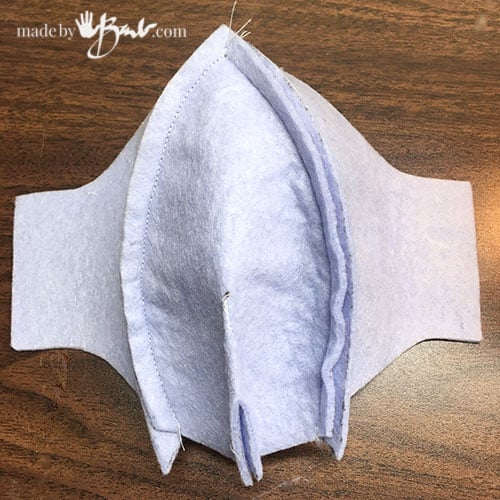
Looks odd, but has great shape already.

Since this felt like ‘shammy’ is a felt, it does not fray and can be trimmed very close. I love that about working with felt.

Turned right side out it holds shape already, without any pressing at all.
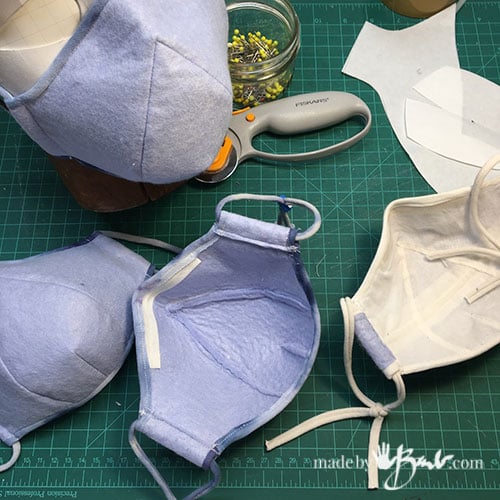
See the unlined and lined option. Rayon is not uncomfortable and this mask pattern does not really lay on the face, so I actually like it in one layer… but suit yourself. (skip down to the edging if no lining desired)

Lining Optional:
If desire you can also line this N95-Style Face Mask Pattern. Repeat the same steps as for the outside with a cotton fabric. Be aware of breathability. I like to top stitch to keep seams as flat as possible and less ironing.

Shape Stiffener:
To make a mask not be able to keep collapsing you can also add some ‘boning’ as they call it in the fashion industry. Remember the corsets? To add a flexible but shape hugging strip ‘zip ties’ can be easily cut and inserted into an added casing.

Determine where you would like the strip to follow across, higher near the nose is better as that is where the space in the mask is most comfortable. Cut a 3/4″ strip of fabric on the bias (45˚ angle) and pin across.

Stitch across on the wrong side of lining.

Sew the casing by leaving a space wide enough for the zip-tie.

When using a lining the metal nose piece is ironed into place between the layers. (make sure to keep at least 1/4″ from edge)

Stay stitch lining to outside, wrong sides together.
Edge Finishing:
As an edge finishing, the outside edge has a bias strip applied. You can use purchased bias band or easily make your own.

I like to stitch the outside last so I sew the first seam from the wrong side.

Fold over to the right side and topstitch the bias band only on top and bottom edges. (side casings will be folded)

Sew the casing line on one side. Insert the zip-tie and cut to length taking in account of the fold for the casing.

Sew the other casing line. This will keep the zip tie in the channel.

As an alternative to double folded bias, you can ‘cheat’ by only folding back and leaving the raw bias edge on the inside. Bias edges tend not to fray. The seams are also cut very close so there is no large seam to bother your face.

Tie one on:
Rather than elastic, (which is getting scarce) I love to use t-shirt strips! If you use a t-shirt with some lycra it has a great stretch, and is soft in the ears. 3/4″ wide or so works well and a ‘Pony Bead’ can act as a toggle.

So, what do you think of this N95-Style Face Mask Pattern? It holds shape nicely, stays off my skin, breathes well, and is blue. But you be the judge… I have a few patterns to offer. We all don’t like the same.

But above all, make good decisions and practice good cleanliness. I hope to just help keep you safe and comfortable one mask at a time.
Thank you Barb! I am making mask and these will be AWESOME!
Thank you Barb! I am making mask and these will be AWESOME! Do you Have more sizes?
Sorry no. I don’t have any little faces but from what I have seen in other mask patterns, they look like they have just sized down the mask at a percentage. Perhaps ask the person to measure the width and height and then do a bit of math… to get a % reduction for printing.
Your patterns, especially the N95 appear to be thoughtfully designed. I would very much like to try this pattern but unfortunately have been unable to download after many tries. I noticed in another comment that you offered to email the pattern to someone who also was unable to download your pattern. I was hoping that would email your pattern to me. Thanks in advance for your efforts in this matter.
🤷🏻♀️ done! 😷
Thank you so much for taking the time to produce this wonderful mask. Could you tell me what size paper you print on, I’m in the UK and we use A4.
kindest regards, Linda
If you print at 100%, not sized to the paper it will be proper size. (A4 dimensions have a width of 210mm and a length of 297mm. US Letter paper has a width of 215.9mm with a length of 279.4mm) It may warn you about something being off page but I think it will be fine. Square should be 1″ Good luck.
Dear Barb,
Thank you so much for posting these patterns. I have been making masks for the past few months and these patterns are simply the best thought-out ones that I’ve found. I love the idea of using a plastic tie to help keep a mask’s shape. Amazing!
Thank you for going through all of the different fabric options, however you never said which felt/fabric you used for your masks. Was it a faux-chamois/sham-wow or was it a felt? If so what kind?
Thanks so much!
Mel
Thanks! That fabric is a Sham-wow type which is much like a felt. Depending on the fibre content and comfort either will work. The thin felt could be doubled if need be, but the shammies are usually some rayon and some polypropylene. I don’t think all polyester would be that comfortable in the heat. The never-ending fabric discussion!
Hi, I’ve been looking at several websites, and I can find Sham Wow in Canadian stores but not in the U.S. There are some shammies that are 100% Viscose. but not a combination of rayon and poypropylene. Should I settle with the 100% Viscose? What stores have you found it?
Also, I was poking around my closets and found a polyester cloth shower liner. I flicked some water on it and it completely repels the water and is quite breathabile. Paired with a good cotton, what is your opinion of its effectiveness in a mask?
I think the whole issues of exact fabrics has been somewhat loosened as I see so many companies now making with all kinds of fabric. I’d say if it feels comfortable and you can breathe it should be fine. There is a candle test; try to blow out a candle with the mask on, if you can’t that is better. I think the shammies here in Canada come under other brand names. Rayon is much like cotton. It can’t hurt to try or use to clean 🤷🏻♀️
I love this pattern, but I don’t have a sewing machine. I scanned etsy many times, but I didn’t see anything… Do you know if anyone is using your pattern and selling them?
Or: Any experienced seamstresses reading this want to make a few bucks? Taylorbrush+gmail+com. (I think you know how to write that correctly, but I don’t just publish my address for scammer reasons… )
Thank you so very much for sharing and making the tutorial. OMG the afternoon to detail and construction are superb!
I will be making these for my family, especially my Grandma.
Thank you so very much.
Could you please e-mail a copy of the pattern of the
mask. Looks like the best one yet. I sure would like
to make a couple. Thank you very much.
done
You are awesome! Thanks so much for your wonderful face mask designs. The best I’ve seen.
Hello Barb,
I am so grateful for your postings and look forward to receiving your newsletters. I have been sewing for 40 years, self taught, but spent endless hours viewing Nancy Zeiman’s Sewing With Nancy program, Sandra Betzina’s and Linda McPhee here in Canada.
I have been sewing hospital gowns for local centres that opened up for our homeless population to isolate safely. Since this ministry now has the 2,500 gowns needed, I have been sewing 3 layer protective masks for the homeless, friends, and anyone who needs one. I have tried 4 different patterns, all with pros and cons, but seeing your mask, I think it’s perfect! I especially love the zip tie insert to keep the mask off the face.
Thank you Barb, for sharing your gift of creativity and innovation with the world! God Bless you!
I understand your love of sewing! I had one of those toys chainstitch machines and was so frustrated that I got a REAL Kenmore at age 12. I still have it over 40 years later (don’t do the math) So great of you to comment!