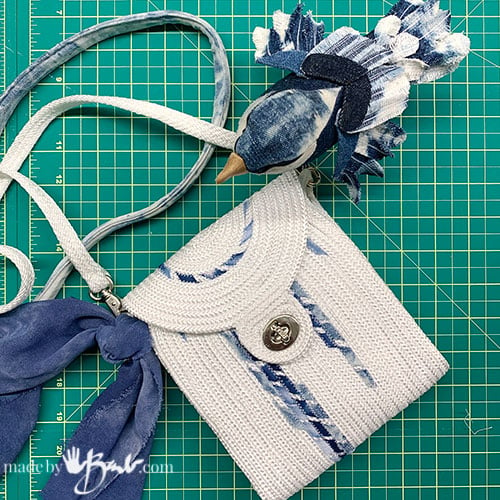
How to Sew a Purse with Rope

There’s always a way to be unique in any media. Designing with the rope has me fascinated and also challenged. I kept looking at how I could make other shapes… A new tutorial for you; How to Sew a Purse with Rope!

The Basic Sewing Rope Story:
The main supplies for this bag is the rope (and basic sewing supplies with sewing machine). There are many different ropes on the market, cotton, polyester and combination of. The key is to find one that will fit under the presser foot of your machine (zig zag stitch capable) as well as not be too floppy when done. But there are no rules, try different ones. The rope I usually use for the bowls are cotton, about 1/4″, 3/16″ or like. Here I used the polyester rope. It won’t stain as easily and it can also be washed. I used the 3/16″ Polyester Solid Braid Rope (comes in 100′)and it fit/sewed nicely. But do shop around and there’s even the possibility to wrap your rope so the colour & design options are endless! This basic principle can be applied to any DIY rope bag.

Designing with rope isn’t as hard as you may think. See how Rope Bowls are made to get an idea. Simple zigzag stitch (or even decorative) attaches the rope. The thing I like best about these purses is that they are quite sturdy and strong, do not need a lining and can have finished edges easily. It is also great for the making of the straps which can be an issue when designing a purse.

Figuring out the Size:
Remember some basic geometry?! (Don’t be scared) To figure out the centre strip that you will start with depends on the width you’d like as well. I wanted a ‘small-ish’ bag that could hold just necessities so 6″ wide and about 19″ long to fold over worked well. Measure off a favourite purse if need be.
That meant the centre rope- strip is 13″ (19″ – (3″ + 3″) = 13″ Then the final oval will be 19″ x 6″. Easy right?
This shape did not have a round centre so it’s even easier than the rope bowls. It only needs basic sewing skills.

Starting with the 13″ strip (or whatever you desire) sew the first line between the 2 strips of rope Pins can help hold it) and then curve around at the end and continue outward. Adjust the amount of rope when coming around a curved section to keep it flat. You may want to practice how-to-sew-rope with simple bowl making sewing tutorials. I have a flatbed machine but piling some books can help to make a flat surface to make sure it ends up flat. The rope ends can be fused by heating/melting a bit with a candle flame or lighter before cutting with scissors, but be careful to not light it on fire! Polyester WILL BURN!

Embellish if you like
As you know; I like blue. I have also been de-constructing a whack of jeans lately so I added a few strips of diagonal cut denim and tie dyed strips wrapped around the rope. I like the random nature of them and it sort of looks like basket weaving.

The Zigzag catches both rope edges and also the strips. Check to see if you’ve missed any spots before finishing. I hold it up to the light. Once you get sewing it goes quite quickly.

Deciding on the Clasp
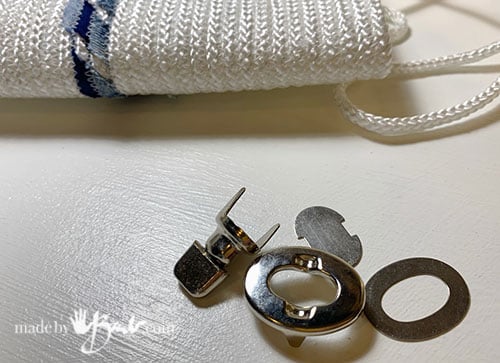
There are so many kinds of closures/clasps that can be used, even some up-cycled buttons or handmade buttons would look great. Since the theme is circular I used an oval clasp that I could make the shape for at the end, that way I did not have to worry about the end cut showing. I clamps into the hole made on the end.

I used an oval clasp since the theme is circular shapes. The oval loop at the end allowed that I did not have to worry about the end cut showing. I clamps into the hole made on the end.

The body of the purse is done and ready for hardware.

Bend the tabs on the back of the oval clasp. It will sit/fit into the opening well.

The other ‘Peg’ of the clasp has prongs that push through the rope without cutting. Bend the tabs over the plate on the inside for a clean finish.

Finishing the Sides:
Sewing the side seams is one option of finishing. I opt to sew an additional piece into the side seam. Measure from the side taking in account the radius at the curve.

The other great design feature of this DIY is that the loop to attach the strap can be built into the side panel, then no ‘D’-ring was needed to attach and it’s super strong!

The best way to cut the polyester rope is to heat it until it fuses otherwise it will fray ‘big-time’ after cutting. Hold it far enough away so that it doesn’t catch fire!

Once you have the 2 matching sides sewn then they can be attached to the main body with stitches hand sewing. The rope allows the needle to go through easily, much better than trying to sew leather (ask me how I know that?!) Sew the seam with a super strong thread in the same colour as the rope. That will make sure the thread will not be visible.

I attached the end of the handle with swivel snaps. These clips prevent the straps from twisting. Also, I like the option to take it off or change the length so I made it a separate piece, but you can do it all in one if you like.

As an added accent, I made sleeve of some of my dyed/bleached denim (with frayed ends) to make it soft on the shoulder, but really this rope is quite soft.
I also love this rope since it is polyester so it will tend not to stain as easily as a cotton rope would. It would probably wash easily by hand as well. It makes a great handmade gift.

All-in-all, this project came together quickly & easily. It will be great in the summer for wearing with my denim jacket and tie-dyed t-shirts. Ah, ya, one of the birds snuck into the picture… great blue!
Now, to keep my eye out for the most unique ropes!!! I love it when a design goes from image in my head to real life! Enjoy!
Well done!
First of all, I’d like to say how much I look forward to your latest creative endeavours. You experiment with different genres and never cease to amaze me. But this one…Wow ! I absolutely love this idea! Can’t wait to try it! and yes, the geometry part scares me, but hey, I may end up with some pretty placemats! 🙂
Some people play ‘brain games’, I come up with new designs! It really helps keep my mind busy and not thinking about all the other negative things going on! The reward is that there is (usually) a nice outcome to be happy about! I’m pretty sure it could be classified as an addiction!
You are continually amazing, creative and very classy!
Thanks, I like the ‘classy’ part! In the midst of the ‘making mess’ it doesn’t always feel that way!
Very lovely. Can’t wait to try it.
Yet another amazing project. A complete original and unique purse that I would be thrilled to own. I look forward to your msgs. in my inbox every Sunday morning because you create and share one of a kind works of art.
I’m glad that you do. I do strive to not just regurgitate what is on the ‘net. I think that’s from my artist background…
Love the idea and the wonderful directions! It would be fun to make using different colored threads.
Yes! even wrapping some ribbon, or yarn, or fabric adds nice detail. There are decorative stitches that also can replace the typical zigzag.
Vc é um gênio
“You are a genius” – Oh, thanks!!!
Awesome job! So unique.
Thanks. I like to doodle on paper, round & round and figure out what shapes I can make… like a brain puzzle!
That was an amazing tutorial and I loved your creation. Great job.
Thanks! You may already have discovered the amazing creative options of rope-designing!
I can’t figure out how you made the end of the purse where you put the clasp to hold it closed. Did you start on the outside and wide it in? I mind is not showing it at all. Thanks for your help. Its a lovely pattern.
I did plan to have an oval opening for the clasp so I wound inward (then no ‘tail’ to deal with!) I often have to do a bit of a drawing to follow how my lines/rope will travel. I hope that helps!
I guess if I draw it on a piece of paper, and follow it that might work. Mine looks wonky. Thanks for your reply
Judy