Make the Most Unique Rope Bowls

Pushing design to the limit makes for more interesting & fun results! Forgetting the rules lets you discover crazy new options to Make the Most Unique Rope Bowls.

I’ll show you the Ropes:
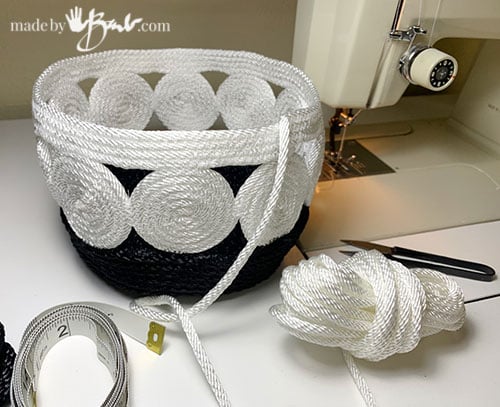
Now the trip to the hardware stores include the rope aisle! I have been trying all kinds of ropes and cord lately. The rustic coloured one here is actually a 1/4″ polypropylene rope with little specs of reflective material for outdoors. I’m liking any rope that is close to 1/4″ and polyester ones sew quite well.

One thing to consider is the end of the rope where you cut it. Cotton ones get wrapped with thread to hold the fibres but the others will be heated to fuse the strands. If it un-strands really quickly then the section I plan to cut at is heated slowly to prevent flames and then cut through it so each end is fused. (caution; be careful as they are quick to catch fire)

This particular vessel is not circular so I started with a longer piece instead of a centre point. I had no specific plans other than to be unique and asymmetrical & often throw caution to the wind and try to make the image that’s in my mind come to life. I sewed the usual zigzag stitch of basic rope bowl making until the bowl curved up about 4 rows.
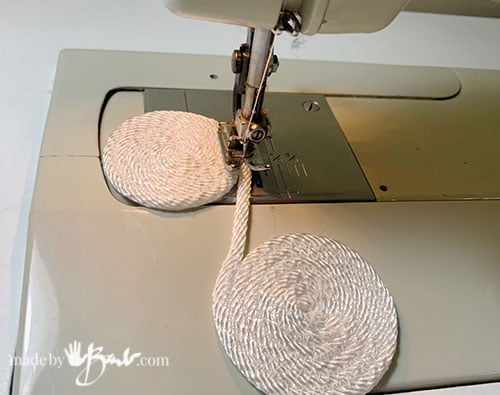
The swirls of shapes by coiling are intriguing so I made a few of varying sizes and lengths. Start in the centre and then work out ward but leave a section of rope that then will be coiled from the centre of the other end so no end tail is on the outside of the final ‘S’ shape. They are fun to make and I’m sure there are many more variations to make!

Adding the Design Elements:
I wanted something that was not a conventional bowl shape but more irregular. As an artist I always strive to be original. Doodle some sketches if you want to visualize ideas.

Just like I would sew on another row of rope I sewed on the shapes but did not continue all around.

After adding the white shapes I then continued the darker rope around those. Following the curve or pulling straight will give some interesting lines in the sides. If things go really wrong it isn’t that difficult to take apart again.
The amount of tension you pull on the rope will determine the amount of flare or curve the bowl will have. The more you pull will make it taper narrower to the top.

After a couple rows I added some more shapes between the rows. The good thing was that there was no cutting of the darker rope until the end.

Finishing Off:
I’ve been meaning to make some wood handles (yup, always more ideas before I am even done the one I’m working on) but it’s still too early to get into the forest here. I envision some knurly old tree handles on these basket bowls.
I’ve settled for a simple glued wrap of leather to clean the end cut.

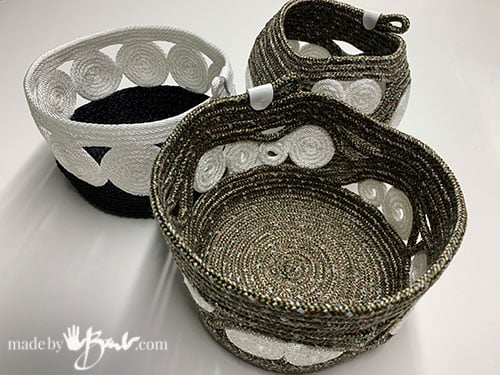
I find these quite interesting to look at and they are quite sturdy as well. They could act as plant pot holders or kitchen fruit/bun baskets…
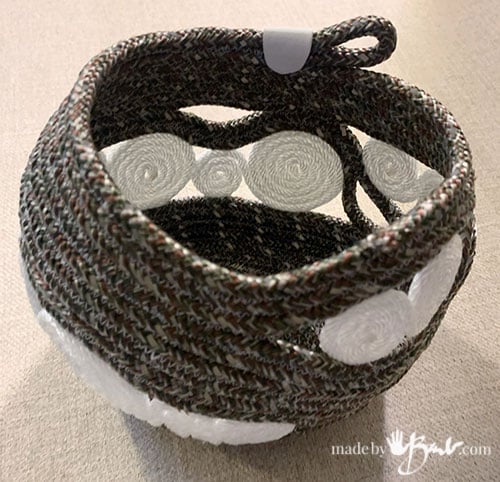
Even though there are voids it still holds well. It the ‘art’ world ‘Negative Shape’ (the shapes between objects/elements) is a great design tool and I love how these unique rope bowls have interest from each view.
Another Predictable Style:
If you like a traditional style, this may be for you. Rather than having varying sizes I planned all ‘S’es to be the same size and fir around the bowl side.
Each rope piece was cut and the middle marked so it could be sewn coil from each end and make the ‘S’ shape.

Continuing the bowl bottom until it became the required multiple of the width of the shapes (oh, just simple math)
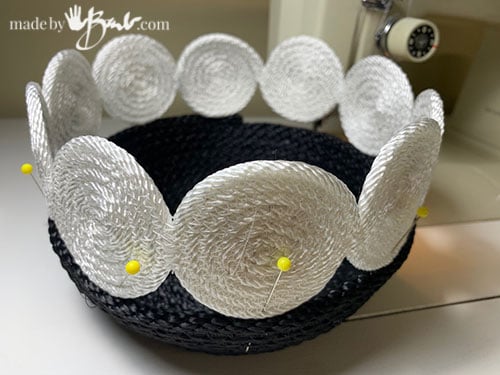
It my case 5 of the ‘s’es fit around the bowl. The are zig-zag sewn together at the ends. To make them stay put I pinned before sewing.

Ok, do not curse me now… It does get a bit ‘futzy’ when sewing further from the edge but I think it’s so worth it.
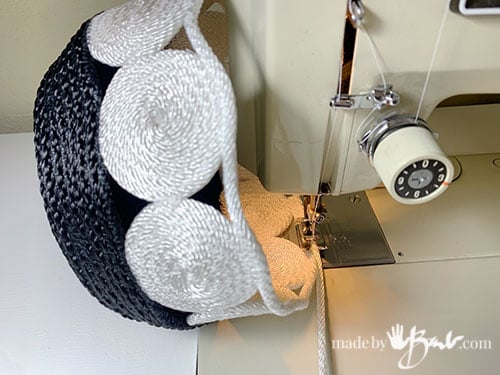
After the shapes are nicely attached it’s back to making a rim (by starting a new rope)
If you do not mind measuring and math, this is a pretty design as well. The white is a 3/16″ polyester clothesline rope and has a soft sheen to it.

Make some baskets/bowls in whatever design you like… I’d love to see what you dream up! I think this one has found a purpose. It’s almost like the bird’s nest basket for my birds.

So, do not forget… check out the ropes when you are at the hardware store next time or make your own rope! There’s just too many choices.
You have some really interesting ideas. I love the more free-form nest bowl so much! I’m really liking that rustic looking cord, it looks like sweetgrass. I like to use a hot knife to cut 100% polyester so it doesn’t fray. It’s faster than burning the ends with a flame since you do both things at the same time and there’s less chance of it catching on fire. It’s really good for cutting poly fabric, too.
Oh yes! I love my hot knife and actually had a project in mind for this month! (I hope) Thanks for reminding me! Did you know you can carve those plastic eggs! It’s my own design and I love making them. That cord is available here. It’s actually called ‘camo’.
Thank you so much for this tutorial! I have had a picture of one of these bowls with the swirls on my “inspiration” board for quite awhile, and you’ve inspired me now to actually try making one. Can’t wait to see how it turns out!
Me too! I was just about to write something and I realized… why not design for the wall?! Oh dear; I’m already ‘seeing’ some images in my brain!
Oh wow Barb! You have my head spinning with so many ideas now. I have made a few of these types of bowls, mostly kitty head type with ears, but now you have the artsy ideas flowing and thanks for experimenting with different types of rope. These are beautiful!
Welcome to my world! (head-spinning too much) It’s too bad there are more ideas! I’ll admit though; it’s an sewing art that does not take a whole lot of cutting of patterns, which I love!
Dearest Barb – I am unlikely to make rope bowls (large collection of traditional baskets and wood boxes) but, and this is a large but, I am entranced with the rabbit hole that is your creative mind. Take your direction with any idea … make one, explore the process, the media and necessary supplies, make more, explore more, expand … the idea takes over and time flies. I encourage us all to take Barb’s lead in our creative lives. It is just too much fun!
Oh Wow Clare! Thank you so much! That’s exactly my purpose – to have everyone share in some big or small way this creative journey! Even if you do not make them it can fill a creative void. That itself can feed some of those voids in our soul. For me, it also fills that void by sharing what I’ve learnt with others. I hope it feels like someone is holding your (creative) hand… I’m blessed to have each one of you joining me in this journey ❤️
These baskets are gorgeous. I’ve made some using hot glue but I would LOVE to make one or a dozen of these, I’m afraid my sewing machine couldn’t handle the cord thickness. Do you have a special heavy duty sewing machine to make these baskets, or is there a trick with a standard sewing machine we need to know
Well, I have an old kenmore (I think over 50 years old) and it does well even though it isn’t an industrial machine. The polyester ropes are easy to sew through compared to multiple layers of denim. I think the only issue is fitting under the presser foot. Measure what your highest rise is. There are ropes that are 3/16″ which should be able to be handled by any machine. I do see some using the modern machines. Since sewing is mostly on the outer edge there isn’t that aggravation of shoving so much material under a machine. I never understood that until I started making. Maybe try a simple bowl first… Anyone have a modern ‘plastic’ machine that does it?
Possibly more important than WHAT machine you’re using are: the machine is in good working order (clean and lubed) and that the needle appropriate and is it is not dull. Terrific technical innovation in needles these last few decades! Our ‘usual’ needle to use is a Universal, meaning it works well on both woven and knit materials; i.e. is not sharp but slightly rounded at the tip. A truly SHARP needle will pass thru the robe cleaner, easier with less work on the machine. MICROTEX needles are a good choice. Also – a thin needles will break too easily … a size 14 or 16 should suffice on any size/type rope. I see nothing in this project to prevent use of any working sewing machine. Go for it!
Once a sewing machine tech – retired or not – always a sewing machine tech.
I have a Husqvarna Viking Brillance 80. Embroidery and Regular sewing. It’s awesome for rope bowls. Just remember to clean the lint out after every few rope projects, it is linty
I also bought a Kenmore from the 70’s which I am getting used to working on rope projects with!
Thank You Barb for sharing your creativity with all of us!
I’ve put my kenmore through so much including reupholstering and living room set! Designing with rope is endless!
Very creative. Thank you for sharing.
I have not made a rope bowl yet but want to do just that. These are amazing! I Love the creativity. I am working on developing my sense of color and creativity. THANK YOU!!
It is fun to explore! I find even doodling will help me come up with ideas… Happy making!
Thank you for the how to. I enjoy making rope bowls and want to expand my designs. I’m not an artist, but I can follow instructions. I will give this a try.
I like to doodle and figure out some unique designs. Good luck; you can do it… start simple.