How to; Needle Felted Momma Robin & Babies
One of the ways I pay tribute to Mother Nature is by imitation. I embrace that challenge & observe the wonders of nature! I have had such wonderful experiences with the Spring Robins & their nests that I’m sharing mine. Won’t you join me for this how to; Needle felted Momma Robin & babies
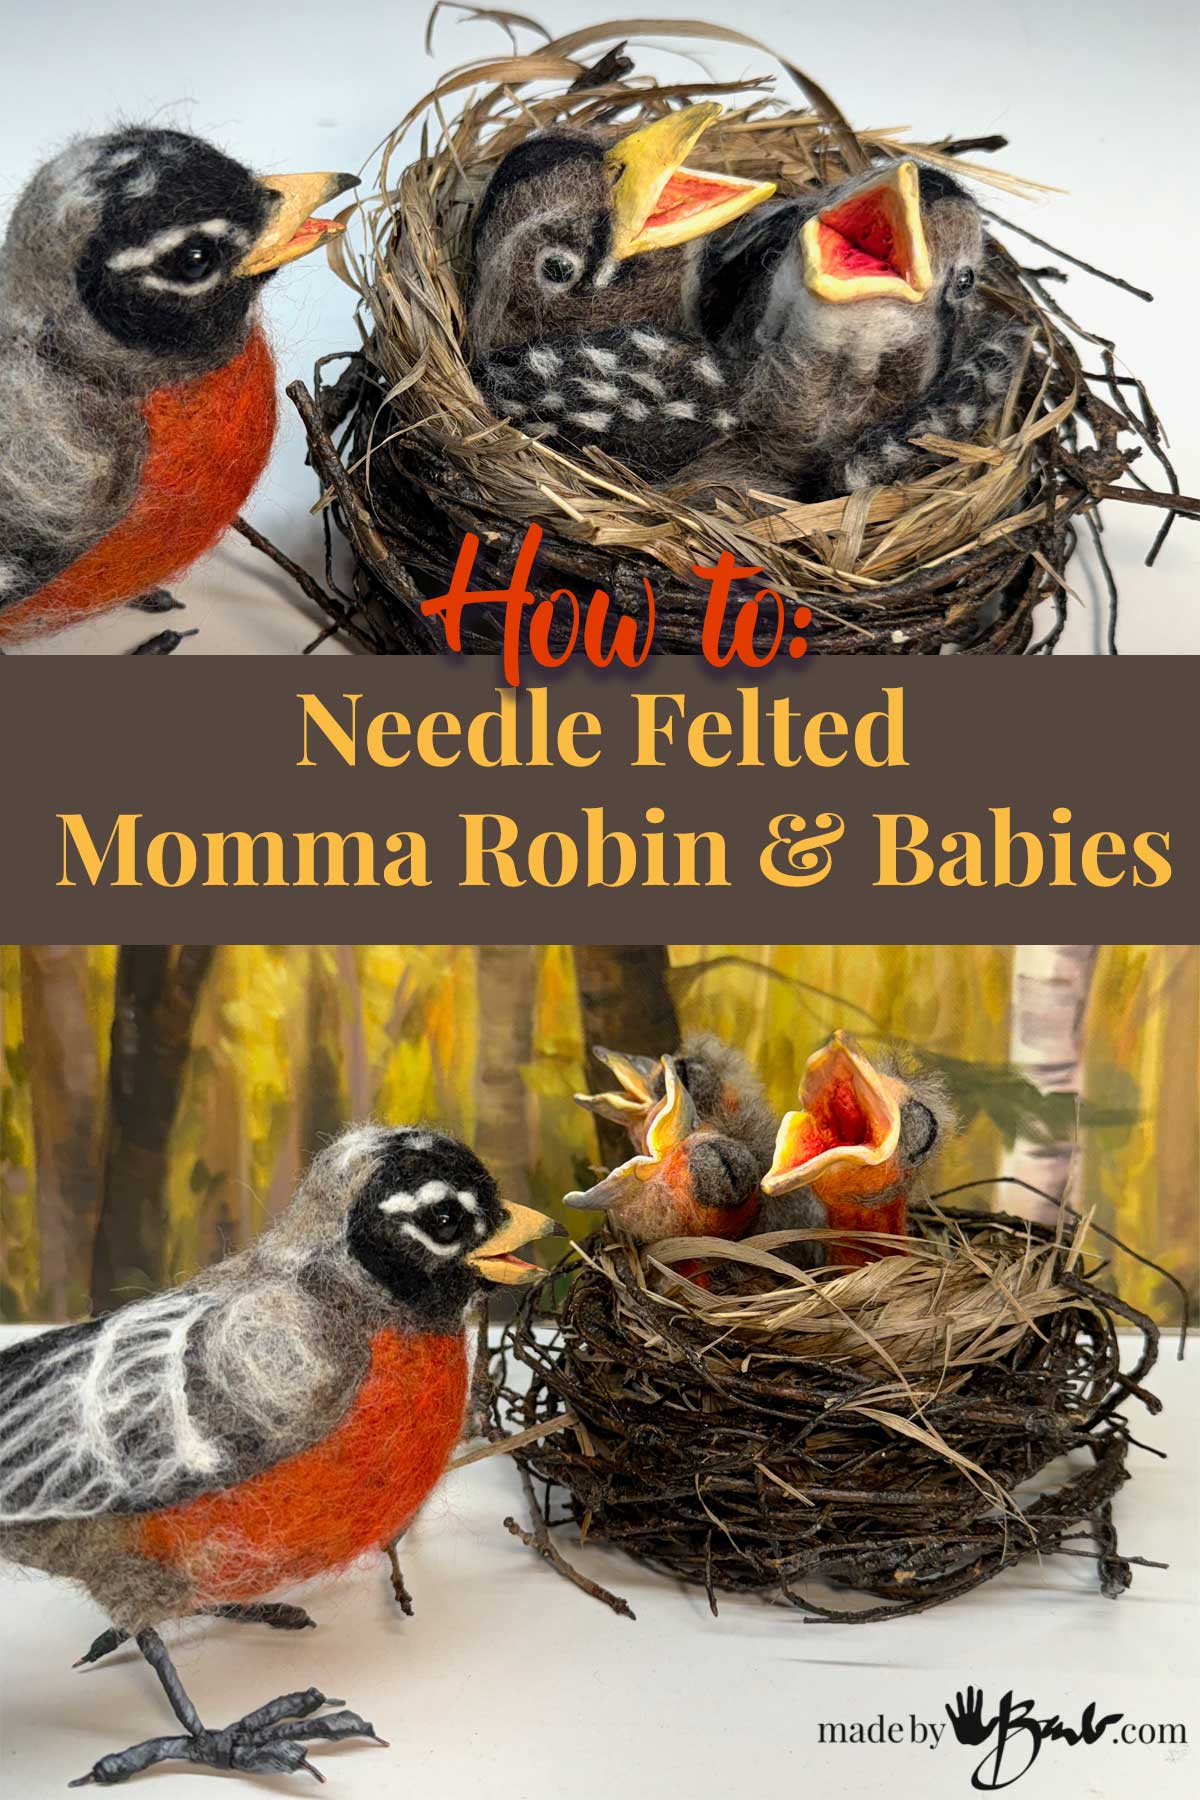
Every spring I’m lucky to watch how the Robins are searching out another place to build a nest or even re-use last year’s. I have the opportunity to witness the miracle so many times now that it prompted me to make a permanent replica in this great craft medium of Needle Felting! I will say it is one of most favourite needle felting projects ever!
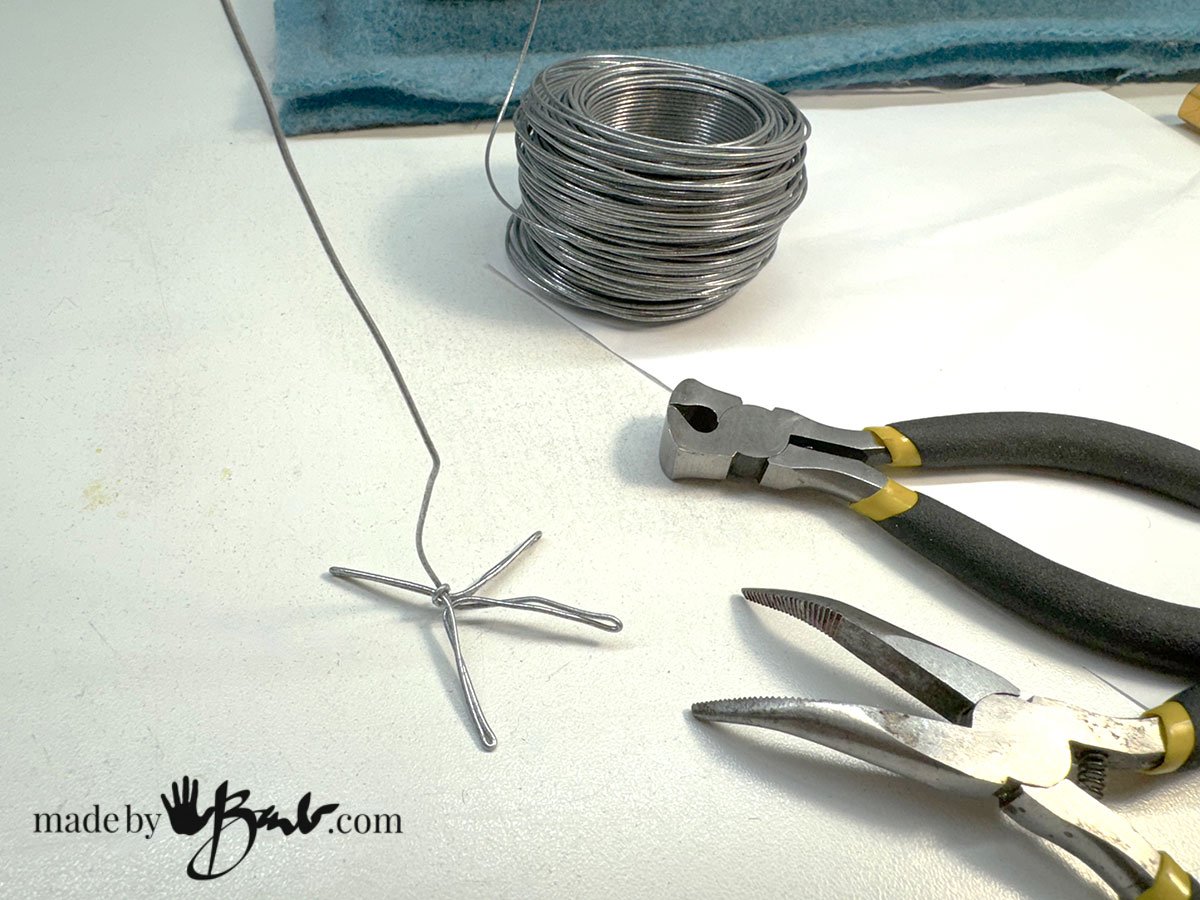
Step 1; Making Feet and Beaks:
Although the main body of the needle felted robin bird is crafted with wool roving and core wool the legs and feet are made with a core of wire. The gauge will depend on your scale of bird and hand dexterity.
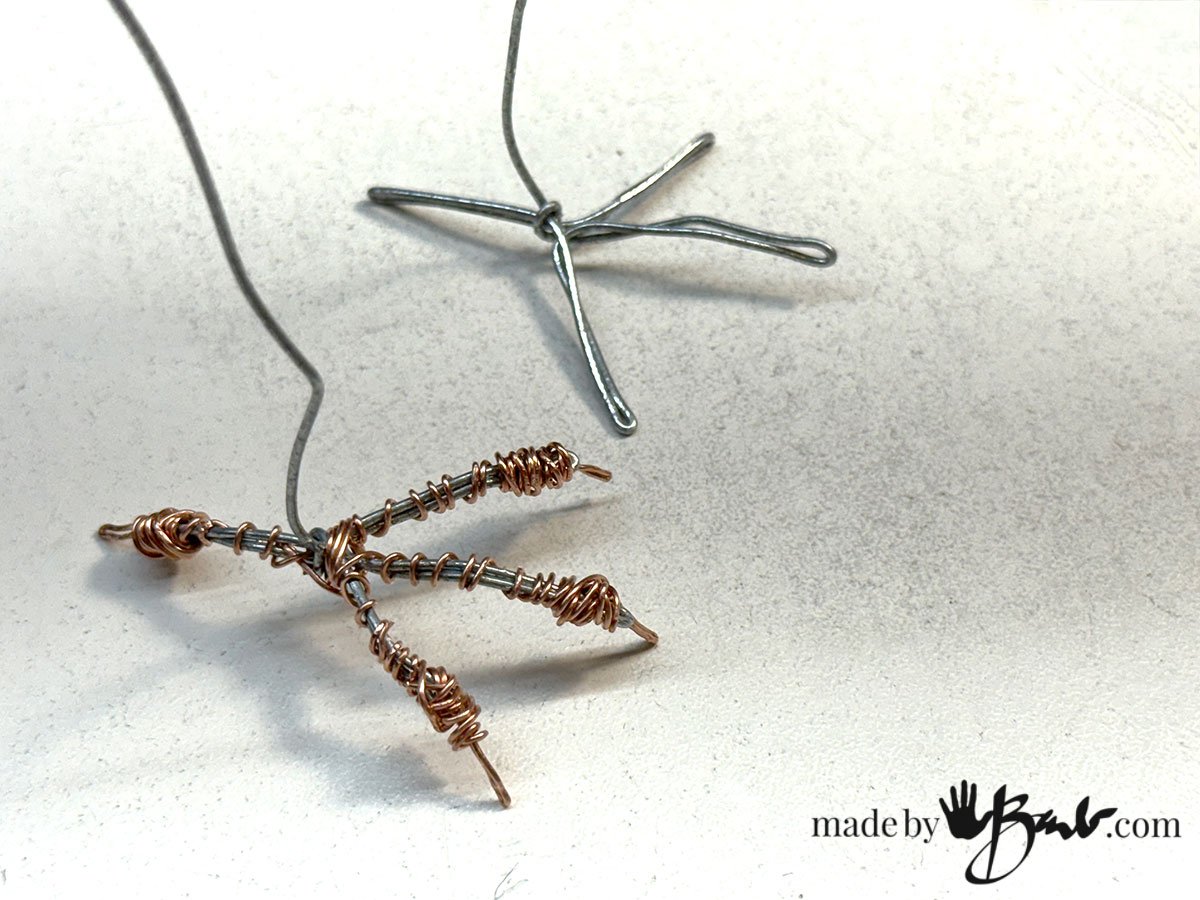
Personally I like to use a more stable wire for the basic form and then a thinner easy to wrap copper wire (reuse old wired cords) for making thicker sections to mimic the birds natural foot anatomy. It is the same basic principle used for my sewn birds.
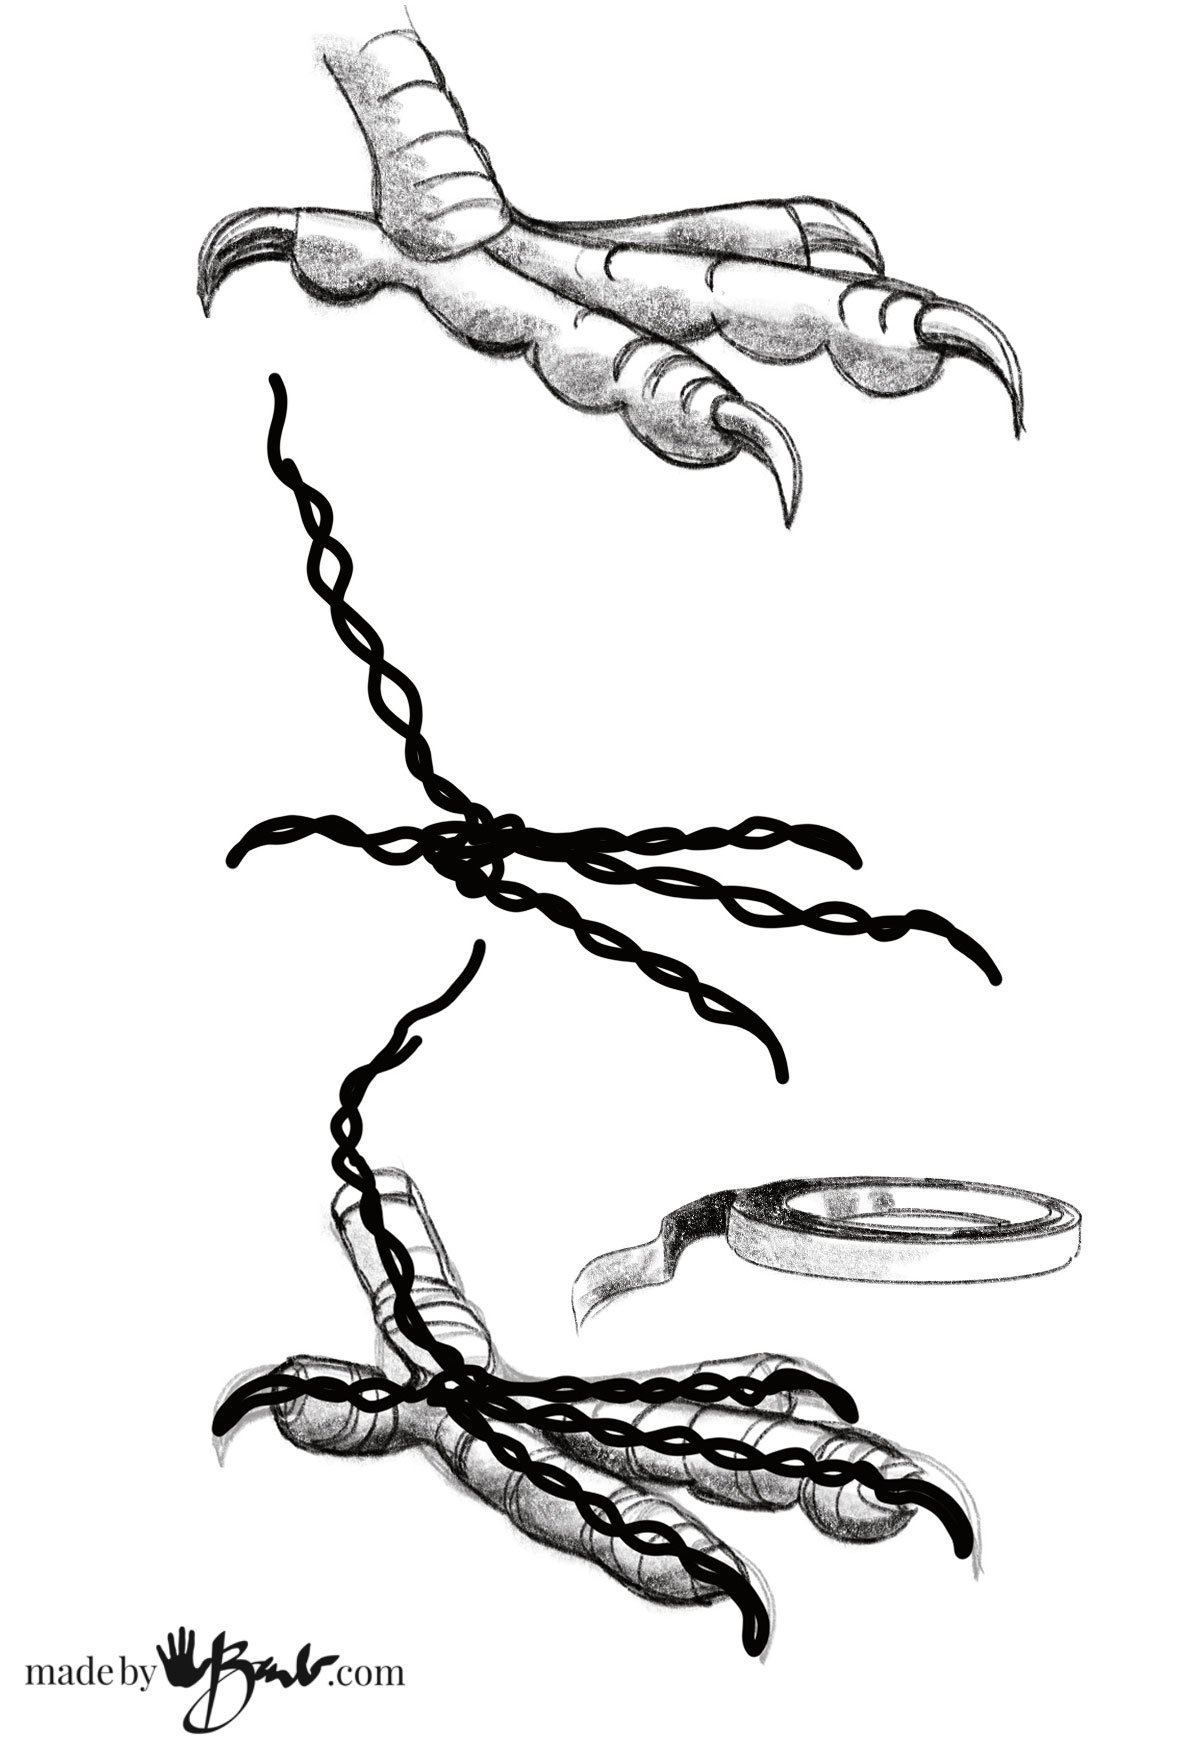
The finishing step utilizes a wrapping with floral tape, thread, yarn or whatever you like. If the colour is not realistic a quick painting with acrylic paint will help.
How to make the Beak:
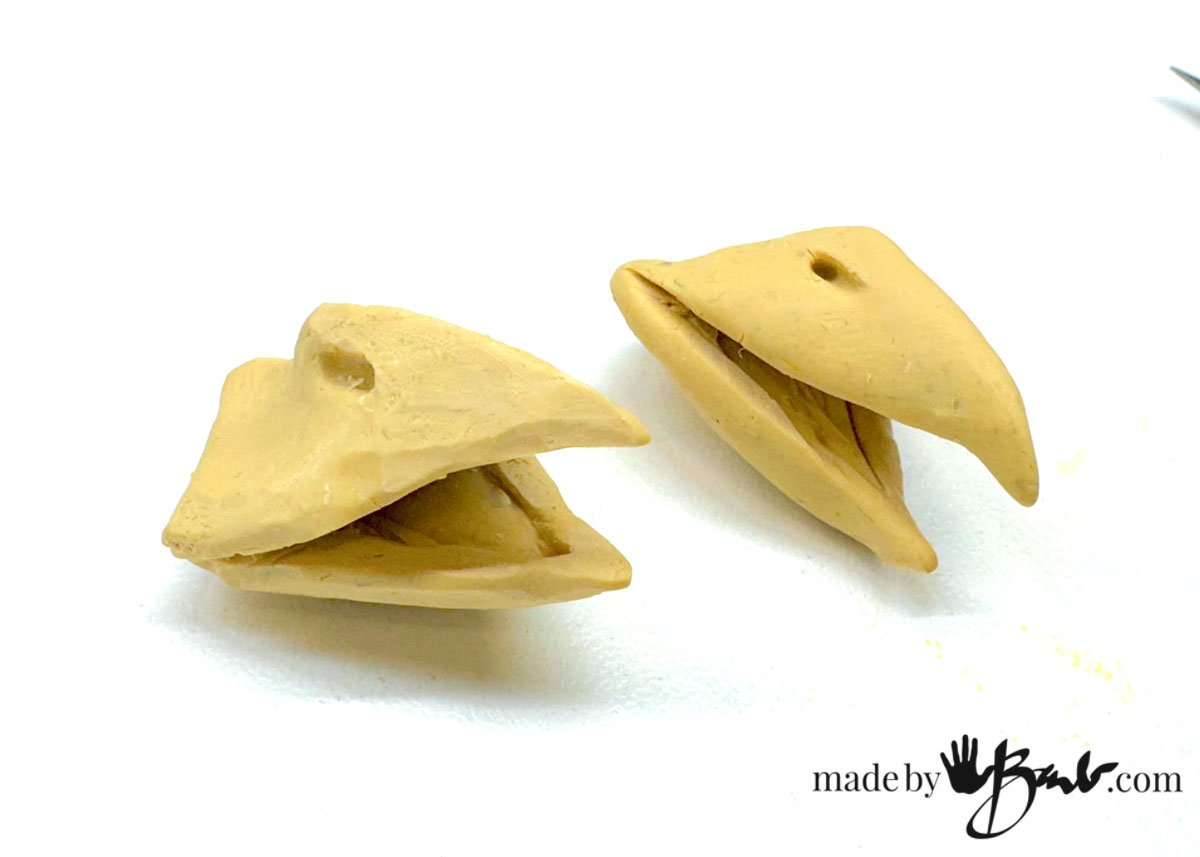
The most remarkable part of this little DIY tutorial is the bird beaks. Although it looks complicated it is quite simple (watch the video tutorial for more details). The upper and lower triangle portions are made separately out of polymer clay. Mixing some colours (yellow, white, brown/black, red) can create a muted yellowish colour.
My other beak making for simple sewn birds used leather pieces. These are much more sculptural.
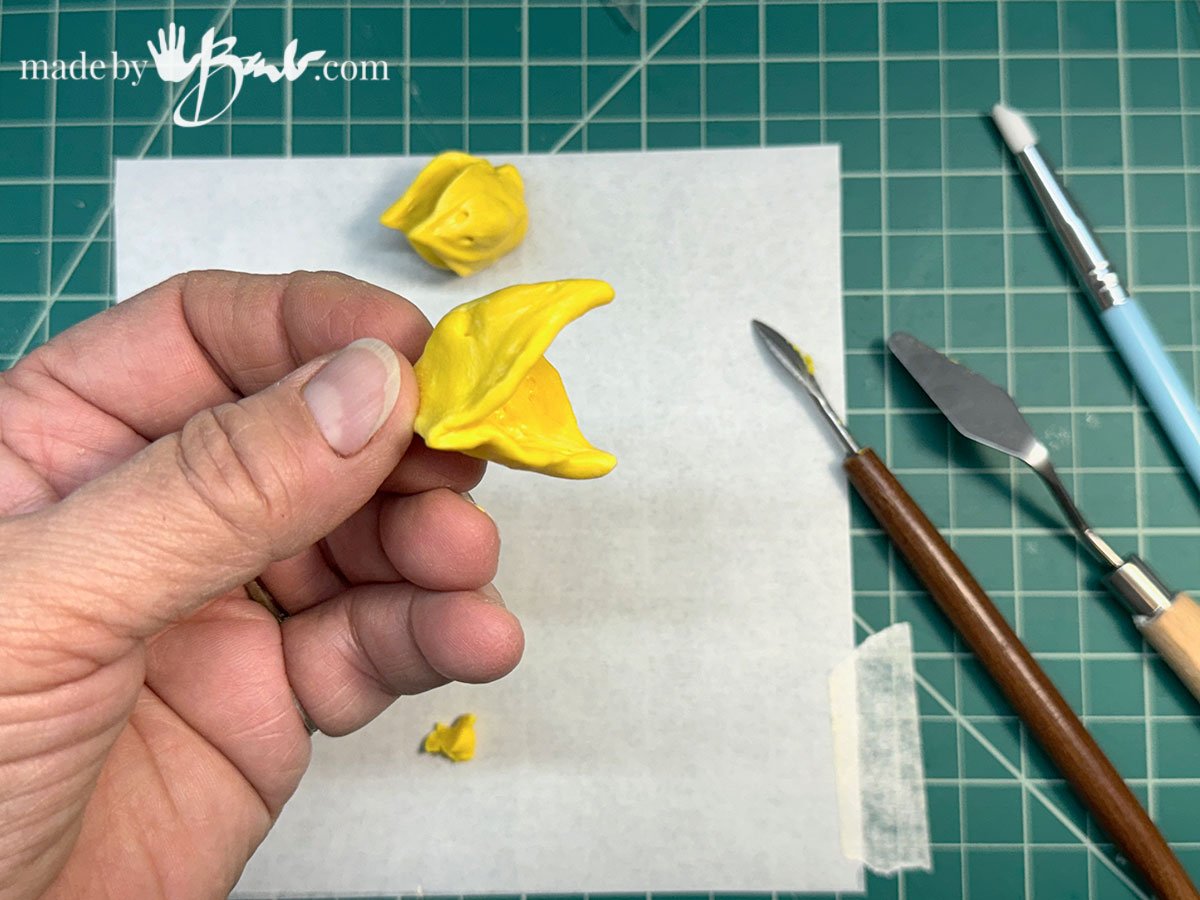
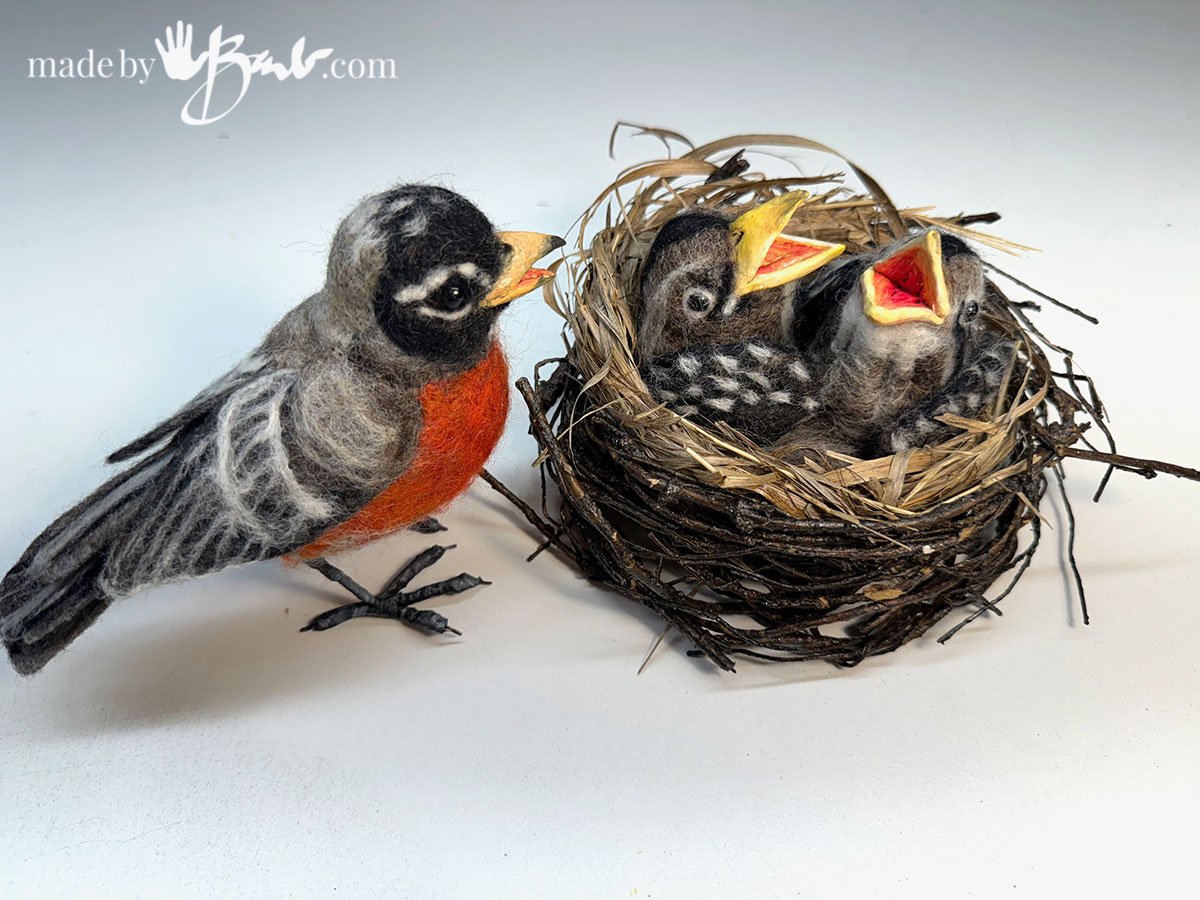
I believe working with the clay is easy for beginners. They are essentially basic shapes; concave ‘triangular’ shapes that are attached in the middle. The nostrils have some holes and edges of beak are somewhat pronounced. Depending on the age of the babies the beaks can be more open or not. I find it so darling to watch the tiny little heads with beaks wide open hoping for momma’s food.
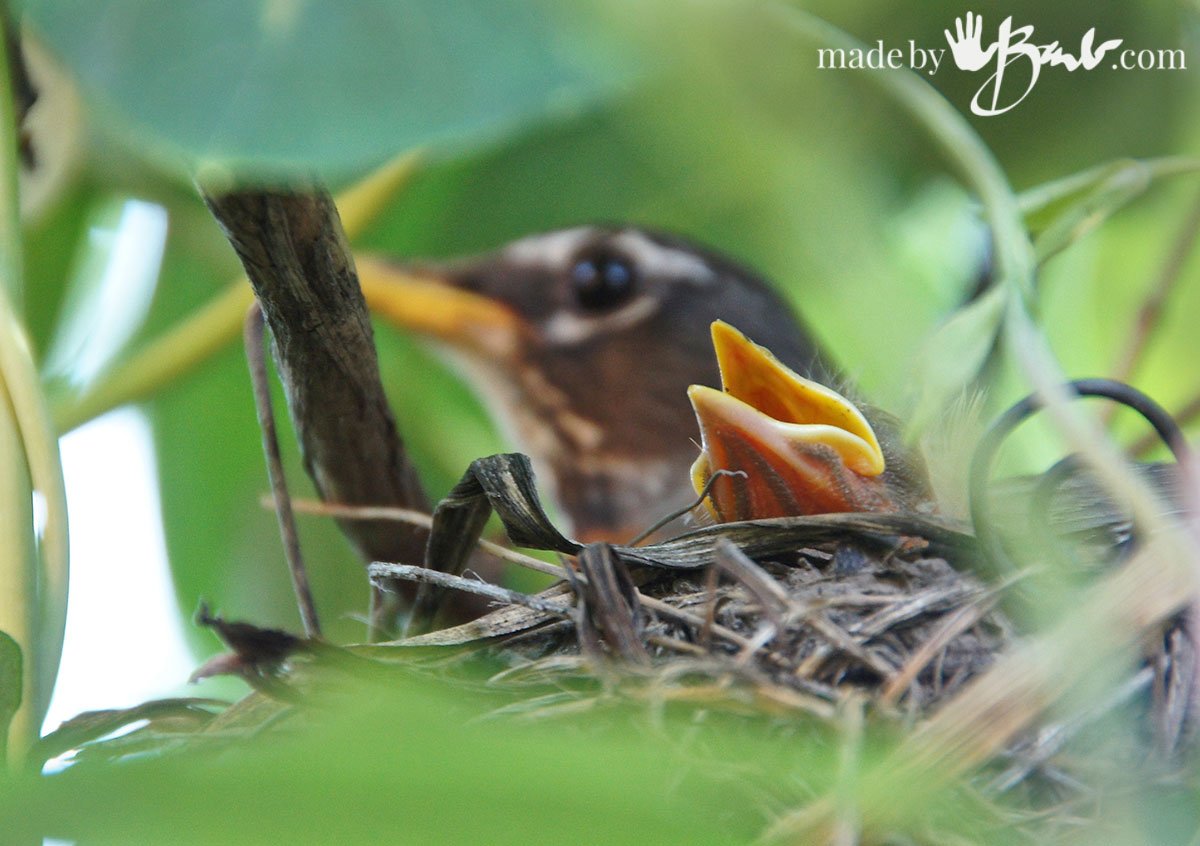
These real robins took residence in my Honeysuckle covered copper Arbour. So much of the character comes from the beak…
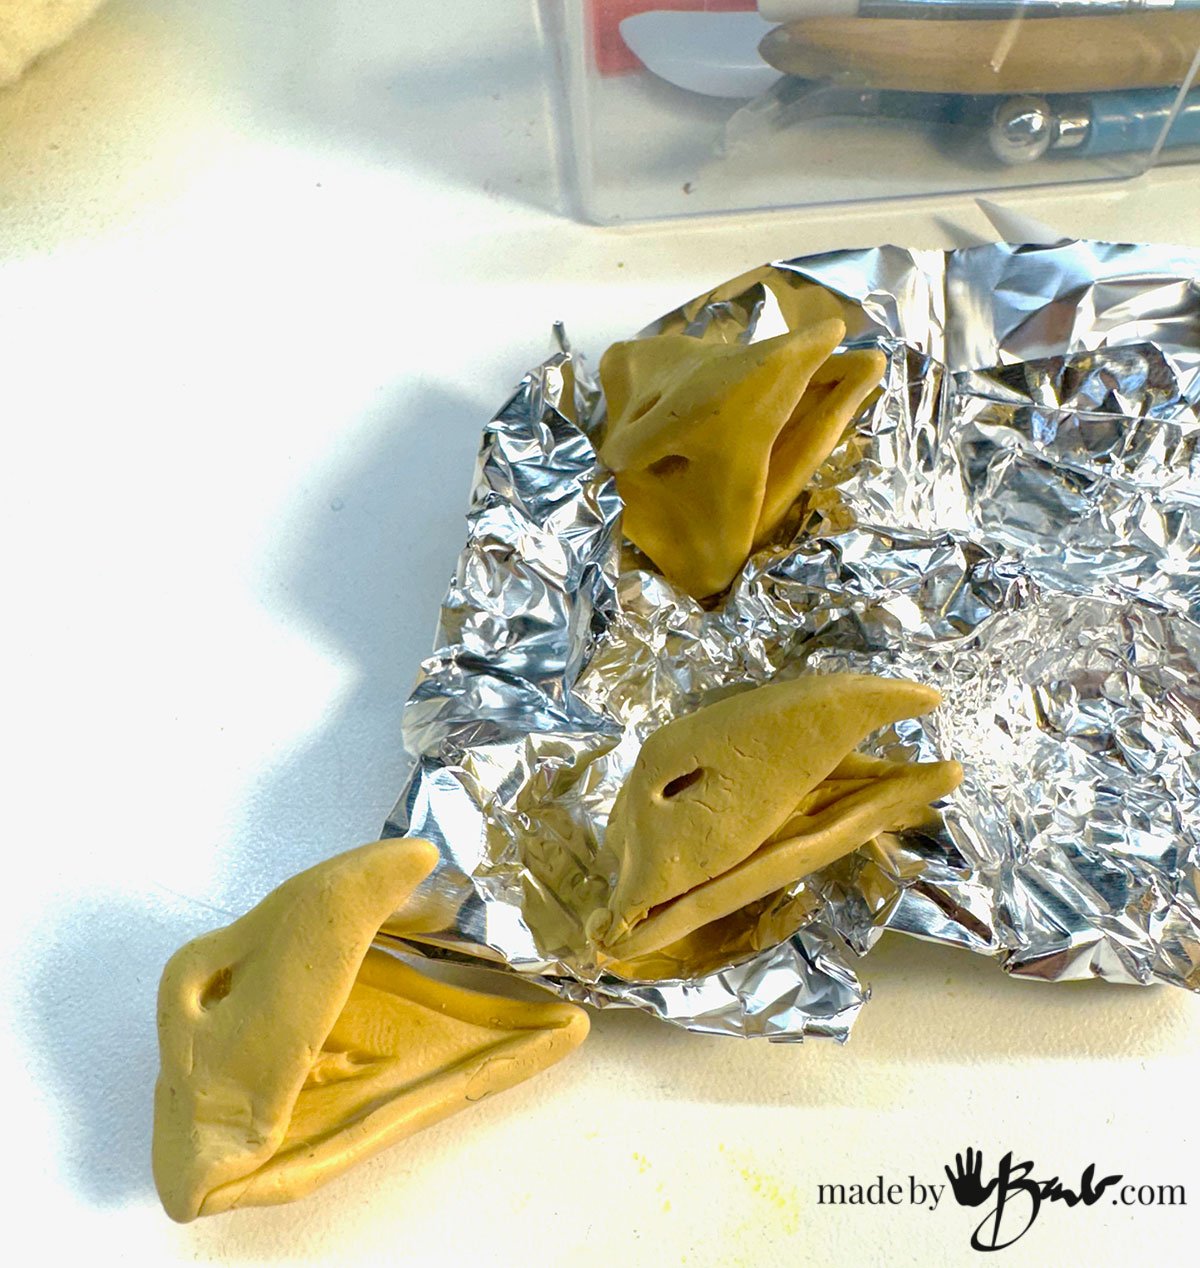
Bake these with a heat gun for a short time since these are so small. I set the beaks in some tin foil in a small pot and applied heat and covered with a towel to insulate and let the heat last for a few minutes.
Setting the Beak:
Be cautious when needle felting as it is best that clay components do not hinder the stabbing with the felting needles too much. Therefore the beak structure does not have a very wide ‘back section’.
Felt the body section of the bird with core wool complete with the head section. No armature is needed for this bird. I start with an egg shape and then add the head shape. Check carefully with reference images for proportions. Tip, use a side view that can be printed to desired scale then you can measure from the picture; like using a blueprint.
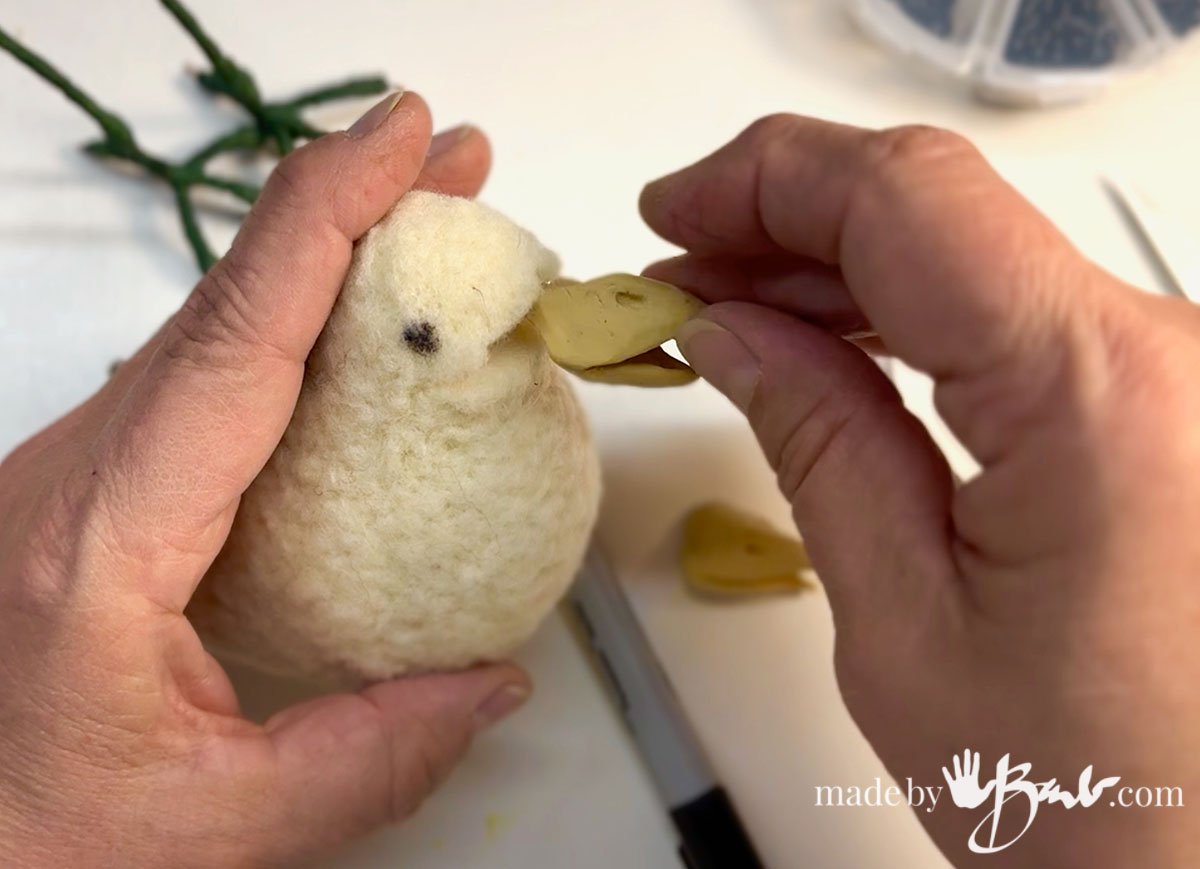
Cut a slot into the densely felted face to attach the beak (scissors or xacto knife works well). A vertical slot also helps to settle in the nostril part of the beak. To make felting around the beak possible be sparing with the use of glue. I used a hot glue to attach the beak in the deep centre.
Add Eyes & Colourful Markings:
Set the glass eyes into holes poked with an awl. Make sure they are symmetrical and set deep enough into the head. Glue in place. The gorgeous robin has great colours. See also my needle felted bird tutorials.
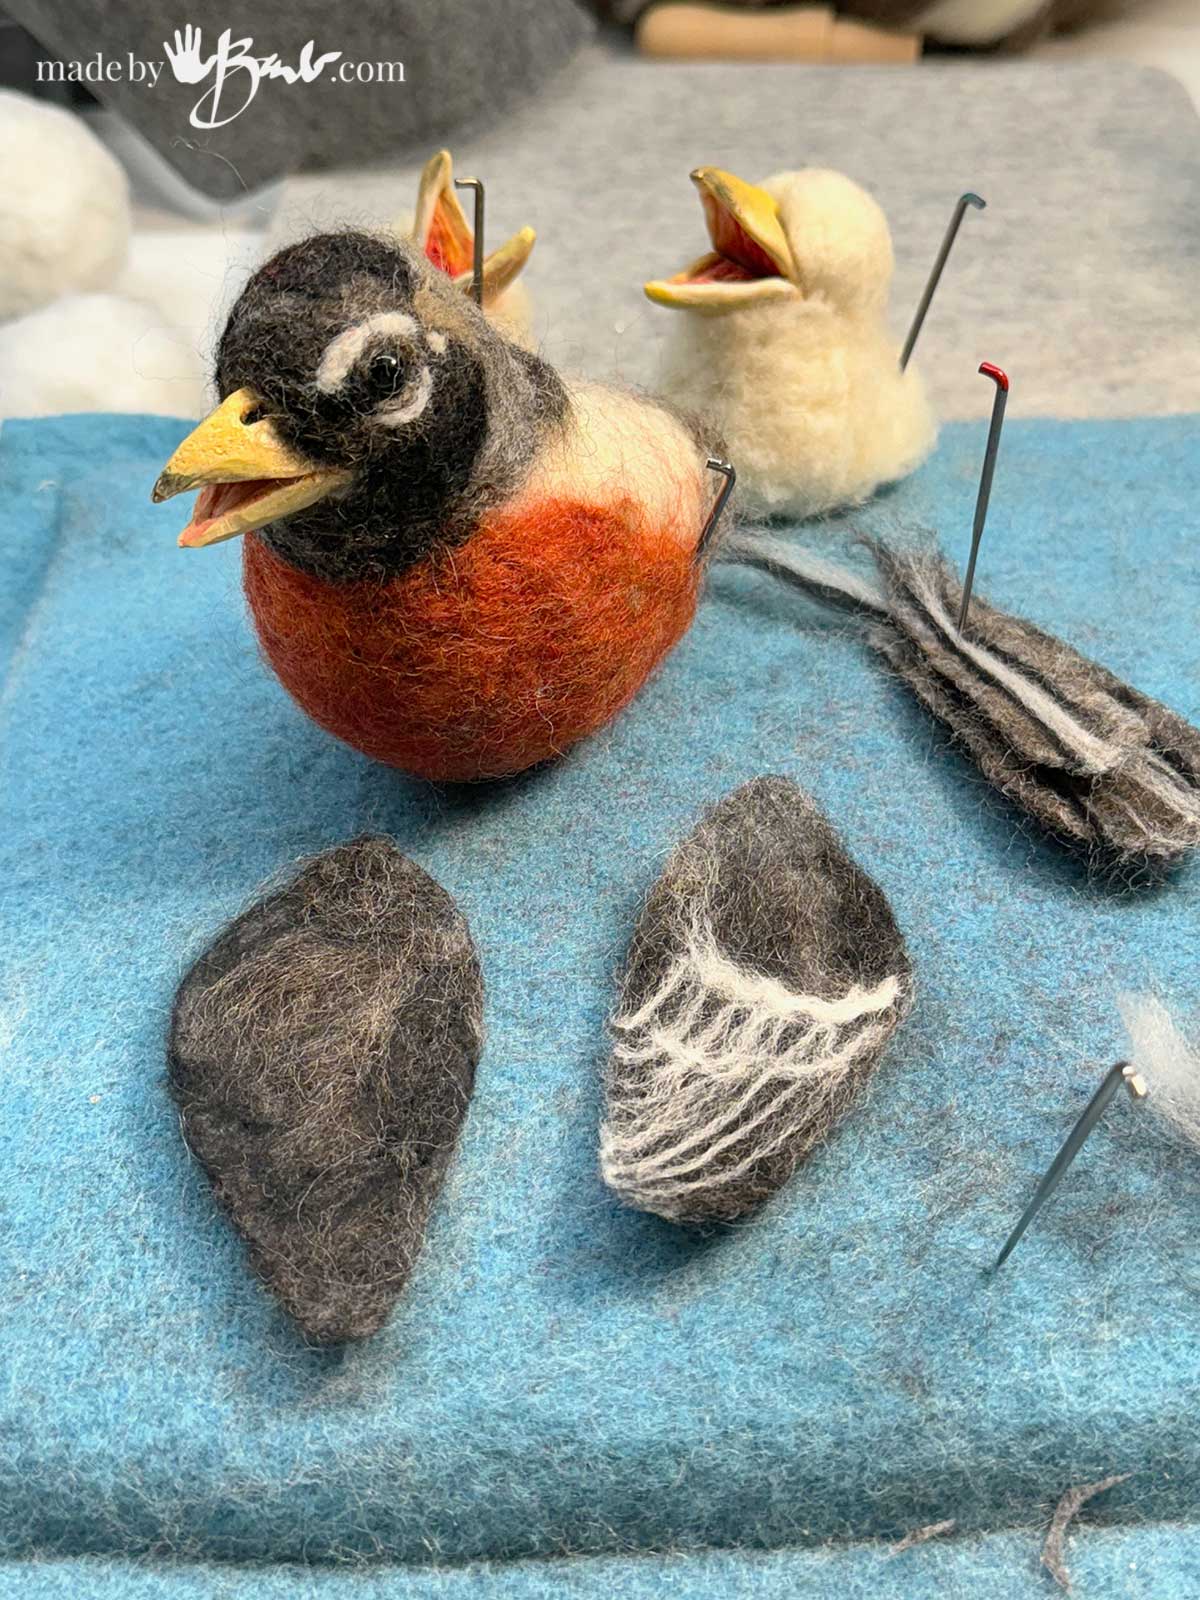
Felt the wings as flat sections/shapes that may be started with a sheet of felt. If the edges are too ‘fuzzy’, use the trick some plastic discs to be able to needle felt from the sides without poking your fingers. This method does give quite a smooth dense edge (see video). Use a small bit of wool to create the feather designs and watch for symmetry on the second wing.
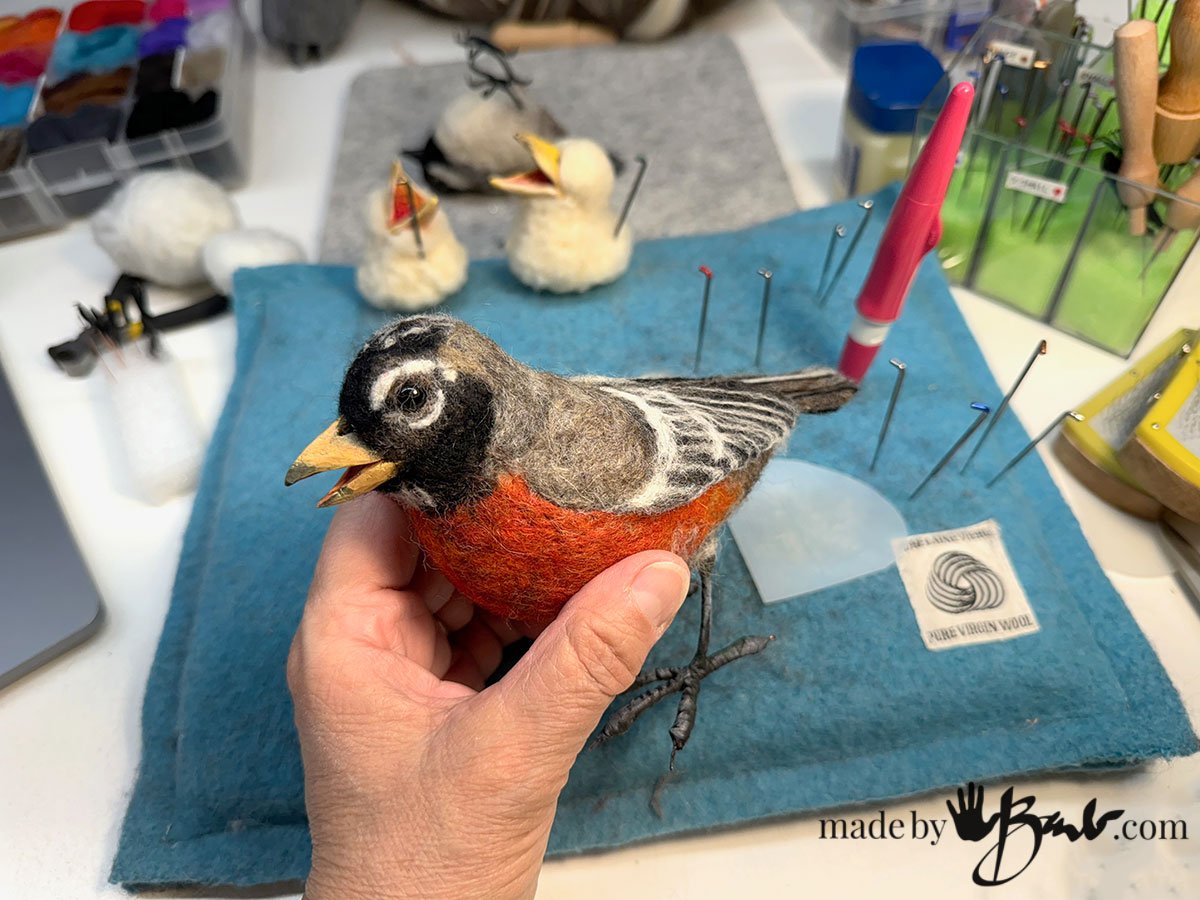
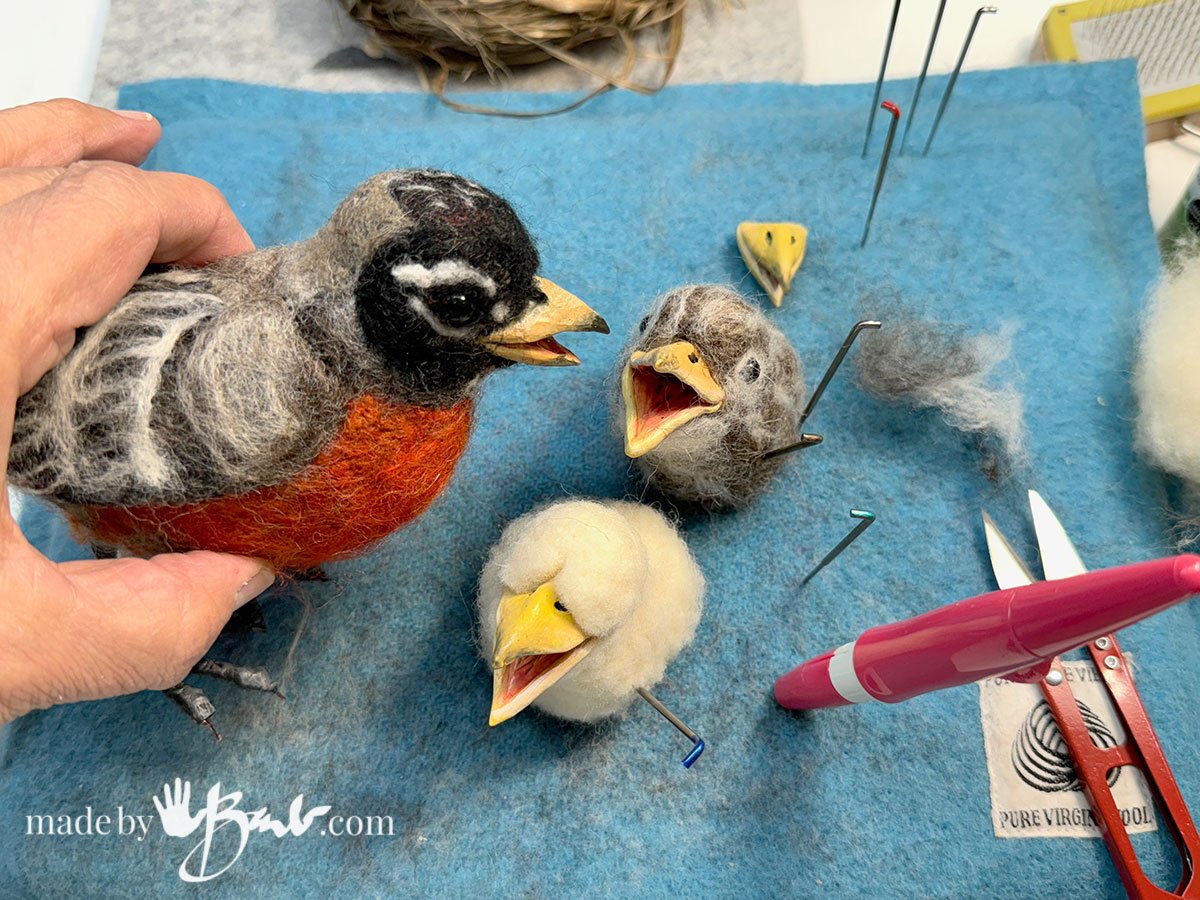
The eyes come to life once you add the small white details around them. Iron the wings for more smoothness of feathers and attach. Blend the wing to back wool. Search which specie has particular markings, as this is my American Robin.
Setting the Beaks in place:
Testing the size of head and beak, after cutting the slots to set the beak into place. Tip; paint the beak details and inside section before attaching so that fibres do not get into the paint.
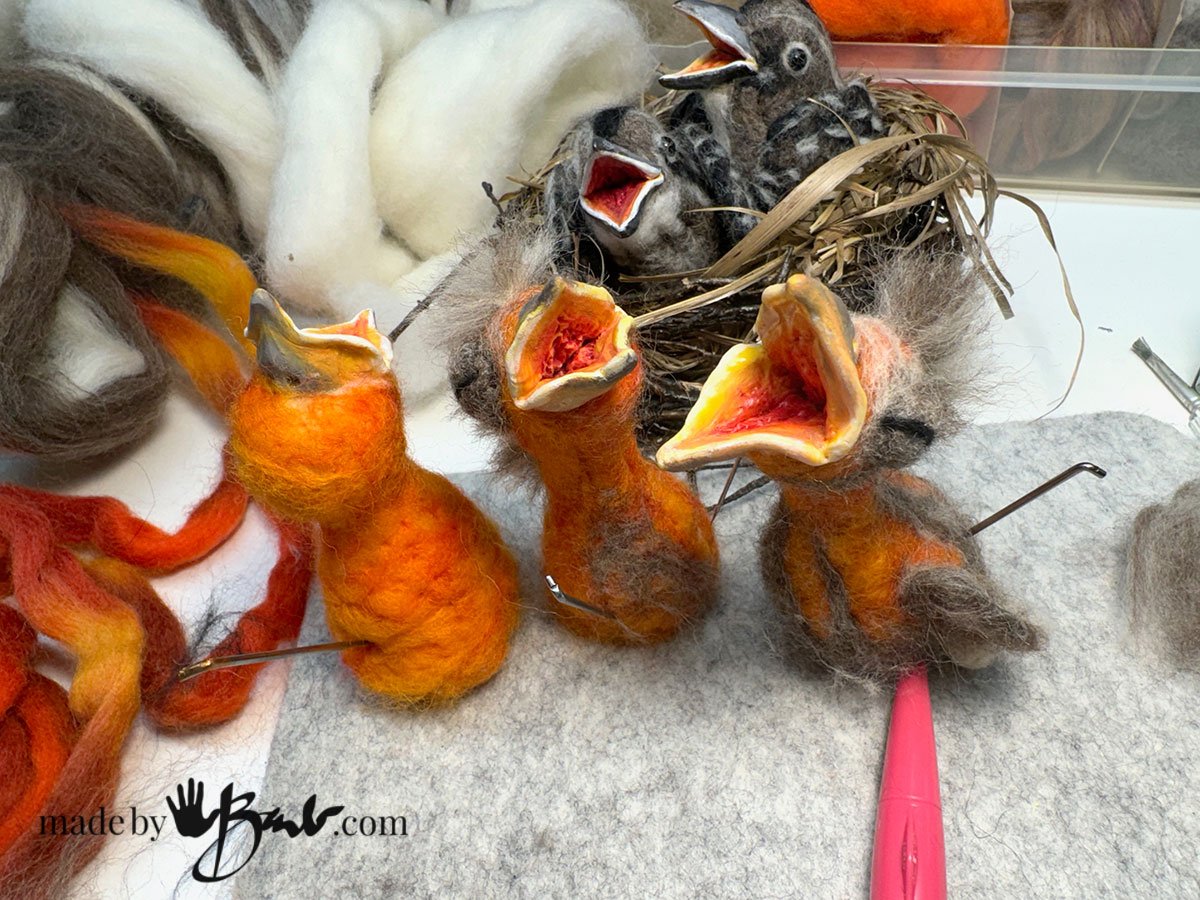
These little fellows were quite simple to make since the forms are quite forgiving. They will be set into a nest so the baby’s legs and feet are not necessary. Baby Robins have a lot of odd fuzz on the tops of their heads and a skinny neck.
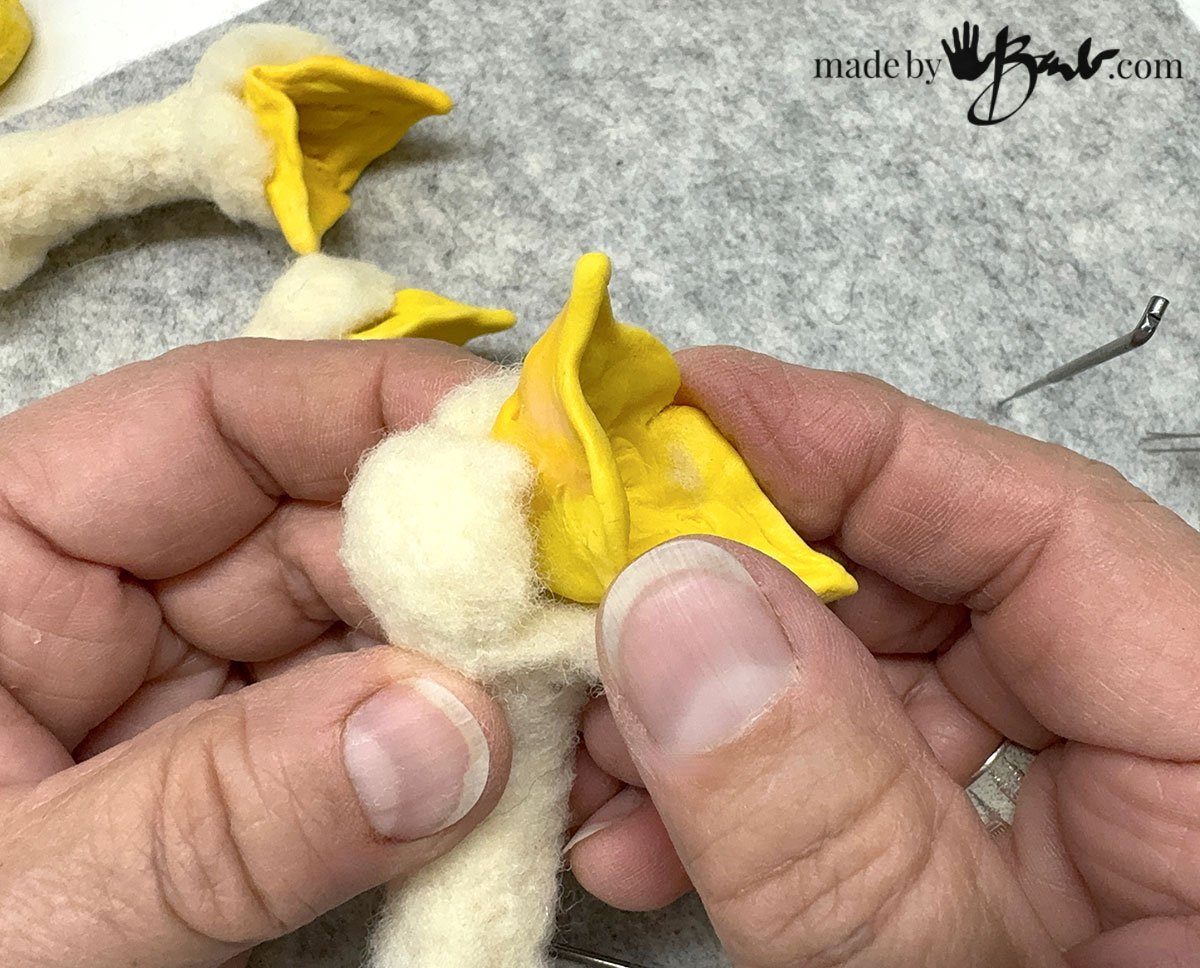
Form the clay insides of the beaks to be rough and paint to show depth with some tones of reds and yellows. There are many reference photos available online.
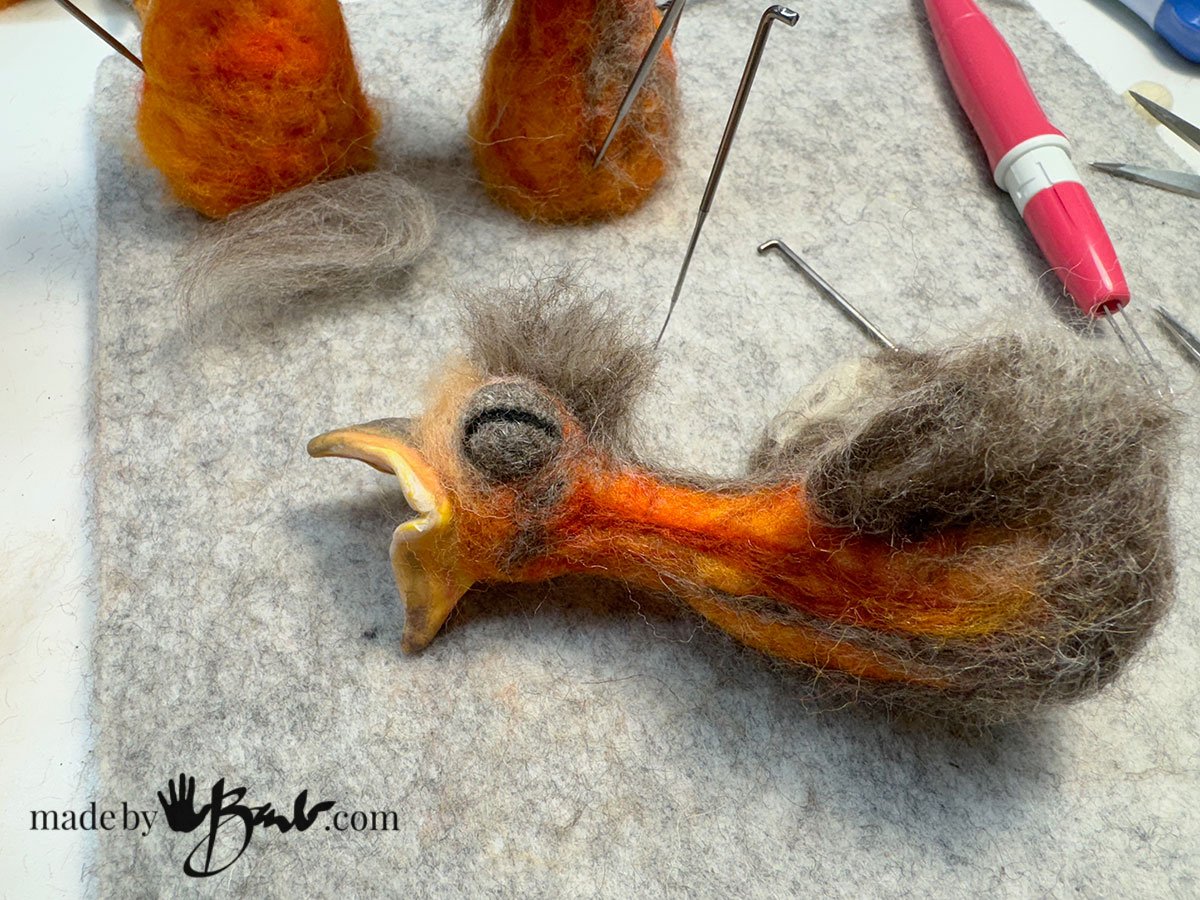
Attach a simple ball with a black line representing an eye slit to the sides of the head. Mix the colours to show a warm skin tone and muscles in the neck. The wings are simple flat tufts of mixed tones of wool.
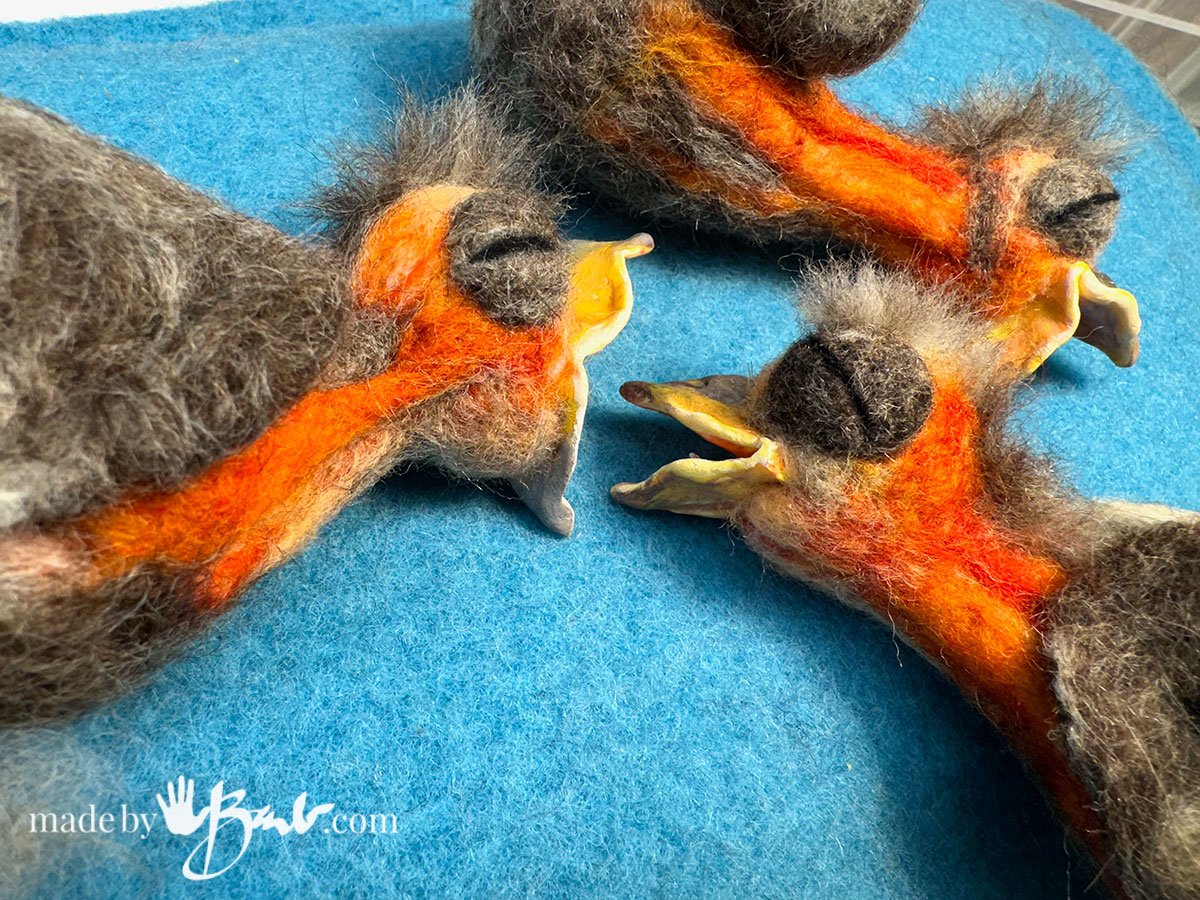
I don’t think robins have lips but there is so much of their character in those beaks! Felt extra wool to bridge the face around the beak.
I captured the older robins as well with more of their feather coverage and less thin neck. Slice the front of the face horizontally and vertically to set the beak in place. Do not use too much glue (I used a bit of hot glue) as you want to be able to needle felt around the face.
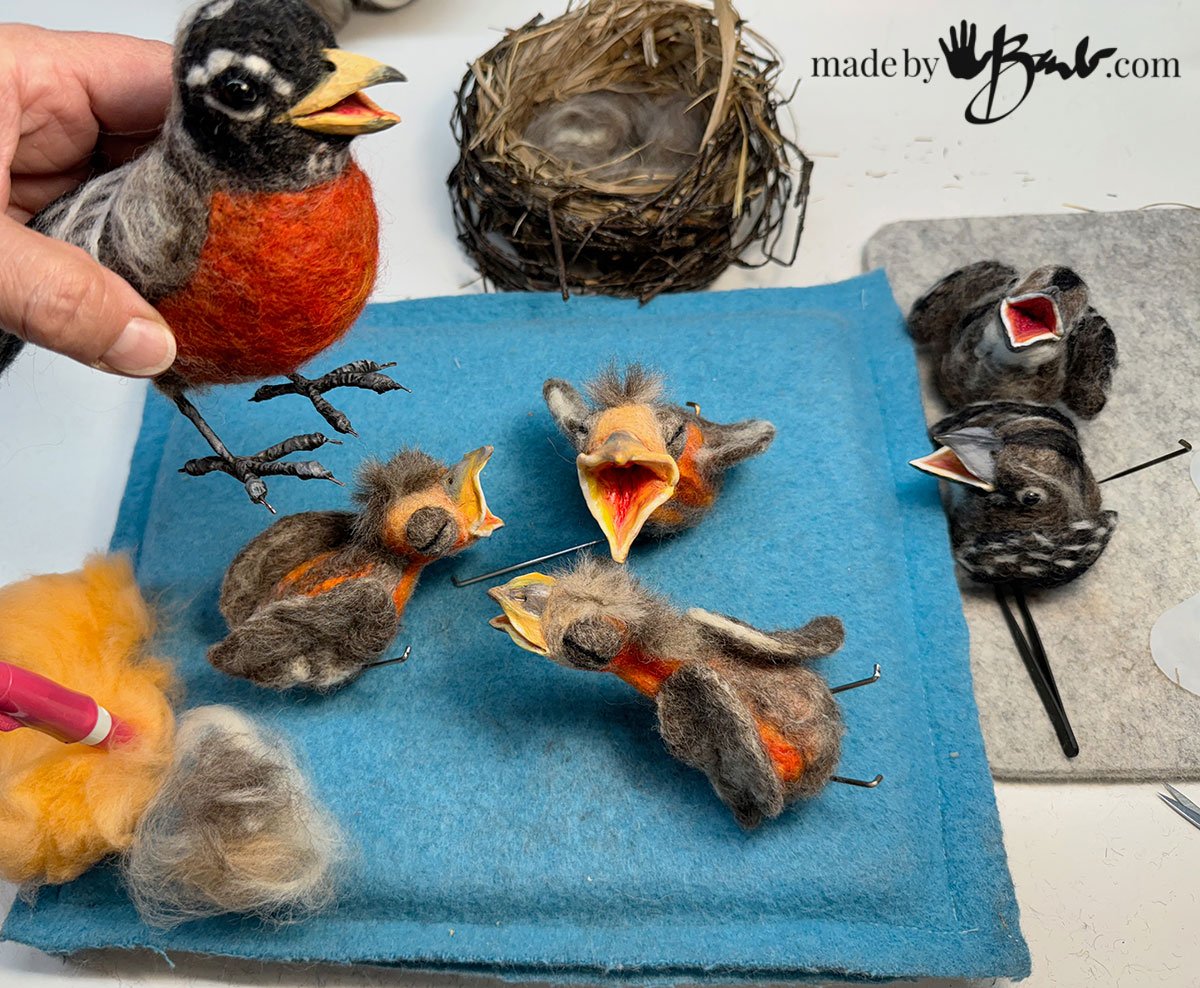
Make the little bird wings with small disks of a thin layer mixed wool. If needed use some disks (plastic bottle pieces) to hold and poke from the edges. To flatten the wing steam iron it.
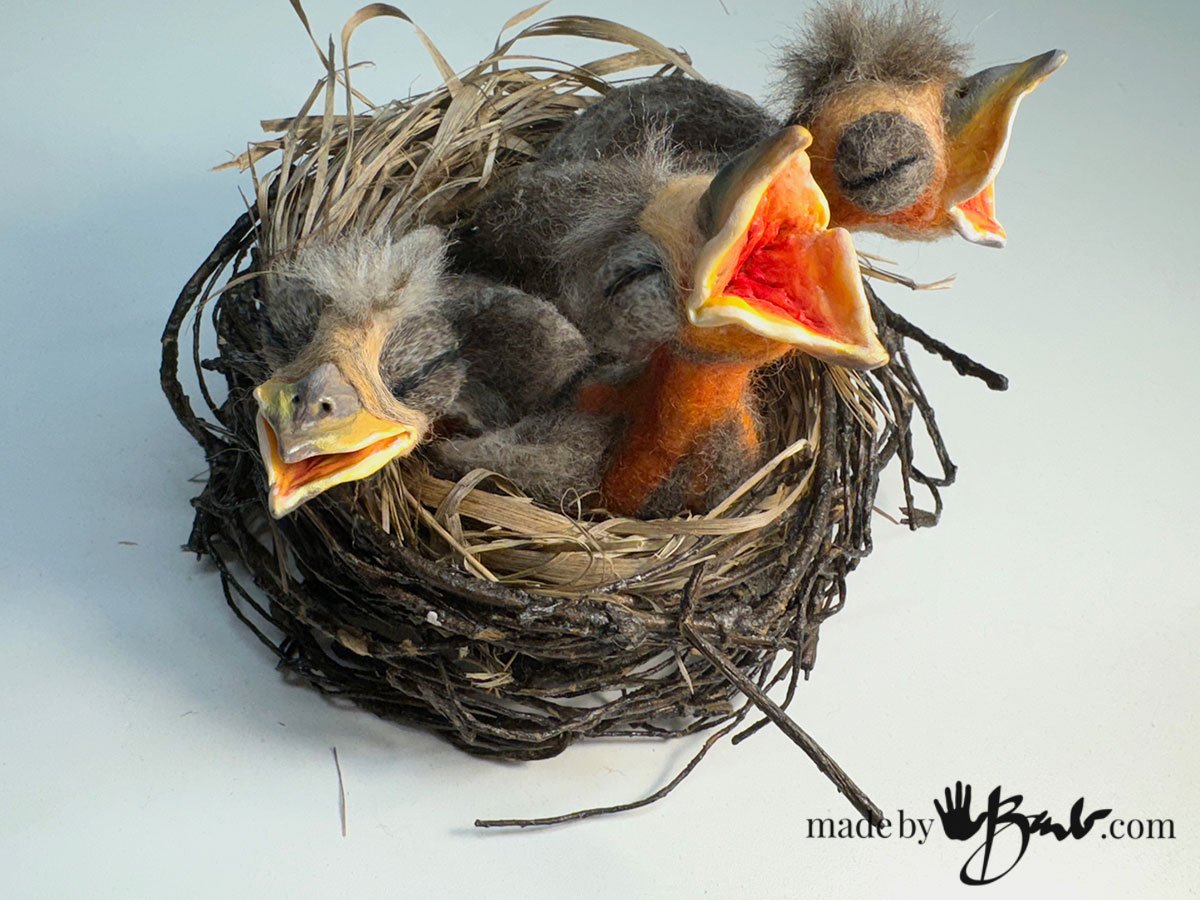
Setting into the Nest:
To make the nest I used some wired faux branches form a wreath. You can also go outside and collect some dried long grass, soak it and form into a circle nest. My ‘It’s all for the Birds’ post has instructions as well for nest making. Tip; use some hairspray to keep little bits from falling off.
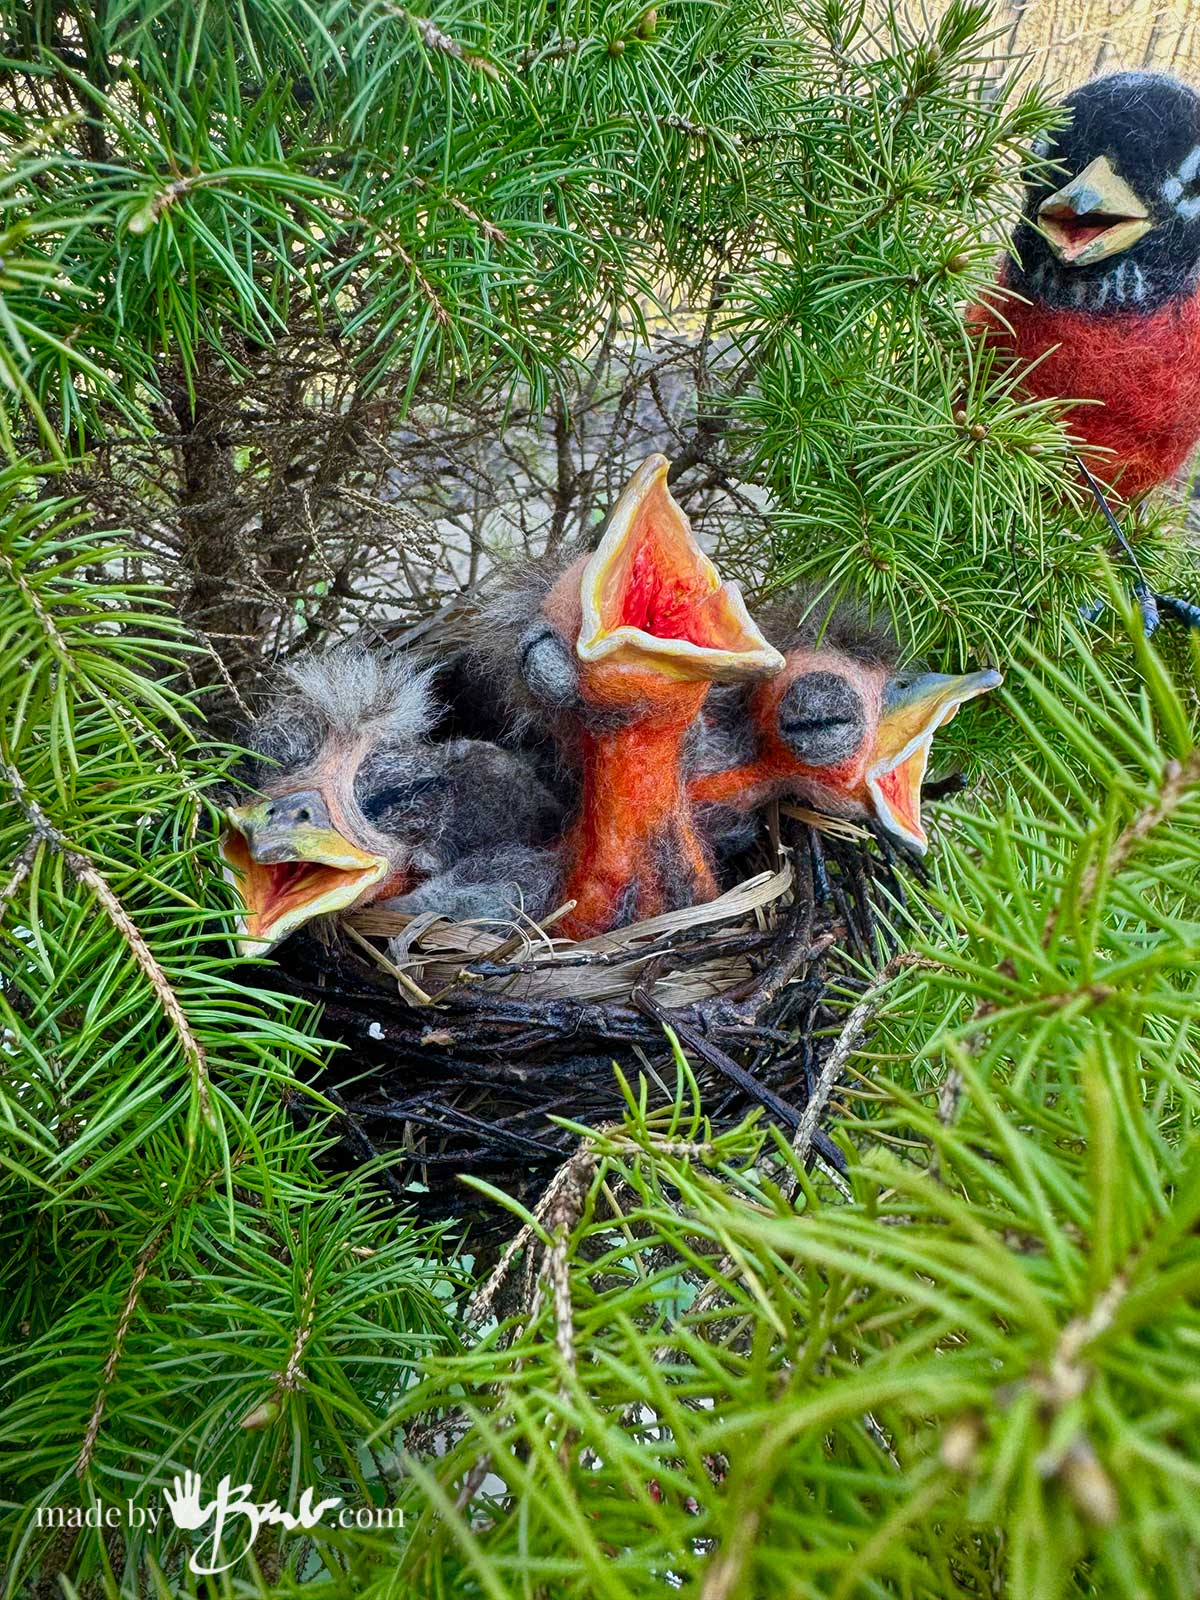
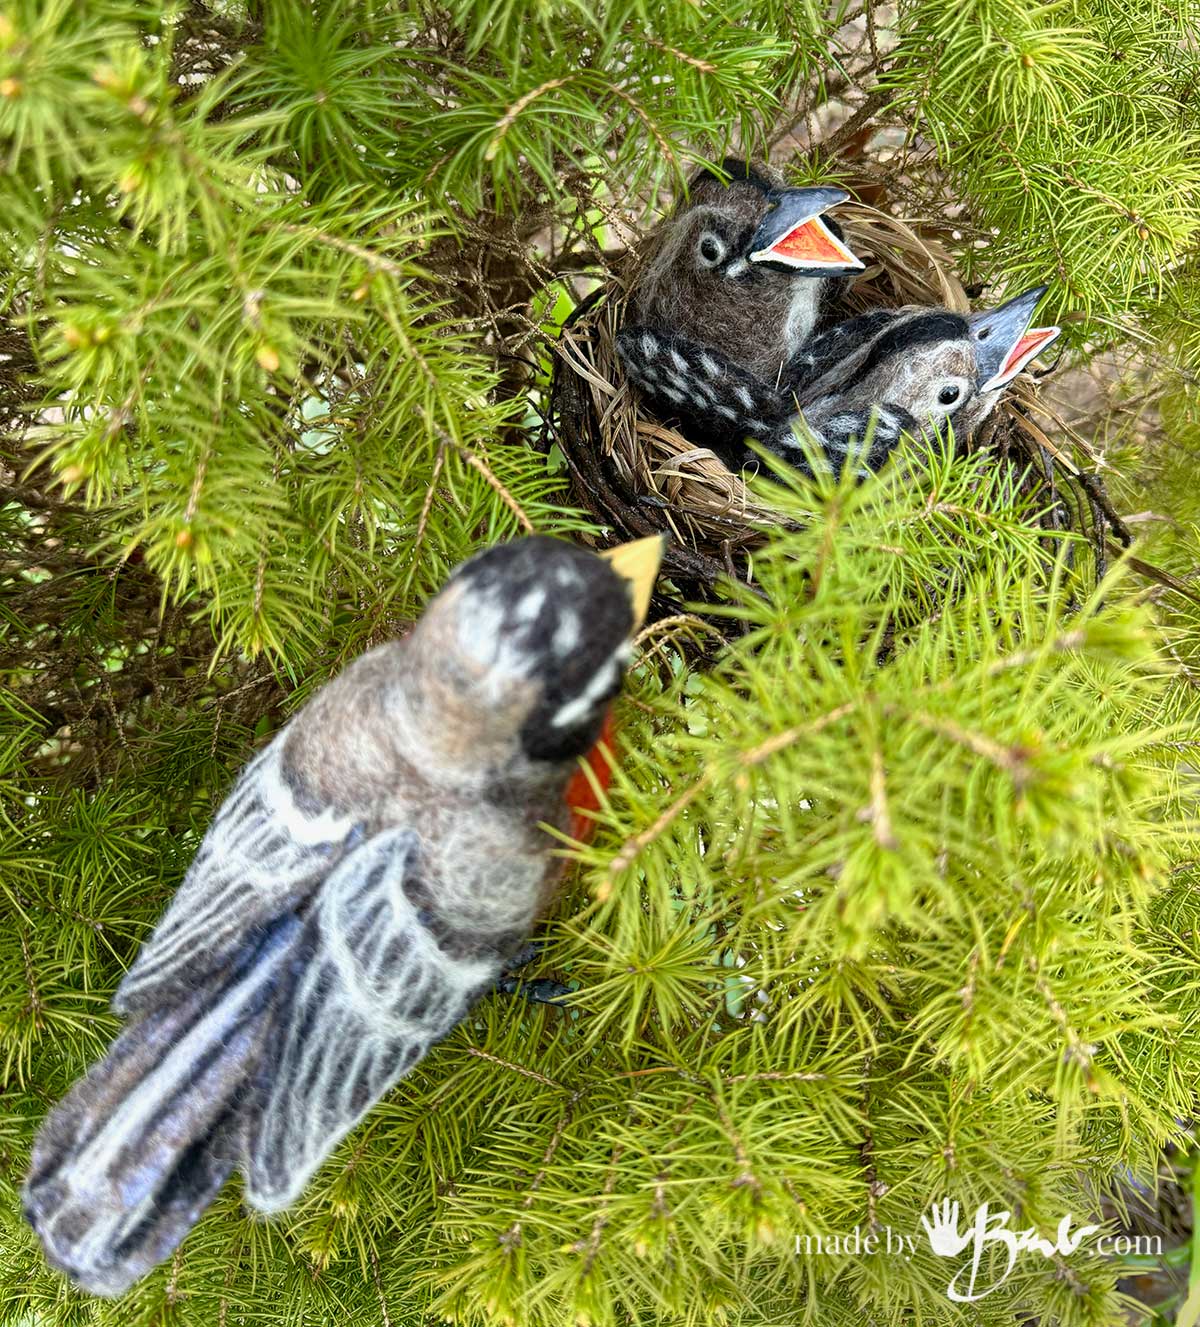
Who’s that silly lady taking pictures in the garden with a nest of birds?! These sweet creatures’ natural instinct is so wonderful to watch; I hope I’ve captured it…
As with any realistic art form the fine details do make a huge difference; but don’t feel pressured. This fabulous robin has details to represent feathers on the sides of the wing. Feel free to add more colours on top of the layer of wool for complexity.
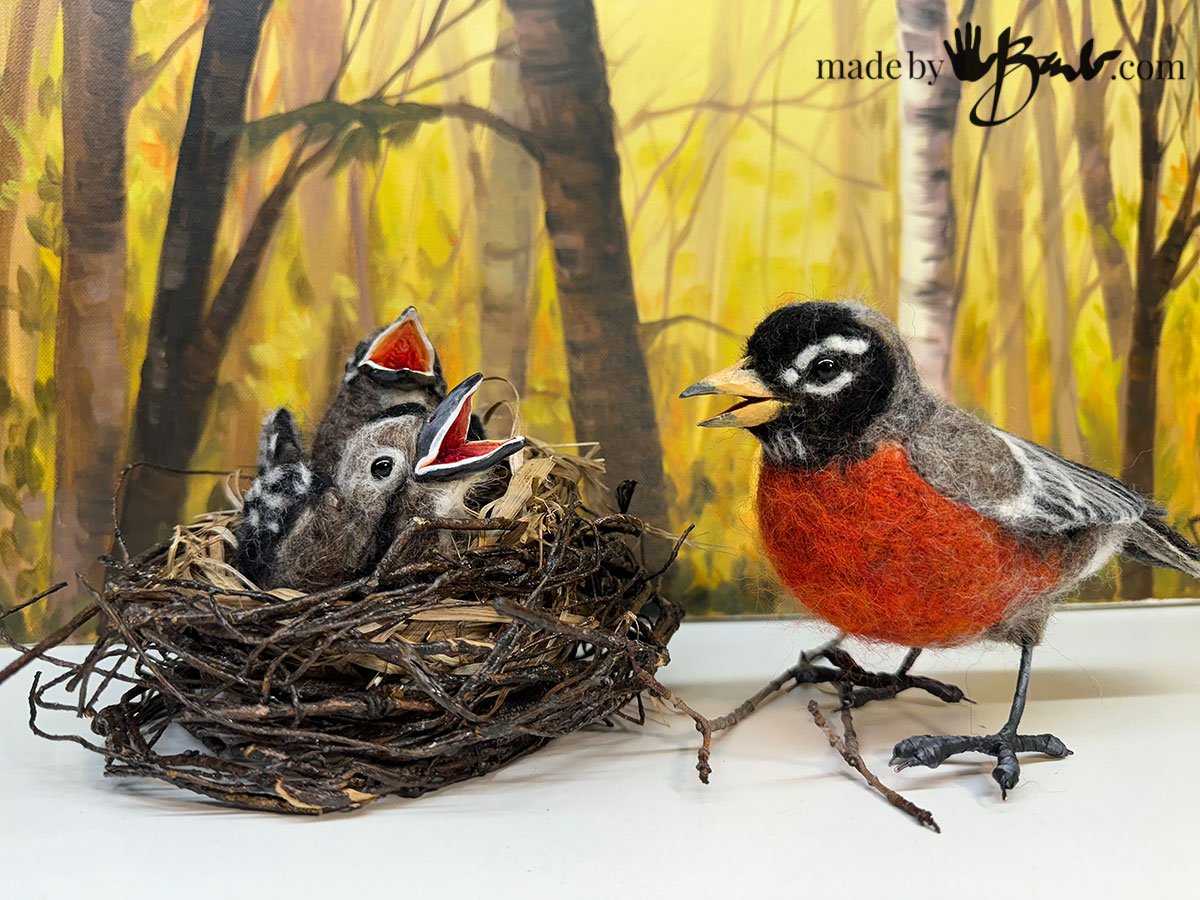
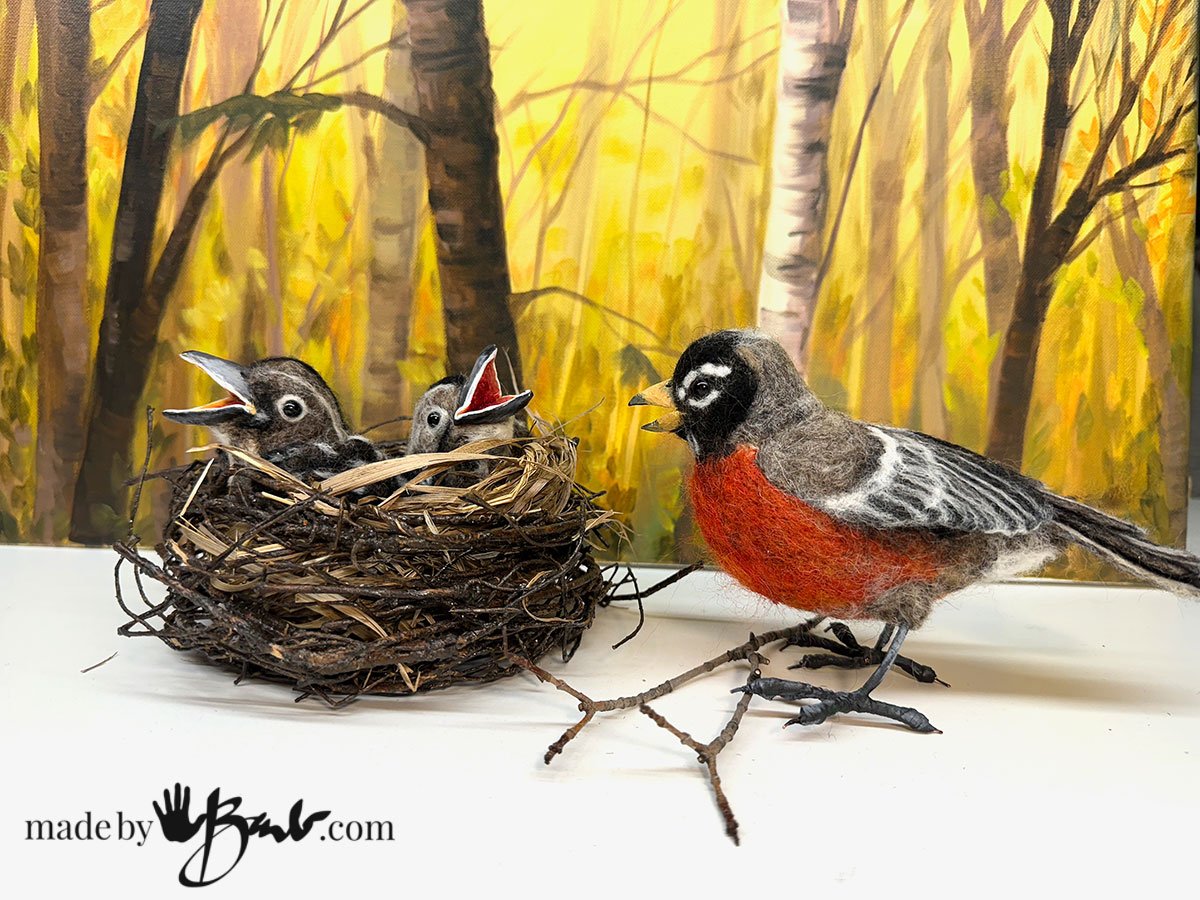
What do you think? Which is your favourite, infant or baby robins?
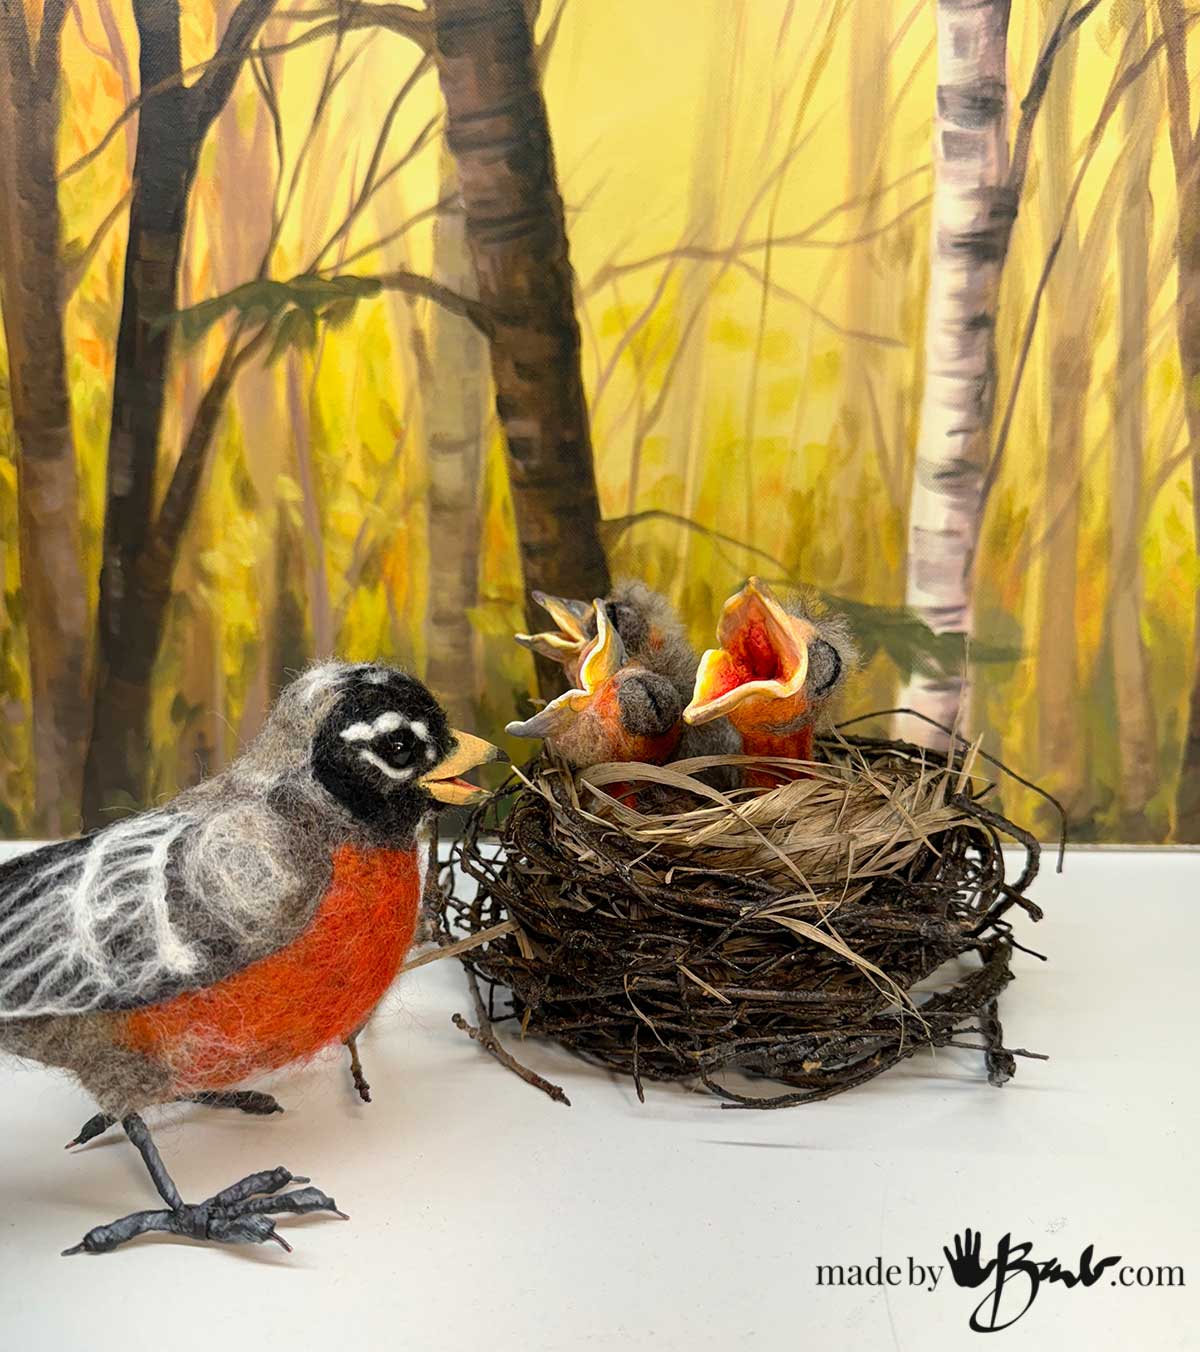
One of my paintings became a great backdrop to showcase these ‘lively’ youngsters!
My grandson loves birds & already knows all the species we have around us. This is a wonderful way to capture that interest, maybe he will become an Ornithologist!
Do we need a smile? I bet these will do just that… enjoy and take time to admire your own nature and possibly make your very own Needle felted Momma Robin & babies
Love this project! Your artistry and talent shines through with these birds. The beaks make the baby birds, so realistic. Thank you!
I keep having to chuckle at what I want to do next… I think as artists grow older they become a bit crazier. I’m so lucky to have all of you cheering me on!
In a survey you sent out last year I replied with ‘anything birdie’. Well dear Barb…this is all about birdies!! The work here, along with your finely tuned eye is incredible. Favourite…well, it’s all my fave. Your notes as well as description on the ‘how to’ is, as usual, detailed and makes me think I might be able to do this…well, when I have some real time. Thank you – thank you!! Monica
Oh, I have always marvelled at how popular my post; ‘It’s all for the Birds’ is! Sometimes projects seem somewhat silly but they do bring much joy so it makes me happy… Enjoy!
Yes, you are an artist and you make all kinds of WONDERFUL things!
Haha, I think I read that somewhere! Since retiring from college teaching I get to see what actually is happening around me. I was eyeing the chipmunk today…
your work is impressive, thanks so much for sharing your art.
Thanks, figuring out the process is like my mental challenge…
Thank you so much dear Barb for this detailed tutorial and all your extra tutorials that bring this one to life. I love the colors of the baby birds, their wispy head feathers and the adorable hungry mouths. (You mention a video for the little beaks but I could not find a link.) I’ve already got my wool and felting needles out!
I just checked, and I did embed the video on the post page too. I had to laugh when I kept checking the development of the lil’ birds in the nest, they have odd feathers on their head. Whenever trying to make something it is key to look for what gives the character to it, whether sculpted or 3D. If I had to make a general statement it would be that ‘observation skills’ are very important to creators. Enjoy & observe!
Oh those irresistable little birdies. What a lovely idea to felt baby ones. They are just cuter than cute 🙂
Oh, Nature can supply endless inspiration!
how cute, i love them a lot
When I work in the garden there is always a robin nearby.
i’m going to try making them .thank you so much
We also have so many too! The nest was relined and the next resident has laid 5 more eggs. ‘More photo ops!
Wow Barb! You really nailed it with the mama bird and those babies! The mouths look so real. Such a beautiful and colorful symbol of spring. Thank you for sharing your very vast and some times quirky talents. You encourage me to continue to be adventurous. Forge on mighty sister!
Demasiadsmente hermosos como hace por favor paso a par por fav podría ayudarme como hace los picos como lo hace ……curso en linea talvez
(Too beautiful, how do you do it? Please, step by step. Please, could you help me, how do you make the beaks? How do you do it? Maybe an online course.)
The beaks are made with polymer clay, it starts with triangles that are then formed to add the details. Try it, with some reference pictures to look at. Polymer clay is easy to work with. I may make a tutorial…