Eco-Printed Linen Pouches
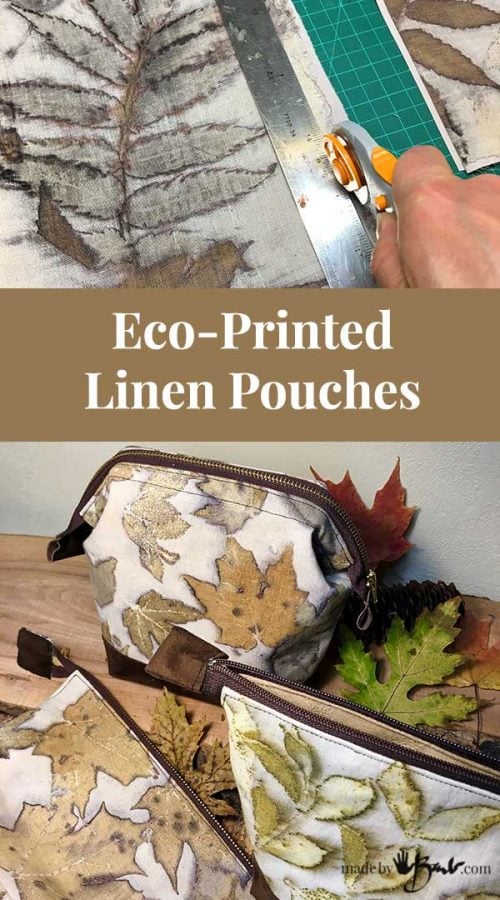
This magical journey into Printing with botanicals has given me such uniques pieces of fabric art. But a stack of awesome fabric does not amount to much unless it’s put to good use. Beauty & functionality come from these Eco-Printed Linen Pouches.

The Printing Method:
Since only natural fibres (other than nylon) can be printed on with botanicals Linen is one of my favourites. It is not that easy to find nowadays so when I do find some I keep it for special treatment.
Linen has a thicker thread thus more texture but also has more body. It is super absorbent as well. See here for the instructions to eco-print as it is the same as other cellulose fibres like cotton.

So many leaves… so many variations in prints! More iron, less iron, but I love them all!
I do like to have a stiffer fabric for these Eco-printed linen pouches so I used some fusible web and fused it (by ironing) to some cotton sheeting. This is an optional step but does give the fabric some good stability.
You will need:
Dyed Fabric, some accent fabric/suede/leather for the bottom, a zipper that is slightly wider than the pouch desired, lining, and some accent leather/fabric for zipper tabs. And the usual sewing stuff… (I bet you knew that 😉

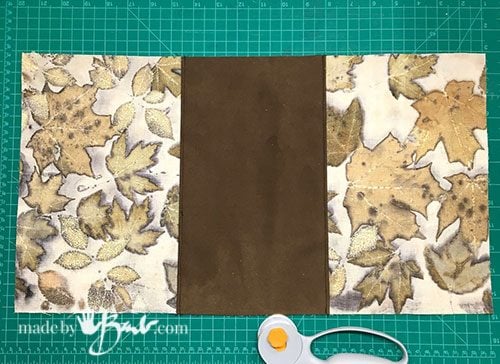
The Cutting:
When I sew things that require nice straight lines I use a rotary cutter (this is my favourite one) and a straight edge. You can’t really be a crafter if you don’t have a cutting mat as these come to so many uses. I use them for paper cutting as well. The larger the better…
The grids make keeping everything square very easy. ‘And they will save you nice table surface.
The Pattern:
I have not made a pattern for you since you can make them what ever size you like. My design has a bottom of ultra suede added to the rectangles of the printed fabric.
Attach each side to the bottom fabric and topstitch to keep it flat. The width and height can be varied as desired.

Assembly:
Since these pouches are lined the main piece is duplicated in lining fabric. The rectangles that are cut out of the bottom will determine the squaring of the bottom. Make sure it is 2x as wide as deep
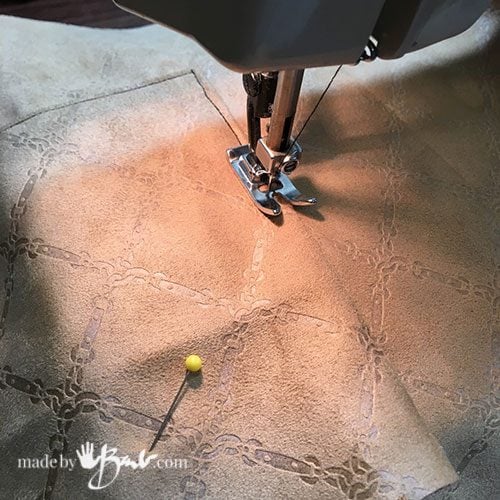
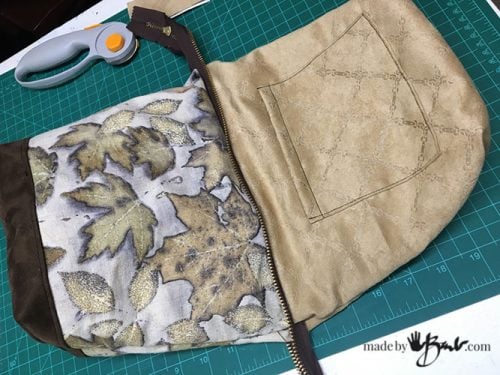
As extra detail you may also make an extra pocket attached to the lining piece. Cut a rectangle, fold over the top edge 2x and top stitch. Top stitch this along 3 sides onto lining.

Sew the zipper to the top of outside (right sides together), make sure to fold in seam allowance at sides. Sew the lining to the other side of zipper.
Fold open. You may want to top stitch along top edge of zipper at this stage or later. (may be easier at this stage)

Essentially this looks like a big pillow shape with a zipper sewn in the middle. The side seams and bottom corners need to sewn next, but do remember to leave a small opening so that the entire pouch can be turned right-side out.
* Note: Leave 1 inch space from top/zipper (2.5cm)

After sewing side seams bring bottom sides together and sew closed.
Turn the entire pouch inside out via the opening left in the side.
Finishing touches:
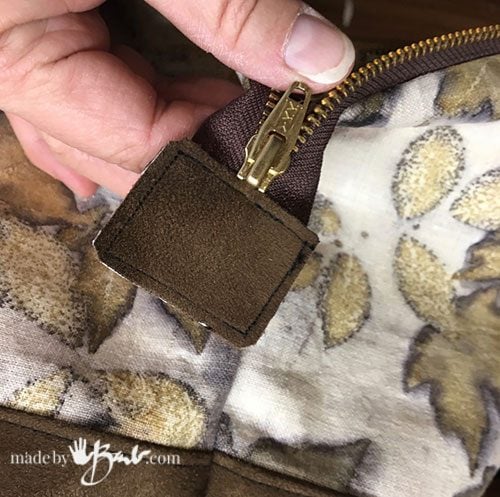
The nice thing about these pouches is that you can use zippers that are any size as long as they are at least long enough to extend 1″ from each end. You could also use 2 zippers that meet in the middle.
To finish the ends make some covers or sew tabs over zipper ends(carefully) and trim afterward. Slip stitch the lining side seam closed.

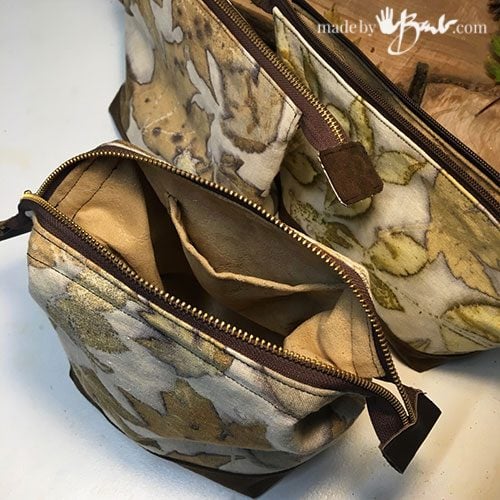
Stitch 2 lines of top stitch to allow the addition of wire. I used a coat hanger cut to size, bent as a rectangle and ends curved back. Insert them in between the top stitching and this will keep the bag in perfect shape.

Now you have a way to be organized AND be unique! ‘Can’t get much better than that. Art is great, but usable art is even better! Go… make some, or maybe get some of mine since I tend to make too much. (soon to be posted)
Beautiful. Thank you and Happy New Year.
I’m very happy with them as well. And here’s to a big year of making!
There are Some awful Ads Coming up on your posts that one can’t X out
Of making it nearly impossible to read on my mobile device. They just stay “on top” of your writing and photos. Thought you should know.
Thanks for letting me know. I am never on a mobile device for my site… I think it’s much better now.
Hi Barb! This looks wonderful. I’ve followed your tutorials for shibori dying and want to try this eco dying as well. If you’re lucky enough to live where there are estate sales, you can almost always scoop up real linen napkins and tablecloths for a couple dollars. Thrift stores are a good source too. Many a lady has bought a lovely linen blouse, decided that all that ironing was not worth it and donated it. For a few dollars you can deconstruct it into enough material for a small pouch and maybe get some cute buttons or lace to trim it with in the bargain! Learn to identify linen by feel and there’s lots of it out there, waiting to be up cycled.
Oh yes! I also have my sources! Many have the traditional linen tablecloths stacked away and never used them. I even have some linen that was hand woven to be in a dowry. Upcycling is perfect & then I feel I am making some positive impact from having them end up in the landfill. Just be sure to do a good scouring! Thanks for the tips.
Огромное спасибо за рассылку, счастлива, что нашла этот сайт.
Изучаю с большим удовольствием
“Thank you so much for the newsletter, happy to have found this site.
I study with great pleasure”
Enjoy! from afar!
Love it as usual! I have a question about your coat hanger-great idea btw and just made the look! Do you have 2 pieces of wire? One on either side? Or one piece that goes all the way around? (that seems sort of impossible lol) Trying to come up with a visual-your photos are always amazingly fabulous! Thanks!
Theresa, it is 2 pieces that have almost 90 degree corners so they flip/hinge up/down almost like a clasp purse opening. I am always trying to limit my amount of pictures as I keep having to ‘up’ my server storage… I hope that helps!
Estoy emocionada de haber descubierto su blog.
El lino es como el algodón se debe mordentar y quisiera hacerlo con soya para hacerlo natural se debe poner el baño de soya muchas veces??
agradecere su respuesta !!
Es MARAVILLOSO su trabajo !!!
“I’m excited to have discovered your blog. The linen is like cotton should be bitten and I would like to do it with soy to make it natural, you should put the soy bath many times ?? I will appreciate your response!! It is WONDERFUL his work!”
Yes, ‘bitten’ is another way of saying ‘mordanting’, yes soy milk dips will also work as a mordant since it adds a ‘protein’ component to the fibre. Use diluted milk and dry between dips/soaks. Happy Printing!
Hi Barb after following you for some time and enjoying all your beautiful creations. I realize you are located in Canada. I am on your eco print site and looking at your mittens , I don’t see anywhere a size. The prices don’t appear to be in Canadian dollars as well. Can you help me find the info I need?
When I list the mittens I price them in Canadian dollars but I am not sure if your Etsy converts it to your countries currency. They are a size large but since the cuff is a knit they adapt quite well to a slightly smaller hand as well. I hope that helps
Thank you Barb! I really appreciate you sharing your expertise and being so kind and helpful in helping me learn the ins & outs of Eco Printing! I just wrapped up my first project using aluminum sulfate and cream of tartar and put it in the fridge to do its thing. I find this all very interesting. I have worked with glass for many years and now I am trying something softer and more mysterious! Cheers.
Mysterious is right! I live that part about this as it keeps me interested. I often let my bundles sit over night under the blankets after microwaving. I haven’t kept a roll in the fridge though. ‘But, there really no wrongs!
I purchase my linen from https://www.purelinenenvy.ca/ right here in Ontario at awesome prices! I have to stay away from the site it costs me plenty each time I visit ha ha!
Simplifi near Cornwall also stocks linen, much higher pricing though https://www.simplififabric.com/
I also look for tablecloths and curtains at the thrift store.