Ghostly Draped Concrete Scarecrow

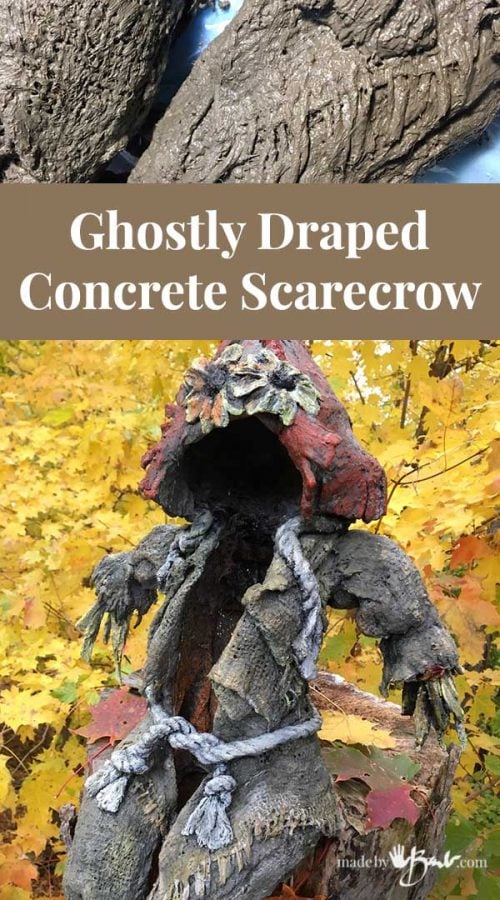
You know I could not let Halloween pass without a new addition to my concrete ‘family’! This charming fellow has so much personality and may look more difficult than he is. Come see how this Ghostly Draped Concrete Scarecrow came to life.

The Body Parts:
Don’t ask me how I come up with these things; it might be that I do a fair bit of sewing and working with felt. This dense felt is fairly stiff but you could substitute some other dense fabric that does not fray too much. I did do a few tests with different fabrics to help you out.
Use a rotary cutter as it just glides through and make a bunch of strips of varied length that replicate corn husks.

The Torso:
As with my Concrete Step Spook & friends (who I have seen all over the place BTW), he is small enough to be portable and easy to make with things you usually throw away. Fill the bottle with water to give him stability. Tape a paint stick across the back.
Funny story; the balloon I was going to use popped so I stuffed a plastic bag this time. It is a bit easier to empty later but a spongey ball can also work.

The Hat:
I had intended to use a straw hat but was not able to find one since he is not human size. Soooo, I made one out of another felt that was quite thick (cheap utility blanket felt).

To make a circle first cut an 11″ square. Fold it into quarters.

Once you cut it into a circle, also cut the ‘head-hole’ circle.

Fold over a cone shape to cut the hat top. Be creative, he can wear whatever hat he wants…

This all comes together very quickly with some hot glue. (No concrete yet) Test on his head to see the fit. I envisioned a floppy hat with fringes (as I think I was one when I was a kid)

The top get squeezed into a hat shape and glued.

The Scarecow’s clothes:
This fellow needs a great outfit! How much better can burlap be?! It has such great texture and and is super cheap (this is landscape type so it is really coarse) See above for the basic pattern pieces.

Since it is such a loose weave it may fall apart when dipping so you can run a line of glue to hold the fringe edges. (You could also use a zigzag stitch)

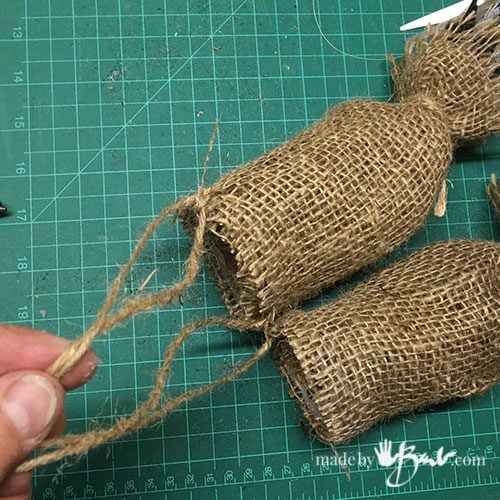
Mr Scarecrow needs arms and legs! Roll the arm & legs pieces to be double layered and the glue the ‘tubes’. Make all 4 tubes.

These ‘tubes’ will then be filled with the ‘corn husk’ felt pieces and tied with some jute twine (or some of the burlap threads). How easy is that!? They are still empty tubes at this point.

Coming Together:
To make the assembly easier and not have limbs falling off I tied some twine to each arm and leg. These little concrete spooks are so simple to make since they don’t have a face or body…

Make sure you have all the pieces and test fit. The jacket also had some ties added, a shawl and a waist wrap ensure good concrete density.

The Concrete:
This time I used only Portland Cement (no acrylic paint added) I do not add any sand as I find that it just stays in the bucket. This project happened in my house; I know it does get a bit messy but if you plan it’s not so bad. Making messes is my specialty!
No concrete into the sink!!! So a ‘wash bucket’ of water is a must and the usual gloves, dust mask and mixing bucket. (see here for some tips) If your portland cement get a bit lumpy use a sieve to strain it; like sifted flour!

Make a slurry mix that is like melted ice cream. Take your pieces, dip them and then massage the cement into them. Squeeze and make sure they are absorbing well. Squeeze the excess out as you want to keep the texture in tact.

Stuffing the Body Parts:
This fellow needs some meat on his bones so after dipping stuff some pieces of old plastic bags into each ‘tube’. The arms will slide over the wood sticks and tie together in the back. The jacket has openings that allow the arms through and fold over the front lapels.
Stuff each leg and tie together in the back as well. He can have his legs hanging down so will need to be propped up.

I find that only one layer of dipped fabric can be too weak so that is why I added the extra wrap around his waist. You can play with whatever fashion you like. Do try to keep the front open to show that he is a ghost and allow for the light later. Any extra concrete can be scrubbed away with a brush to show the burlap texture.

Manipulate the fabric as you like to show the fringes and wrinkles. I love this look so much… there may be more coming! His hat got folded up at the front. Make sure there is a good amount of fabric around the neck so the hat is well attached once the insides come out.

The Concrete Scarecrow needs a Belt:
Texture! Of course he needs a thick belt made of twisted cord. Knot the ends and let it fringe. The texture can be brushed out to show the details.

I can’t help myself sometimes; so I gave him a couple flower on his hat. Just a faux flower dipped in the cement as well.
I cover him loosely with plastic to slow the drying as concrete likes to be damp while curing. Poke him to see how well he has set and how sturdy he is.

Pull the head parts out and open the bottle to drain the water. Then cut up the middle of the bottle and pull it out of the bottom. Don’t laugh while you do it… it’s like birth. I was surprised at how well and sturdy he turned out! If he is ‘soft’ you can paint on any extra Portland cement slurry to make him stronger.

The Finishing Touches:
If you follow my concrete projects you know I hate painted concrete! This time I wanted a hint of some colour to bring out the details even more! My absolute favourite ‘can’t-be-any-easier’ method is with ‘antiquing‘! Just mix a thin watery black acrylic paint and let it run through the details. Have a rag handy if you think there’s too much.
Be sparing with this, and concentrate on the detail areas.

Once the dark paint is in the details then the texture can be accented with some lighter ‘Dry-brushing’ DO NOT Paint everything. Just the odd bit of dry brushing where there is a some nice edges and textures. If the concrete eventually loses some of the paint it will not noticeable – perfect!

This took about 15 minutes to add the accents.

Wonderful In the Garden:
He could not wait to get outside and sit on a stump! The glorious colour plays off his rustic texture perfect for a natural garden. ‘Have I said that I LOVE the burlap texture yet?!

Go ahead – admit it; it is an easy project since all the hard work is done before the concrete with clean hands!

Add a candle or battery light for the spooky glow. I bet another bird will find it tempting to build a nest in!

He now joins his friends! Yup, the Spook, the Witch, the Cat – all easily made to last in concrete. They are quite light and sit on steps or stumps. They move to the front steps on Halloween but don’t mind hanging out amongst the foliage all year long.
Go ahead and get your hands dirty!
Amazing!! I am Making the concrete lighted step spook now. Cant wait. Thanks, Melissa
That’s a good start! He was my ‘first’ and still holds strong like the day I made him. Happy Halloween!
Barb, I love all your cement creations! They look so good outside altogether. Where did you find the nice, thick, gray felt fabric and is it a synthetic fabric that will last? I live in south Louisiana and our hot and humid and rainy weather makes things rot very fast. I don’t want to work with natural burlap for that reason. I just don’t see it lasting. Thank you.
Thanks Joni! They do make a nice bunch and blend well into the garden all year. The grey felt fabric is actually an automotive product so it is all synthetic. Since I have been dyeing I am now aware that almost all fabrics are synthetics, so looking for a thick upholstery fabric may do the trick. I do wonder how much the embedded fabric deteriorates, as it is encased in dense portland cement, much like the steel they use. You could consider a sealer, one that is clear. I know it will probably fail after a while but that’s ok, can be recoated. I am hoping to test a sealer made of sodium acetate (vinegar and baking soda) I also like the idea of beeswax but have not tested that. Another thought is adding an acrylic binder. The Rapidset Cementall is so dense and fortified that I find it stays quite dry. We aren’t as wet but we get a wide range of temps! The winter has had no effect… Happy making!
Barb!!! He is Wonderful!!! You are so creative and imaginative!!! I am so in love with your gang of spooks😍!! May you always continue to outdo yourself👏👏👏
Haha! Yes, more likely I ‘overdo’ myself! I have an overactive imagination; wish I had a few more hours in the day! The difficult part is deciding which to make! Concrete on!
I am responding with a big smile on my face and so much joy!
These are absolutely amazing…and they look so fun to make…my
inner child is jumping up and down…
Gratitude for the sheer joy of creation and messy sculpture!
Oh, I must have an inner child who loves to get ‘mud’ between my fingers! But now I feel like an adult since my job is to share! Haha! Let’s all embrace our inner child and have some good honest mucky fun! That’s Halloween!
Beautiful job. I love following you because of your talent. You go girl. Shirley
Hi Barb,
I enjoy looking at your creations. I have a question. Do you use pure concrete, or the one with sand in it. I was thinking about making a globe for my first one.
Thanks nina
I use a few different mixes that are commercially available. Not all mixes will behave the same so make sure to see which mix I use for the specific project (each post). The Scarecrow is just portland cement with water. This post also helps. Happy concreting…
Wow how awesome
Hey, there. Kind of a side-step, but I have a question about the rope. If I used a thick rope (like as thick as a baseball bat) and coated it with cement, do you think that would be strong and durable enough to use for garden edging?
I think that would be problematic since there may be small parts that let moisture into the absorbent material (the rope). Freezing would then make it break apart. I’ve seen solid edging that is poured along garden edges and they seem to crack after a while too, not sure why…
Super cute! I’ll have to try these!
Have fun, once you see how versatile concrete draping is there’s so many options!