My Eco Printing Tips & Tricks
I completely understand! I get so many email questions about Eco printing all the time! I really do know how it is; as I had many of the same questions when I first started. Let me help you out a bit with my Eco Printing tips & Tricks.

I know how you may feel; you see some amazing Eco Print and think it’s really just that simple! ‘Roll up some fabric and leaves and steam (or boil) and you get an amazing print, right? Well maybe, but probably not.

I went through quite a few early attempts and with each would learn something. Some of my first prints looked like I just drove over them with my car; dirty blotches. But I was determined to figure it all out; and I would not even attest that I have, but I now have some (yes some, no one does get all) control on the results.
You have to start somewhere:
Many who have figured it out with their experimentation are not that happy to just give away the secret recipes, hence there are quite a few expensive workshops. Myself; well, that stubborn streak in me sent me on a mission.

Finally some prints:
When I look back at my first true prints I chuckle now; they were exciting at the time but I see how I have progressed in these years of making a bundle on a wood dowel. They were very basic and heavy on the use of iron.
I had started to learn that preparing the fabric is so important! Do make sure the fabric is super clean by scouring well. Also, mordanting according to what fibre you are using makes all the difference. Eco printing on cotton fabric and other cellulose fibres are quite a challenge. Soy milk dips and drying make the cellulose fibre become somewhat ‘protein-like’. As of late I have have been using homemade Aluminum Acetate with quite good results as with the Maple Leaves.

It’s how we roll:
Even with perfectly prepared fabric things can go awry. How it is bundled can also affect the outcome of the prints. This is a contact type of ‘mark making’ so it has to be tight and flat. I dry my leaves to store for later use so they are quite flat (rehydrate before use).
Another issue about bundling is ‘ghosting’ which happens when the prints travel through the layers of the fabric. It’s all about what you prefer but I like clear prints so I use a barrier layer. I use a plastic barrier made from drop sheets and reuse many many times. Paper or other fabric can also be used and then have another purpose afterward.

If you look closely above you will see the lines across the maple leaf. The string wrapping was not dense enough and this translated into the striping across the print.

Making sure the bundles are tied really tight is important. Stay tuned (post coming soon) for my unique innovative method for tight tying without the cut fingers.

‘Why is my print so blurry’? The amount of wetness is also a possible problem in Eco Printing. If there is a lot of water it can flow and leak through causing blurs. I suggest that you wring as best as possible and also don’t submerge the bundle in a water bath to simmer. Some fabrics like thick wool have added challenges as the amount of contact is less due to fibre size and may need extra moisture. That is why tests should be done.
Perfect recipes are not quite easy in this art form as the variables are so great.
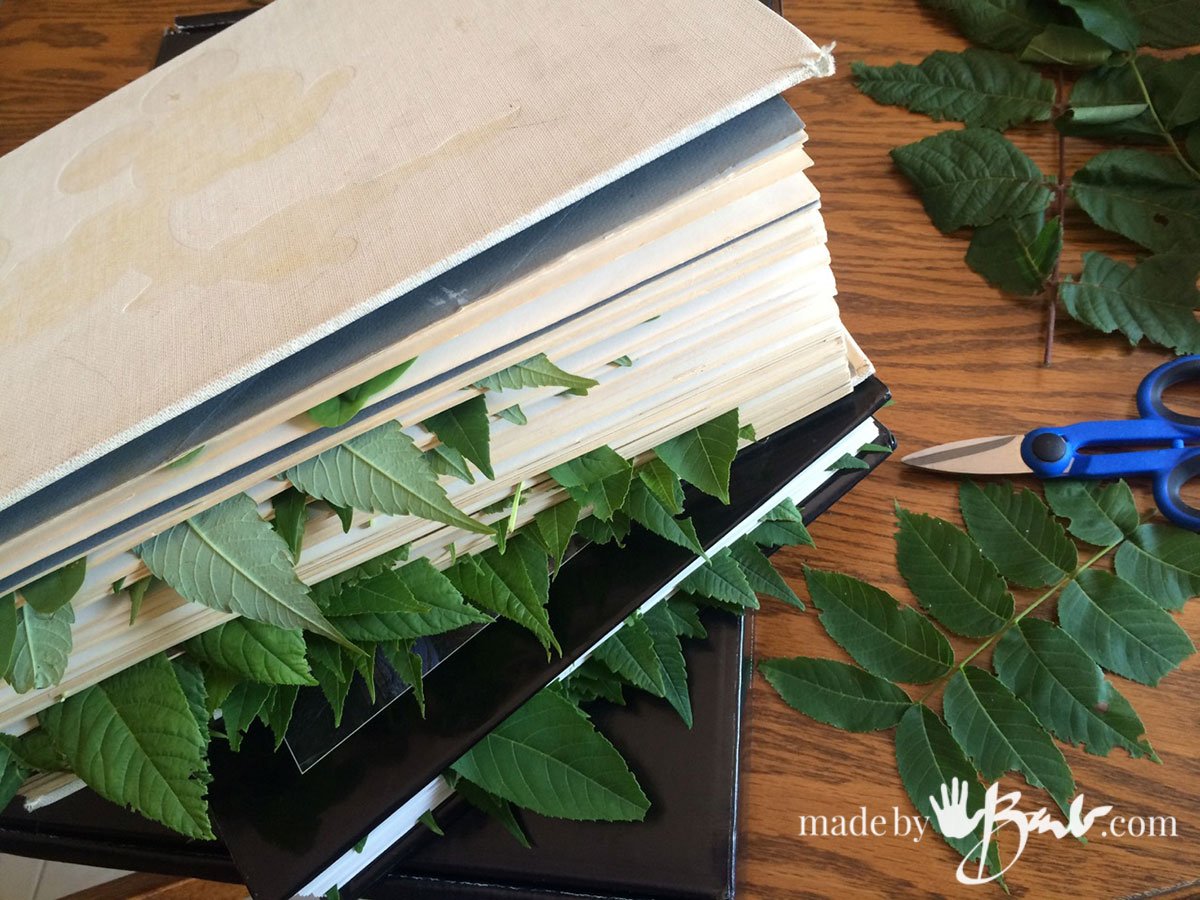
Drying & Storing leaves:
I found out the hard way that using books to store leaves is not a good idea. The uneven pressure and tight quarters makes for mold growing when attempting to dry the leaves. Too heavy weight on the stacks will not allow air to pass and dry the leaves. I now have a better system to prepare leaves for storing.

Which Side is best?
When placing the Leaves to Eco Print there is also the question about which side to use. The top side is usually a brighter colour but that does not mean that it will give that colour print. The cells on the bottom vein side of the leaf have thinner walls so they print easier. However this may be one way to achieve the type of print you prefer so it’s not a rule…

All are not Equal:
Don’t be fooled by fancy colours or shapes; not all leaves print well. It is not the colour on the leaf but the tannin that it holds. Every country has it’s best ones and more are discovered by testing all the time.

But there are still ways to use the lesser performers in a resist method. In this linen piece of fabric the ‘resist’ process uses the plant materials to create such amazing shapes.

I love the many maples species available as well as rose leaves, sumac, Weigela, some oak leaves, liquidambars, plum, black walnut, blackberry leaves, not to mention the wonderful eucalyptus leaves available to some.

Take note how colours do not always print as the colours that you see. There are ways to have brighter colours but rarely the exact brilliant colours seen before heat processing.

Protein Fibres print well:
It’s inexpensive to test on old cotton sheets but lovely silk fabrics print & take up dyes so easily. How exciting is it when the bundle gives you the hint of great things to come?! ‘But don’t despair when not every print is great; that makes the great ones more special!

Wool is also a protein fibre and also loves to accept the tannic prints. Wool does not hold moisture well so it brings it’s own challenges but it’s worth it!

Oh, the Iron Question:
Iron is one of the simplest mordants used to achieve prints. It is also a modifier that can even be applied after printing.
When I first started Eco Printing I thought it was great that I could just make my own rusty iron water to aid in the printing. It is true but sometimes I would not know exactly how strong it was or what other metals were in it.
I now use fresh iron water (rust water) solution that I make with Iron Sulphate. Do I have an exact recipe for the strength? ‘Usually no, as I like to vary it and sometimes take an artistic risk to see what might happen. It’s art and I don’t measure my colours when I paint either. But it may be a good idea to keep notes so that you can repeat if magic happens!
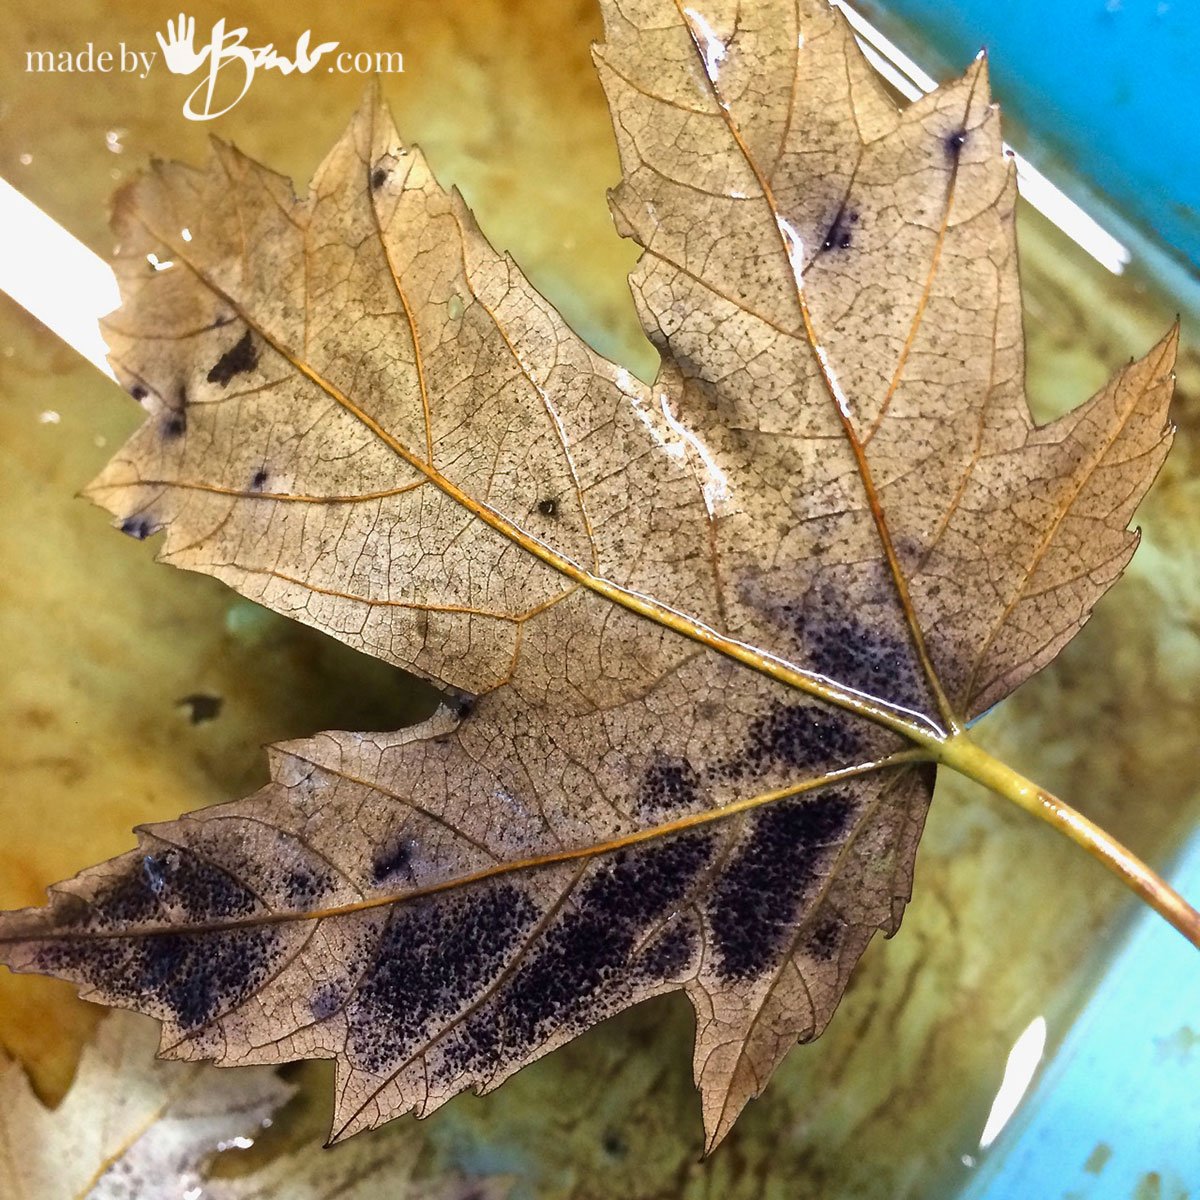
Look at this leaf (above)! That dark marking is the reaction of the natural tannins and the iron solution; the basics of eco printing. This leaf was left in the iron water for a long time.

Why Are my prints so dark?
Yes, I love what iron brings to the art form most of the time! It’s been an important player in the history of dyeing and pigments but it can also be frustrating. Here the prints are quite dark and dulled due to an overuse of iron. Thinner and lighter fabrics need less as concentration is calculated to the WOF (weight of dry fibre).
Where does this colour come from?
When you see some amazing colour in Eco Printing it is often from combining with a natural dye. Madder Root, Cochineal and Logwood all bring amazing colours and effects to the table. Other ‘helpers’ such as tannins can come in the forms of teas, such as Myrobalan and Pomegranate.

Look at all the amazing combinations of colours! Even indigo can be brought into the mix before or after and eco printing round.

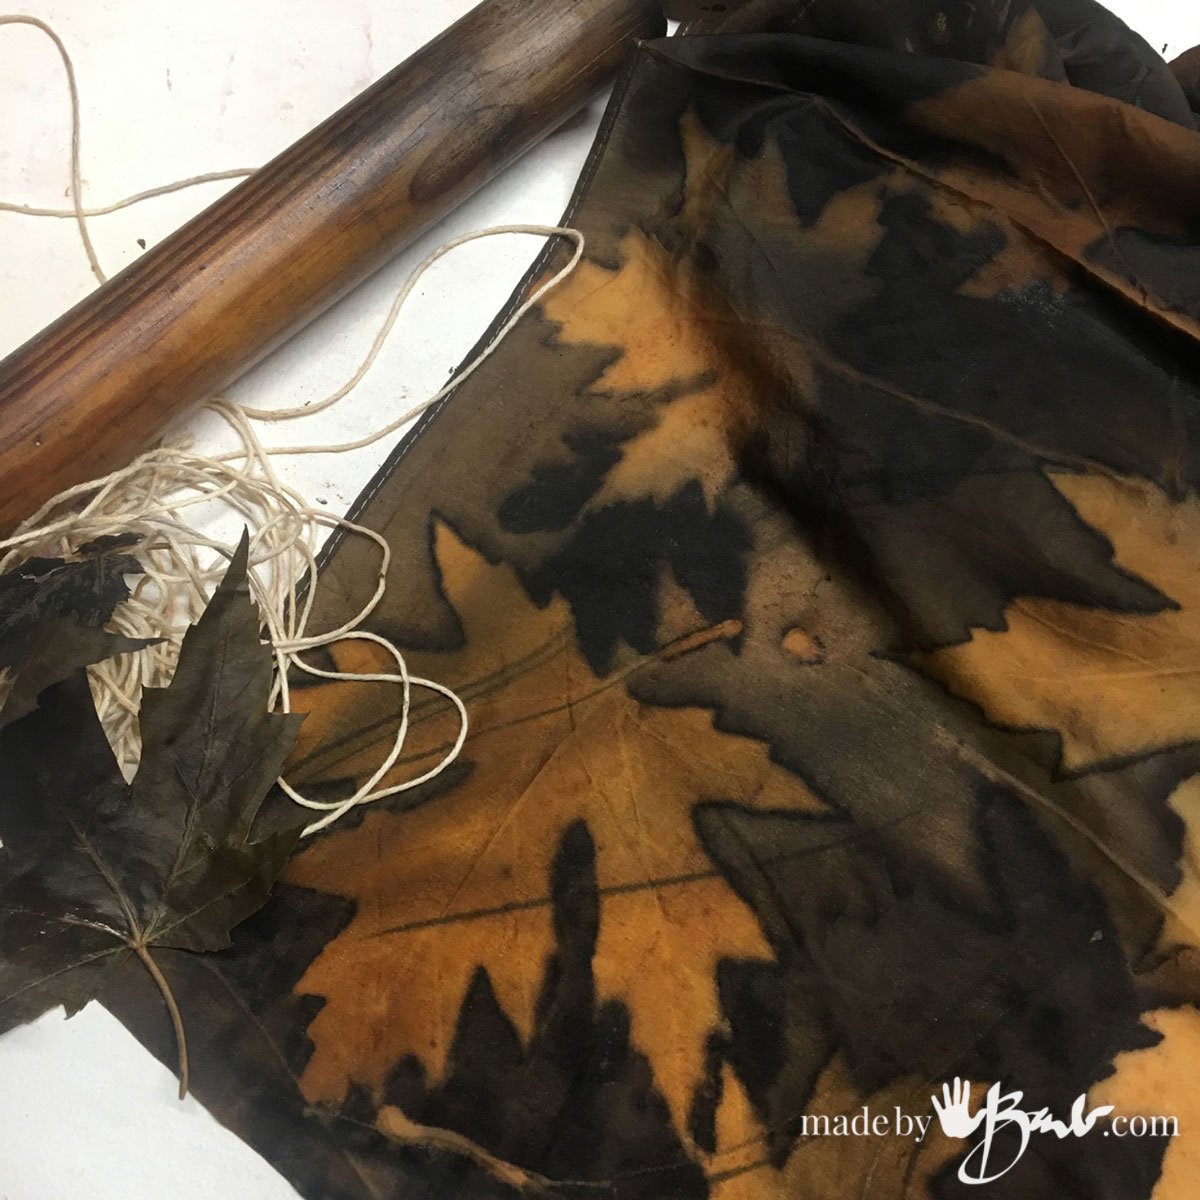
Some great Byproducts:
I’ll admit that my favourite method is usually with the use of the iron blanket, and it gives some great prints on the iron blankets as well. These can used for various purposes!

It’s a lot of Science:
I won’t even pretend that I am a science-pro but I am a good observer! Eco printing is a testament to reactions of PH levels. Many colours from natural dyes are so sensitive to acids that amazing magical things happen! What was all one bright pink is now many colours of the rainbow! How wonderful can nature be?!

Can we really anticipate exactly what result we will get?! I think not! If we could then it would not be as interesting or give us the drive to take on the challenge.

Go Ahead and get your fingers dirty!
Yup, fingers of all colours! These are ‘cochineal’ pink since we are a ‘protein fibre’! Other times mine are dark from iron staining. But don’t worry a soak in some lemon juice (or citric acid) will brighten and clean them up!
You’ll collect a few buckets (for soaking, mordanting, washing and dyeing) and be seen bent over picking up leaves quite often!
Barb, I really have enjoyed your posts about dyeing. I am wondering how to dye an old sweater.
Do you know the content? What is it made of? If it’s wool you could simply print with leaves like this blanket was printed. If you are new to this maybe you’d like to do some testing first though… Practice on some up-cycle fabric to see what leaves work best for you as they do not work the same.
Thank you so much for these posts. I have been eco printing for about 8 months now and your posts have been helpful. I agree that eco printing may look simple. It is not. It takes soooooo much experimenting. I have been also studying several online classes and everyone does things differently. It’s important to find what works for you. I like wrapping my bundles in ace bandages. I hated using string. Also, some things work and some things don’t. I have been currently over dying some of my failed acid dyed scarves from the winter. I have been using madder and logwood over my acid blanket dyed scarves and getting some beautiful layered results.
You are so right! It’s for that reason I do not do very structured classes or courses as you may get different results from any of the variables of leaves, water, mordant fabric, temperature etc… I overdyed some of mine as well and got really interesting results from what was lying hidden in the prior prints. I guess my favourite description is ‘magic’. ‘And that rerally was what keeps me quite determined whereas painting is just so very predictable. I am so glad you are taking it in your own direction as too often people are trying to duplicate something seen without much experimentation. Happy printing!