The Best Way to Paint Concrete

After making those fabulous concrete projects they deserve some special finishing! You my friends deserve to know my secrets for the Best Way to Paint Concrete.

What to do with the concrete:
After I make my diy bowls or bags or even any of the other concrete projects I need to decide how to finish them. I like concrete crafts, and I like ‘naked’ concrete – but sometimes I fancy a bit of colour! I HATE when I see huge thick layers of solid colour on concrete. It makes it look like badly cast plastic. The whole charm of concrete is the texture and the lovely greys of this material made with natural elements. I often get asked about ‘sealing concrete’ but this is post is more about the aesthetic way to add colour.
These ways of finishing with paint can be used on indoor or outdoor concrete. I use my good quality acrylic paints as I notice they stand up to use as much as any specialty type of acrylic craft paints. I try to avoid the super cheap paints as you know that you only get what you pay for. Acrylic paint has a flexibility once cured that helps it cling to the surface through expansion and contraction due to temperature. There are also outdoor acrylic paints if you prefer. I painted some rocks with my kids eons (15 years?) ago and they are still fine, as long as they stay away from being in water.
If you would like to keep the painting to a minimum there is also the option to add a concrete pigment to the concrete mix ( like Quikcrete Charcoal pigment powder ). Masonry supply store do sell specific pigments for concrete or a bit of acrylic latex paint can be added to the cement.
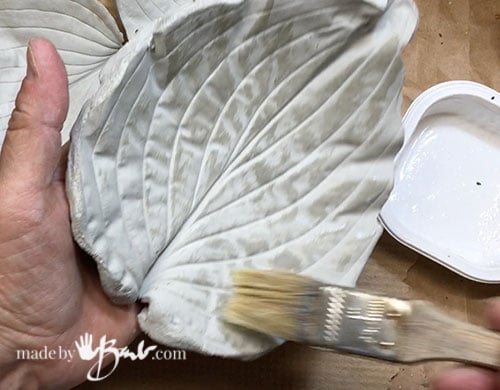
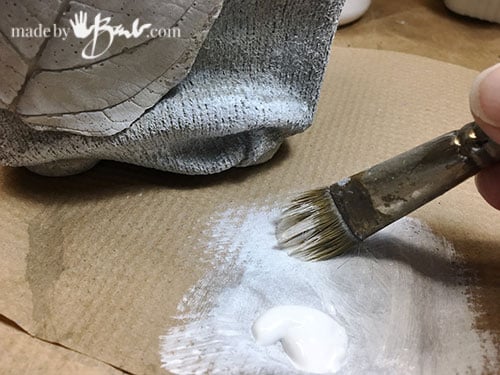
Step # 1 – Thin Seal
To keep the concrete from being too absorbent of the next layer I give it a sparse layer of Matt Medium. Craft stores and art supply carry a wide variety of clear mediums. This will not give colour but will allow easier wiping off of the antiquing stage. Since concrete is very absorbent it would soak up the paint and not give the desired effect. Thin the Matt Medium with about 30% water and only brush across the high surfaces; no need to get it into every crevice. Keep it a thin layer. Let dry, as it will quite quickly.
Generally I try to avoid the use of sprays and spray paint. Some enamel paints are very brittel and therefore do not expand/contract with changes in temperature so they can flake off. The use of an airbrush does give some more control and ability to mix your own colours.

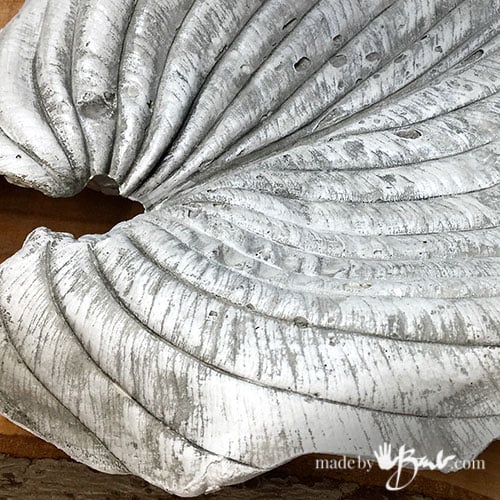
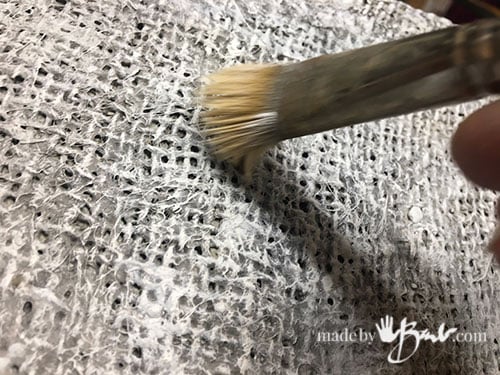
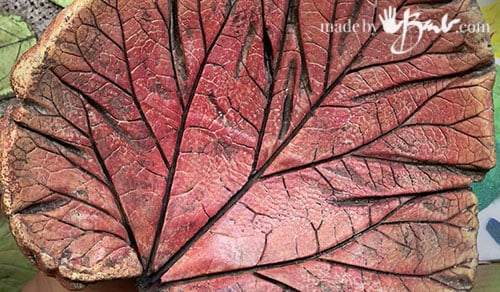
Step # 2 – Thin Antiquing Wash
Mix a watery dark paint (black or what ever colour you like) with about 50% water and 50% matt medium. Using a non-precious stiff paint brush apply it all over the concrete piece quickly. Make sure to get it into the crevices, hence the stiff brush. This stain method will bring out so much of the details! It can really be any colour you desire. I do find that red pigments can fade a bit faster than others outside though.

Step # 3 – Wipe off:
With a soft rag (like an old towel or similar) or damp sponge wipe off the ‘antiquing wash’ paint so that it remains in the crevices. If it has dried a bit you can usually dampen the rag to help remove it.
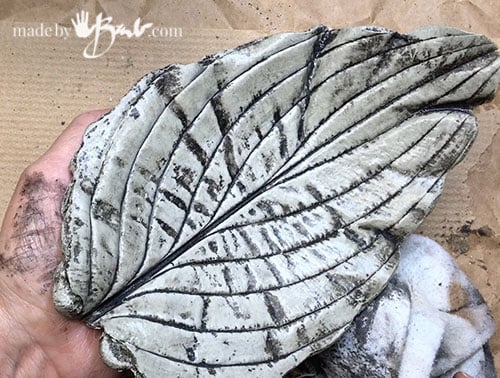
It is amazing how the details now come to life! Many years ago I used to paint greenware beer steins in a similar way to get the definition of the relief work on the surface. This is not rocket science but well-guarded artists secrets! To keep hands clean wear gloves.

There’s no limit to how you can vary this technique. The beauty is that you can keep the almost ‘naked’ look of the concrete without ‘globs’ of thick paint. Any outdoor painted concrete (often called cement by mistake) will eventually fail… yup, sorry to burst your bubble but that’s how the driveway sealer guys stay in business.
Once a thickly painted concrete would start to peel it has sections that didn’t; that’s the problem. This technique is so sparse that it may not be that evident that it is failing if/when it does = win. It also somewhat mimics the natural way concrete will ‘patina’.

So many Options:
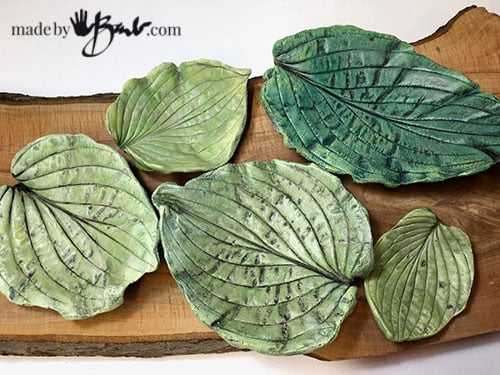
Amazing textures are brought out with this antiquing wash that were barely even visible before. You can use lighter contrasts if you like as well. When using nature’s artifacts as molds it is truly amazing what textures are transferred.
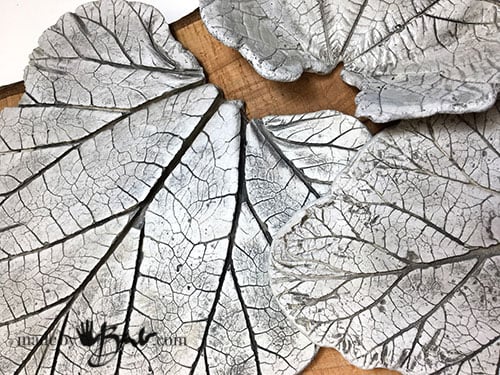
This technique works especially well for leaves and anything textured like the Draped Concrete Projects and also the Botanical Relief Casting
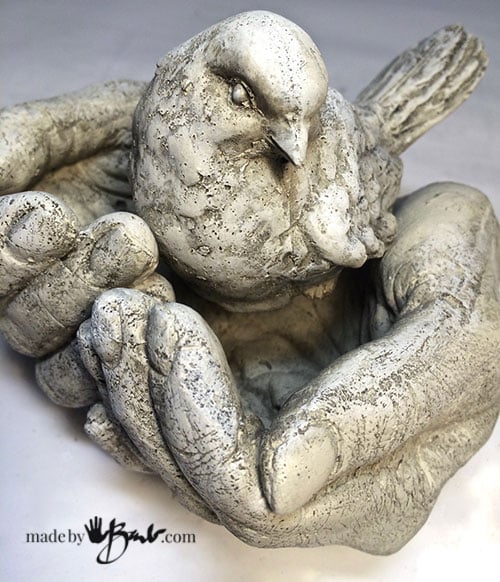
But it also works on anything else like my life-cast hands.
I can not imagine these painted in a solid colour at all! I cringe when I see thick bright colours painted onto concrete in the idea that it protects. Concrete is porous so that means there is moisture passing in and out. If something; like paint gets in the way it gets pushed off. If there are are ways for it to breath then it will more likely stay.

Just like nature is endless beauty to behold, so are these permanent captures of it!
Optional Step # 4 – Dry-Brush Accenting:
Even after the antiquing wash you may want to add some more accenting to bring out even more details or add a colour accent.
To dry-brush (incidently one of my MOST FAVOURITE paint techniques) you take a dry soft type brush and only add a tiny bit of paint. Work most of it off on a paper towel and then run it across the surface. You should not see brush strokes, only subtle accents.
Scrub around and it will slightly add the accent only on the highest surfaces. It worked so great for the burlap bowls & Burlap bags. Now you can see every strand of the burlap.

I especially love to add the accent using a metallic paint (like a bronze, silver, gold or copper) It is like magic as it looks like it’s cast in metal! It only takes a drop or 2 for such amazing effect.
Combining techniques:
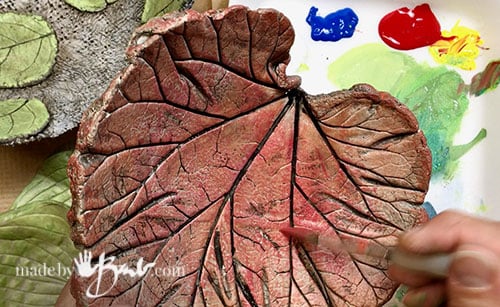
So why not antique it, add some varied dry brushing with different colours (like fall leaves) and some gold around the edges. The texture is captured by the dark antique wash of step # 2.

I love how these bowls also have the leaf on both top and bottom, so they deserve the best way to paint concrete.
You can never get that amount of detail by applying thick coats of paint. And this method is so fast!
Change colours to mimic nature. Don’t use colours straight from the tube, come on, mix some unique colours. You know this is the best way to paint concrete! Look outside for inspiration.

Do I need to use a Concrete sealer?
That’s a loaded question! If it makes you feel much better to know the whole piece is encased in a layer of clear matt medium; sure go ahead. But then do not use outside. I like to let the outside concrete have ability to ‘breathe’ so a not complete layer is better. That’s my theory from observation of all the concrete I leave outside in the winter and year-round. The one big no-no is to let anything that can hold water freeze! Bam, it will crack! Even metal buckets will push out the bottom from freezing! (ask me how I know…) As for the inside of planters, I’m still working on some type of sealer for that…
So go make some concrete projects! Before you know it… you will have a lot of concrete. ‘And many choices of colour! Happy making!

If you would like to colour concrete without paints there are also ways to use Homemade Acid stain.
So go grab some concrete/cement mix and make you own concrete vases, vessels, bowls or planters…
love these cement leaves ,i made these many years ago ,I think its time to make some more for gifts . Thanks for the wake up call. …JOANNE
Did you make them double-sided? These have both good sides! And this mix is great for details! Go fo it!
How did you make the leaves double sided?
See this post It’s pretty easy but make sure to use an appropriate mix. Have fun!
Hi, Barb.
Your articles are so informative, and I am grateful for your willingness to share your knowledge and artistic experiences. You offer a unique creative venue that I am looking forward to dipping into this summer, after completing a myriad of gardening projects. Soon.
Cheers,
Carolyn
Yes, I have a long list in my mind! If only there were more hours in a day!
Barb,
I enjoy reading your postings so much!!❤️They are so concise and well thought out like you can almost see me as I go to make an error and it is at this point you note the important tip to the project. In my lifetime I will never accomplish all the crafty things but you sure push me to try. With my heartfelt thanks❤️❤️
Half the battle of teaching is to inspire! Glad I have! Too many have deemed themselves incapable!
You do beautiful work on concrete. I have some angelic busts of just the head that I would like to try to make look like bronze. Wish me luck with it.
Thanks for the information. I suppose if it doesn’t turnout I could just paint over it.
You’ll be amazed at the metallic dry-brushing! Prob a dark brownish wash will give the depth!
Hi, Barb! I am absolutely in love with your work and your blog. I am a long term crafter and started experimenting with concrete about a year ago.
I picked quite a difficult project which is a birdbath, painted and sealed with something that is non-toxic and wouldn’t harm the wildlife. My first error was to paint it with high coverage, but I thought sealing it will protect the paint. Finding something to seal it was a challenge on its own. I ended up using epoxy resin, the same type as for sealing worktops and making food safe resin items. Have you used epoxy resin for sealing concrete? Yes, it sits in the sun and constantly has water in, so quite an extreme use case…
Any thoughts? Aggie
That’s interesting as I have used resin quite a bit. I know most (prob all) will yellow in the sun. It prob has a pretty good length of time. I wonder if they use something like that for concrete pools, or it is too expensive. As even the pools seem to need redoing. My latest test in my birdbath is just the high density Rapidset Cementall. I see the water does not penetrate that mix so its been good so far. Thanks for the sharing
Do you let the concrete cure before painting? If so how long? Thanks for the post!
If using the rapidset cementall it cures really fast and feels dry quickly. Also, acrylic paint does still have the ability to ‘breathe’. If using other kinds you can usually ‘feel’ if the concrete is still damp; then wait.
I have been making cement leaves for some time. I choose to use alcohol ink to color mine but wonder if a sealer is needed for when they are outside. I can create a combination of color that melds together for a natural look. I would love to share a picture with you and get your comments and advice.
I can well imagine how lovely they look. You can reply to my email newsletter with a picture. I do worry that the sun will fade them. A sealer would help protect agains the elements like water but even some paints fade in colour. Since they are flat on the ground the moisture comings through the ground may be an issue!
I am very happy with the beautiful workI am very happy with the beautiful work , and I am very proud to be able to enter your link. Thank You
Good luck, take a look around!
You are truly the bomb. Thank you for sharing your hard earned experiences. I read and reread them regularly and have recreated some of your examples with great results. Thank you so much!
Oh wow! Thanks! I am so glad to hear that!