How to Colour Concrete with Homemade Acid Stain
As I delve deeper into dyeing and colour I’m seeing some commonalities across the different medias. These are my first amazing colours on concrete that I’ve created using some easily found ingredients. With some safety precautions you can also learn how to colour concrete with Homemade Acid Stain.

What is Acid stain for Concrete?
Acid stain in respect to concrete is a translucent, penetrating stain that slightly etches and permanently changes the colour of concrete. This is achieved by chemically reacting with the lime in the concrete. That is why I like it; as acid stain is not a ‘paint’ that only lies on the surface, it becomes part of the surface. The concrete does need to not be sealed free of stains. Any grease or grime will inhibit the absorption of the stain.

For my testing I am using a collection of castings that have been made with a variety of concrete mixes (Rapidset Cementall, Quikrete Fastset, Quikrete & Sandtopping mix.)

Etching the Concrete before staining:
Safety: Please stay safe when working with any strong acid like MURIATIC ACID! Muriatic acid will cause burns to the skin and eyes, and its vapours can even damage your respiratory tract. Make sure to cover all exposed skin and eyes, wear acid-resistant gloves, and use a respirator and/or work in a well-ventilated area
There seems to be conflicting information about whether the concrete needs to be etched with an acid before staining. The theory is that the acid etching depletes the lime content in the concrete, which is what the minerals (iron, copper, etc) in the acid stain react with to develop colour. In my testing I etched sections of a piece of concrete to see the difference. Since new cured concrete may not have any debris yet the acid stain can be applied without etching first. If the concrete is very slick the etching will roughen the surface. Any exposed aggregate will not take on the stain.

What Supplies are needed?
(Safety equipment: Gloves, goggles, mask, and protective clothing)
‘If’ you plan to etch the concrete first (decide carefully) you will need muriatic acid (hydrochloric acid). Under proper safety conditions dilute the the acid by adding 1 part to 10 parts water (do not pour water into acid). After applying the muriatic solution to the concrete you will see the bubbling as the acid reacts with the lime, dissolving it slightly.
After the etching it is recommended to neutralize the concrete from further damage by applying a solution of baking soda and water (1/2 cup baking soda in a quart of water). The problem arises when the neutralizing does not reach the depth of the acid in the concrete.
After all this consideration and seeing that the test piece does not show significant differences in the outcome I think I would not bother with the etching step. In my purpose I am using this concrete acid stain to colour my diy projects rather than a concrete floor. I am also using cured clean concrete. There are many commercial cleaners available that can remove debris & dirt without the use of a strong acid.

The Source of Colours:
There are a few minerals that will yield colour for dyes and pigments. For my initial testing I will be using Iron Sulphate & Copper Sulphate. I have already been using iron sulphate in the process of eco printing as a mordant. Copper sulphate is also used as an assist in eco printing fabric mordanting.
As I am more of an artist than chemist I dabbled with some variety in stain recipes, some with more vinegar and some with less. The metal sulphates tend to need the water (sometimes warm) to be able to dissolve.
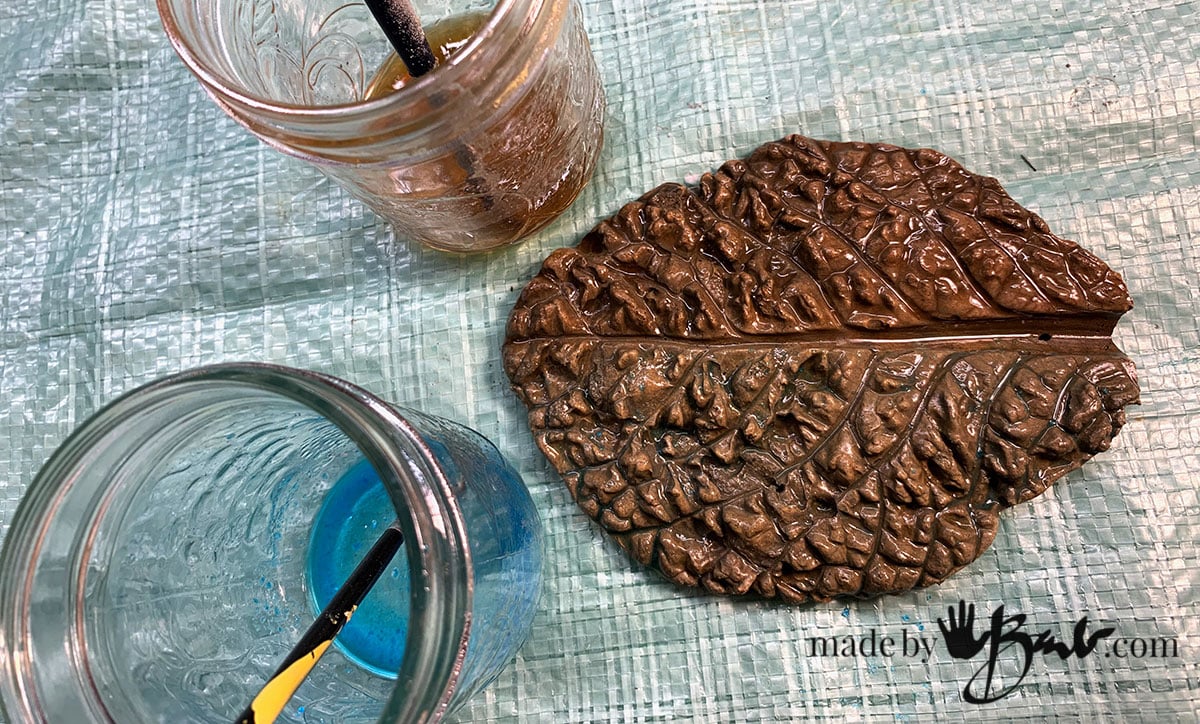
My Acid Stain Recipe: 1 ounce Iron/Copper Sulphate : 10ML vinegar : 50ML water. Variations with more vinegar and also less sulphates also worked.
The Type of Acid in my stain:
Acids come in many forms; muriatic acid (hydrochloric acid) vinegar (acetic acid) & sulphuric acid. Even coffee and teas (black tea) can be acidic. I am using regular 5% (acetic Acid) Vinegar as the acid since I do not want to deal with the fumes of muriatic acid.

The stain will react with the minerals in the concrete, so a smooth, clean surface is essential for optimal results. Make sure whatever you are staining is clean, no grease, dust, especially if it is old concrete.
The Oxidation:
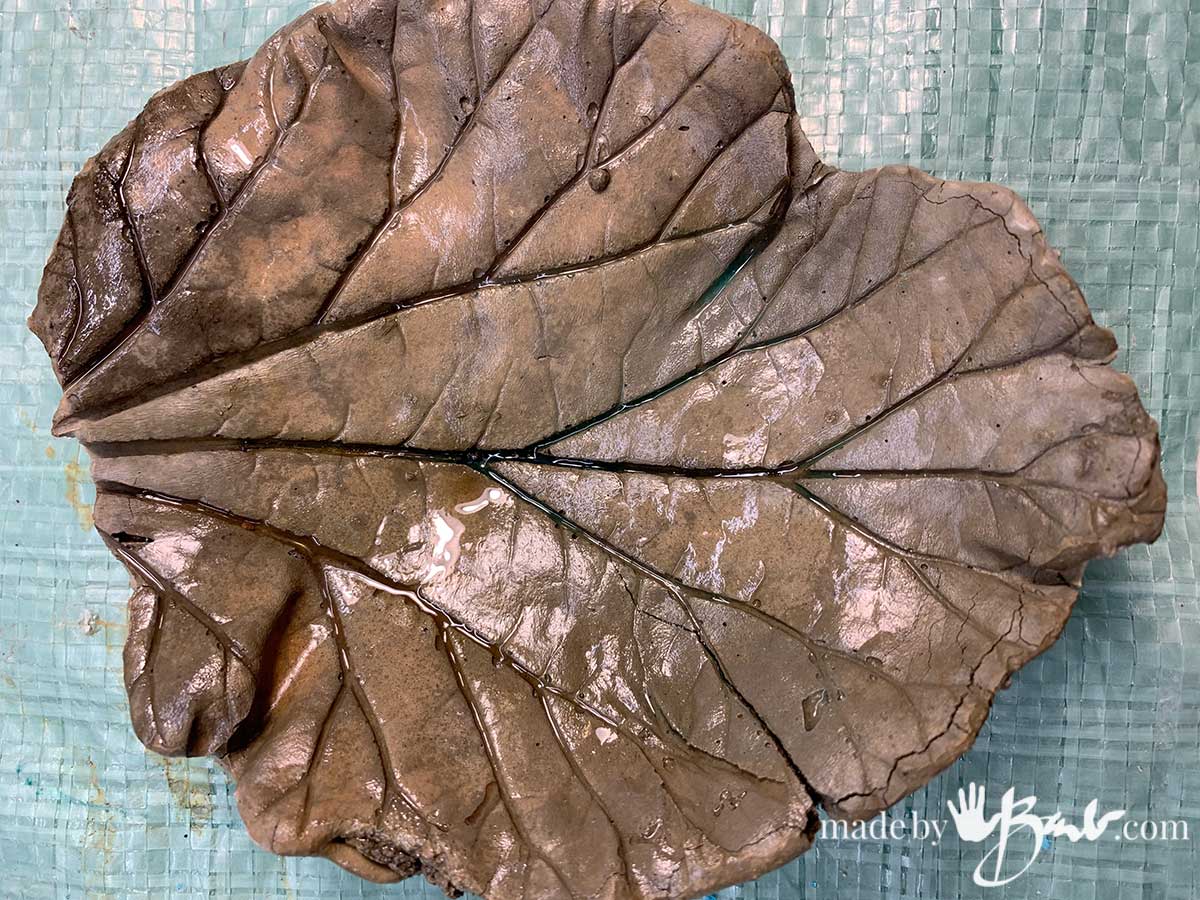
At first when the stain is applied to the concrete it does not show much characteristic colour. It soaks into the concrete and shows quite wet and dark. When applying to large flat surfaces like slab concrete or a floor may require a mop or push broom. Make sure the floor is dust free (shop vac) as well.
The stain may not show much colour at first, but will become more colourful as oxidation happens over hours. Some lightening happens as it dries but sealing will also affect it later on and will darken to a similar strength of colour as when wet. That is why a good test is crucial if exact results are wanted.
How to Apply Acid Stain:
Since this is a stain; it soaks into the surface. Puddles or uneven application can be part of the design and texture of the finished look. Personally I like the uneven organic look of colour variations. A nap roller, pump sprayer, spray bottles, paint roller or even sponges can enhance designs.
I know this all to well when I also think of watercolour painting. Applying the stain in layers, or wet-on-wet technique, multiple layers, even partial sealing can create very artistic results.

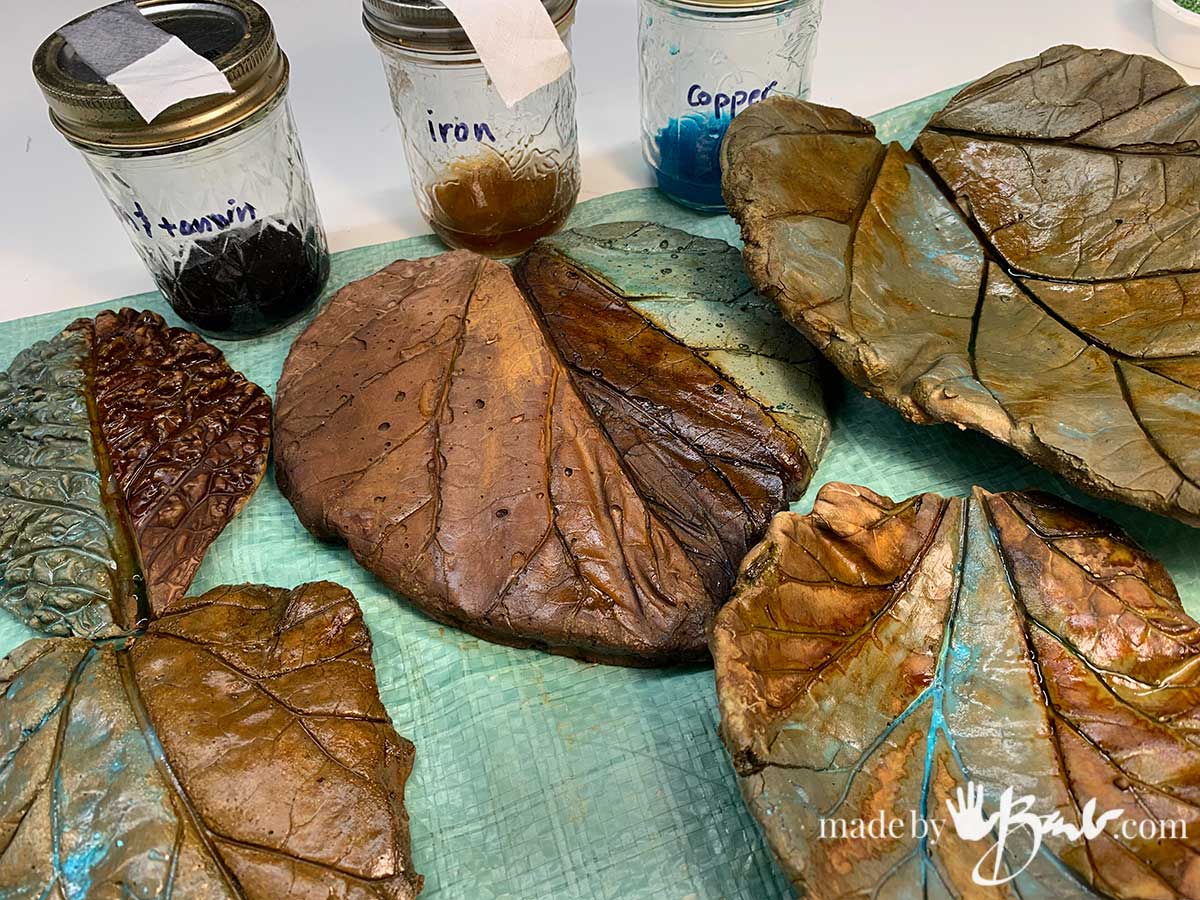
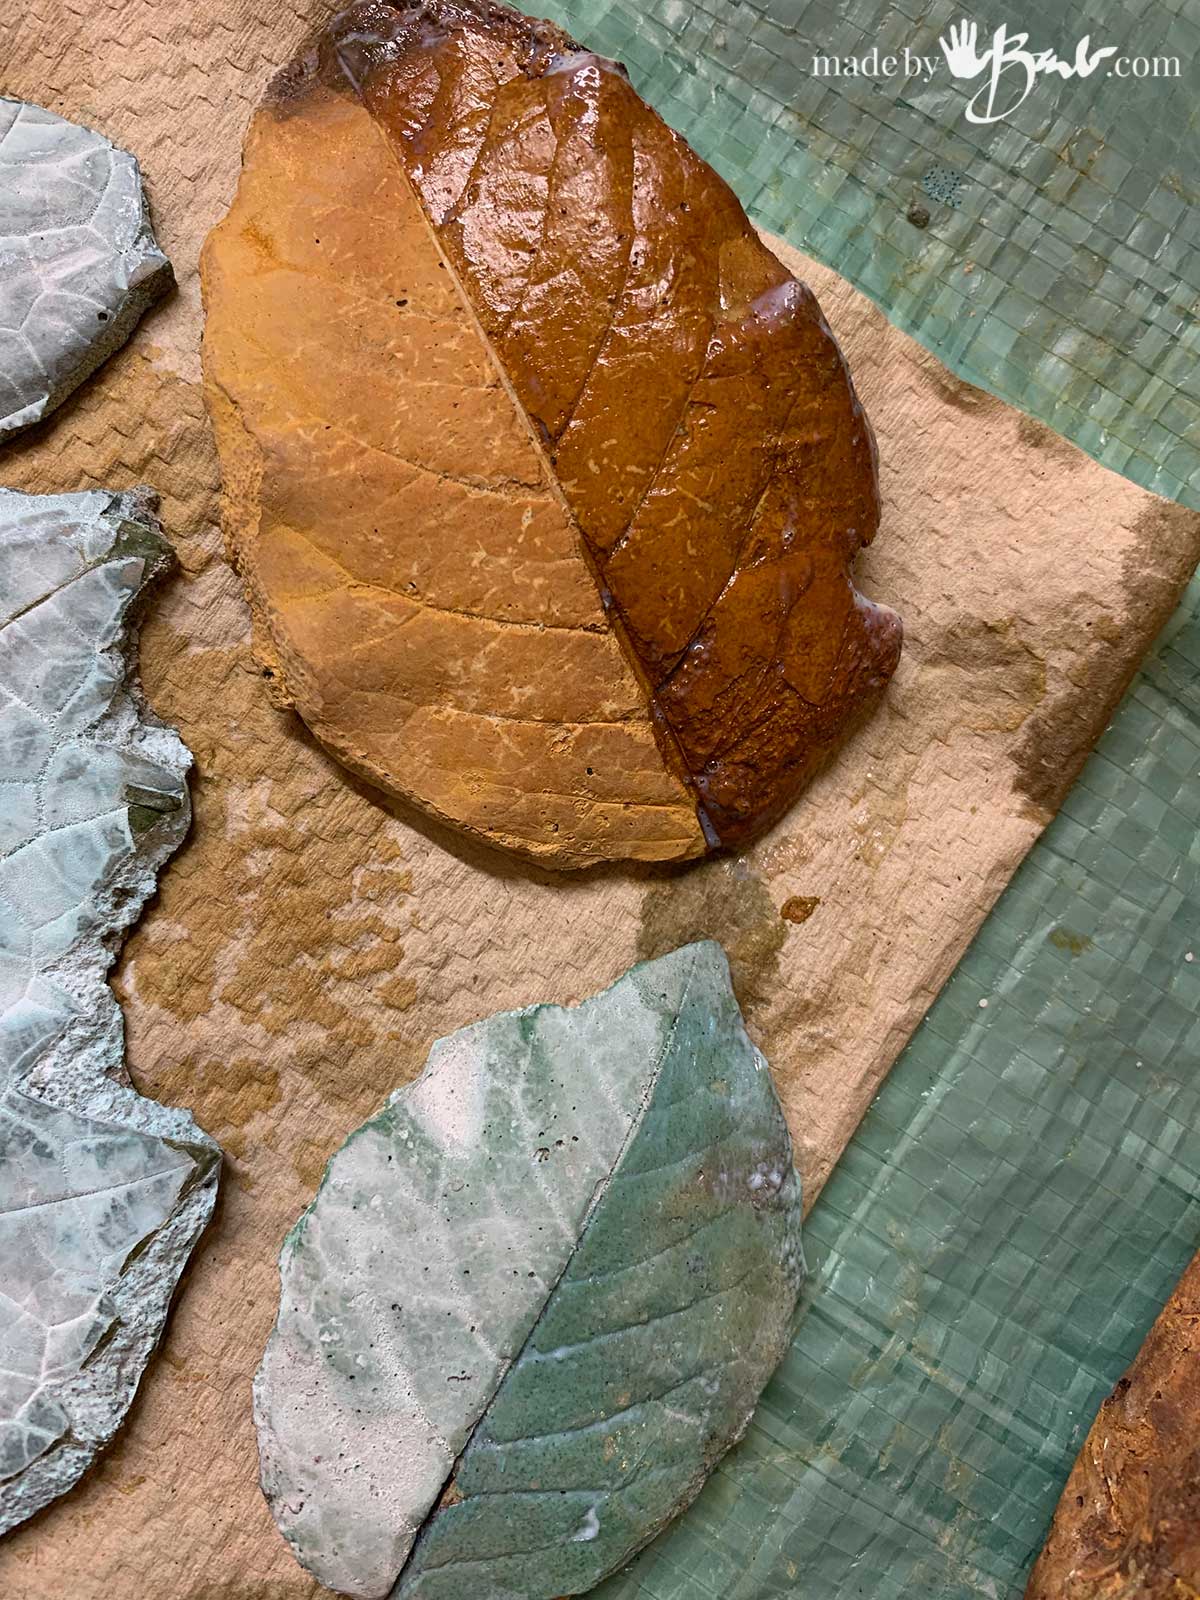
The half iron/copper developed a lovely contrast of teal to rust colours. Since these test pieces are quite textures the divots will also catch a lot of the stain whereas a floor would be more flat.

Making a darker Stain:
In the world of fabric dyeing adding a tannin to react with the metal salt (iron) darkens the colour. Teas and coffee also have tannins that can also darken the stain.

I added a bit of Myrobalan (Harde Powder available in local shops). It instantly made the iron solution a dark greyish purple.

This still has iron in it so it will bring some warm strength of colour to the acid stain concrete. I would rather use natural elements than strange chemicals.

For experimentation each section has a different stain applied. (right to left) Copper, Iron & Tannin, Iron variations.
To make your own iron solution you can also soak some rusty things in a jar of water with some vinegar added (about 2 : 1 water to vinegar). After some time the solution will also absorb the iron. As an Eco Printer I usually have some jar brewing as I also had with the copper (see video)

The colours have not quite developed (oxidized) yet but there are some subtle hints…
Combining the Acid Stains:
Just like when painting art a lot of different application techniques can be used. After a basic coverage of blended blotches of both the copper and iron I let it oxidize and dry. The time needed can vary from a couple hours to overnight. How long it takes depends on the amount of wetness and also the depth of absorption. Not all concrete is the same, as some is grainier than others.
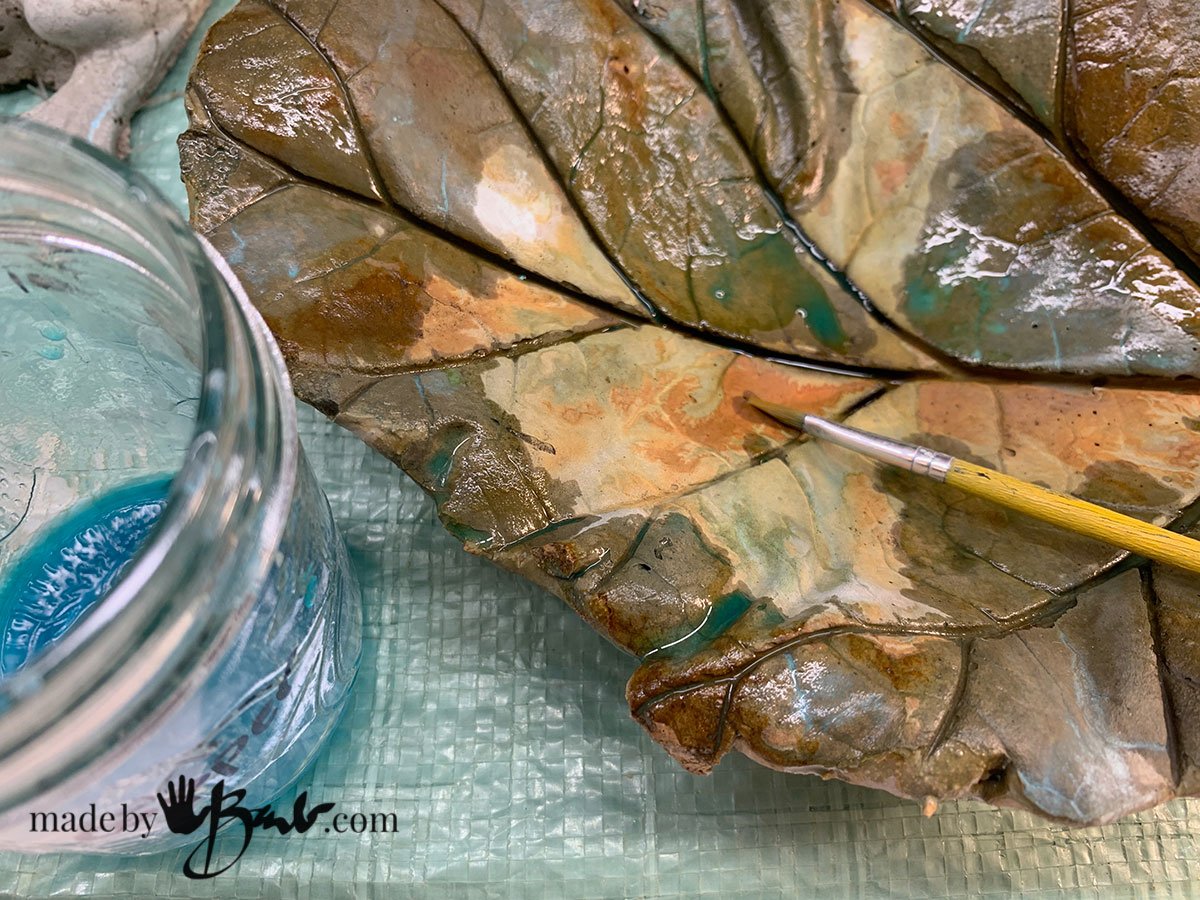
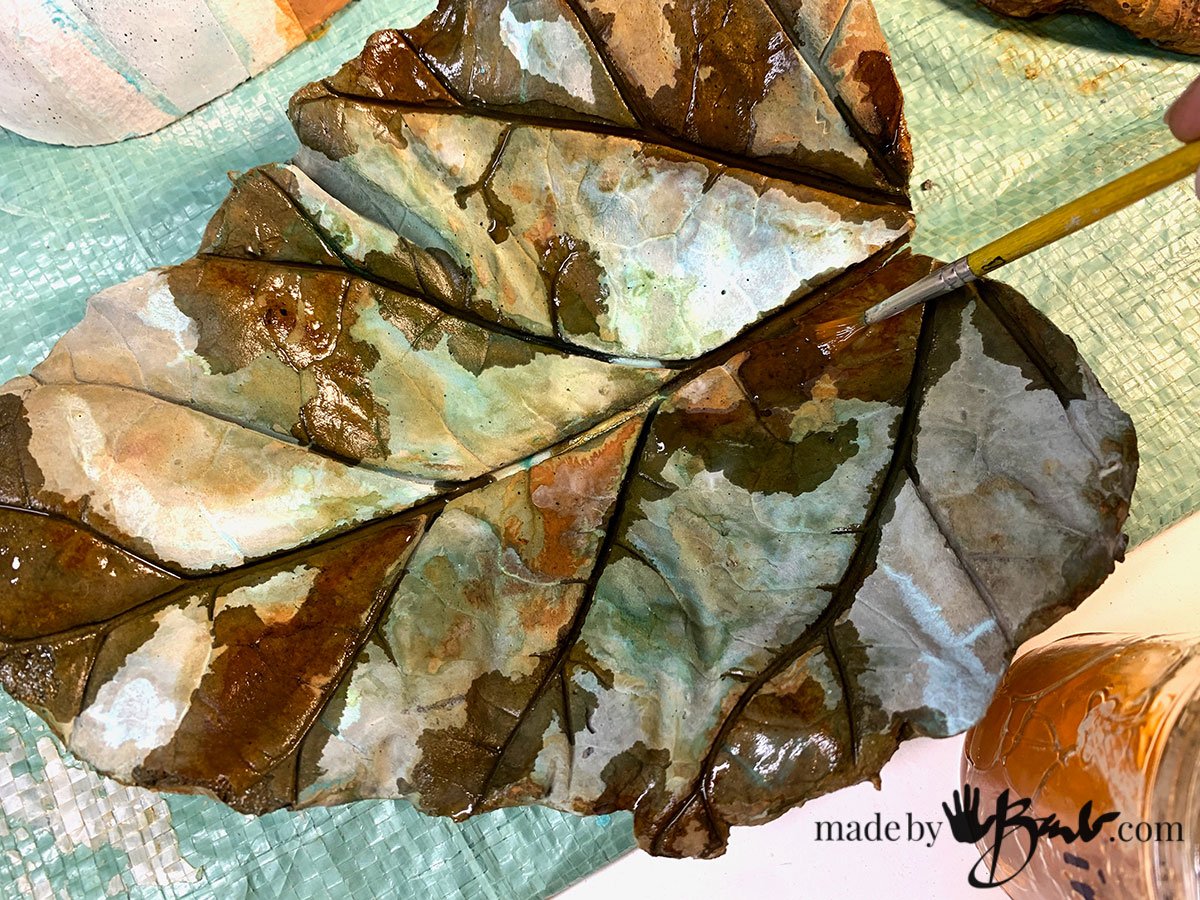
After the lovely first colours another round of concrete stains were applied.

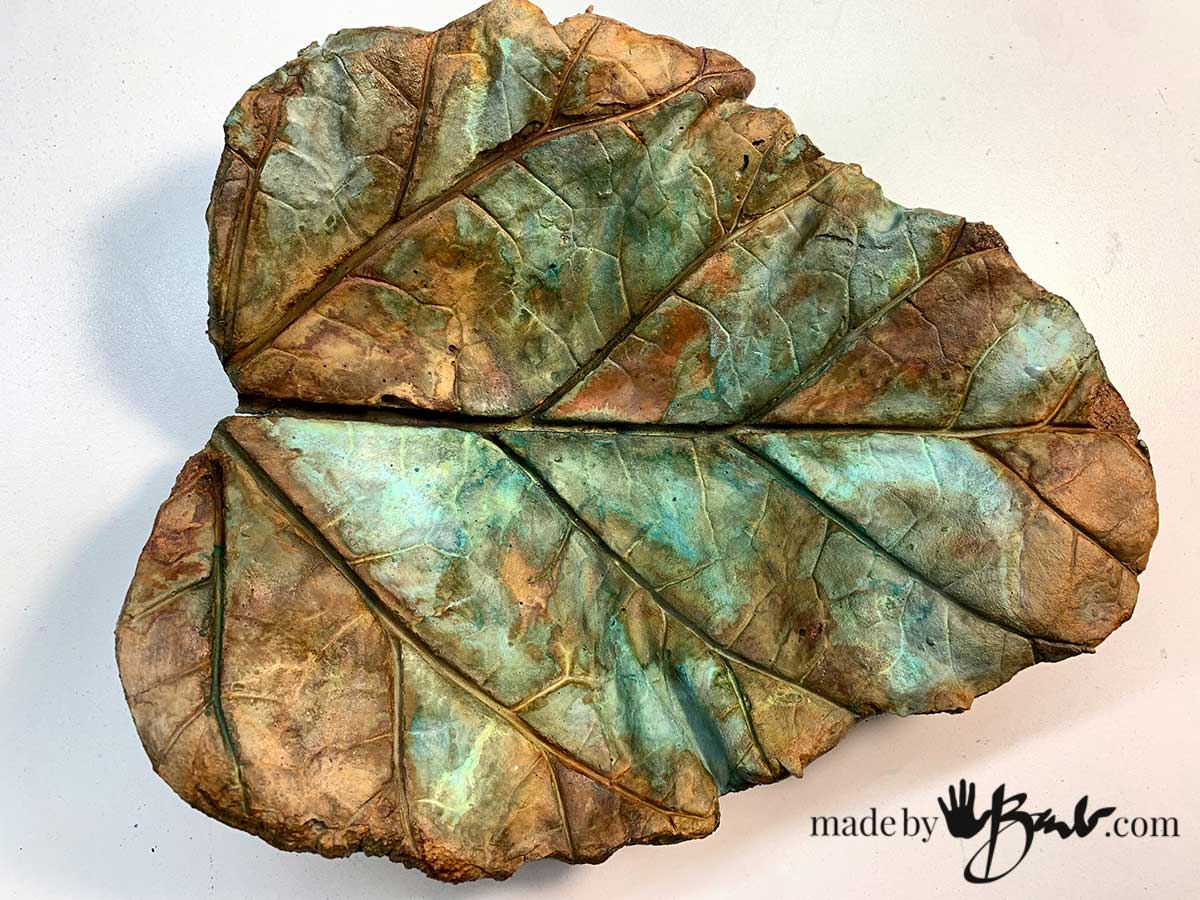
As I brush the stain colours blend and puddle, reminding me of nature’s fall leaves. Wear rubber gloves to protect from absorbing the metal solution through the skin.


How to Colour Concrete with Homemade Acid Stain
Equipment
- Tools for application of stains (brushes, broom, sprayer etc)
- Safety equipment to protect skin, eyes and lungs
- Plastic bucket
Ingredients
- Vinegar
- Iron Sulphate
- Copper Sulphate
- Water
- Concrete Sealer
- Baking Soda
- Optional Tannin (coffee, tea, Myrobalan) to darken stain
Instructions
- Prepare work area and protect anything that may become in contact with stain
- Prepare concrete by cleaning or etching with weak Muriatic Acid solution (1 part Muriatic Acid to 10 Parts Water) . Neutralize the concrete after etching with Baking Soda solution
- Prepare Acid Stain by mixing Iron or Copper Sulphate with water and add vinegar. 1 ounce Iron/Copper Sulphate : 10ML vinegar : 50ML water
- Apply to concrete in desired technique. Apply evenly or dabble for more textured designs.
- Let the stain colours develop.
- Add more stain if desired.
- Neutralize the stained concrete with a solution of baking soda. (8 ounces per 5 gallon bucket)
- Clean and rinse off any residue.
- Let dry completely
- Apply an appropriate concrete sealer for your application.
Such a Beautiful variety of Stain Colors:
Depending on your preferences, more layers can be built up. Be aware that the final colours will be darker and stronger as the sealer is applied.
Considering that these will be tested for longevity, a mottled design will not show wear or fade as much as a flat application. These are weak solutions so layers can be built up as part of the staining process.
Adding special effects like sprinkling sawdust or cereal can add even more fine details to the concrete surfaces.

Finally I am pretty happy with the depth of tones. Subtle colours can be achieved by adding less of the iron or copper sulphates. Perhaps a less saturated colour can be achieved with more of the tannin.
Be patient and let the stains cure and dry.

Neutralizing the Stained Concrete:
Why must I neutralize the concrete? The Acid attacks the lime in the concrete so to stop further damage it is advised to neutralize the the concrete. Concrete is alkaline by nature but the stain is acidic.
I tested my water, the iron stain, and the area before neutralization. As you can see the iron was quite acidic, and the concrete was still acidic after staining. The Baking soda solution (BS) used to neutralize is about 8ounces per 5 gallon bucket. I used about 1 teaspoon in a cup of water; is tests quite alkaline. Before rinsing the neutralizing off it still shows quite alkaline. After rinsing the surface is showing more neutral. I assume that the depth and amount of acid stain used can affect this process in terms of time needed and also how much rinsing is possible. Small pieces can be rinsed more easily than a floor.
I was impressed that it did not look like any pigments were washing off when rinsing, as I thought some excess could only be sitting on the surface. This further reinforces the idea that these stains will last.
Adding the finishing Sealer:
There are many many choices of concrete sealers. I know I tend to avoid the question as I have observed so many failing products over the years. Neighbours seem to be reapplying it and sometimes it does not look any better. Matte finish tends to be less rich than a high gloss finish when it comes to rich colours.
Some of the sealers are water-based, and some are solvent based. Since I am not finishing a floor; only some decorative pieces I am using my Artist quality Gloss medium. This acrylic polymer finish has withstood exterior applications well.

As soon as the finish is applied the colours become rich; wet-look. If the finish is too think, thin with a bit of water so that it can absorb.
After drying the finish has absorbed into the surface, and therefore lost a bit of it’s sheen. My major concern is that the surface does not leave any stain residue on fingers or wash off.

The copper stain has also darkened. It could look like a well aged copper sculpture. Let’s just say that I am very happy with how these results are.

The left side is un-etched concrete, the right is etched with muriatic acid. The shiny sections show the sealed sections. I conclude that the muriatic acid is not needed.

The amount of colour detail is astounding! This homemade acid staining method will work well with my style of nature inspired concrete crafting.
If any ‘cons’ to this would be not being able to completely predict a certain colour without extensive testing. Also, it takes time to wait for colours to develop and also dry, so patience is needed. The cost is quite low however!

‘Cast with nature, stained with natural elements and it blends perfectly with nature… Thank you!
Fascinating Barb!! These results are beautiful, even stunning, and you’ve well-documented them. Thank You. I’ve only used Muriatic Acid to etch copper pieces for jewelry. Hopefully, this Winter I’ll have some time and working space to try some of your Concrete tutorials for future garden art. I really love them all and you’re so generous to share them. Again, Merci! Alysen
Oh, I understand! Time is something we never seem to have enough of; no wonder I feel like I’m in a hurry all the time!
Barb,
Fascinating. Happy m. acid is not needed – so hazardous. Please be careful. We never discover anything new if we don’t think out of the box but experimenting can have unexpected results – especially with chemical reactions. I am thinking of some fairly lethal combinations of harmless cleaning products. I love color and “happy accidents”. I wonder what adding a few walnut hulls to the mix might do? I think you are just at the beginning of what you will achieve with this process. Can’t wait to see where you take each other.
Sawdust and cereal? I am taking that to my watercolors right now.! If my painting is a failure, maybe I can just eat it. nv
Well, funny you should mention that! I have a few bottles of walnut ink that I could add to some vinegar and see how it would last. I know it would give immediate colour. I know the iron would make it quite dark. Hmmm…
Fantastic information and inspiration on staining the concrete.
Thanks so much. So well put together with pictures of all the results, how you got there.
Love getting your emails.
This is super helpful!!!
However, I think in your recipe you may have meant one part muriatic acid to 10 parts water, rather than “Prepare concrete by cleaning or etching with weak Muriatic Acid solution (1 part water to 10 Parts Muriatic Acid)”.
Wow, all fixed/updated! Thanks!
Coloring concrete with homemade acid stain is such a fascinating DIY project! Not only does it give your surfaces a unique and artistic touch, but it’s also a great way to personalize your space on a budget. Plus, the creative possibilities are endless when it comes to experimenting with different colors and techniques. Thanks for sharing this insightful guide!
I agree… endless possibilities!
Hi Barb. I came accross your post and I’m absolutely fascinated. For the stain that gave that beautiful turquoise color on your leaves, did you just add more copper sulphate. I’d like the recipe to a achieve that color as I’m going to experiment on my kitchen floor with brown and turquoise. Hope to hear from you soon.
Before you make changes on the floor, perhaps it’s good to test on some small pieces that are not ‘installed’. A floor has more challenges as there may already be some stains etc in the concrete. Floors do get a beating…
Hello! This looks so fun! Where is the best place to find iron sulfate and copper sulfate for this project? Thanks so much!
You can get the iron ferrous sulphate on amazon or also where you buy supplies for printing. Copper sulphate as well… Sometimes it can be obtained at garden supply shops too. Enjoy!
I didn’t even know I was interested in this until I read your article, can’t wait to try this on some bonsai pots I’m attempting to make, thanks!
Oooh, bonsai! I think these rock orbs would be wonderful for bonsai as the rocks are so organic looking. Good luck!
Hi Barb,
I would like to see your examples of iron sulfate and copper sulfate in eco printing if possible.
Thank you for your detailed sharing!
Christina
I use iron sulphate the most. Here’s a bunch of posts that mention it. I have not used copper much and should write a post; I’ll add it to my to do list!
I’m highly impressed with this DIY PROJECT & the simplicity of the stain you made as well as your detailed steps…& can’t wait to try this in my home. I’ve had 3 bare LARGE rooms where old carpet had been removed…& I’m on an extremely Limited budget… I think I can do this! TY
Wishing you luck!