Botanical Relief Casting in Plaster
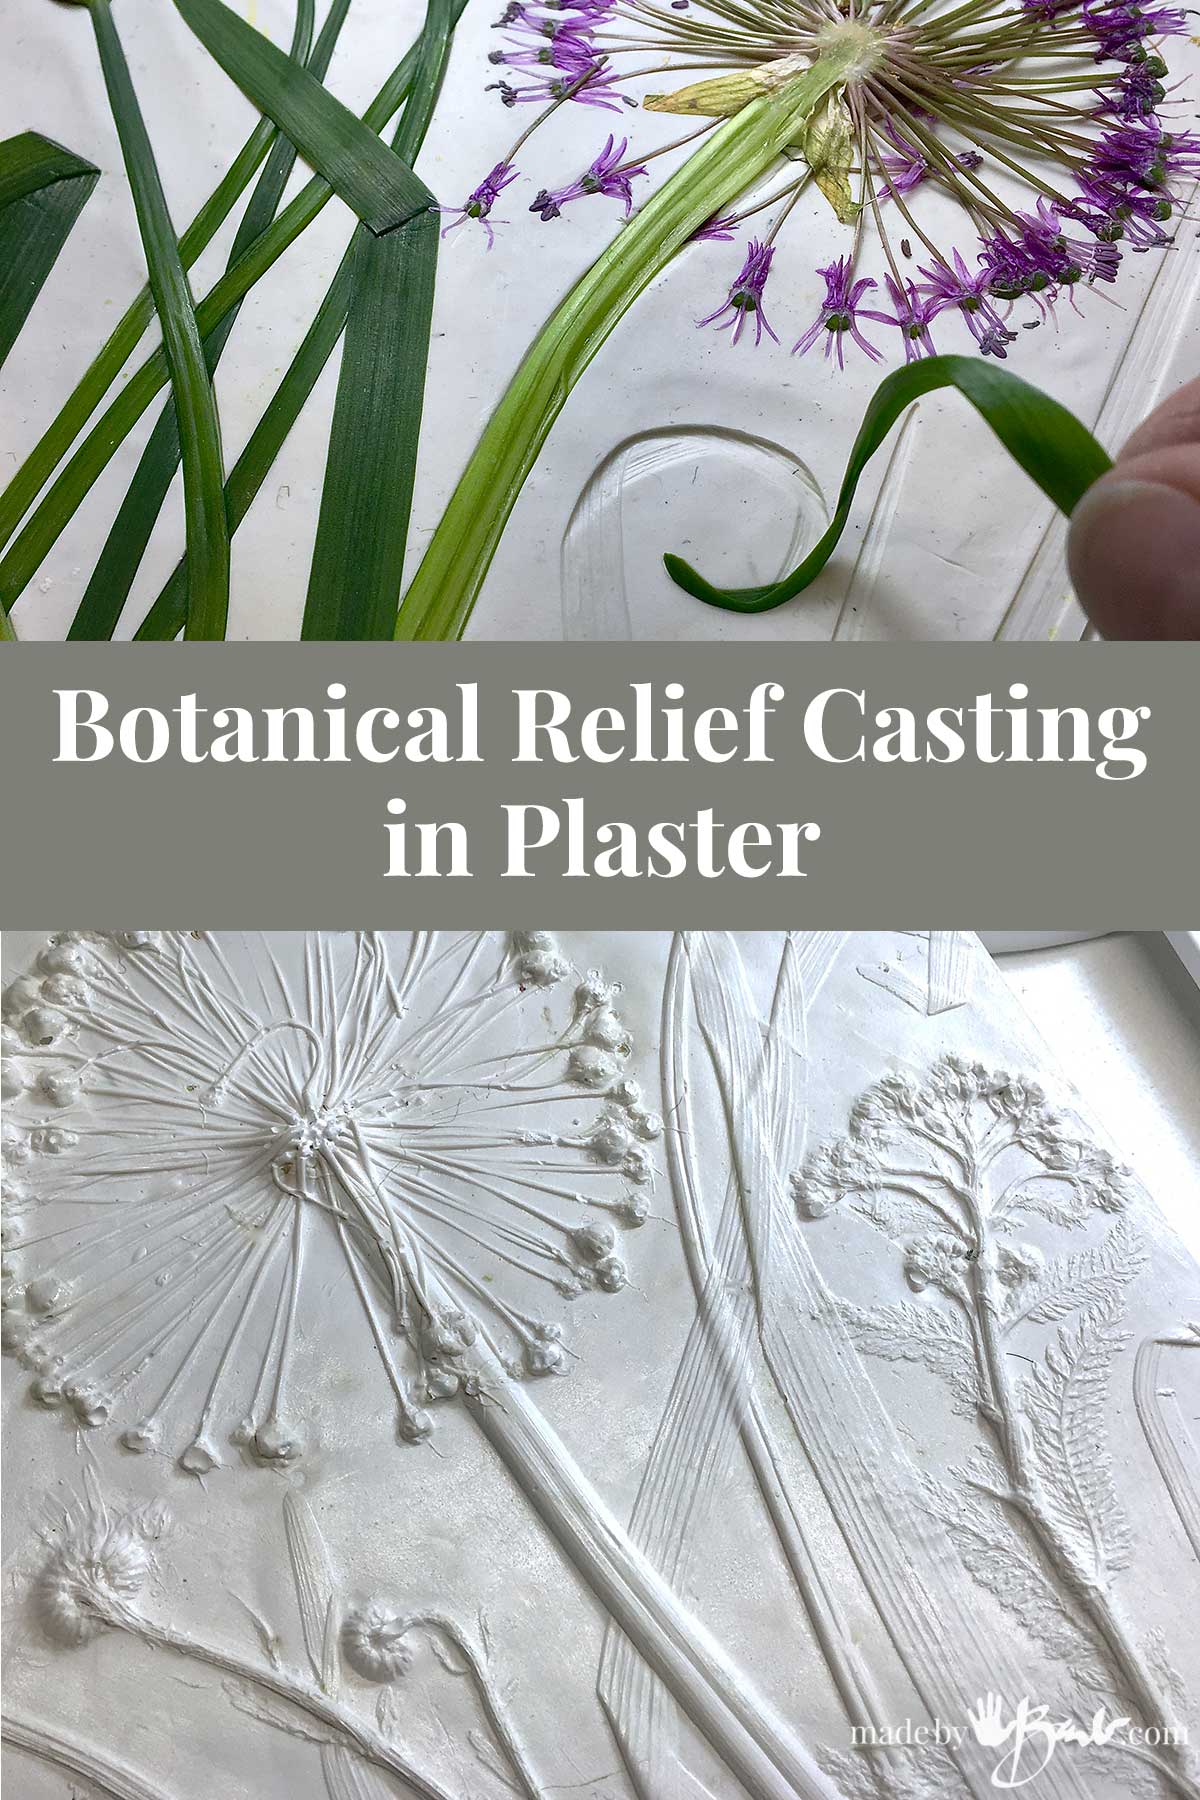
As if I haven’t used botanicals enough in my art & design! How amazing it is that capturing nature’s form can be so beautiful! I am not going to tell you how… just kidding! Here we go; Botanical Relief Casting in plaster (and concrete as well)
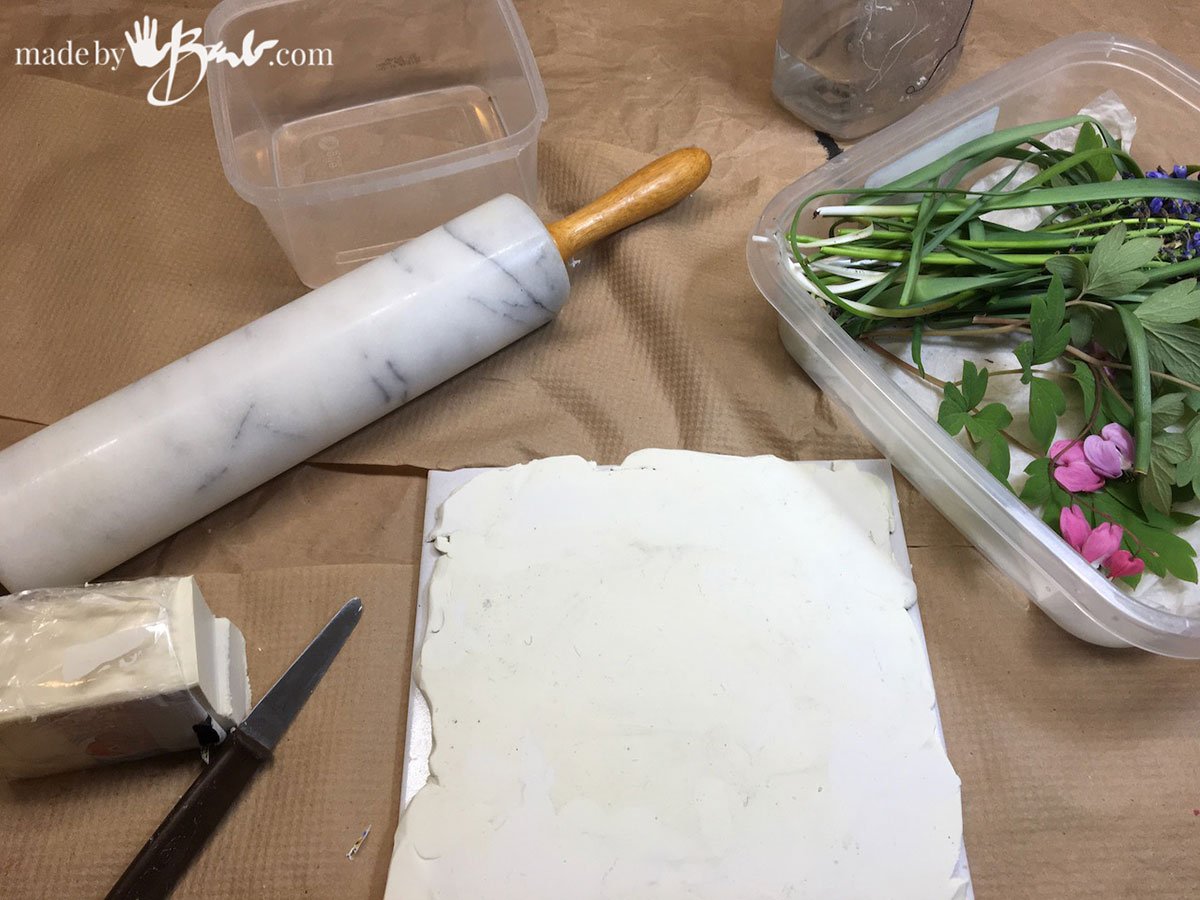
Simple Supplies:
I was so happy to realize that I didn’t need anything that special for this. Doesn’t everyone have some plaster of Paris and plasticine at home? Simple children’s modelling clay works great for this project. This would also make a great project for summer camp as it will help create an awareness of nature and easy materials to use.
Supplies:
- Modelling Clay (oil-base Plasticine)
- Botanical Specimens
- Rolling Pin
- Wood Thickness spacers (not shown) opt
- parchment paper
- clay cutting tool (knife or similar)
- Stiff board or tile
- Frame shape (may use pre-made containers)
- Plaster of Paris (or for harder casts Hydrocal)
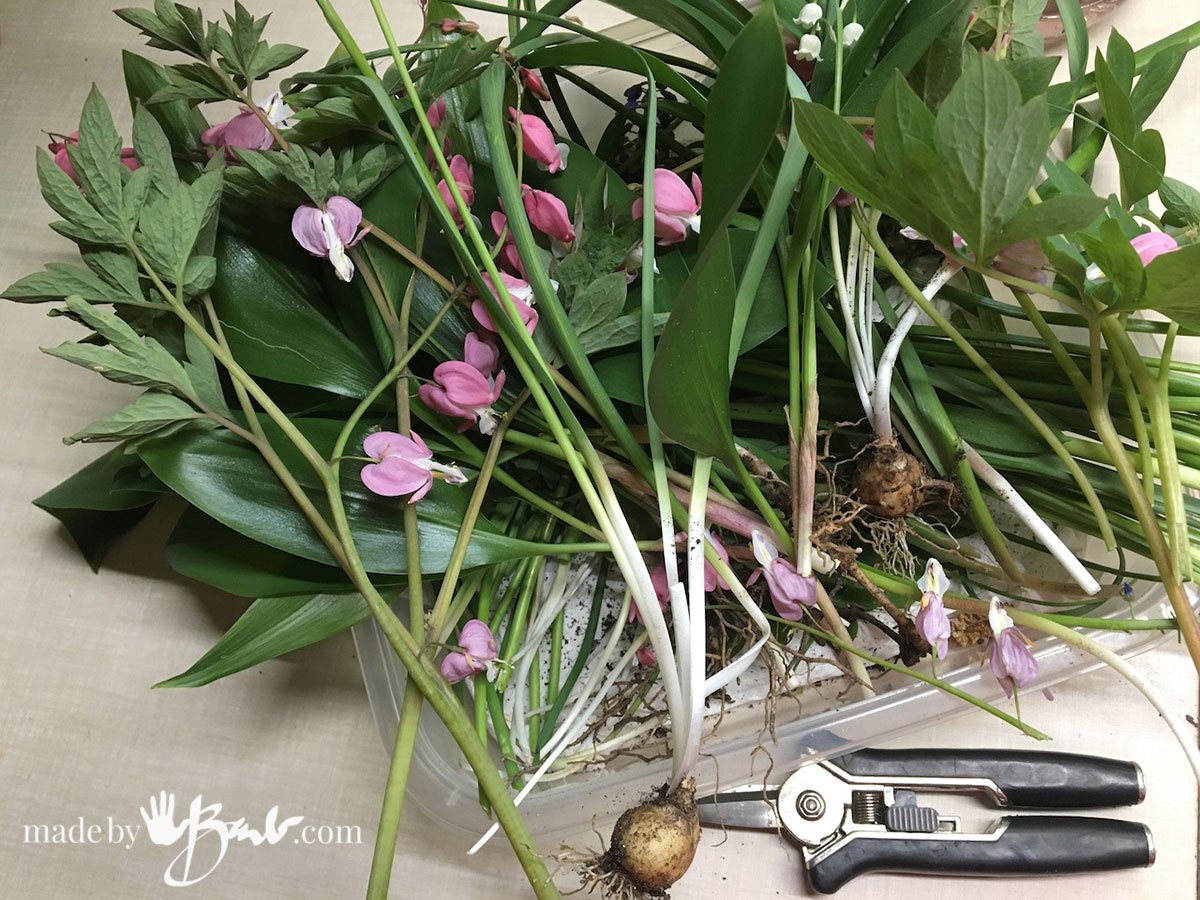
The Pretty Plants:
I have a simple garden with a lot of variety but it’s by no means huge! This art form uses the form of the plants so it is better to choose ones that have some good texture or interest. There really are no rules! Once you start you will want to try them all! It is even interesting to show the roots or the bulbs! Try to have some type of design plan… Hint: if you can’t use the plants right away stash them in a container in the fridge.
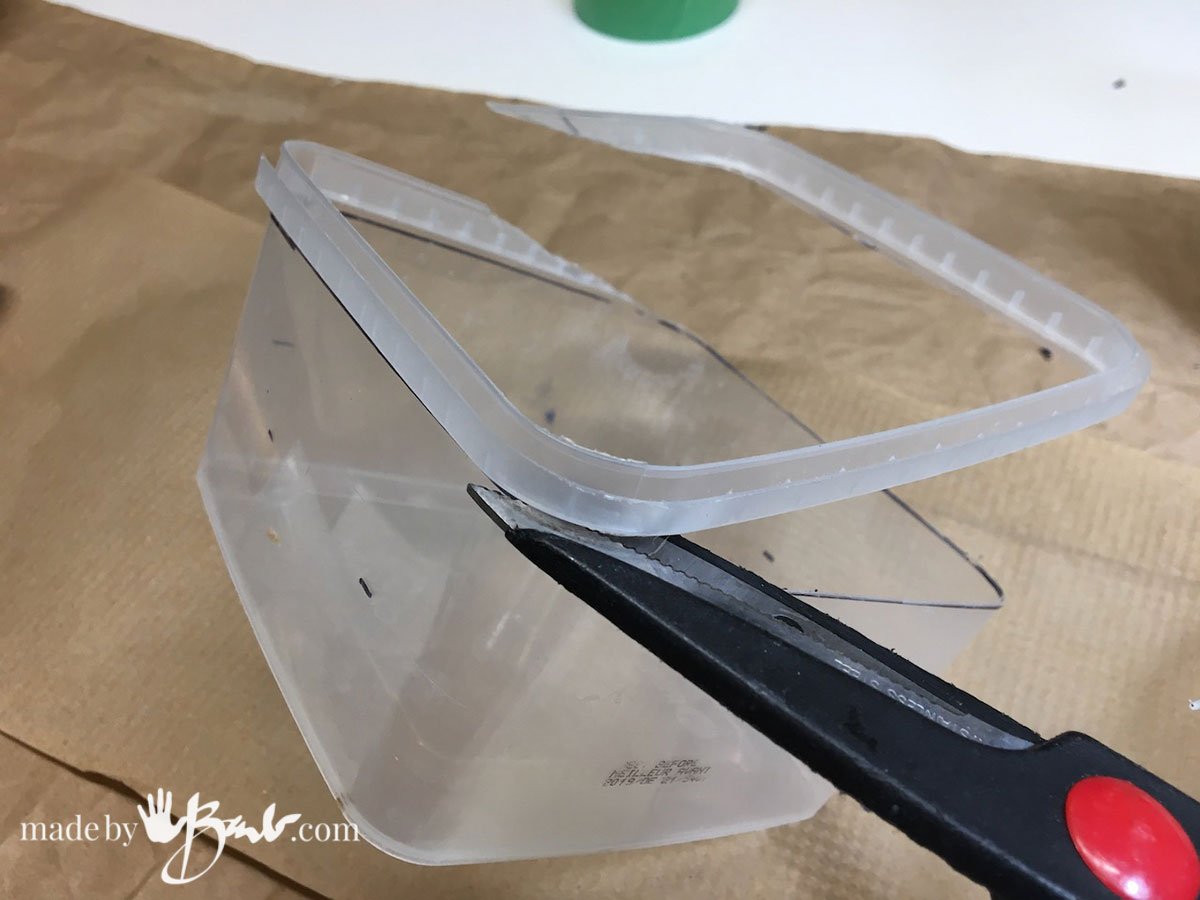
The Frame Shape:
You can make any frame shape that you like… For simplicity I like to up-cycle some containers so that I have less ‘futzing’ with wood pieces. I also like them to be somewhat flexible to allow easy removal after casting.
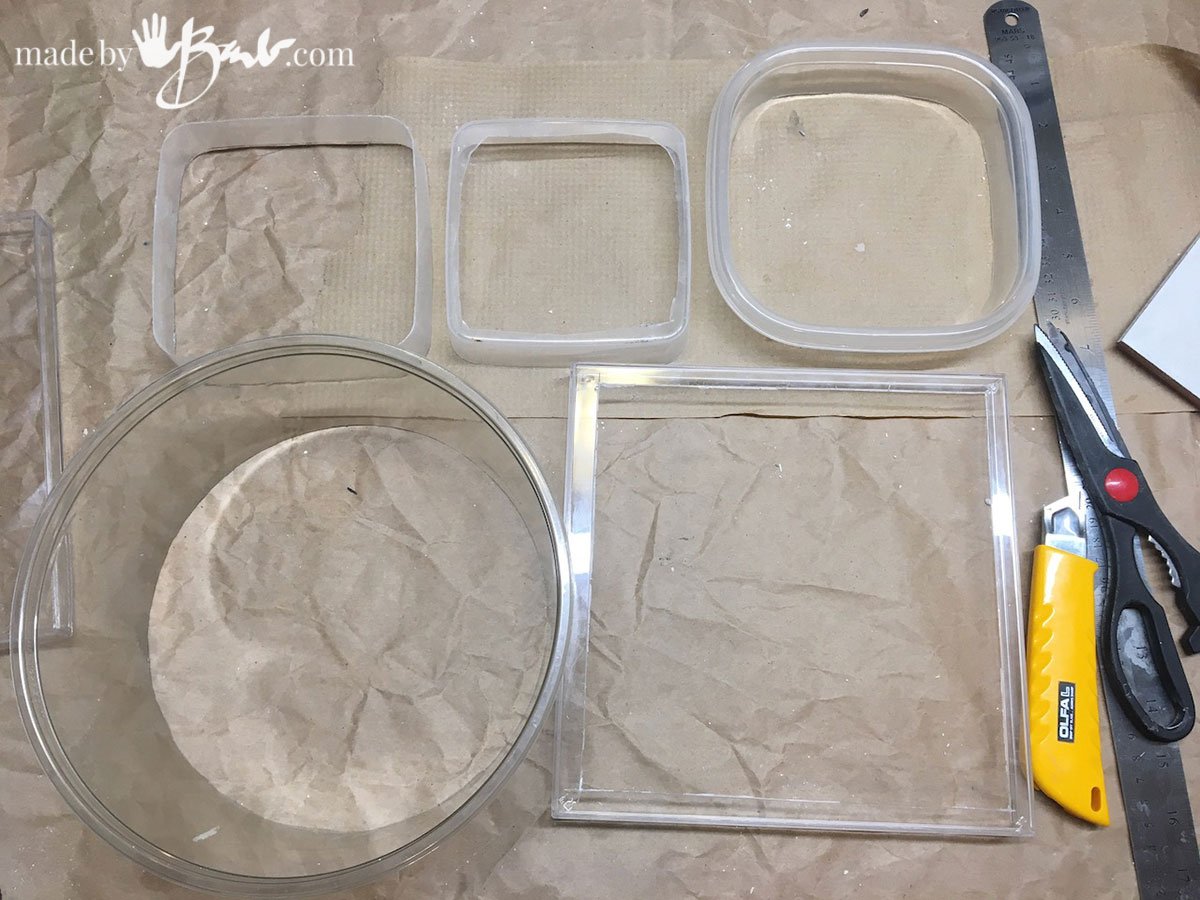
These are a collection of my ‘frames’; store-bought cake container, storage containers cut, and even a chocolate box with middle cut out. I like that they are quite exact and can be cleaned. They are also transparent for some ease of use later…

Step #1 Make the base
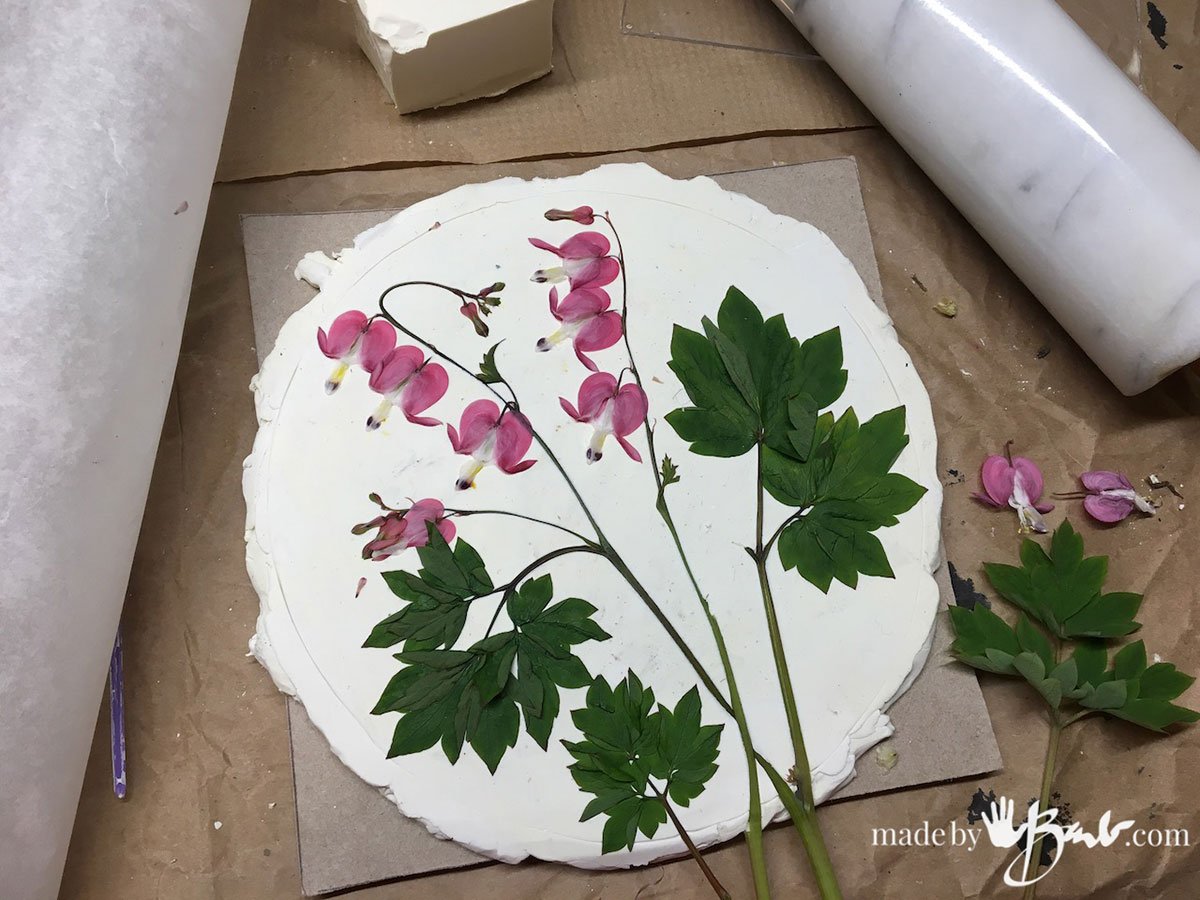
Flatten an area of the clay with the rolling pin to a uniform smooth thickness on top of some paper or thin card board. This is important later so that you can lift the clay! The clay does not dry out and will be softer if it is warmer. You can use some heat like the sun to make it easier to flatten. If you like to use some strips to ensure consistent thickness at the edges that helps too! I plan to use some 1/2″ wood strips. Make sure the clay area is larger than the frame you want to use.
Step #2 Imprinting the design:
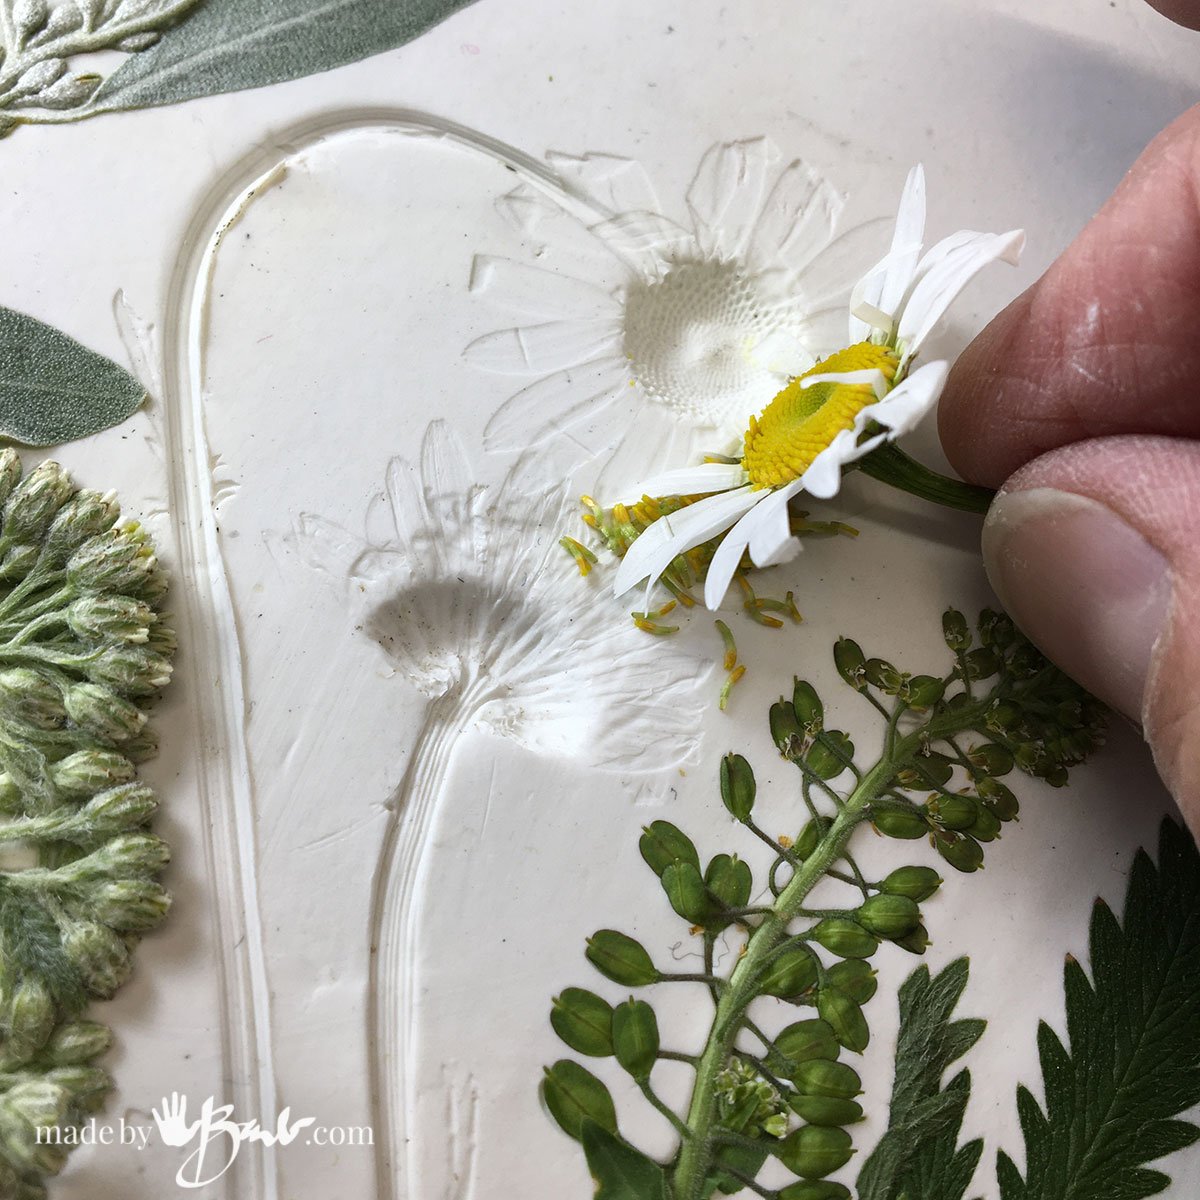
Arrange the botanicals as you like on your readied base of rolled modelling clay. You can place them all or work one by one. I like to arrange how they curve etc and hold in place before rolling over with the rolling pin. A sheet of parchment paper will help to make sure it does not stick. If the material is quite stiff and thick you may need a stiff board to push down the botanicals. I use a piece of clear plastic so I can see the design through.
Hint: the back sides of the leaves usually have more texture so face them down. If you want to make a change you can start over since it’s just reusable clay that does not dry, just flatten well again.
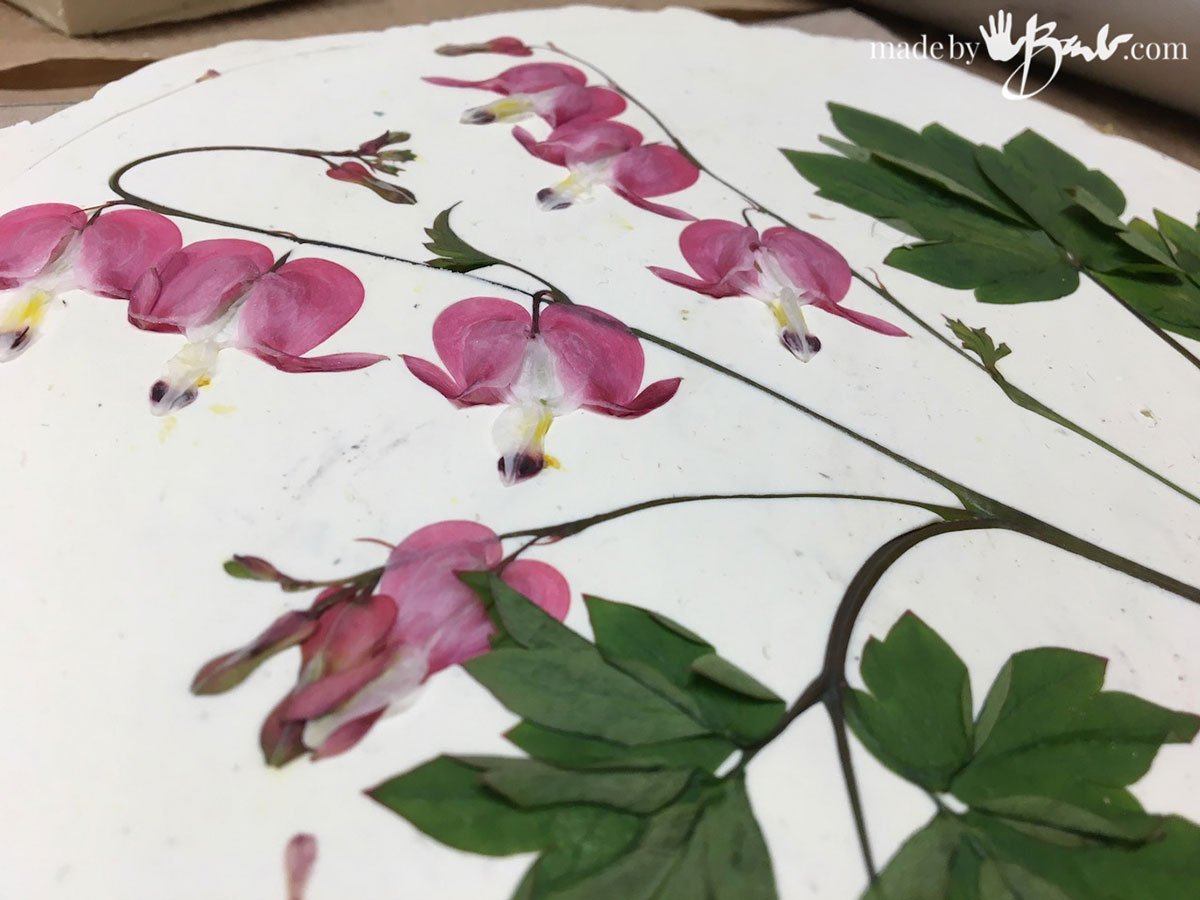
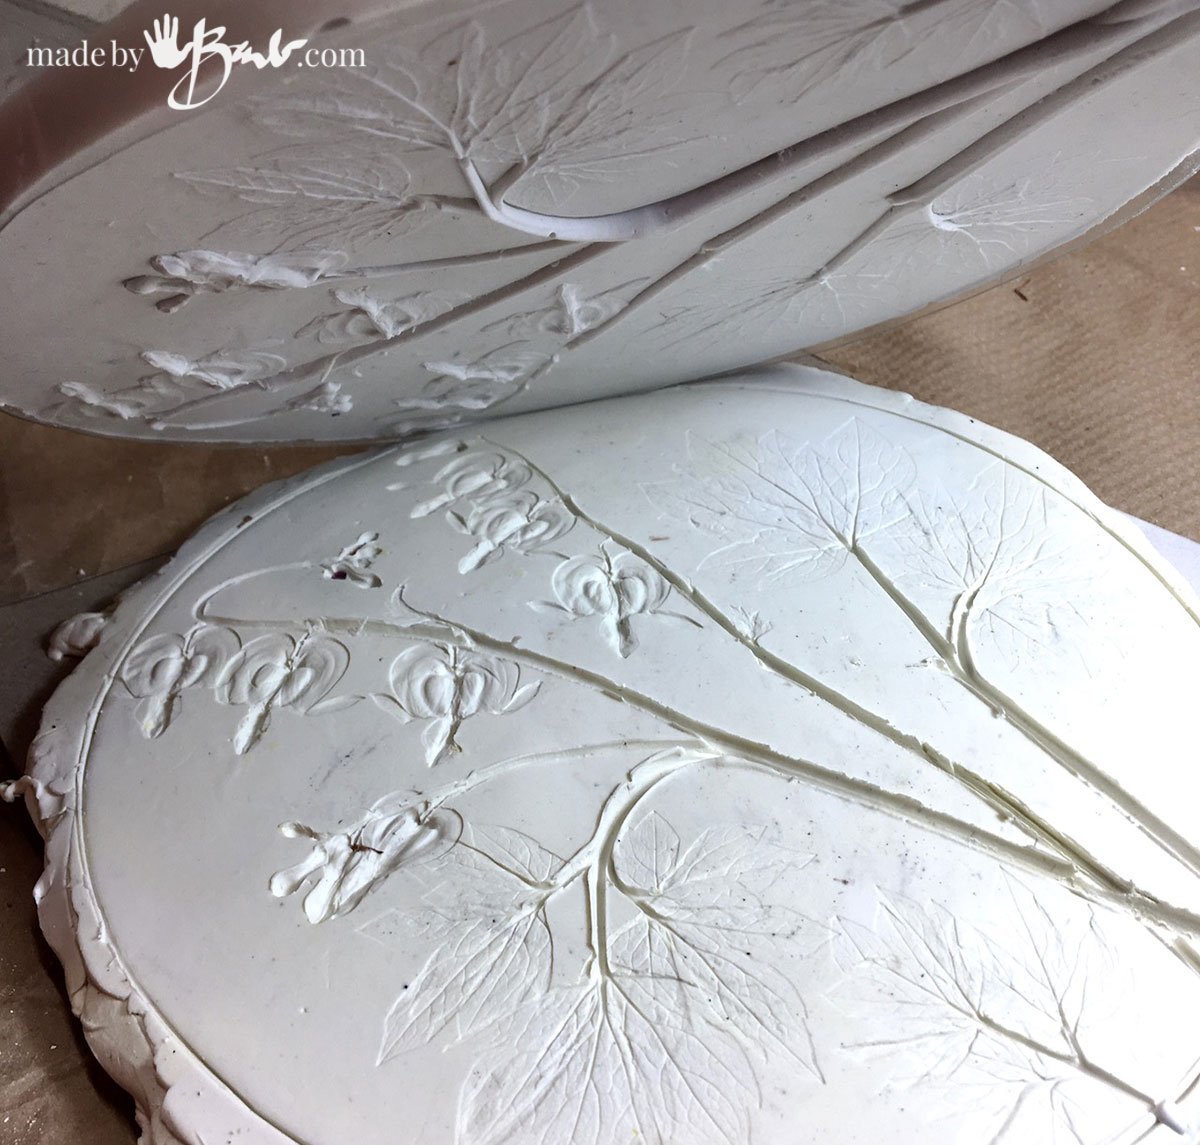
Once you rolled out the specimens they will be pushed into the clay. Flowers are nice but are be very very thin so the impression is very subtle. These bleeding hearts are quite dimensional! Be careful to keep the background as flat as possible for neatness.
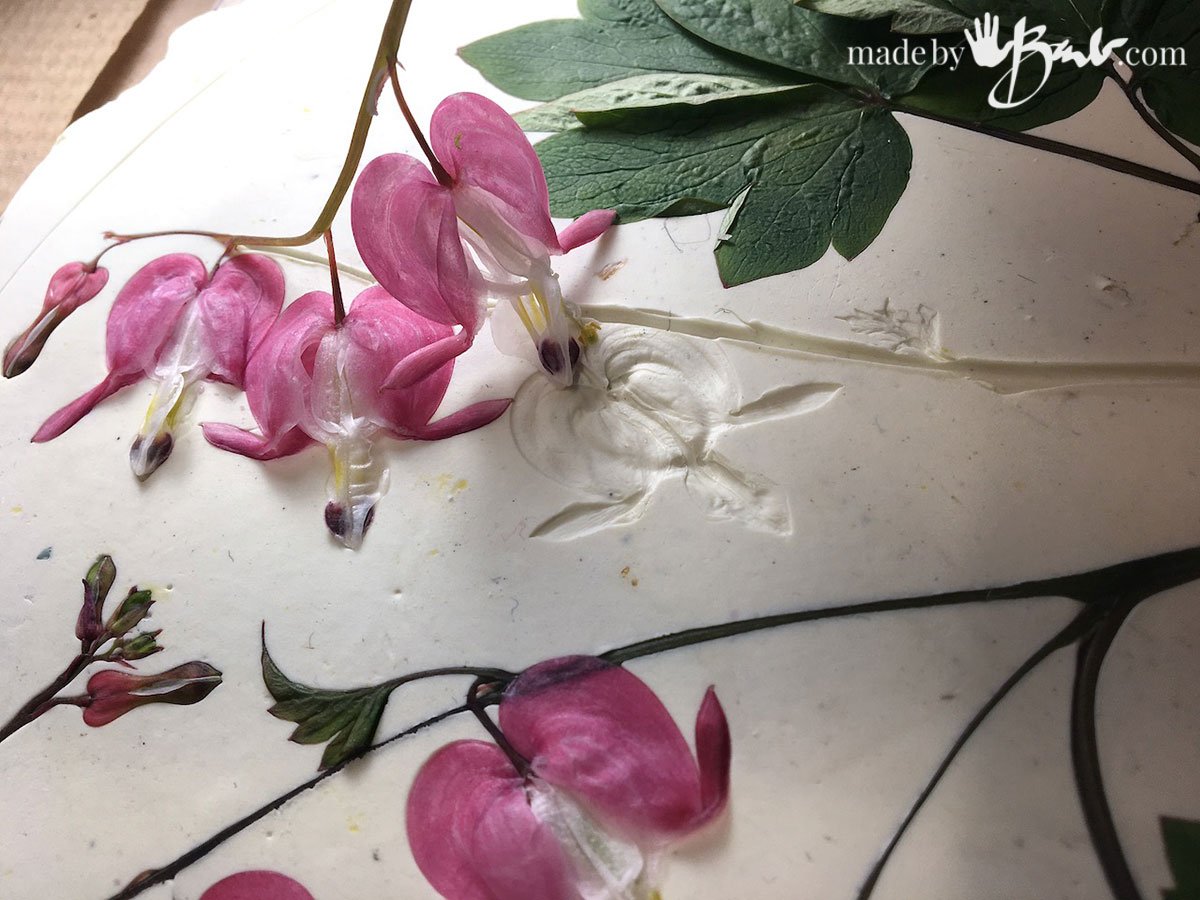
Step #3 Pulling it out
I love the Bleeding hearts as they do have some interesting form in the flowers but there are many many more as well. Checkout all the kinds of weeds around… Spring & early summer usually has much budding going on.

Once you are happy with the design and have tested how it fills the frame carefully pull out the botanicals. They do come out quite easily since the clay is oil based and the plants are not. It is amazing how much texture appears! Use a low light source to see the details best. Use some tweezers or toothpicks if small parts get stuck.

Step #4 Shape of the frame
Whatever frame shape you decide can now be pushed into the clay. This will hold the plaster and create a mold so make sure it is well imbedded. If needed fill any of the openings like the stems that could leak with some clay bits from the outside.

Step #5 Pour your plaster
Mix up enough plaster to fill about 1/4 inch or more of the framed relief you have made. It is not vital to be a specific thickness. Some plaster is softer than others. Some also seems to have more bubbles…
Note: I have moved from using the cheap DAP plaster (as it was having many bubbles) to Hydrocal as it is much harder and less bubbles. You may practice with plaster to get the hang of it. Ultracal is even harder if you choose. I will also be casting in concrete… (soon)
Mix the plaster by first filling the water (flexible vessels like sour cream containers work well) and then keep adding the plaster until it sinks no more. Wait until it absorbs the water and then stir until smooth. Tap the container to rid of bubbles. Pour into the prepared frame.
It is also important to keep things level for uniform thickness. Lift the filled piece and tap it (lift entire stiff board) to make bubbles rise. The stems are quite thin voids so bubbles need to escape there. I have found that I prefer Hydrocal over plaster of paris since it is much harder.
Step #6 Pull from mold
I hope you remembered to put the clay on top of something flexible like paper. To lift the mold carefully pull the clay back from the plaster. You can slowly curve it away from the plaster form. Be ready to be amazed! ‘Or realize that you need to get all the bubbles out of the plaster. If you are careful when pulling the clay off the plaster you can usually cast another one from the same clay…

Since the plastic ring (from store-bought cake cover) is flexible and slightly tapered it come off easily. Any imperfections can be sanded with sand paper (do wear a dust mask for the plaster dust)

I never tire of how how much detail nature has! Now there is even much more reason to slow down and really look. So many plants have interesting shapes and textures not to mention when they have seed pods etc.
The Magic of Nature!
Flowers are very pretty but quite delicate. It may take a bit of extra pressure since the flower heads are thicker. Take a walk through the wild flowers and weeds; there is so much texture design that Mother Nature offers you.
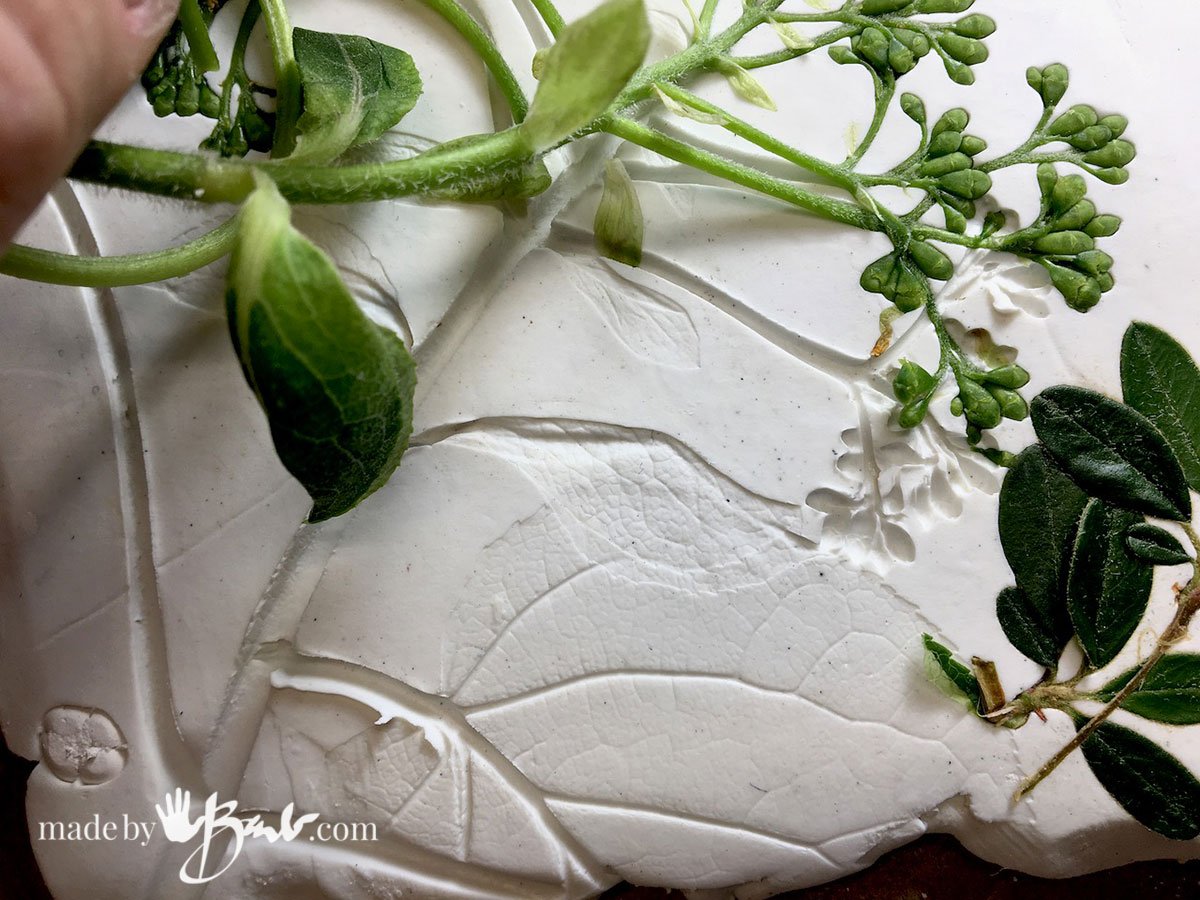
This is my climbing hydrangea with spring buds. As with any art there is a million ways you can arrange and design the piece.
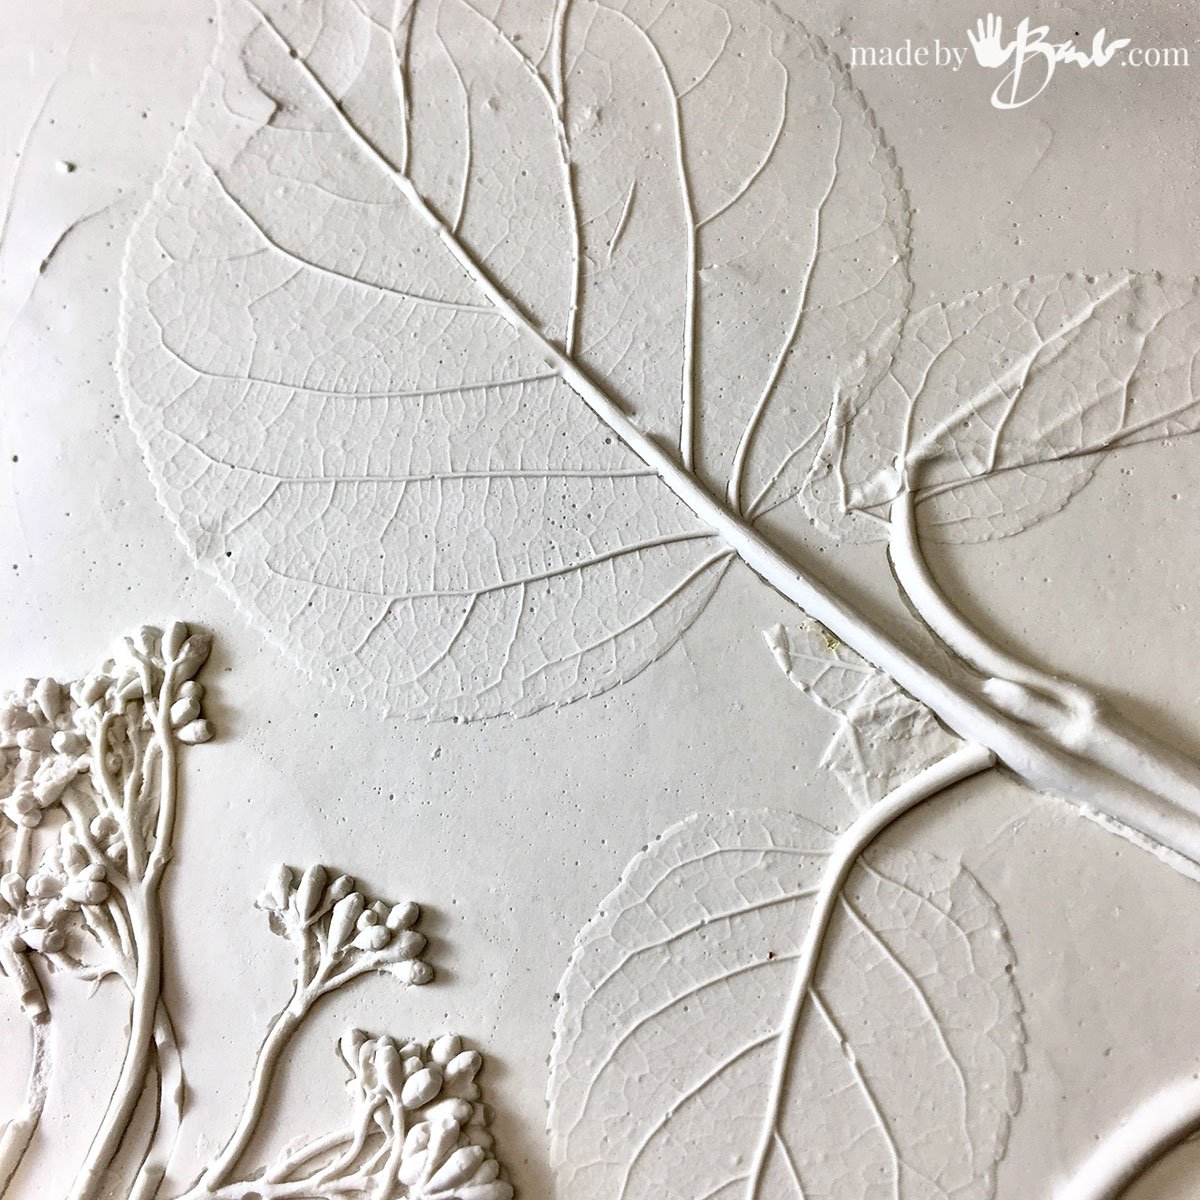
I am no stranger to using leaves but I had never realized the tactile amount of detail. I am now obsessed (no surprise) to make a huge variety and cast them in … CONCRETE! Yup, you guessed it! I am hoping to have some up for sale soon since I probably have too many!

‘And I haven’t even added colour yet! I do like the simplicity of colourless since then it’s about the relief textures. What do you like best? Colour or no colour? Plaster or concrete? Please add your comment below
Lots of effort and supplies go into making a process that works… I appreciate any sales of these through my shop
I love this idea and they look beautiful. I would like to know if regular construction plaster can be used. Purchased a large bag a while back and don’t know what to do with it now. I know I bought it with the intentions of making something I saw on your website but I can’t remember what it was lol.
I am not sure exactly what type/quality of plaster you have. I would take a bit and mix it up and pour into something shallow (plastic tray or like). Let it set and test for how strong it is. I think some of my plaster that I bought at the hardware store was old as it didn’t have the strength that the other did. I hate putting time into something that breaks.
Hallo
I love your work and it looks so achievable but I find it difficult to keep the clay smooth and flat as I push in or roll the flowers… it smudges and wrinkles. If I disturb the clay and try to smooth it, it gets worse
I have tried botanical bas relief twice and realise my mistakes with the consistency of the plaster of Paris which has to be just ok.
I really want to make it right but maybe I am just clumsy or it is not as easy as it looks.
Do I just keep rolling up the clay then rolling it out until its smooth or am I making hard work of it?
So sorry to be negative.
Keeping the background clay flat is a bit of a challenge so I make sure to start with a very flat rolled piece (rolling pin). I did try rolling it with the rolling pin and having some strips of wood to keep the thickness consistent. Parchment can also help keep it flat. Another option is to not try to be so perfect and embrace a more rustic background and edge. Imagine even using some interesting texture for the background. The temperature of the plasticine can also affect how easily the background gets damaged. If I plan to make a mold from the plaster then the plaster can actually be sanded and fixed in spots.
Barbara, could a silicon cast be made of this?
Yes! See here for the mold making. Is that what you meant? I did try the silicone caulking/cornstarch as well and it did work but not as nicely detailed and caution for how fast to work and the pressure applied.
I came across your blog looking for tutorials on how to add texture to the outside of my ceramics (doll faces specifically, a bit gothic I know) you have covered EVERYTHING I’ve been looking to create over the last year. Finding these photo tutorials is awesome! I hate YouTube bc the first 5 mins are BS and ppl take FOREVER to get to the point…plus commercials. I can quickly scan through your photos to see if it’s what I’m looking for then go back. Thanks so much and keep it up!!
I do have a lot of variety in media! Look around; you’ll prob love the smiling rocks and Step Spook
Hi Barb
Your botanical relief art and casting is so beautiful. I have begun my hand at this and curious how you get the smooth background. Sanding seems to leave scratch marks behind.
Thanks so much
The best way is to have the clay really well rolled out. ‘If’ you have to sand you can use a fine sandpaper to not have scratches. ‘Or, you can even use intentional background textures. Happy making!
Hi – I am wondering how you hang these beautiful images on the wall.
Thanks!
Heather
Oh yes I included that detail in the concrete casting ones… I make a hook with wire and some bent ends so that it can hold well without sliding out and embed it into the back plaster when pouring. They can also be secured with an epoxy in a shadow-box frame. Enjoy!
Hello there
What a great post your work is lovely, I have been dabbling in this craft now for about 6 months and learning by my mistakes and there is lots of them😊
Please can you tell me when you find the best time to clean casts and approx how long till casts are fully dry for you
Thankyou
Debby
It will depend on a few things. Plaster is softer but easier to make revisions. You can even add a bit of mix to fix any bubbles. Hydrocal is very hard and is more difficult to add. I add a bit of powder to a few drops of powder and then use a brush to apply where needed. It is better to slightly dampen the area so it does not suck all the water from the mix. It is easier to sand a dry plaster but use precautions for the dust. Eventually I became more fussy at the prep stage so that there is less fixing. I prefer the hydrocal… Hope that helps!
I just made a plaster cast of my mother’s wedding bouquet flowers as a gift to the newlyweds, and I’m terrified it will break! I’ve never done this before. I’m looking for a creative way to frame it or secure it somehow so it’s a little protected, and would love if you have any suggestions. Your work is beautiful, by the way!
Oh great! Make sure to let it cure/dry completely as sometimes it can be hard but still feels kind of wet. I do strange things where I like to ‘test’ strength of my plasters and concrete by making little patties. Later I like to see how fragile they are… I did give a plaster tile as a gift and I framed it in a shadow box frame since it needed to undo some travel. Check your stores for ones that have enough clearance between glass and backing. You could also use a deep frame to protect a bit without the glass. I use a 2-part epoxy to adhere it to the back board (hope it’s a pretty strong MDF type) You can get the 5-minute kind, mixes thick and will fill voids if it isn’t perfectly flat back. If you want to consider doing a stronger cast, there are also Hyrdocal and other plaster types that are harder… You got this! 🤞🏻
Hi! Lovely castings!
What type of clay do you use? I see many different types being used, and I’m unsure which picks up detail the best and is soft to roll out.
Is USG plaster the correct one to use? Have you used hydro-stone as well?
Thanks!
Thank you. I used an oil based clay that can be reused and tends not to stick to the specimens, it does not dry out either. It softens more when a bit warmer. As I see, USG is a brand. I have used both regular Plaster and Hydrocal. I like the harder hydrocal but it is a bit more difficult to fix any bubbles etc. Perhaps practicing with cheap hardware store plaster to start is good…
Barb – thanks for these step-by-step instructions! I love the look of these botanical casts. Will be trying my hand at these soon 🙂
Can you paint the clay mould so when you pull the cast it will be colored? Seems like could be easier to paint prior to pouring rather than after the fact?
Cheers!
Thanks! I really do not think the paint would transfer, then again I did not try it. I like them white and the details show in the light…