Eco Printing on Cotton

Combine my stubborn streak with this mysterious art form of ‘Eco Printing’ and you have a whole lot of unique prints! I have been completely obsessed with this way of printing especially on cotton. Eco printing uses natures gifts in the form of leaves (and sometimes flowers) to create a transfer print to fabric without the use of ink or painting (so no drawing or painting skills needed). Come see this magic of Eco Printing on Cotton…
Preparing the Cotton Fabric:
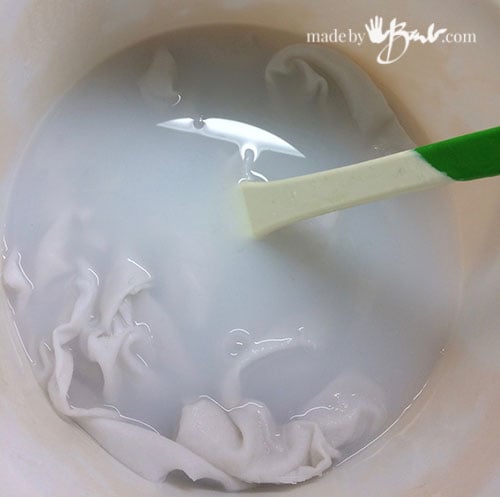
As I had mentioned in my earlier post, each type of fibre needs to be readied for taking the colour from the leaves. To make sure you are starting with the cleanest possible fibres you should scour your fabric. Most fabrics have some coatings, starches and buildup of oils. Scouring is a strong cleaning to get of these impurities. Cotton should be scoured with a 2 hour simmer in a washing soda (soda ash) solution. Rinse out all the ‘dirty’ water once cooled enough to handle.
Cotton is fairly inexpensive so it seems a great fibre to start with. That is what I thought; however it turns out it is more difficult to print on cotton and other cellulose fibres (such as linen, rayon, hemp) than it is on protein fibers (such as wool & silk). With that said, preparing/scouring and pre-mordanting cotton is even more important.

The pre-mordant that can be used with cotton is soya milk. Multiple ‘soak and dry’ cycles help the fibre allow printing. Aluminum acetate (make at home using alum, washing soda & vinegar) is another possible pre-mordant however soya milk is readily available.
One of the printing mordants that I like to use is iron. I make a bucket full of rusty items and water to create a solution of iron. Vinegar can help you along to create an iron acetate. You may also buy iron sulphate and then use specific recipes for your iron solution. But the artist in me likes to be a bit more adventurous and leave some to chance, but it takes patience.
Oh the Mystery:
As a side note; this Eco dyeing art form is very satisfying when it all works, but it will not always happen. If you want perfect results each time, then find another print method. ‘Just as in life; things that are more difficult to get are usually worth more…’ That’s my theory and I accept the ‘duds’ as part of the process.
I have spent months learning and reading and testing and testing some more. But just like a degree in chemistry it is still no where near knowing it all. But that is also the beauty of this Eco printing; it keeps you yearning to learn more and trying new variations to make beautiful textiles.
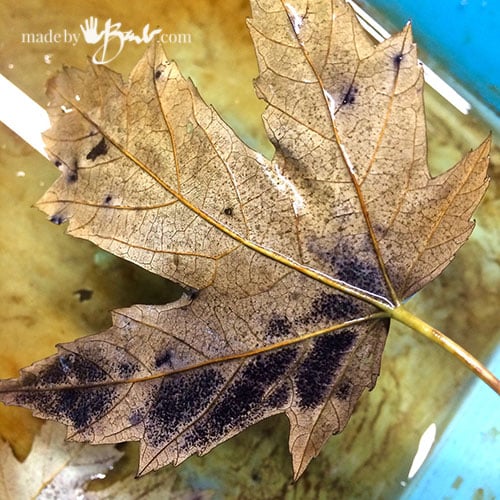
I am a great observer. I had left a leaf in the iron water for a couple days and when I noticed it there was some great blue-black created by the iron and the tannins in the leaves. Ah-ha! A chemical reaction of sorts; so much fun!
Materials Needed:
- Cotton Fabric (practice on ripped strips of cotton bed sheets)
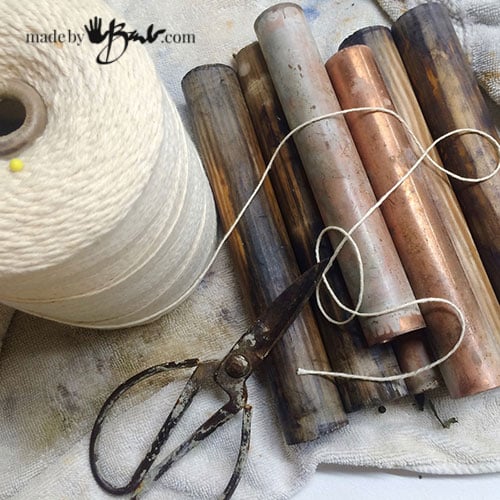
- strong string of some type (butchers twine is great)
- scissors
- some round type of dowel/pipe to wrap the fabric around (thicker is a bit better) (old wood curtain rods work well, copper pipe, piece of pvc pipe )
- tray to soak leaves in
- rags/towels (to soak up extra messes)
- gloves
- extra old sheeting (optional to make ‘Iron Blanket’)
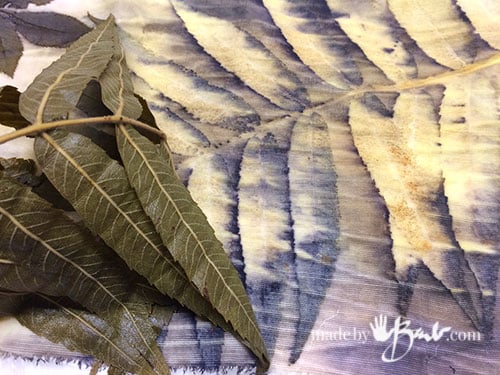
Step #1 Prepare your leaves
Depending on the time of year, you may have fresh or dried/pressed leaves to dampen. I let them soak in the iron water for at least 30 minutes (enough time to get set up)
A long table is great, and placing some plastic or tarp to protect against stains (from iron)
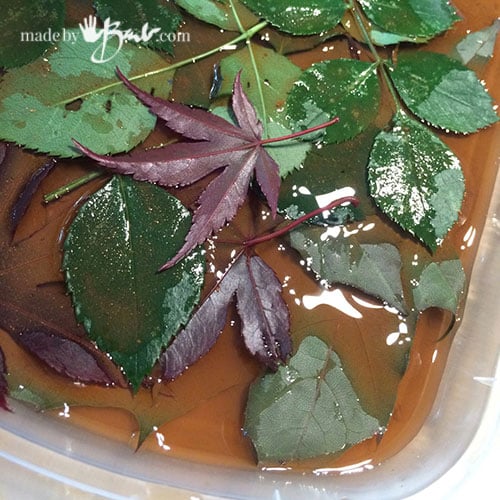
In reference to the leaves, there are some that are more sure to print well. Maple leaves, japanese maple, rose, sumac, eucalyptus, smoke bush, black walnut, red maple leaves etc. have high tannin content. You will find your favourites. The weather, time of year, area, all play into the way that the leaf prints. The underside tends to print stronger as well.
Is your head spinning yet? That is why you need to take notes, for future reference.

Step #2 Place the leaves
These sheets were scoured in washing soda (not baking soda) well and no other treatment. (see further down for more pre-mordanted cotton methods)
The dipped leaves are placed so that there is a good coverage. Some are facing up and some down.

Step #3 Roll’em Up
Roll it up tightly to keep the iron-dipped leaves well flattened to the fabric. At this time I was not aware that there may be bleed through to other layers (like a fabric sandwich). A layer of ‘barrier’ plastic drop cloth can be put on top of the leaves to make sure there is no bleed through.
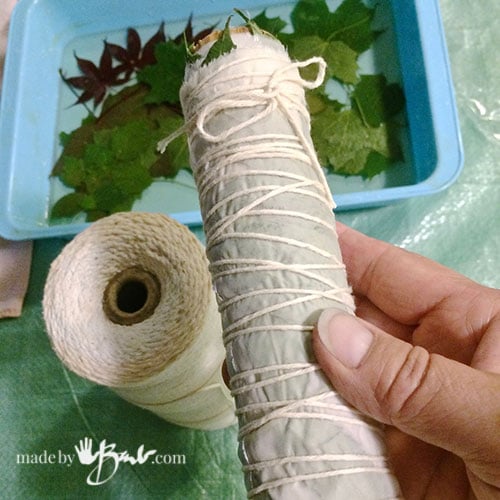
Step #4 Tie the Bundle
To keep the fabric tight to the leaves, wrap at regular intervals quite tightly.
As an extra measure you may wrap the entire roll in a foil or plastic. This will keep the moisture in and not let more in. Each slight variation may give different effects.
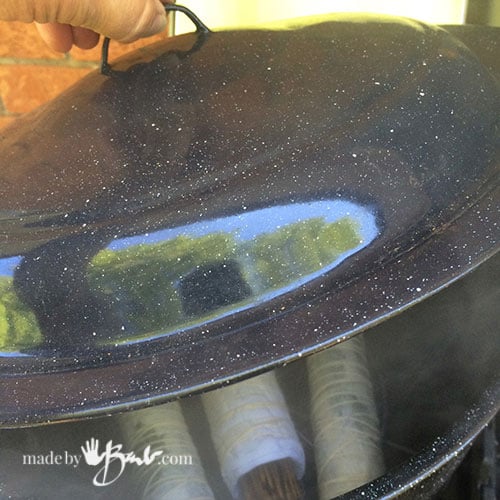
Step #5 Steaming (or boiling)
Depending on the type of leaves you have used they may give off odd smells/vapour when they are steamed/boiled. I have read that sumac may be somewhat irritating to some. For that reason I decided to do the cooking outside on the BBQ side burner. Use an old pot or dedicated vessel.
You have the choice of steaming or submerged boiling. I chose to use steaming since it seems like less extra water would effect the print. Make sure the bundle is elevated (on top of some small mason jars or steam basket) and you don’t run dry. You can add metals to the water as extra mordant but I feel that they don’t really get into the bundle when steaming.
The time needed also varies. Some boil/steam for as much as 3 hours and some for about 1.5 hours. I tend to steam for about 2 hours. If you would like extra setting you can leave it bundled for a long time (weeks) or open right away. I chose something mid way. After steaming for 2 hours I wrapped them in a thick blanket to hold heat for a while longer.
UPDATE: As of late I am often using my ‘Alternate Eco Print Processing’ method and it works great and saves so much energy
Since there is generally no indication how things are going it is like Christmas when it is time to open them up. This one was giving me a bit of a sneak peek. I never tire of the opening stage! I bet that is why most find this art form so addicting.
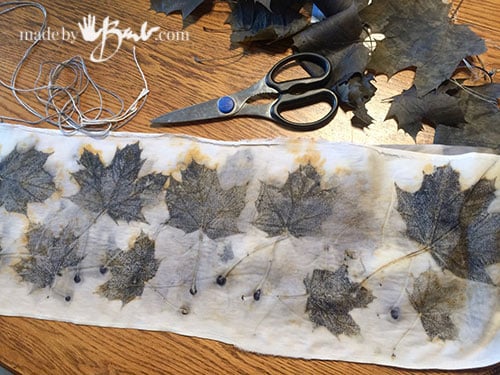
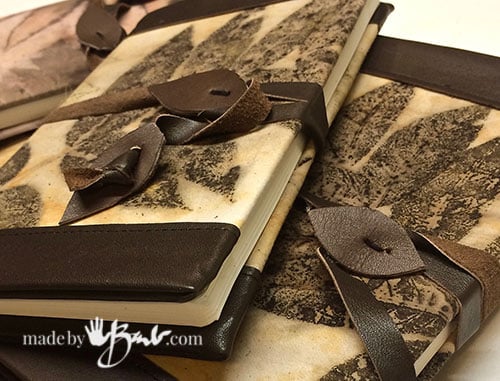
Well, there you have it! I was quite happy with these results!

The amount of detail that these prints made was quite amazing. ‘Like stipple drawings of leaves.

These are walnut leaves were also dipped in iron solution prior to steaming. I love the detail!
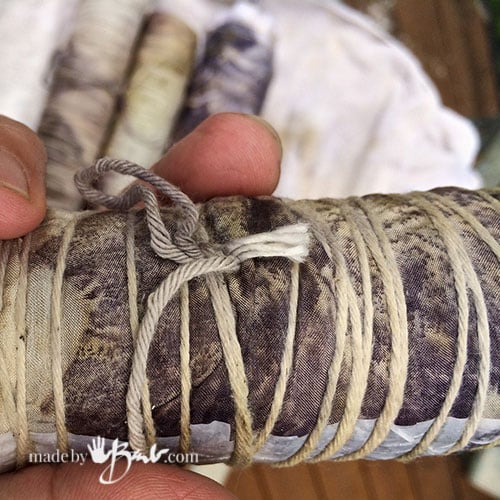
Step #6 Neutralize and Wash
After unwrapping you should give them a rinse in a weak baking soda bath to neutralize the iron. Then wash in a ph neutral detergent like (good for the duckies) ‘Dawn’ or other specialized washing soap. I find there may be a bit of extra tannin washing out, but most of the strong blacks stay put quite well.
If you have too much ‘black’ print then you have a strong iron solution and can dilute it more next time.

So, are you amazed yet!? That is just one simple basic method. There are many more variations, add in some natural colours by using a dye bath with plant dyes and you will be even more amazed how truly magical it is!
Eco Printing Method #2
‘The Iron Blanket’
As a variation of the application of the iron mordant you can also make an ‘iron blanket’. An iron blanket is an extra piece of fabric (even paper towels) that is soaked in the rusty iron water and then wrung out. This layer will be put above the leaves to bring the iron to the fabric in a different way. In this method the leaves are not dipped in iron water, they are used as is (or wetted if dried)

Do you notice a difference in how the colours/prints turn out here? They are now printing the colours outside of the leaf shapes since the iron is applied around the leaf shape. The tannin of the leaf spreads out from the leaf and blends with the iron from the blanket to create the ‘halo’ shape and accent the leaf. Some make soak through the leaf and also print a colour. You just never know exactly…
The Barrier Layer
To keep the colours from bleeding through the layers I definitely use a barrier layer. That can be plastic wrap (Like Saran wrap) or strips of plastic drop sheets (reusable). Some find success in using baking parchment paper, even tin foil as a barrier. I like to use the drop sheets as I can cut off a strip in the width that I am working with.
This is a heavy weight cotton that was pre-mordanted with soya milk. It is soaked in a solution of soya milk and water ( 1 part to 5 parts) and dried and then repeated. This can be repeated as many as 5 times. I soaked in soya 2x.
The results are again quite amazing! I love how they look like water colour paintings! Each specie of leaf can also bring some colour to the mix.
Oh how I wish I could grow some eucalyptus leaves! Go ahead, run out and get some leaves and Eco Print on Cotton. Do check out here before you start on your magical Eco Printing journey. Natural dyes add another dimension (cochineal, pomegranate, logwood, sumac )
Have fun creating botanical prints, so many variables, easy instructions. More complete info here
Thanks for all your wonderful posts, you are so generous!. I am just starting to eco print and have ordered 3 Eucalyptus plants via the internet. I’m in zone 7a (near Philadelphia) and the farm says they will grow here. (https://www.thegrowers-exchange.com) We will see! Thanks again!
I have been thinking of doing that too! Do let me know how it goes! I had someone generously offer to ship me some from ‘down under’ but it is not allowed. I am sure I will find some new way to be creative!
Thanks for all your information. I did my first last evening and am already steaming some houseplants like coleus today. You can start eucalyptus from seed and grow outdoors to zone 8 . OSC seeds has them. I also read that you can bring them inside to overwinter if you have lots of sun.
I did manage to buy a couple eucalyptus plants and was super excited! I did everything the garden centre said and they just dried right up! I had them in bright light as well. Maybe it’s just not meant to be…
Hola excelente trabajo, la leche de soya entonces se utiliza como el mordiente de la tela de algodón, o se debe aplicar algo más, y para sellar la estampación se debe utilizar bicarbonato? Me encantan tus trabajos quiero comenzar con algodón saludos desde Chile.
From what I translated yes, soy can be a mordant. I have read that some using a little baking soda to neutralize the iron afterward. Yes, it may take a few experiments to figure out which leaves work best in your area. Good luck!
Thank you so much.
Love the way you write!
Thanks! I’m glad you enjoy it!
Desde Argentina te envío un agradecimiento enorme por la generosidad de explicar muy bien cada paso. Amo el Ecoprint y tus datos me han servido muchísimo.
translated: From Argentina I send you a huge thank you for the generosity of explaining each step very well. I love the Ecoprint and your data has helped me a lot.
It always amazes me how far and wide my posts go! I wonder what type of plants you have there? Happy printing!
Hi.
I really enjoyed reading your blog.
Ecoprinting is not new to me. I was working mainly with silk and some wool.
I like cotton and want to practice more with it.
Your instructions are very friendly and clear.
Thank you
I would love to follow your blog.
Best wishes
Nitza
Oh thanks. I do put a lot of work into it! There are so many variations with Eco printing. I’m sad to see my summer ending soon… Happy printing!
Hi Barb, really nice post. I wish i’d find you before haha. I have a question, in the first method, I understand you used soy as a pre mordant, but, when you talk about iron is that another mordant? Or is it just for leaves? I didn’t get it. Thank you so much!
There are so many answers in this world of eco printing. As soon as there seems like a definite method then someone figures out something new. I guess its like cooking; so many recipes. Iron can be used as a pre-dip, or to soak leaves or to make an ‘iron’ blanket. The strength of the the iron will also play a role. Grab an old bed sheet (100% cotton) and make some tests, take notes and have fun!
I love this!!! I was recently married and would love to do this with my wedding bouquet. I currently have the flowers in the freezer. I’m just terrified it wont work.
Well, I did make a scarf for my daughter in-law with the leaves from her wedding bouquet roses. The flowers from what I have ead and learnt don’t really make good prints that last. But rose leaves, not flowers do. Practice with some regular ones then use yours from the freezer when you are getting decent results. That’s the nature of echo printing, there’s some magic needed…
Donation worked this time. Thanks for your work, very inspiring.
Thanks so much! The world of eco printing is so intriguing!
I live in Australia on acreage and I have literally billions of eucalyptus leaves is it legal to post them to you if you can find out Im happy to post you some please contact me via my email if you’d like me to do that for you maybe we could swap leaves if its legal to do so – I love your blogs so so informative so interesting Ive made a donation hope it helps to keep you afloat lol have a great day
Bonjour Leona. J’ai lu votre commentaire sur le blog de Barbra (Madebybarb.com) où vous dites que vous avez plein d’eucalyptus chez vous. En France, nous avons aussi des Eucalyptus mais ce ne sont pas les mêmes. Les feuilles marchent moins bien. J’ai vu que pour avoir de bons résultats il faut un certain Eucalyptus qui n’a pas une écorce lisse sur son tronc mais, au contraire, une écorce épaisse et craquelée. Si vous avez ce type d’arbre chez vous, voudriez-vous m’en envoyer quelques feuilles pour que je fasse des essais ? Chez nous les Eucalyptus ont des feuilles plutôt longues et pointues. Le tronc a une écorce lisse qui pèle en longues bandes très fines comme du papier. Sur mon blog, j’ai mis des photos de ces arbres que j’ai tout près de chez moi. Je me dis toujours qu’il faudrait que je trouve un parc exotique pour, peut-être, y trouver un eucalyptus différent qui donnerait de bons résultats…. Actuellement, je prépare un petit travail d’art textile avec quelques-uns de ces tissus teints. Bien sûr, quand ce travail sera terminé, je mettrai la photo sur mon blog. Ici l’été commence tout juste mais nous n’avons pas encore très chaud. D’ailleurs, en Bretagne, il ne fait jamais très chaud contrairement au Sud de la France où habitent ma fille et sa famille. J’espère que vous voudrez bien envoyer une petite enveloppe avec quelques feuilles vers la France ? Je vous souhaite de beaux ecoprints avec les recettes de Barb !!! A bientôt peut-être ? Merci d’avoir lu …. Mimi
Hello Leona. I read your comment on Barbra’s blog (Madebybarb.com) where you say you have lots of eucalyptus at home. In France, we also have Eucalyptus but they are not the same. The leaves don’t work as well. I saw that to have good results you need a certain Eucalyptus which does not have a smooth bark on its trunk but, on the contrary, a thick and cracked bark. If you have this type of tree at home, would you send me a few leaves for me to try out? With us the Eucalyptus have rather long and pointed leaves. The trunk has a smooth bark which peels in long very fine strips like paper. On my blog, I put pictures of these trees that I have very close to my home. I always tell myself that I would have to find an exotic park to, perhaps, find a different eucalyptus tree that would give good results…. Currently, I am preparing a small textile art work with some of these dyed fabrics. Of course, when this work is finished, I will put the photo on my blog. Here summer is just starting but we are not very hot yet. Besides, in Brittany, it is never very hot unlike the South of France where my daughter and her family live. I hope you will send a small envelope with a few leaves to France? I wish you beautiful ecoprints with Barb’s recipes !!! See you soon maybe ? Thanks for reading …. Mimi
As far as I know, the post office does not allow shipping of leaves. People have offered to send some to me and it was not allowed. Good luck.
Hi there! Just found this post and your work is beautiful! I have a question for you. Could this be done using dead plants? Like the dead leaves in the middle of winter? Could it also be done using sticks or bark? I read that the bark of trees also contain tannin so I would assume it would work, but I was just wondering if you or anyone you know has tried. Thanks!
Funny, I just picked up some a couple minutes ago and it’s winter here! The whole question is always ‘which ones print best?’ I have heard that some eucalyptus bark prints well and I had tried small branches from my birch; which did not work for me. But that may also be about the prep and the fact that they are hard to get contact with fabric. Soooo, I stick to nice flat leaves. There are methods to making some ‘teas’ with found things like gallnuts and acorns to use as tannins. There is really a whole book-worth and it’s generally hard to get exact info since many factors have impact on the result. Check out the entire ‘Eco Print’ section I have under the ‘Home’ menu. You’d especially like the latest cotton printing I have a stock pile of dried leaves ‘calling my name’ right now… Happy making!