Fabric Tests for Concrete Draping

Halloween brings out all the spooks, ghouls and witches! So you need to know how to work with concrete fabric draping; it’s an essential concrete skill. So many choices… so many results. I’ve done a few Fabric Tests for Concrete Draping so you can get to making in time for Halloween!

The Magic in the Mix:
Portland cement is my ingredient of choice. I know many do add other things like sand but I like the way this simple mix behaves. I tend to learn from doing and testing. My ghoul/spook has sat out on a stump through much weather here in Canada, super cold, wind and even crazy heat. He’s been quite smothered in snow and has lasted without any deterioration for over 2 years, so this year there is a surprise addition to his family!

When mixing up the slurry to dip your fabric/fibre in it needs to be thin enough to get into the fibres. That is why I do not use a sand mix as I would find the sand would just end up accumulating in the bottom of the bucket since it had a hard time getting into the fabric.

I will however add some additive many times; just a small ‘squirt’ of acrylic paint. It doesn’t really add much if any colour but does change the consistency slightly and is believed to add strength. It seems to immediately add some thickening to the slurry.
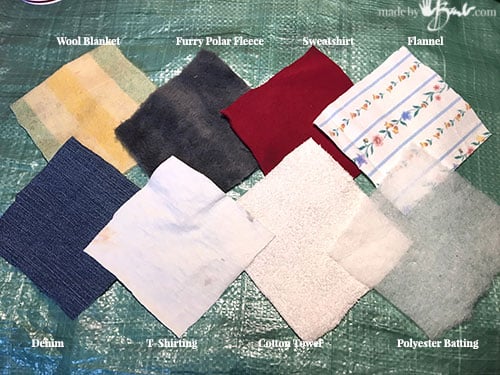
The Fabric Tested:
Since I do a lot of sewing I have a variety of fabrics. Here I have tested typical readily available ones; (upper left to right) Wool Blanket, Fuzzy polyester polar fleece, poly-cotton sweatshirt, cotton flannel, Denim, Cotton T-shirting, Cotton Towel and thin Polyester Quilt Batting.
Make sure to dampen your fabric before dipping as then it will not ‘steal’ the moisture from the cement mix.
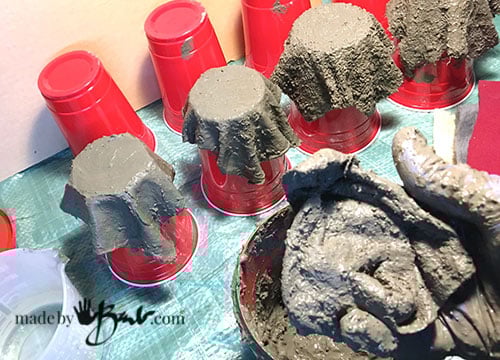
Muck Time:
Make sure to fully incorporate the ‘slurry’ into the fabric. Knead and turn and squeeze until you can see it ooze in/out of the fabric; that is very important. Yes, it gets a bit messy so cover the work area, but then again so is making a pie… Be aware that once the fabric is dipped it will gain a lot of weight so be prepared with your vessel or armature so that it will support the weight.
(Tip: Since I did this indoors I had a bucket of water to dip my hands into to avoid any concrete into the sink.)

All dipped and ready to cure. If it is very hot or dry mist with water to slow the drying and make the concrete stronger.

As it cures the thicker mixes are taking more time and thus look darker.

The Results:
Since some of the fabrics have a tighter weave they will have less ability to absorb the portland cement and thus end up quite thin. They have set nicely but feel fragile and easily broken or squished.

To remedy that you can add more layers of the Portland cement slurry to reinforce and add thickness. You can also do this to smooth any unwanted texture.
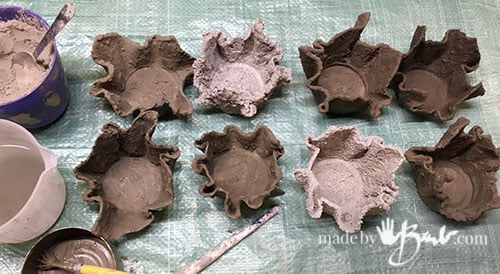
I decided to add a layer to all the tests except the towel and the polar fleece. They were quite strong all by themselves!
The Final Observations:

The Wool Blanket:
I was somewhat surprised at how the blanket did absorb the cement. It was a vintage blanket so it was quite thick and thus less able to get into folds and drape nicely. It will hold up quite well though and be fairly smooth. I do wonder though if the since it is a natural fibre it would eventually breakdown inside the cement thus losing some of it’s reinforcing properties.

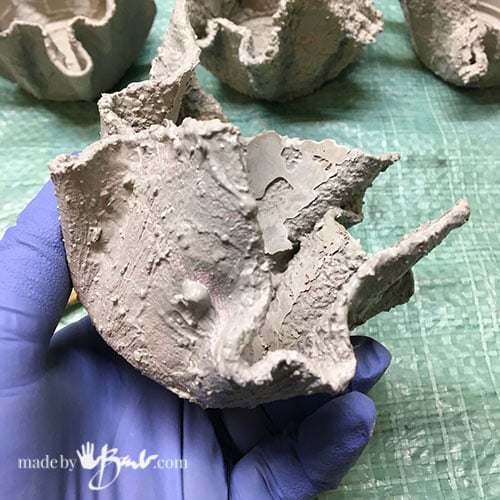
The Polar Fleece:
This looks quite lumpy and thick since it does get a lot of mix into the fibres. It is great to look like a fur or you can smooth it with a brush just after dipping. (as I did with the spook) It was the strongest of all the tests though due to sheer amount of cement. Since it is polar fleece it is 100% polyester meaning it will take a long long time to breakdown so it will lend it’s reinforcing properties for a long time!
The Sweatshirt Fabric:
This fabric absorbed a medium amount of cement, and could be textured depending on which side of the fabric outward. I did feel it needed extra reinforcement though just as a precaution. It does allow smaller details and folding than the thicker fabrics.

The Flannel:
Flannel has some fuzziness that will hold the mix but really not enough to leave as is. It could however work nicely if you have many folds and layers as that would give it strength. It was one thickness so it definitely needed extra coatings. The lumps were from some of the bits that were in the portland cement. I later put it through a sieve to get rid of them (like flour sifting). The witch was made with a velour fabric which is fuzzier than flannel and it worked quite well.

The Denim:
This denim was one of the thinner types of this day and probably had some slight polyester content in it. Being a tight weave it was very thin and fragile. Since it is a weave and does not stretch it will not drape as well as a knit which gives it limitations. Being quite smooth it shows the brush marks thus making it not one of my first choices.

The T-Shirting:
Cotton tends to absorb a lot so this did as well however it is still limited to it’s thin thickness. It does drape quite well and could benefit from much layering and folds but at a single thickness would need many extra coatings.

The Cotton Towel:
As you see this is really nubbly from the towel textures. Obviously a towel is made to absorb so it does quite well and has good strength. Like the fleece it will however have texture unless it is filled/brushed with more mix. It can drape quite well since it was an old well worn towel.

The Quilt Batting:
I had just come across this and thought it may surprise me. Since it has a fairly large open fibre it does grab a lot of mix but the excess texture does not show that well. It also tends to look ‘hairy’ from the fibres. It was fairly strong but did not give a good edge so it would have limited applications.
Go Make Some:

Now that you have an understanding of how easy it is who knows what you can make?!
I will be having a new addition to my family; to my concrete family that is! I have a new ebook for download to make this sweet Cat… Just in time for Halloween.
Happy Concreting!
Hi Bard.
Just came across this article. Brilliant information. Thank you.
So, I’m currently doing up my garden and have a cement mixer.
Going to try the draped flower pots using towels or babies blankets.
Portland cement and sand mix.
Does it matter if the towels or blankets are coloured?
Will also be using some cement dye.
Weather here in Ireland is currently brutal so won’t have to worry about them drying out !
Also, do you leave the mould (bucket/container in situ at the end or
try to remove it ?
Thanks again.
Owen.
Sounds like fun! The grey of the portland cement does cover the colour of the fabric. Depending on the shape of the bucket it should be able to slide out. The concrete does not stick to plastic ones. I had great success on the Scarecrow as well, not what I thought about burlap… Good luck!
Hi, I live in far north Queensland in Australia. I’m keen to try your cement pots with draped cloth. I don’t know anything about cement but we don’t have Portland’s cement. Could you maybe describe what sort of cement it had to be. We do have rapid set but a lot of little stones. Is it just like a type of cement powder that you just add water too. HELP. 😥
This will help you understand a bit more. As I read in AU it is referred to as GP Cement. See here for a few products, as it states GP as being portland cement. When it is a mix with aggregate then stone/gravel/sand is added. My Rapidset Cementall is probably different than what is in AU. When in doubt speak to the professinals or do a test. Good luck! See this post about mixes
I am going to give this a try and make some outdoor candle holders. Thanks Barb!
Good luck, they will be beautiful!
Hey Barb, need some serious advice, I have an assignment of furniture and I took the challenge of making a sitting stool with a single cement cloth(as a material)…can u prefer which could be the best for the purpose(strength) and thickness(around 3-5mm) for the same!? Also, I have some ideas about combination of jute or foam sheets with cement as a material for the same…your thoughts!?
Thank you
Anubhav
That’s a challenge! Have you seen this It is along the same lines. I would look for a fabric that can wick up a lot of cement slurry. Maybe sandwich a couple layers? Maybe sew them together to hold or even make a quilt? Or, add another layer once first one is firm enough (dampen it though). I would do some small tests… Not sure if the foam will ‘hold’ the cement, haven’t tried that. Sounds like fun!
Thanks a lot mam😊… Definitely will keep your points in mind!
Very informative! Have been wanting to do a project similar to yours for a while. I now feel like I can attempt it with more confidence and have it come out with good results. Thank you!😃
Barb,
I love your posts! I have a question..my metal firepit’s bottom is gone, completely rusted away. I tried to make a concrete fire pit bowl with sand as a mold and a 4 to 1 mix of perlite and portland cement. Within minutes of my first fire, it cracked completely up onside. I patched it best I could and am using it as a planter bowl. Looking at your site about concrete and fabric, do you think I could dip fabric in concrete and line my rusted metal bowl (the top 2 thirds of the bowl is sturdy) with the concrete fabric to make a usable firepit? Would, say burlap dipped in portland cement or cement all hold up to a wood fire? My stand is solid cast iron and I hate to just chuck it in the dumpster. Ideas?
So far I have not made a fire pit. I would hesitate to use a fabric as I’m not sure how it would act with the fire. I wonder how the perlite burned. With a bit of research I see why now, if there was any moisture left it gets so hot and needs to escape. Also this may happen to concrete with the risk of exploding. Fire bricks are made for lining fireplaces. Maybe make a base and use your cast iron on top.
Cindy and Barb:
There are products called castable refractories , but also home- and shopmade versions.The Nov. 1981 issue of Ceramics Monthly has 2 articles on homemade versions by Miska Petersham and W. Lowell Baker. Potters.org had a massive listserv/blog archives with a section on them and commentary from Baker. I highly recommend reading the articles and giving the archive a good skim.
I believe my low-duty mix was 1:2:2:4, 1 part portland cement, 2 vermiculite, 2 crushed used soft firebrick (crushed to 5/8 or smaller), 2 fireclay (or local dug high-kaolin stoneware clay, with all ocher bits removed) and 4 parts coarse *sawmill/pallet mill/maybe chainsaw* **hardwood** sawdust sieved through a 1/2″ hardware cloth.. Not tablesaw sawdust. This was intentionally a cheap scroungable low duty mix, not expected to last forever (or even a year or two) at aluminum and certainly ceramic temperatures (1900-2380F).
Other mixes have other cements or ingredients to taise the temp range, this will do for a campfire. Yellow or white heat, not so much. I think I used it for aluminum casting too. Backyard metal casting , home metal casting, instructables.com should get you a zillion links.
The articles should be available through the local community college library and certainly university library databases.
If you don’t buy the clay, you want to pick/spoon out any iron deposits, then dry it bone dry, then mix it with a drywall mixer and a lot of water to a thin slip(clay slurry) and run it through a 5 gal painters bag sieve. Any actual stone bits left if you didn’t sieve it would explode near hot coals.. I didnt use perlite because it melts and slags on a hot face, it is ok in a mix for a second cool-side layer. In a “real” kiln, my mix would be the backup layer and a mix with alumina (expensive) or using calcium aluminate cement (shipping is more than the cement which was $45 a bag last I looked a decade ago) would be a hot face layer 2-several inches thick.
Have fun
Ellmann
Brilliant site. So clear.
Keep going Barb from a fan in 🇬🇧
Thanks!! I’ll be honest; I do get exhausted sometimes! I need to clone myself!
we have been making some of the draped planters and LOVE them, but were told that if planted with dirt, the planter will rot in under a year. What has your experience been? Is there some type of sealer we should be using? Thanks. really have enjoyed all your projects.
I have not seen any rotting. I have never read that, odd. Even my papercrete has lasted perfectly over the years. I generally do not like sealers as they seem to need repeated application. I have see that Rapidset Cementall is a very dense mix that seems to not let water penetrate at all. Happy concreting.
I have been told that the concrete dipped fabric pots will rot when used outside as a planter? is that your experience? If so, is there some way to seal the pot so it is durable?
thanks so much for any input. we had made a lot, love your ideas. appreciate all your tutorials.
I have not seen any rot at all. I do not have many as use for planters but do have my characters like the Spook. The one planter looks just like when I made it. I do not let water collect in it over the winter though. I live in Canada so we all kinds of weather and I do not ‘baby’ my concrete. The Step-Spook is almost 5 years old and has not changed a bit! He sits on a stump in all weather. I think it also depends on how much concrete you use. I see projects on the ‘net that look troublesome since they are so thin. Best of luck!
I want to make flower pots using fabric and cement. I will use Portland cement to see if it works well. Thanks for your tip.
Have fun!!! It’s like playing with muck!
Have you ever tried fabric pots/whatever with hypertufa?
I have tried ‘Tufa but I’m not that crazy about it since it is softer and takes a long time to cure from what I understand. I like the strength of concrete.