Concrete Garden Orbs
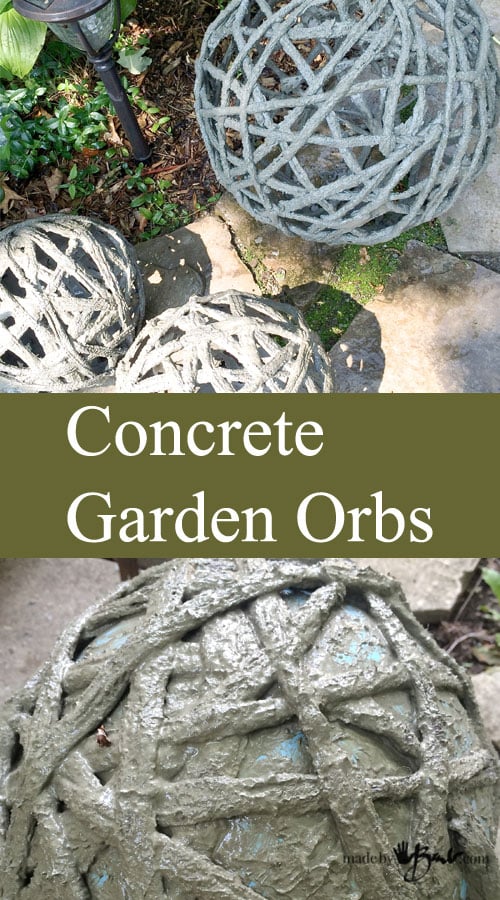 I was noticing that orbs are everywhere and for good reason; can there really be a better shape!? So that got me thinking in my ‘concrete ways’… I knew concrete spheres can be poured but how could I change it up a bit? Here are my DIY Concrete Garden Orbs inspired by draping methods but my own original exclusive design. These are not solid, don’t require fancy molds and are so easy to make!

The first large concrete garden sphere is made with a large beach ball and some polar fleece fabric that I had on hand. I have a lot on hand, fabrics, yarns etc.
I employed the rotary cutter to get that job of strip cutting done faster. The pieces were not a continuous string, but that was ok. Either would work. The pieces were cut ½” wide. The whole principle is similar to any concrete work.

The Materials:
- Portland cement
- Bucket or container to mix in
- water
- Rubber gloves, Dust Mask
- Utensil to stir, scoop
- Beach balls, balloons, inexpensive deflatable balls
- Strips of fleece, Fuzzy Chenille yarn, or multi-strand yarn
- buckets to rest spheres til set

The Portland cement is the ‘active’ part of most concrete mixes. The mixes do however also contain gravel and sand. In this recipe the sand and gravel is replaced by the fibrous yarn or fleece. The portland cement is meant to get into the fabric and once cured will create a very stiff shape.
My concrete Leaf stepping stones here are made of a mix that already includes sand as the material with the Portland cement. Do be aware that Portland Cement does have an expiration date and will lose it’s strength. The downside of Portland cement; it weighs A TON! It is a bit pricier, but you usually don’t use it by itself, so it can go a long way.

Step 1: Mixing
Inflate your forms and ready a place to set them once wrapped (like a bucket or container). Covering with plastic bags will eliminate sticking. Gloves and mask on…
Mixing this recipe is a little different since there is no sand or gravel. It will be creamier and almost like melted ice cream. A pudding texture is too dry, as the fabric will pull out some of the water as well. You can dampen the fabric or yarn to aid in the absorption of the cement.
Concrete is pretty patient, but sitting too long will start to set it. Plus, take my advice, once you get your hands in there, you can’t touch other things.
Plop the fabric into the slurry, squeeze and make sure it gets into the fibre. That is key to the strength. There shouldn’t be any air left in the fabric. You also want to keep track of an end, especially if it’s one long piece, because it may be impossible to find later!

Step 2: Dunk and Wrap
Here’s the tough part: we only have 2 hands, so wrapping and running the strip through fingers to remove the excess cement becomes a challenge. In my case I worked on the large ball one half at a time. Once the first was relatively hard I turned it to the bottom and incorporated the top half. The ends were wrapped or just hidden under another piece. Try to criss-cross to make a random pattern with similar size spaces. I was surprised that it ended with the strength it has. If need be a second layer can be added once the first one has set enough. The large size makes it more difficult than a smaller size.

Here it is, waiting to cure. The polar fleece curves nicely when somewhat stretched. The concrete texture camouflages the fabric and resembles grapevines.

Fleece strips and addition of the top of sphere.

Here you see balloons for the smaller forms, also resting on some buckets/pots.
In this case I again found some yarn that was quite “chunky”. I wanted even more thickness, so I tied it in double strand every 12” or so. I believe it was dollar store yarn. The fuzzier and fatter – the better.

Again, mushed into the slurry of portland cement.
Squeeze the cement into the yarn. Add water if needed, only a smidgen at a time.

Since this was yarn, it was longer and allowed me to just pull up as I turned the balloon above the bucket to wrap back and forth. Smooth the excess off or run through fingers. You WILL be covered in concrete at some point, so don’t wear your best clothes. I do now have concrete stains on my camera.
The amount of wrapping and coverage on these is more dense, so I’d say they are stronger. But who really sits or stomps on these anyways?!
Step 3: Cure and Wet
Spray the orbs with water to strengthen the concrete during curing. Don’t rush, they will cure.
The balloons were easy to pop, where as the beach ball needed some manipulation to deflate. If you aren’t cheap you could just sacrifice it and cut it. I decided to do the more difficult deflation.

Step 4: Remove the form
There will be some of the thin “extra” concrete in the spaces, but that usually chips off easily with any tool. It is quite rustic looking anyways, so it isn’t fussy.

In the design sense, larger simple forms are best. Imagine these in a minimalist garden, perhaps even filled with light strings at Christmas. AND the bonus, is that they will withstand the elements, and be able to stay in the garden. AND you will be able to say: I made them!
Oh, the possibilities of concrete… DIY heaven! Check out how I even made more for planter decoration. If you don’t want to crack out the concrete perhaps you would enjoy using stone to number your house. So many easy garden ideas…
First REALLY great idea of seen in a long time. I think it was Thomas Edison that tried to make cement furniture . You have IMPROVED on a a genius ‘s idea !!!
What do you think about painting them ? I have a tiny ,tiny yard and it could look really tacky.
Thank you!
Thanks! I generally don’t like concrete that is ‘smothered’ with paint as then it looks like ‘bad plastic’! The texture that these orbs have could be a bit of an issue painting them… But I have an idea! what if you cover a tray with some great metallic paint and then roll it around on it?! then you’d get almost a ‘gold-leafing effect’! That would be cool! Let me know how it goes…
Have you ever tried using old tee shirts for the balls? Love all that you do for all of e folks that like concret art.
I think you mean to use as the strips for the dipping? No, I tend to use fabric/fibre that can absorb enough cement it make it strong.
I’m considering doing this for my daughter’s gift card “box” at her wedding. I’m having white yarn orbs on the tables and in lanterns and thought this would be a substitution for the card box. I’d make it into a snowman with this as the base. (So if someone wants to steal the cards at the reception it would be noticeable and difficult.) How heavy is this? I’m kind of known to do something unique for the card box and this certainly could be it!
They are not crazy heavy, but not too light either. Easy to move around. Depending on the amount of ‘wraps’ it can be more dense or light. The choice of yarn can also make a difference it the thickness. See my trees as well. Good luck, always great to be able to say ‘I made that’!
Thank you. Should there have been photos to go with the narrative in the “Orb tutorial “? Looks very interesting & can’t wait to try it for my Australian garden !
Oh, yes there should be lots of photos to make the orbs I have many orbs on my site Enjoy!
Thank you so much for sharing. My daddy had me doing concrete work as a teenager 60 yrs. ago and now I am looking forward to doing some of the decorative stuff with it.
It’s funny how well we remember special times with dad! It will mean so much more for you. Good for you to craft so many years later…
I want to do a 6 ft round mosaic sphere for our local park from scratch. I created a 6ft sphere shaped with steel bars, but I’m currently thinking of ways to create the surface of the sphere. I like how you use polar fleece fabric for your concrete orbs. Maybe, I can dip some old blankets in concrete, then wrap it around the sphere (steel bars) to create a surface. I would create a think surface, about 4 inches thick by apply a few layers of cemented blanks. Do you think this would hold?
That is quite a project! The fact that it is so large makes me nervous. It will be very heavy and being hollow will add to problems with freeze/thaw. I suppose you won’t be turning it. I think the fabric embedded with cement will be quite strong, but be sure it is saturated so that it will not just absorb water. A wrapping of some wire mesh/chicken wire may help anchor the fabric. I have not made any mosaics. I embedded some glass pebbles in concrete stepping stones and they shattered in the weather. Let me know how it goes… another thought; what if it was not solid, some iron was visible? Good Luck
I am on my second attempt with this. I have a very fuzzy fleece and Portland. I let it sit for two weeks the first time and it never set up. Second attempt last night and again…almost at 24 hours and remains soft and wet. I’m in a panic as it’s a Christmas present. Any tips?? What am I doing wrong??
There are a few things that can happen; the portland cement is outdated, the mix was too wet/diluted, temperatures were not warm enough, it did not absorb enough. But since it’s sounding about the setting I wonder about the portland cement. Did you just buy it? I just recently made the scarecrow with burlap and it turned out great. I did it in the house for good temps though.
I finally tried the yarn cement orbs!! Just finished them. I hope they turn out!! I love the look!!! Thanks for your inspiration!!!
Great! If they are too soft you can add some painted on slurry. Let them cure slowly and not dry too fast… 🤞🏻
Hi Barb, love to orbs and you have inspired me to try it myself. I have started an orb that is smooth, the idea being to have a cut out part and use it as a planter, the next one is to be entirely smooth all over and sit next to the planter. That way it looks like the orb has cracked open and a beautiful plant has grown out of it, and people will wonder what the next orb has in store. I used some cut up old shirts and jumpers as my aggregate for the first two layers and they are not exactly smooth yet. I want to do a final smooth layer, what are your recommendations on achieving this
Many thanks
I always like to have some texture so I do not try for perfectly smooth. These orbs ended up much like what you are saying, but not so super smooth. If you want them smoother, then you will need to fill with a tool or your gloved hands and a thick mix like Rapidset Cementall or Top’n Bond. You’d probably also love these ones Happy concreting!
How tough are the strips covered in cement? I was thinking it would be cool to make a large planter out of them. I was considering driving rebar into the ground and then weaving jean covered in cement around the rebar, kind of like weaving a basket. Think this dries hard enough for that?
They can be quite strong. I have made many draped projects like the spook and some tests for different fabric ‘Hope that helps!